
Web Portal: Manual Review
This article describes the process of reviewing mismatched products generated in an inventory audit. Based on this manual review process RFID Actions & Partner Corrections are generated to ensure all steps are completed.
What is a Manual Review?
A Manual Review is the process of determining what is accurate, manually. This includes the option to "Trust" either the partner's expected count, trusting the scanned count, or manually counting:
- Partner Count - Do you trust the partner software expected count is correct? If so you can choose this quantity. You may choose to trust the partner count at the beginning of the process when you don't have any better data to go from. Trusting the partner quantity means that you are simply aligning your RFID counts to match the partner. Trusting the Partner count means that all pending actions will be "RFID Actions".
- Scanned Count - Do you trust that all items are tagged and accurately scanning? If so, you can choose this quantity. You may choose to trust the RFID count if you are afraid of overselling and want to ensure that partner quantity don't exceed RFID scan count. Trusting the Scanned Count means that all pending actions will be "Partner Corrections."
- Manual Count - For best accuracy choose this method. Why? Because neither the partner nor scanned quantity may be accurate. Performing a manual review ensures that the correct quantity is entered. Entering a manual count may mean that the product may require both RFID Actions and Partner Corrections.
A Resolution in Simple RFID is the process of investigating discrepancies between scanned RFID counts and expected on-hand quantities from a partner system. It involves reviewing each mismatch, assigning a reason, and completing the needed actions to fix the error and align both inventory records.
Assigning a Reason / Generating an Action
Each mismatched product must be assigned a Reason that accounts for why the RFID count differs from the expected quantity (e.g., missing tags, extra items, or incorrect tagging). Each Reason is linked to an Action, which defines how the discrepancy should be resolved.
Examples:
- If a product is scanned -5 less than expected due to missing tags, the Reason would be Missing Tags. The Action would be to print the missing tags and perform Add scans to update the RFID count.
- If a product is scanned +5 more than expected, the Reason may be Items Double Tagged. The Action would be to remove the extra tags and perform Archive scans to remove them from the RFID inventory.
- If a product is scanned -1 below expected, and inspection confirms the RFID count is accurate, the Reason may be Shrink/Theft. In this case, no RFID adjustment is required; instead, the Action is to reduce the partner on-hand quantity .
Resolution Workflows
Discrepancies move through two workflows depending on what correction is required:
Pending Actions (RFID Actions)
The RFID inventory must be adjusted to reflect physical inventory, either increasing or decreasing counts. This may include printing and applying new tags, performing Add scans to register items, or performing Archive scans to remove tags from inventory.
Ready to Sync / Ready for Correction (Update Partner Inventory)
This flow accounts for when the partner system on-hand inventory must be updated up or down.
- With an integration enabled, this tab appears as Ready to Sync, allowing corrections to be sent directly to the partner system.
- If the audit was created using a spreadsheet, the tab will be called Ready for Correction, where an inventory correction file can be exported and uploaded into the partner system.
Accessing the Resolution Center
Once an audit is completed, all mismatched products are moved to the Resolution Center. From there, users can access mismatches either:
- Directly from the audit by selecting Resolution Center, or
- From the left navigation menu by selecting Resolve & Sync
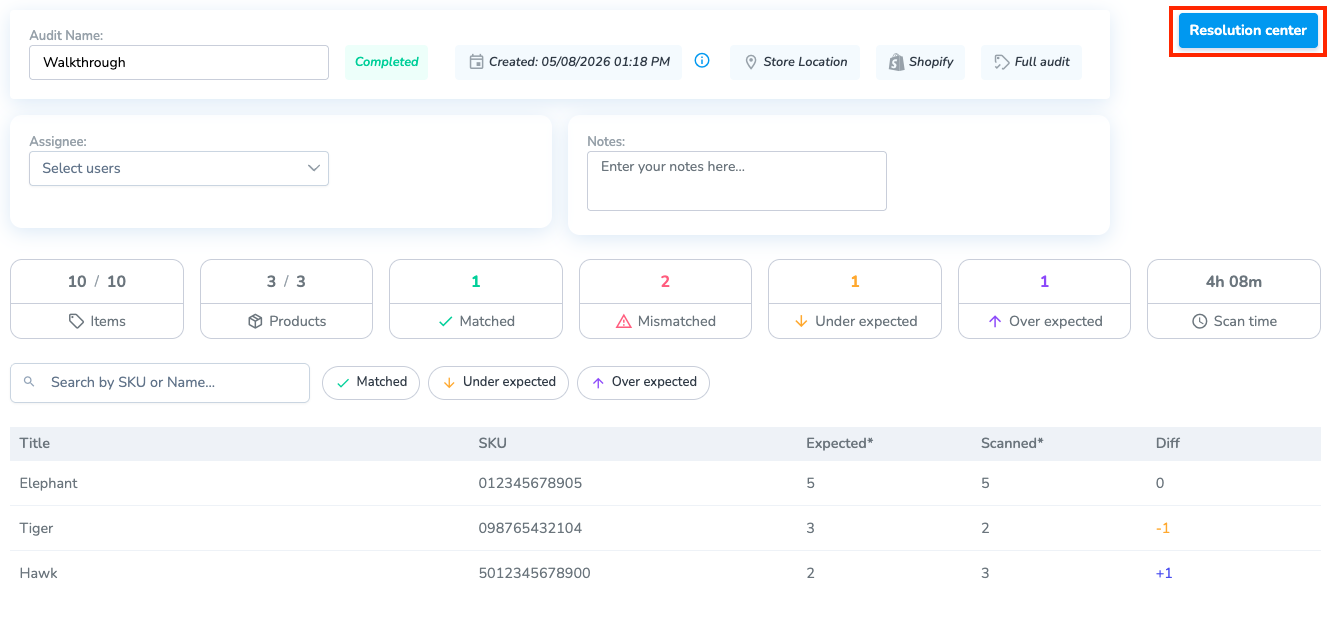
Reviewing Mismatched Products
- Choose the products you wish to resolve by clicking the checkbox on the far right.
- Next, click the "Resolve" button to apply a reason.
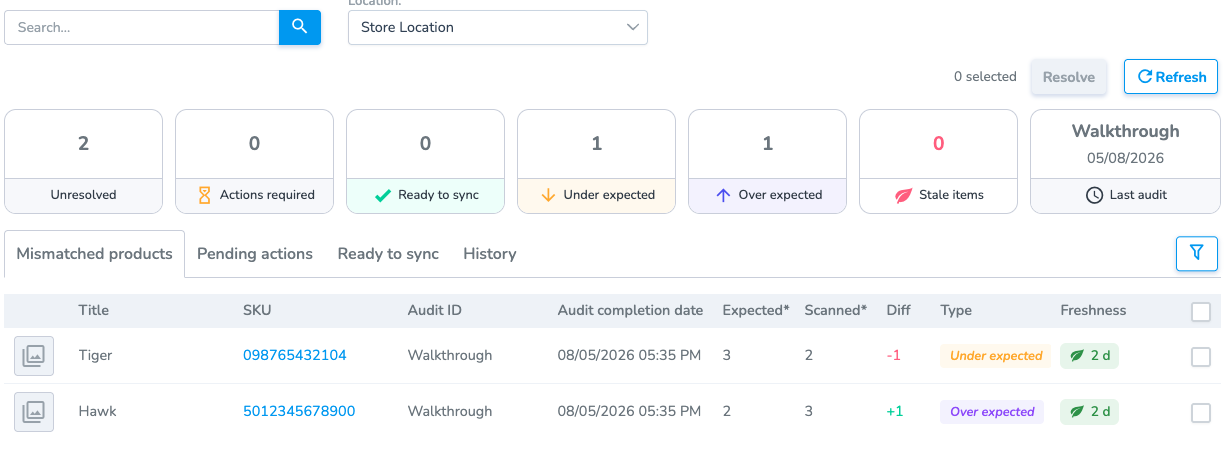
Apply a Reason to Group and/or a Single product
Mismatched Products are grouped as: Under Expected and Over Expected. Once a reason has been applied containing the correct discrepancy adjustment, and Resolved, Pending Actions and Sync / Update tasks are created.
Here are a few of the reasons for an item being Over & Under Expected, along with the associated required Action:
Common Reasons for Over Expected
Common Reasons for Under Expected
- Incomplete Purchase Received - Fewer items arrived than ordered. Decrease the partner quantity to match with RFID counts.
- Purchase Not Received - You updated your system with expected inventory that was never delivered. Decrease partner quantity to match with RFID quantity.
- New Inventory Not Tagged - Items exist in inventory but aren't tagged. Print new tags, then perform Add scan to add them to RFID counts.
- Incorrect Adjustment - Reduce partner quantity to correct to match with RFID scans.
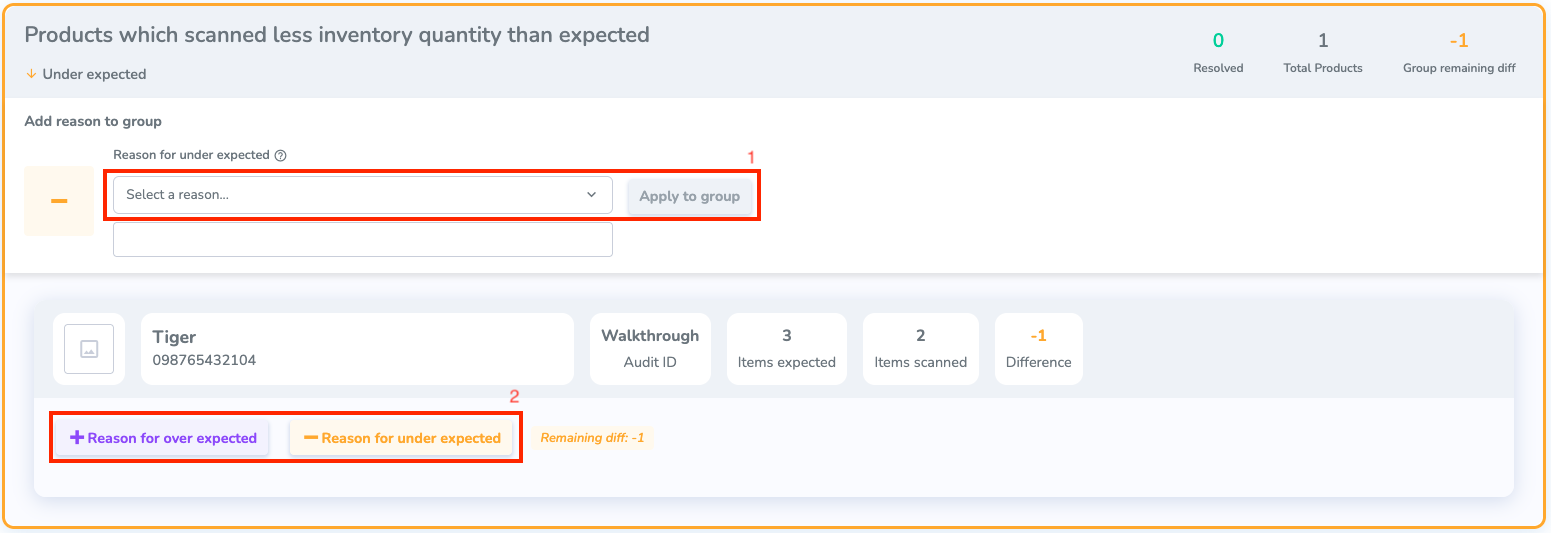
When to apply Reason for Over / Under Expected
Generally you'll use the associated reason for over/under expected counts. For example, if an item is under expected, you'll want to use an associated "Under" reason.
To Resolve a mismatch, you need to give it a Reason. Depending on the reason you give it, it will require a specific Action.
There are two different ways you can add a Reason:
1. Group Reason: To apply the same reason for all selected products, use the "Add reason to group" selector.
2. Single Reason: Give a reason for a specific product. The single reason option allows the user to apply both over and under expected reasons to a product.
Multiple reasons can be applied to a single product. This may include applying the opposite reason to its over/under status. This may be needed to properly account for discrepancies. Understand that applying a "Over" expected reason to an "Under Expected" count will create a greater difference to the mismatched count which must be accounted for to resolve the mismatch.