
Web Portal: Audit: View & Create
Audit Page
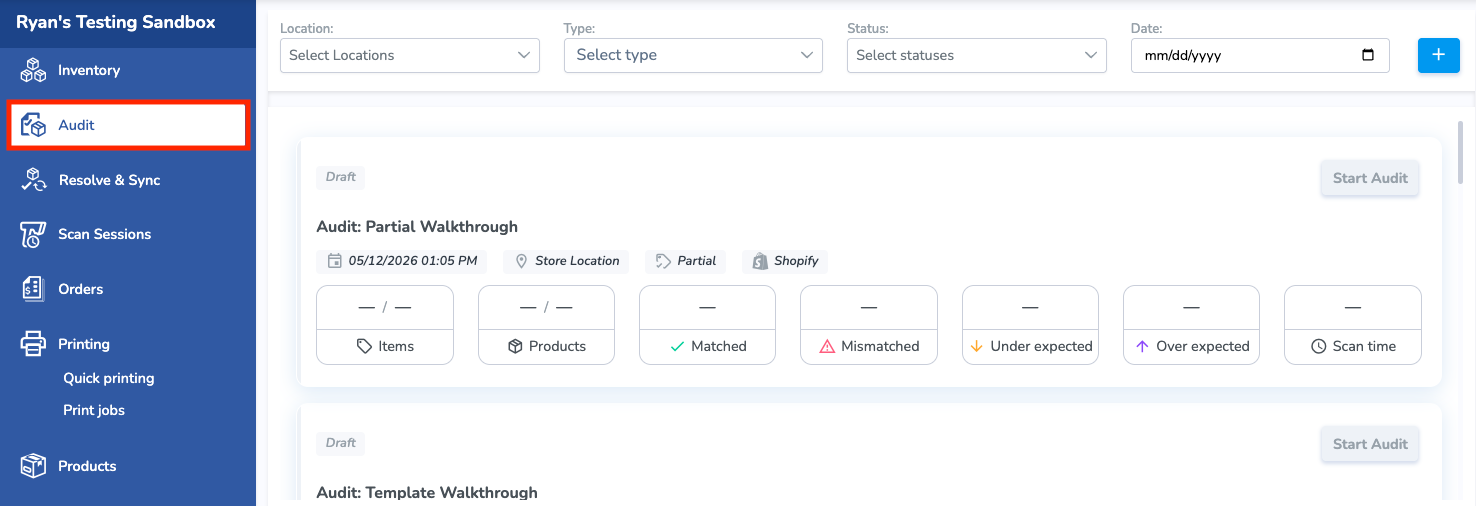
The Audit page is located in the Simple RFID Web Portal and serves as the central location for creating, managing, and reviewing inventory audits.
To access the page, select Audit from the left navigation menu.
The Audit page displays a list of all current and previous Audits. Click any Audit to view its details, progress, and results.
Use the available filters to quickly find specific Audits:
- Location – Filter by inventory location.
- Type – View Full, Partial, or Template Audits.
- Status – Filter by the Audit's current status, such as Draft, Open, or Completed.
- Date – Display Audits created or performed within a specific date range.
To create a new Audit, click the blue + (plus) button in the upper-right corner of the page.
Create a New Audit
You can also create an Audit from the Mobile App
From the Create New Audit pop-up window, enter the following details:
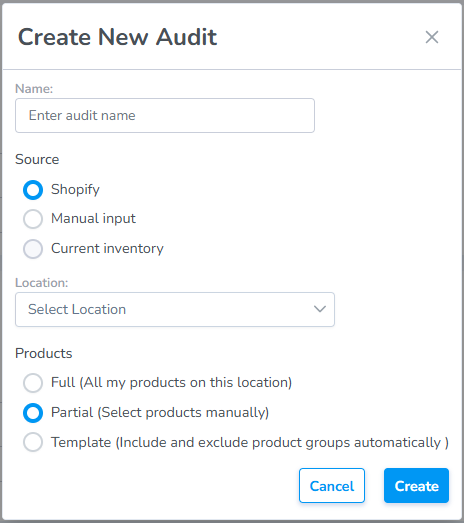
Enter the Name of the Audit, the Source of the comparison, the Location where the audit is being conducted, and the Products being audited
Name:
- This is a free text field to name the audit anything you choose. If you choose to keep this field blank the system will auto-generate an Audit Name for you.
Source:
- Integrated Platform: Shopify, Apparel Magic, etc.
- Manual Input: This allows the user to use their own Custom Source such as a spreadsheet
- Current Inventory: Not yet implemented.
Location:
- Choose the location where the audit is being conducted
Products:
- Full: All of the products in your location
- Partial: Specific products that you define
- Template: Products from a reusable template you define
Click "Create" to create
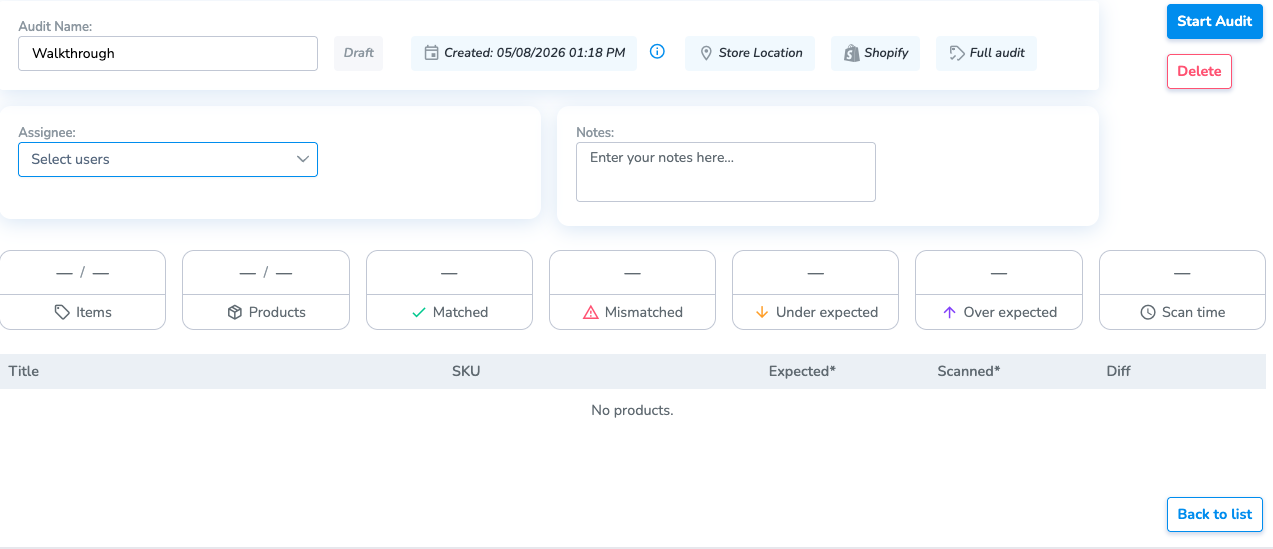
- The Audit will be created in Draft status.
- From inside the Audit, you can Assign a user, add Notes for future reference, or Delete the audit.
Add Products to an Audit
Product inventory quantities are not displayed until you click Start Audit.
When you start an Audit, Simple RFID retrieves the latest inventory quantities from the selected Source (such as Shopify or Apparel Magic). These quantities become the baseline for comparing your RFID scan results during the Audit.
Important: Once you click Start Audit, the Audit is locked. You will no longer be able to add or remove products from the Audit.
Full Audit
If you selected Full, you do not need to manually add products.
When you click Start Audit, all products from the selected Source and Location are automatically loaded into the Audit along with their current inventory quantities.
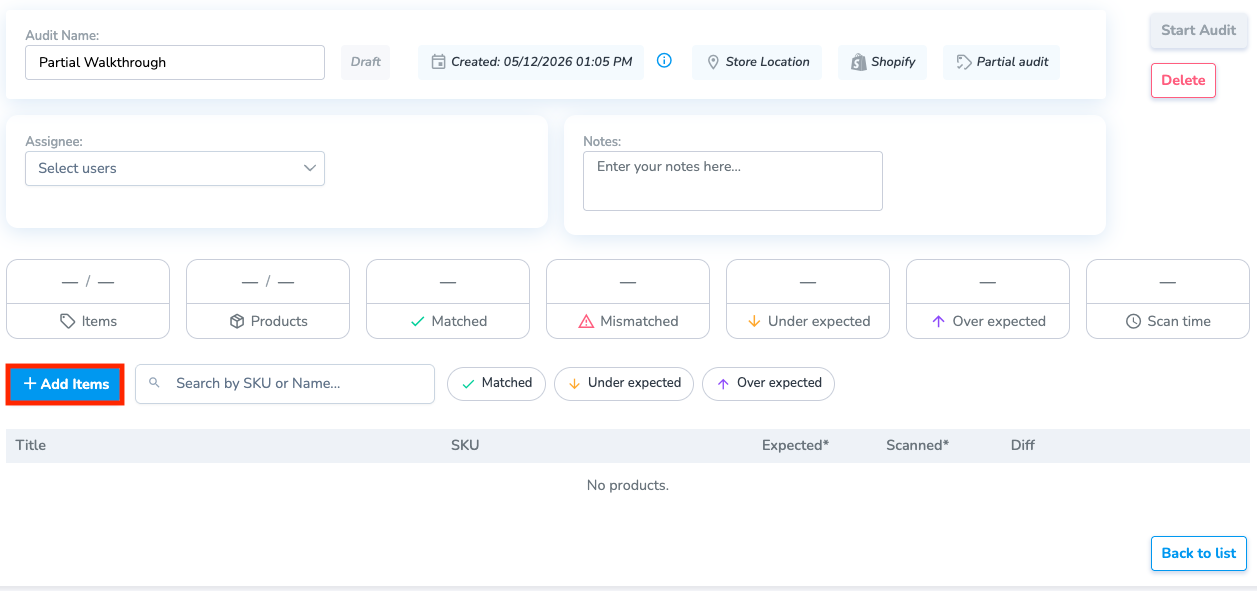
Partial Audit
If you selected Partial, the Audit includes an Add Items button.
Click Add Items to search for and select the specific products you want to include in the Audit before starting it. Once you have added all desired products, click Start Audit to load their current inventory quantities and begin the Audit.
Template Audit
If you selected Template, a window will open displaying your saved Audit Templates.
From this window, you can:
- View existing templates.
- Create a new template.
- Edit an existing template.
- Delete a template.
To create a new template or modify template settings, click the Configuration icon. This opens the Templates side panel, where you can view, create, edit, and manage your reusable Audit Templates.
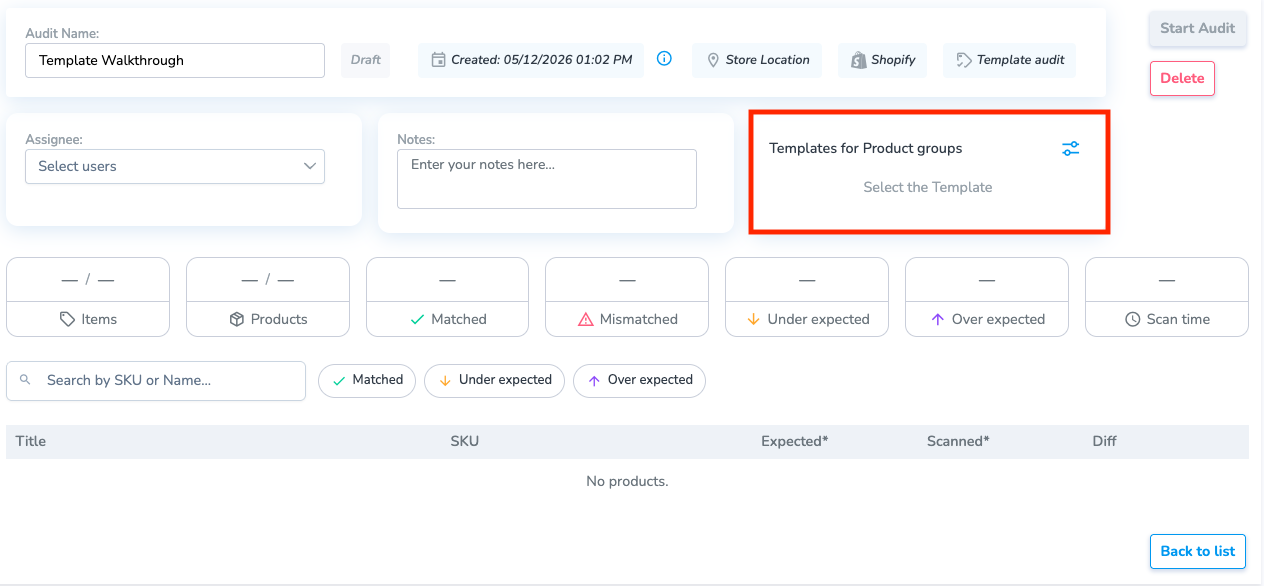
Create, Edit, Delete, and Apply Templates
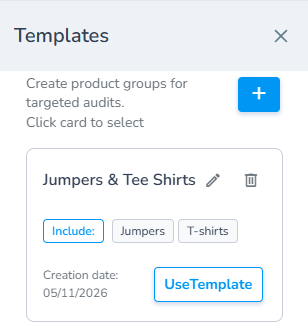
Managing Audit Templates
Use the controls in the Templates window to manage your saved Audit Templates:
- Click the + (Plus) button to create a new template.
- Click the Pencil icon to edit an existing template.
- Click the Trash icon to permanently delete a template.
- Click Use Template (or Include) to apply the selected template to the current Audit.
Creating a New Template
When creating a new template, provide the following information:
- Name – A descriptive name for the template.
- Description – An optional description to help identify the template's purpose.
- Categories – Select the product categories to include in or exclude from the template.
Category values are populated from the product Type field in Shopify. Products are included in the template based on the categories you select.
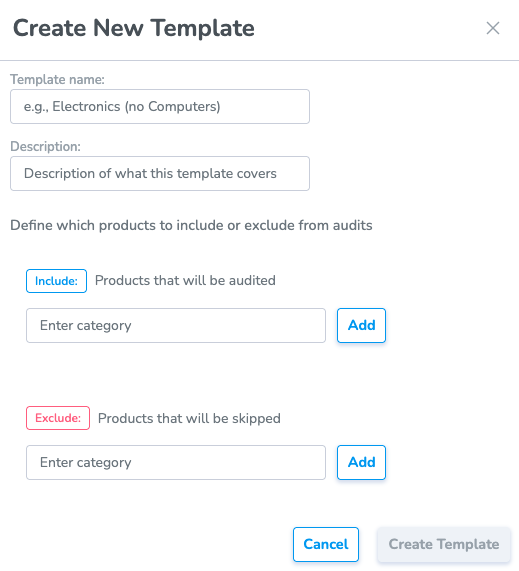
When you have finished configuring the template, click Create Template to save it.
After applying the template to the Audit, click Start Audit to retrieve the current On Hand inventory quantities for the selected products.
Scanning Items During an Audit
Once all desired products have been added to the Audit, click Start Audit to begin.
The Audit grid displays the following information for each product:
- Expected – Displays the current On Hand inventory quantity retrieved from the selected source (such as Shopify or Apparel Magic). This serves as the baseline for comparison during the Audit.
- Scanned – Initially displays 0 for every product because no RFID tags have been scanned. As RFID tags are scanned and uploaded, this value updates to reflect the total number of tags detected for each product during the current Audit.
- Diff – Displays the difference between the Expected and Scanned quantities, allowing you to quickly identify inventory discrepancies.
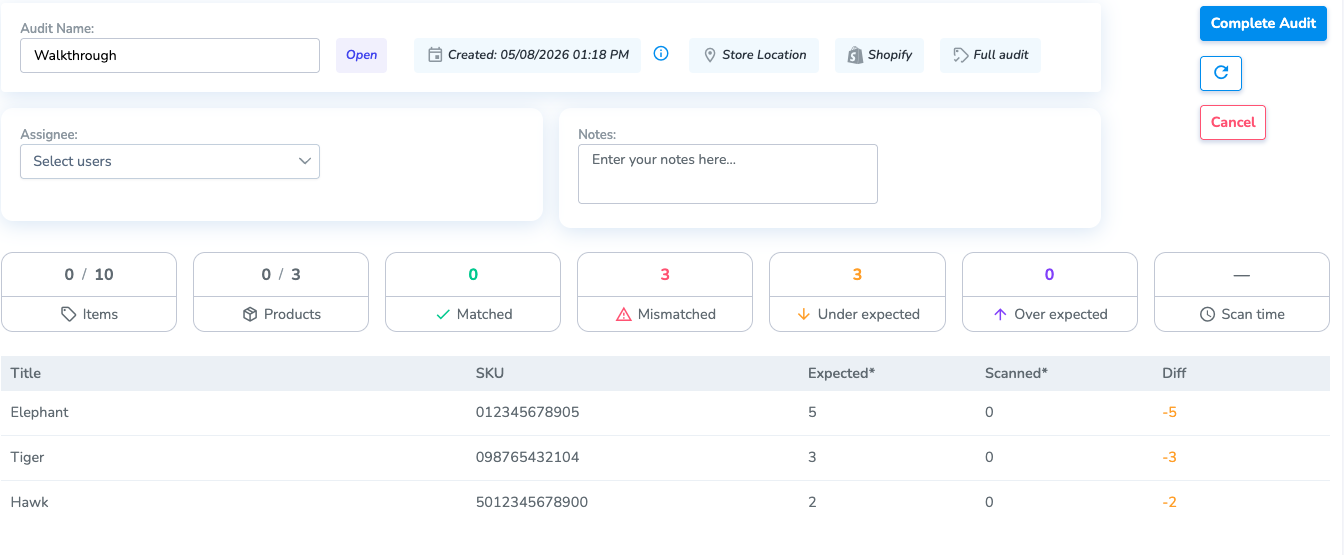
Scanning Items in Audit from Mobile App
The Audit will appear on the mobile device and will contain the same products and quantities. To scan items into this Audit, navigate to the Audit page on the Simple RFID mobile app.
From here, you can select an Auditapp and start a Scan. You can also create Audits from the mobile app, or edit Audits in Draft status.
Over Expected, Under Expected and Matched
The process can be repeated as many times as the user wishes, untilfollow the Audit isScan Closed. Please be aware that clicking the "Complete Audit" button will close the audit and prevent additional scans to be uploaded for that Audit.workflow.
Completing an Audit
After uploadingall theRFID scan,scans have been uploaded, refresh the web view of the Audit page in the Simple RFID Web Portal to view the scannedlatest amounts,results.
The includingAudit displays the mismatchesupdated Expected, Scanned, and Diff values for each product, allowing you to quickly identify Matched, Over Expected, and Under Expected inventory counts. These results highlight any discrepancies between your partner system's inventory (such as Shopify or Apparel Magic) and allthe scansinventory detected through RFID scanning.
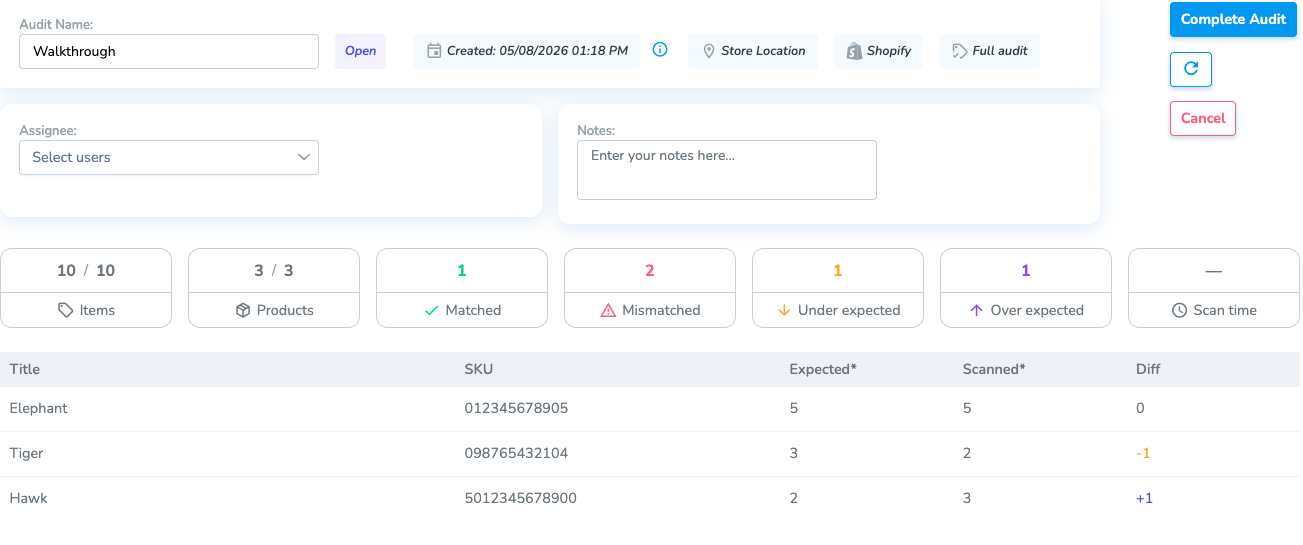
When you arehave finished scanning,scanning pressand verified the Audit results, click Complete Audit.
button. This will changeCompleting the Audit changes its status to Completed. and prevents any additional RFID scans from being uploaded.
Once you completeAfter the Audit,Audit youhas canbeen gocompleted, navigate to the Resolve & Sync page to review any inventory discrepancies, resolve outstanding issues, and sync the updated inventory quantities back to Shopify or your connected inventory to Shopify.system.