Auditing
- Shopify: Audit & Compare
- Audit & Compare
- Audit - Shopify
- Create an Audit from the Mobile App - Shopify
- Audit Legacy Mode
- Audit - Manual
Shopify: Audit & Compare
The following article is a part of a Legacy RFID vs On Hand system that will eventually be fully replaced by a new Audit flow
It is currently only available for customers who use our Shopify integration
Legacy mode can be enabled or disabled by following the instructions here: Audit Legacy Mode
The most common question customers ask when scanning "When do I know when to stop?"
To answer this question, we've introduced a new feature: Audit & Compare.
This feature will pull your current On Hand quantities from Shopify for the selected location, and allow you to scan directly against those values and compare them in real time.
Video Overview
Instructions:
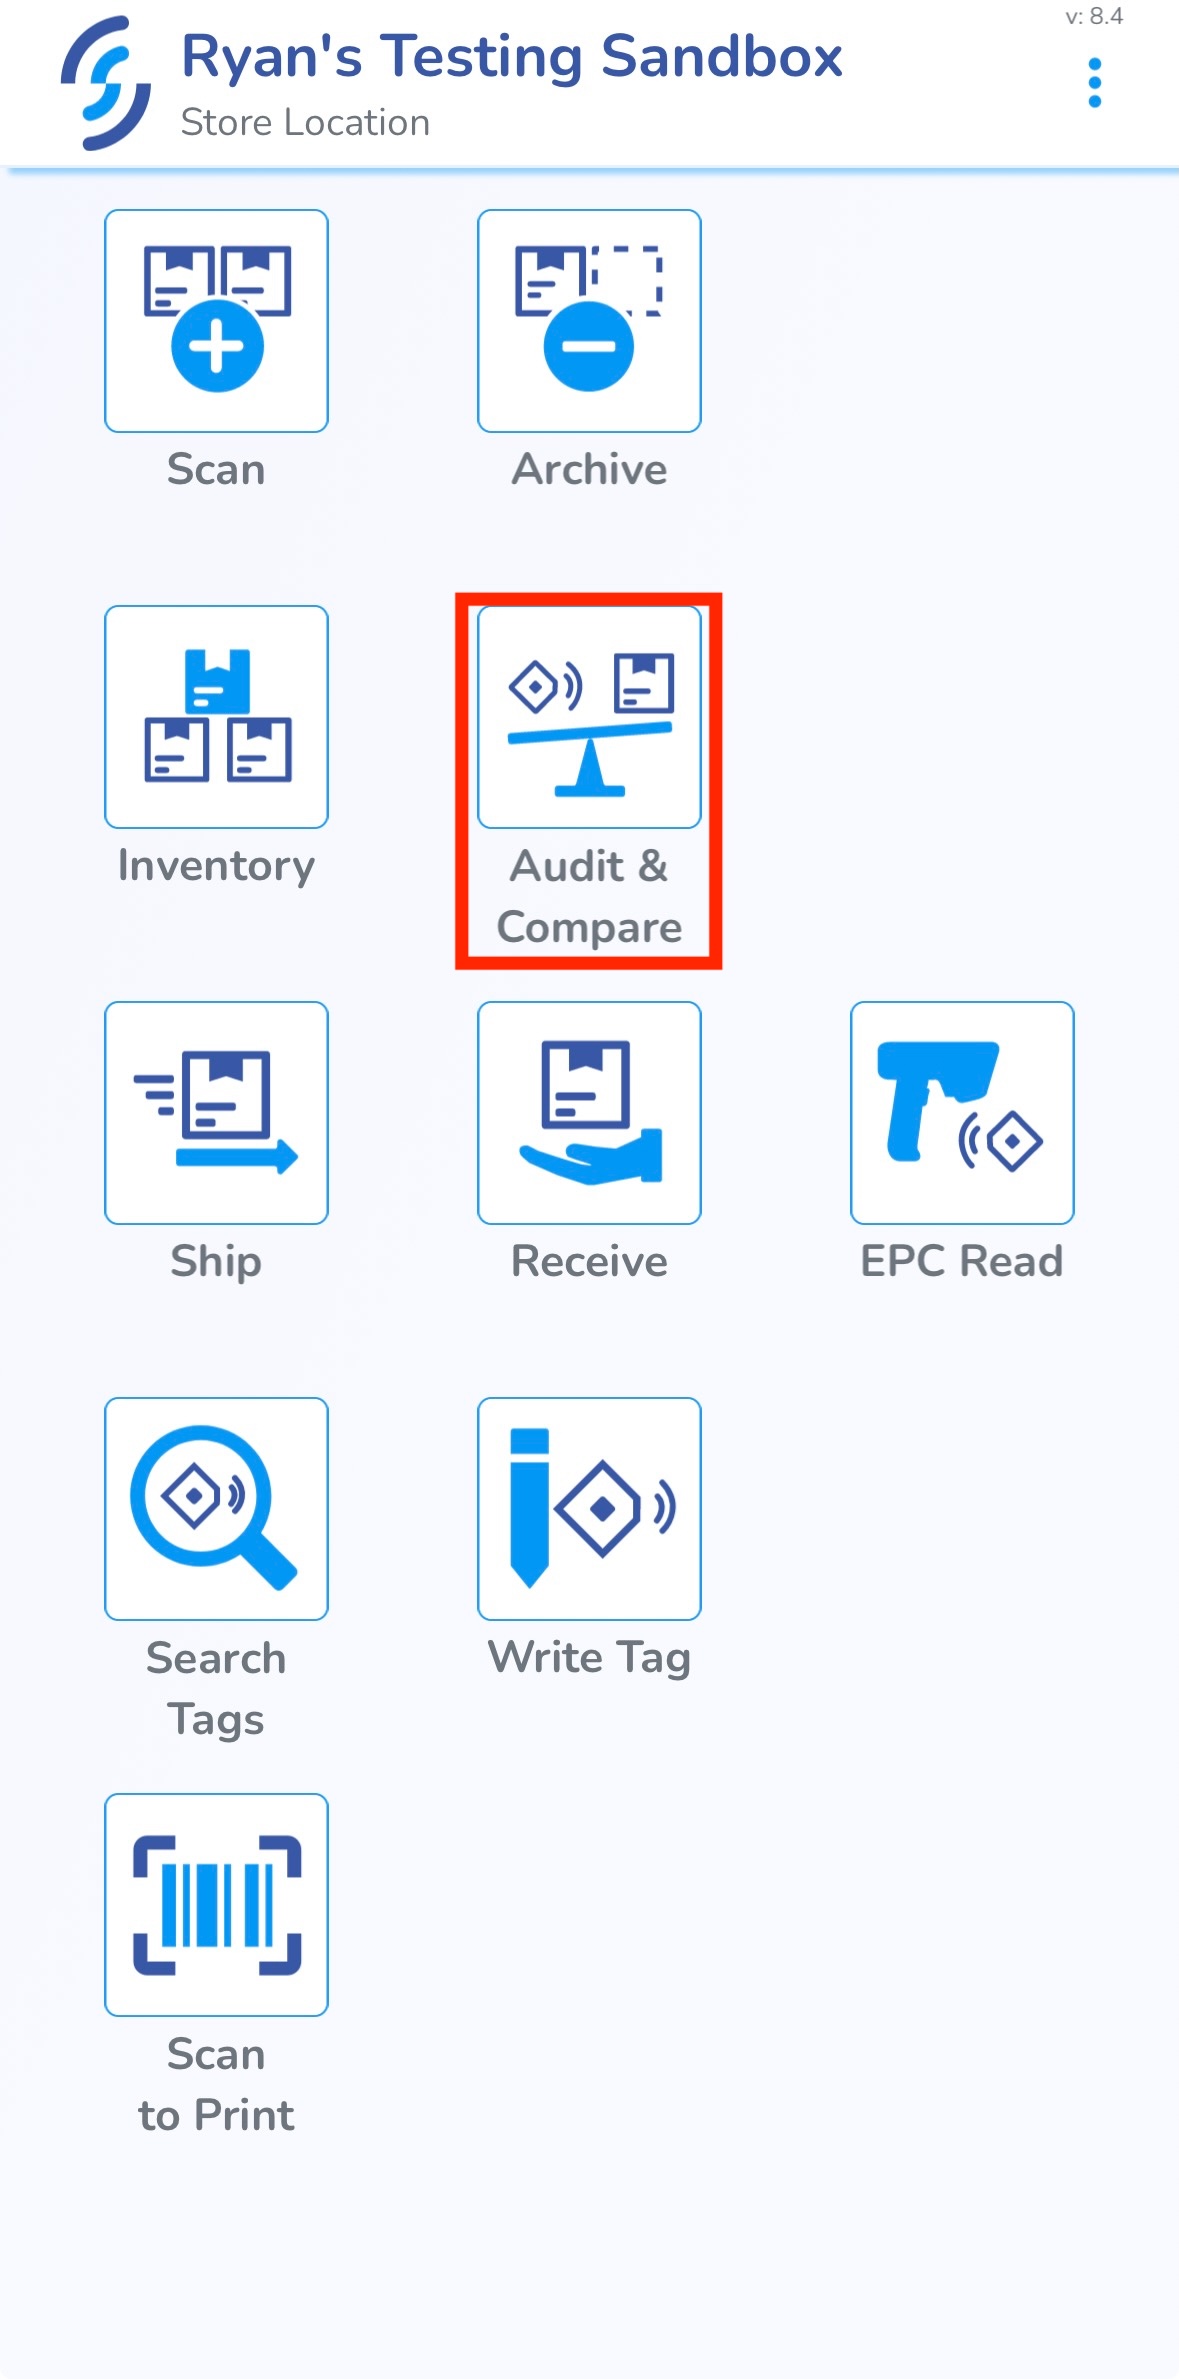
- Open the Simple RFID mobile app
- On the dashboard, press Audit & Compare.
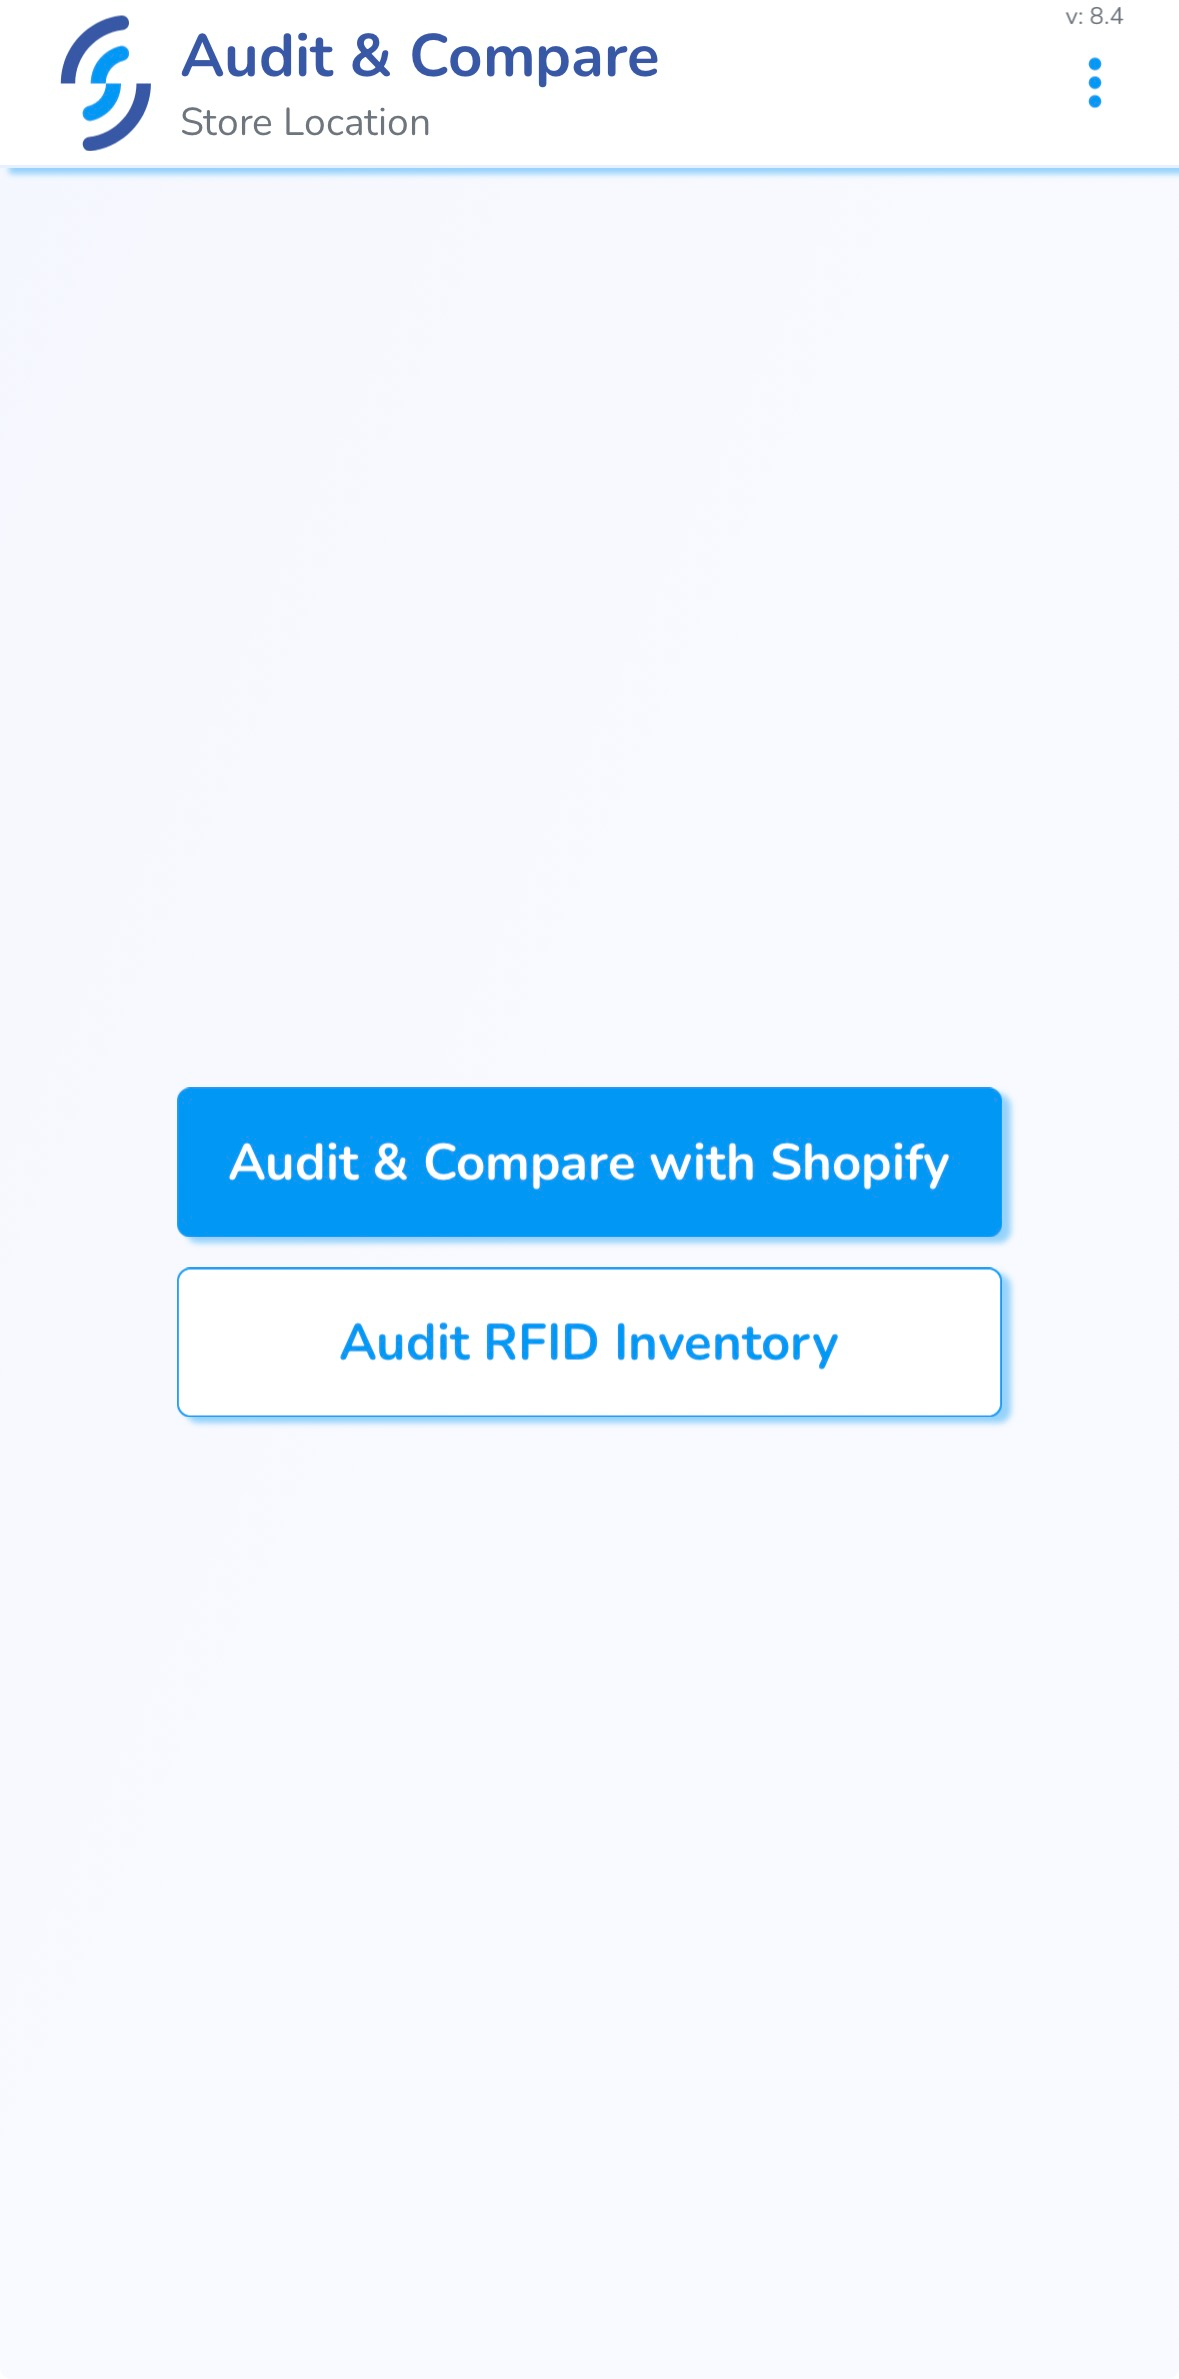
- Press Audit & Compare with Shopify.
If this option is not available, switch to a location that is connected with a Shopify location. - Press Start Audit.
NOTE: You shouldn't make any changes to your Shopify inventory until the process is completed; otherwise you'll be working with outdated information during your scan. - When the Shopify On Hand quantities have finished loading, start your first scan.
You'll see the Mismatched products count decrease as you scan tags, and the Matched products increase. - After your first pass, click Finish.
Here, you'll see an overview of your first scan, including the percentage of your products that are Matched. - Press Control Scan to start your second pass.
This will adjust the scanner settings to pick up any tags that may have been missed in the first pass. - Scan your inventory again until all of your products Match, or you stop picking up tags altogether.
- Last, press Finish again to finish the Control scan.
You'll see another summary of the total of your two scans. - Last, press Upload to Inventory and then Upload.
This will replace your inventory counts with the scan you just completed.
Audit & Compare
This article describes the process of Auditing your Simple RFID inventory against itself.
This is a legacy feature. For our new audit process, disable legacy mode. Read about this new process here
An Audit will permanently affect your on-hand inventory. Read about these affects here
Start an Audit
From the Simple RFID Mobile App, select Audit and Compare
From here, you can either start an Audit with Shopify, or your Simple RFID inventory
Selecting one of these options will start a Compare Scan
Completing an Audit
After you upload the scan, your Simple RFID Inventory will be updated. All of the tags that you scanned will be in the Verified section, and all the previously verified tags that weren't picked up will be in the Absent section.
If you need to sync the new inventory counts into Shopify, you can use the Compare & Sync tool
Audit - Shopify
This article describes the process of getting a fresh count of your inventory in Simple RFID
This feature is currently only available for customers using our Shopify integration. For all other customers, refer to the Audit & Compare article
What is an Audit?
An Audit is essentially a full or partial recount of your current inventory for a specific location. While you are scanning these products, you will be comparing the items the scanner picks up, and the count on Shopify. This is useful if you want the current inventory counts to be synced to Shopify. After you perform an Audit, you will need to visit the Resolve & Sync center to push these counts to Shopify.
Audit page
The Audit page is located in the Simple RFID Web Portal. Select Audit from the navigation menu
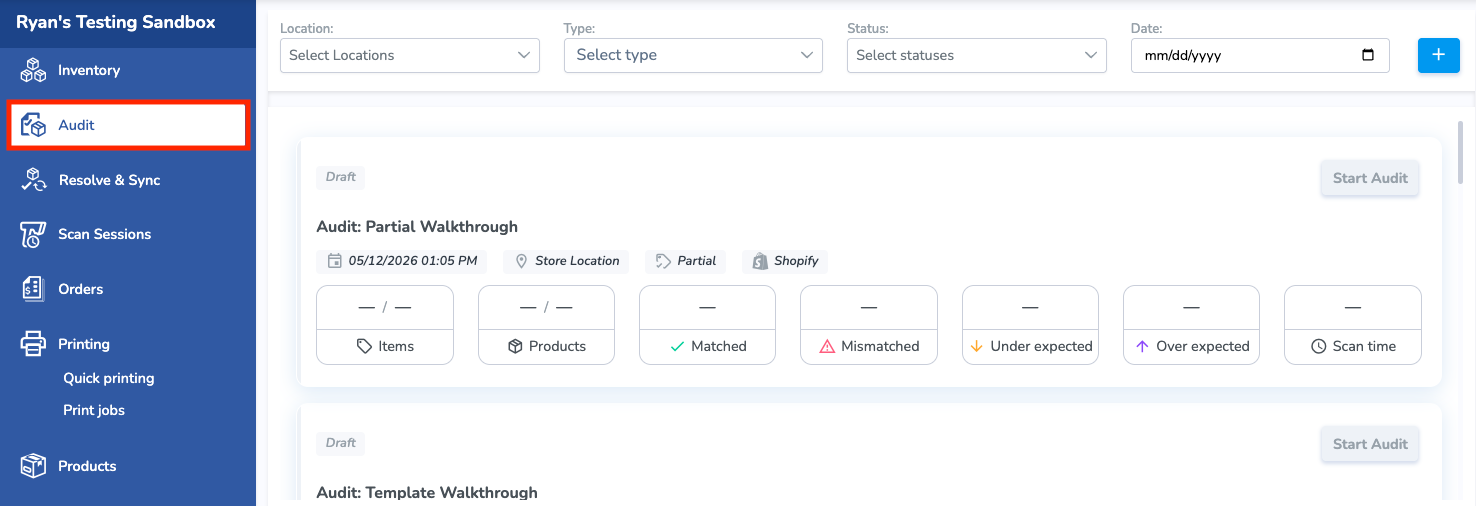
This page shows every previous Audit performed. You can view any of the previous Audits, or complete them from this page by clicking on a specific Audit.
- There are filters for the Audits that include the Location, the Type (Full, Partial, Template), the Current Status (Draft, Open, Completed, etc.), and the Date.
- Click the blue plus button on the top right of the page to create a new Audit
Create a New Audit
You can also create an Audit from the Mobile App
Select the Create New Audit button
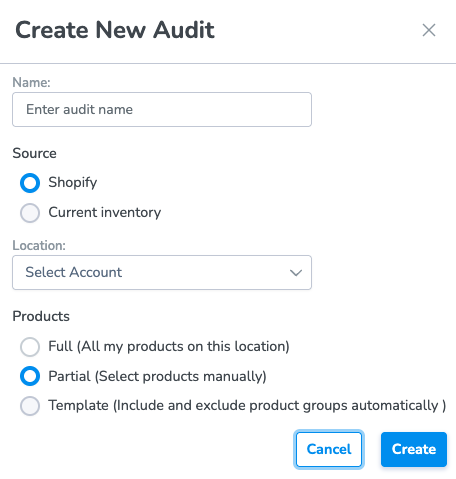
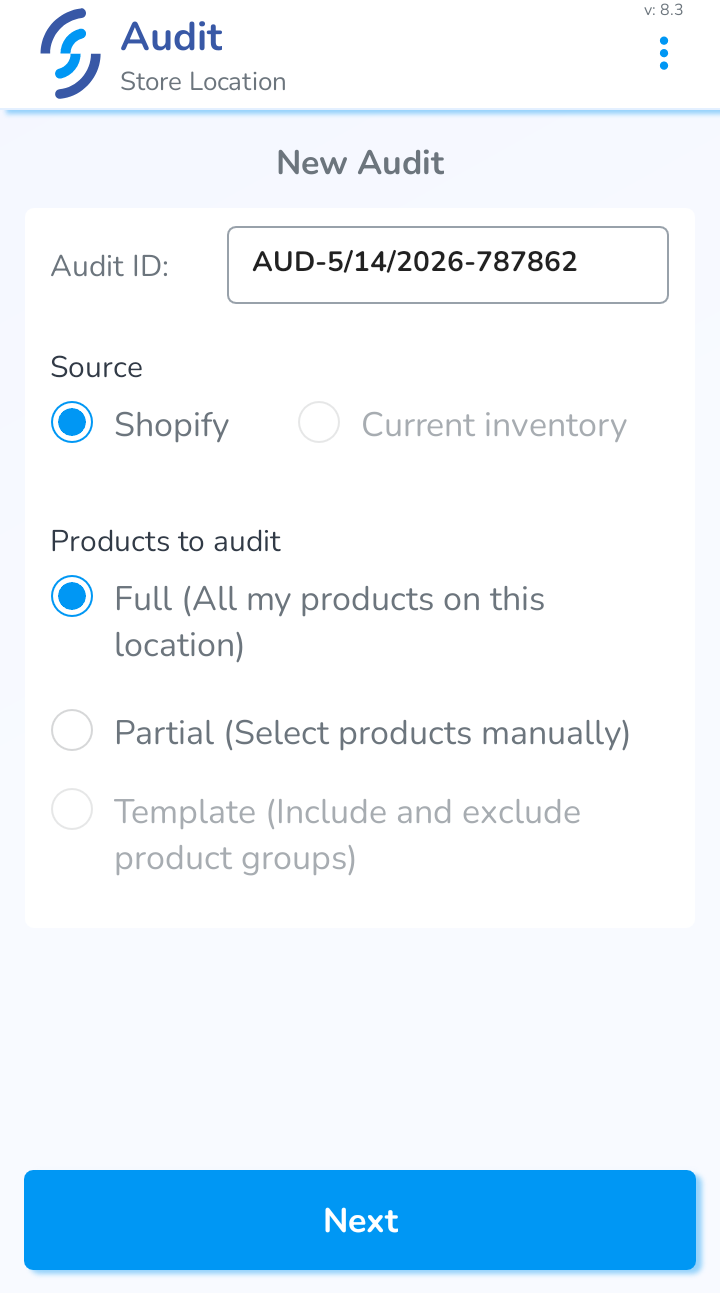
Enter the Name of the Audit, the Source of the comparison(currently only Shopify), the Location, and the Products
Products include:
- Full: All of the products in your location
- Partial: Specific products that you define
- Template: Products from a reusable template you define
Creating the Audit will put it in Draft status. You can find this new Audit in the Audit page. From the Audit page, you can Assign a user to this specific Audit, add Notes for future reference, or Delete the audit.
Add Products to an Audit
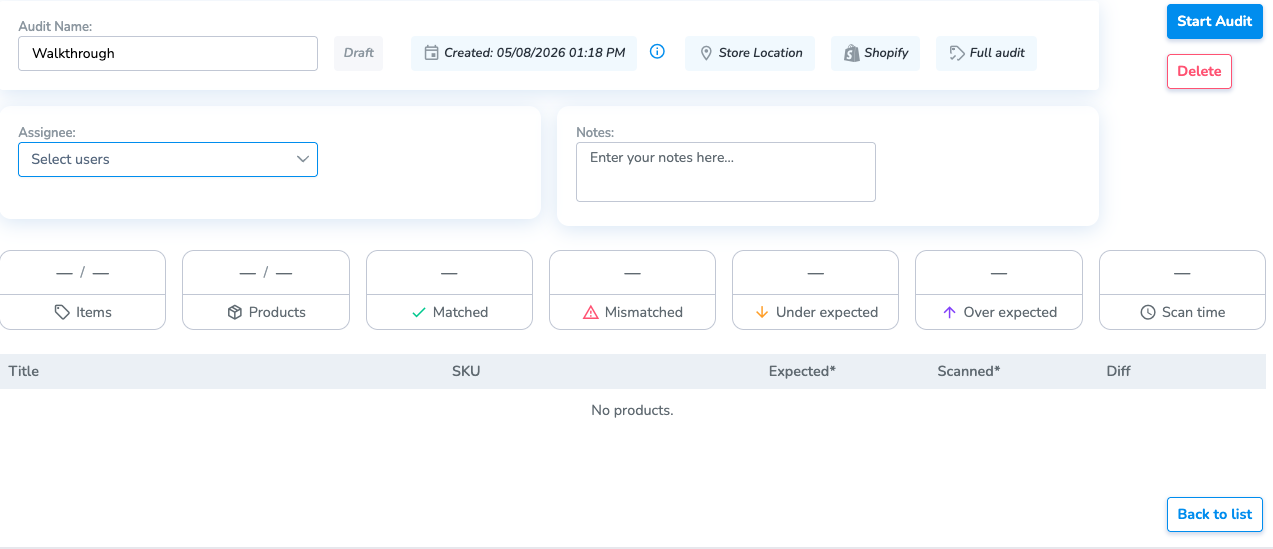
Full Audit
There will be no products in the Product section until you select Start Audit. This will get all the products and their counts in Shopify.
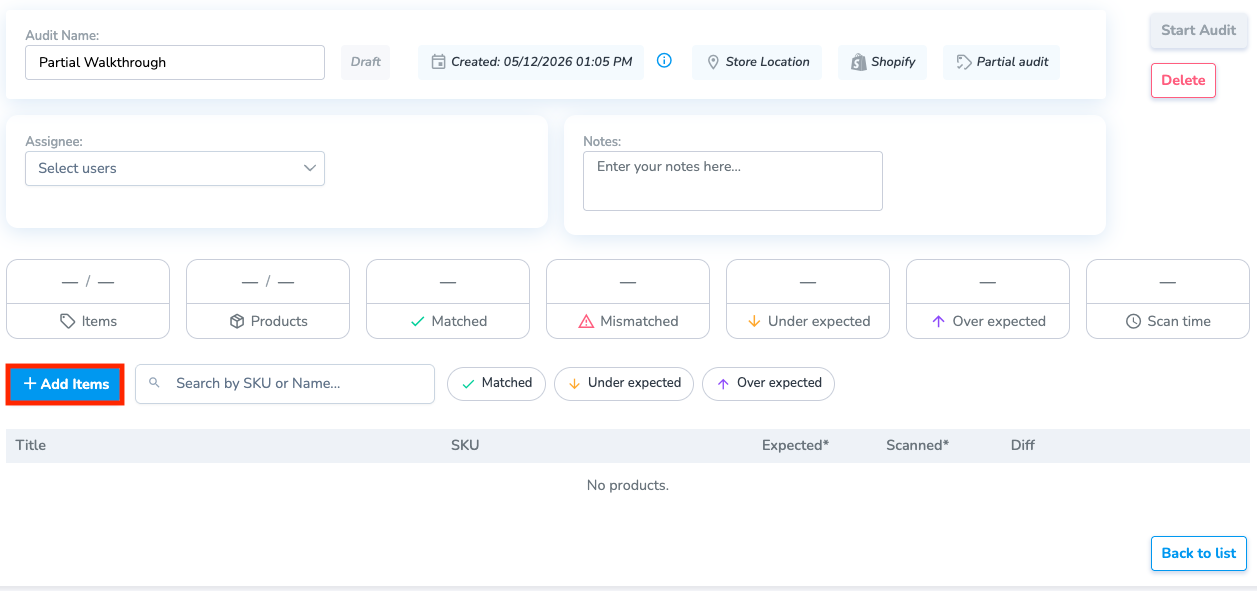
Partial Audit
Select the Add Items button, and search for the specific products you want to Audit
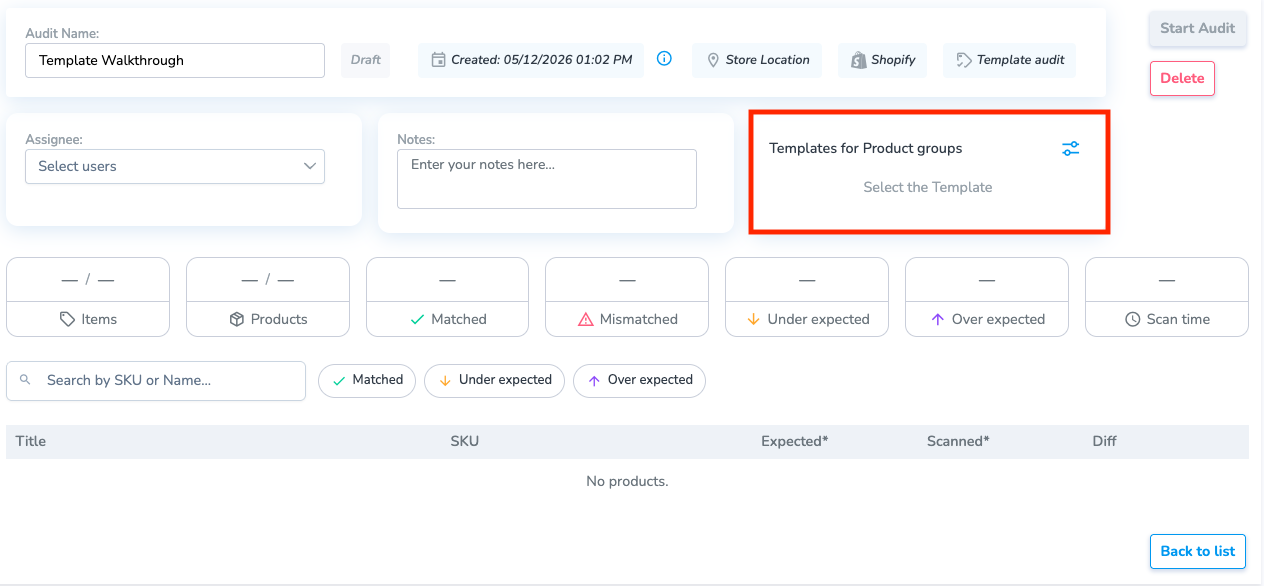
Template Audit
Select the Template button to view your saved templates. You can edit or delete these templates. To create a new one, select the Add button
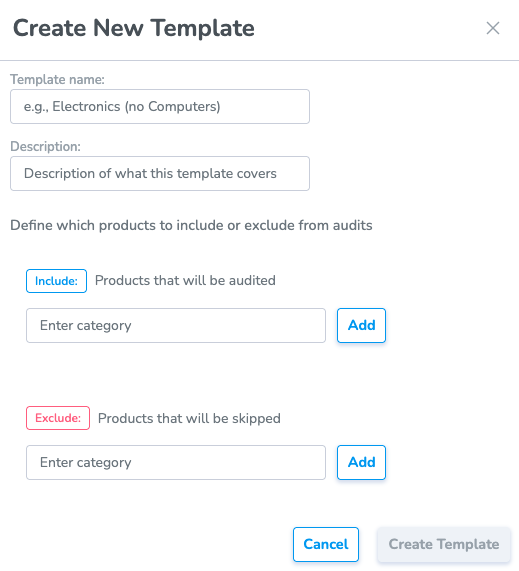
From the Add page, you can give the template a Name, a Description, and include or exclude the Category.
The Category will read from the Type field of the product in Shopify.
Performing an Audit
Once you have all of the products that you want to Audit, select the Start Audit button.
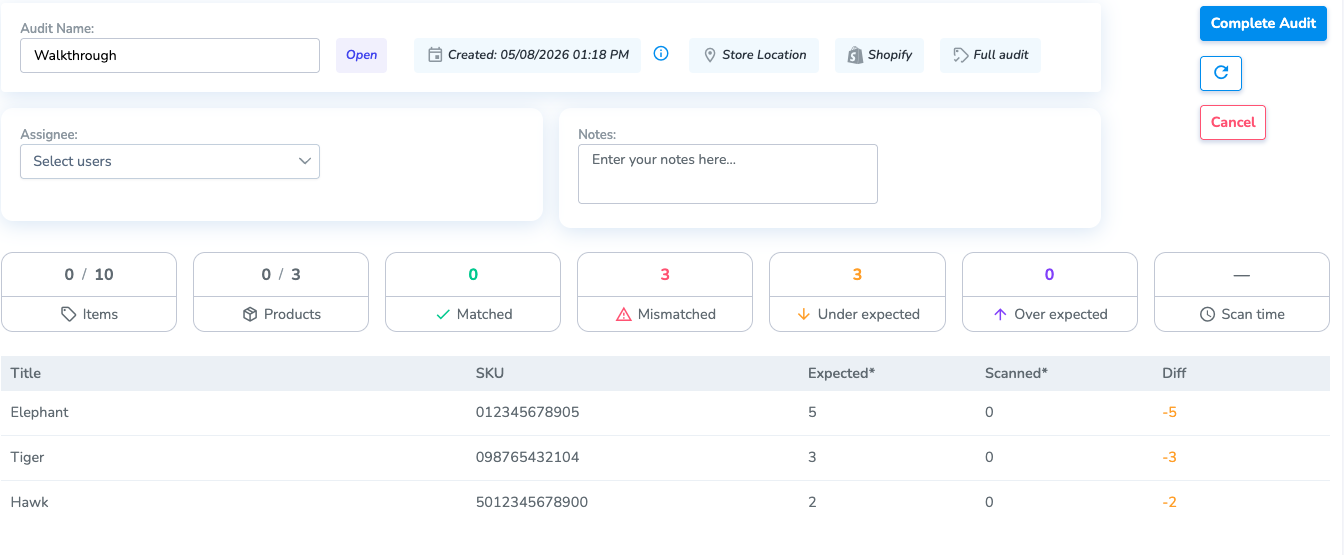
The inventory counts from Shopify will be loaded in, and the Scanned counts (this will always be 0 at the start). The Scanned count is the total amount of tags for a specific product that have been picked up in Scans for this specific Audit.
To scan items into this Audit, navigate to the Audit page on the Simple RFID mobile app.

From here, you can select an Audit and start a Scan. You can also create Audits from the mobile app, or edit Audits in Draft status.
Completing an Audit
After you upload the scan, the Audit page will update to show the scanned amounts, and the difference between Shopify and all scans
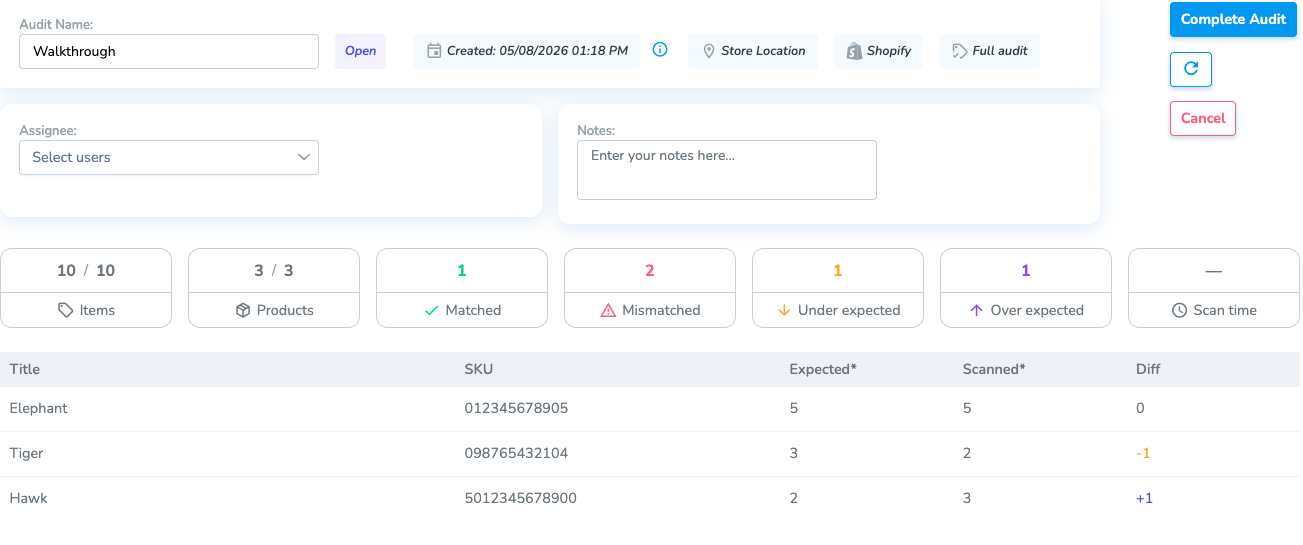
When you are finished scanning, press the Complete Audit button. This will change the Audit status to Completed.
Once you complete the Audit, you can go to the Resolve & Sync page to sync your inventory to Shopify.
Create an Audit from the Mobile App - Shopify
This article describes the process of creating an Audit on the Simple RFID mobile app
This feature is currently only available for customers using our Shopify integration. For all other customers, refer to the Audit & Compare article
For more information on the full Audit process, refer to this article
Create an Audit
In the Simple RFID mobile app, navigate to the Audit page.
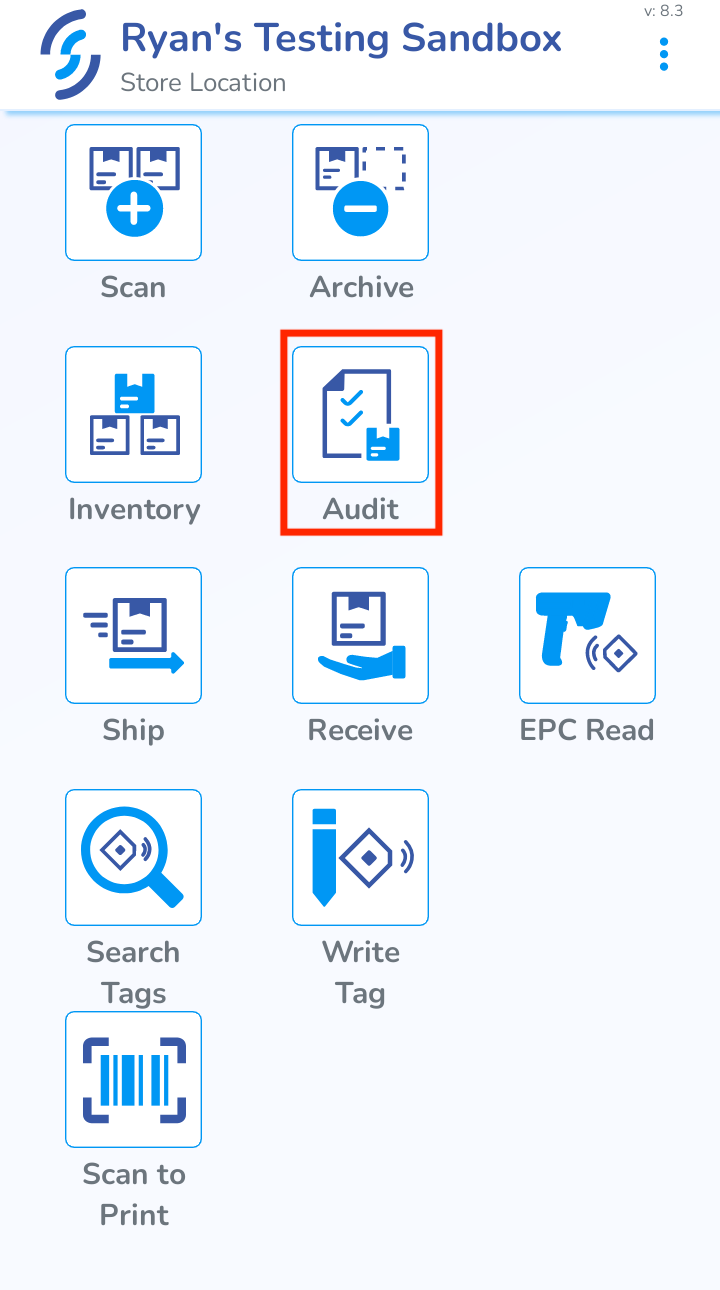
From here you will see all of the current Audits in Draft and Open. Tap the Create New Audit button on the bottom of the page.
You can name the Audit, and choose either Full or Partial as the type. In a Partial Audit, you can search for products that you want to recount.
Templates are currently only available on the web version
Start Audit
When you select the Audit type, you will have a few options. You can change the Name, add Comments to the Audit, and either Save as Draft or Start Audit.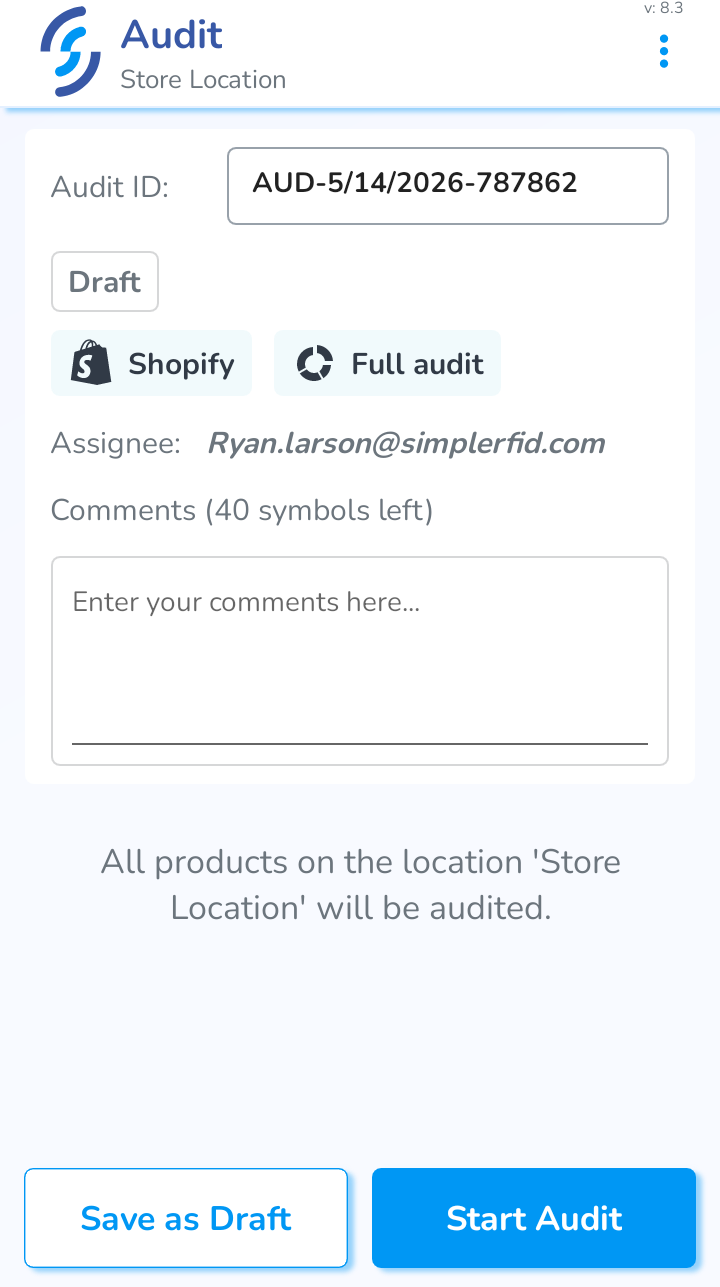
Save as Draft will save the Audit normally
Start Audit will go straight to the scanning portion.
Audit Legacy Mode
Legacy Audit mode can be enabled or disabled from the customer profile menu using the switch button at all times.
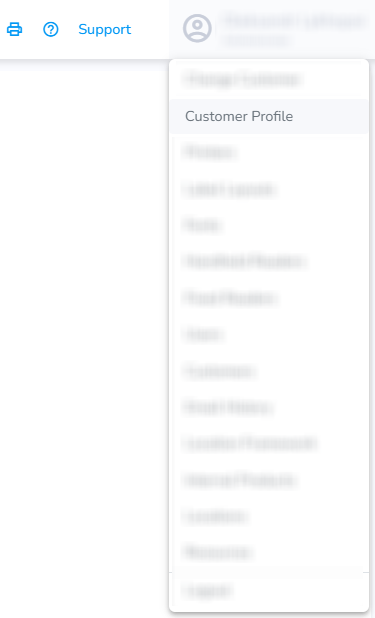
You will need to be a Manager on the Simple RFID Web Portal to access this page
On the SimpleRFID web portal, click your account name and select Customer Profile.
On the Customer Profile page, you can switch to use the Legacy Audit mode
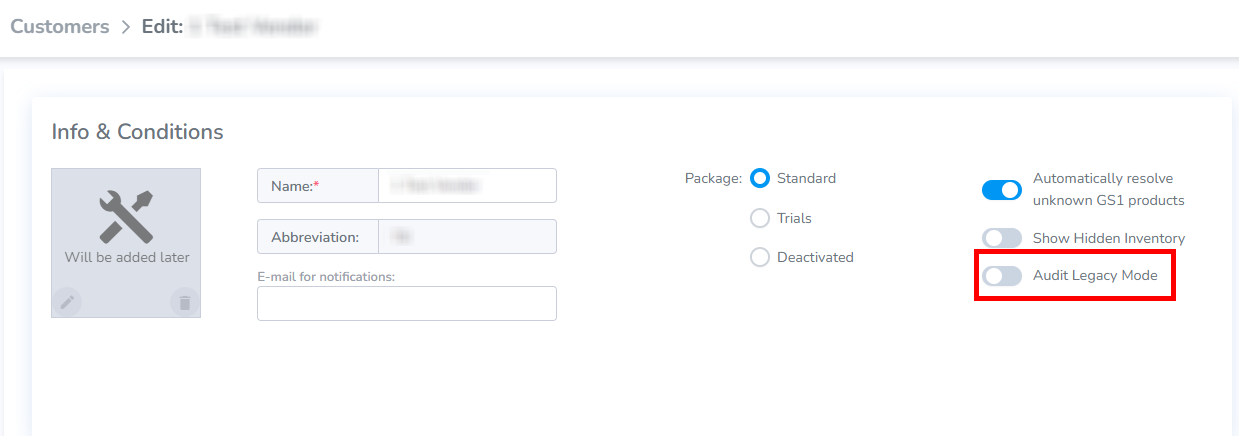
Doing so will change the Audit process! Both modes have their own set of actions required for a successful Audit. All active Audits will be canceled.
The instructions for the Legacy Audit Mode can be found here: Audit and Compare and Audit & Compare Shopify.
The instructions for the New Audit flow can be found here: Audit - Shopify
Audit - Manual
This type of audit is focused on managing inventory without integrations.
Please refer to Audit - Shopify if the Shopify integration is being used.
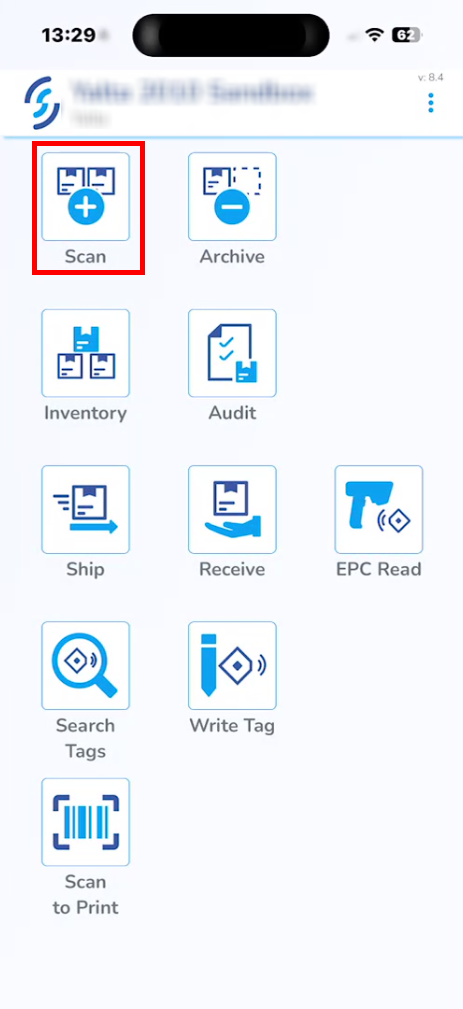
Open the Simple RFID app on your scanner or phone that is paired with a scanner.

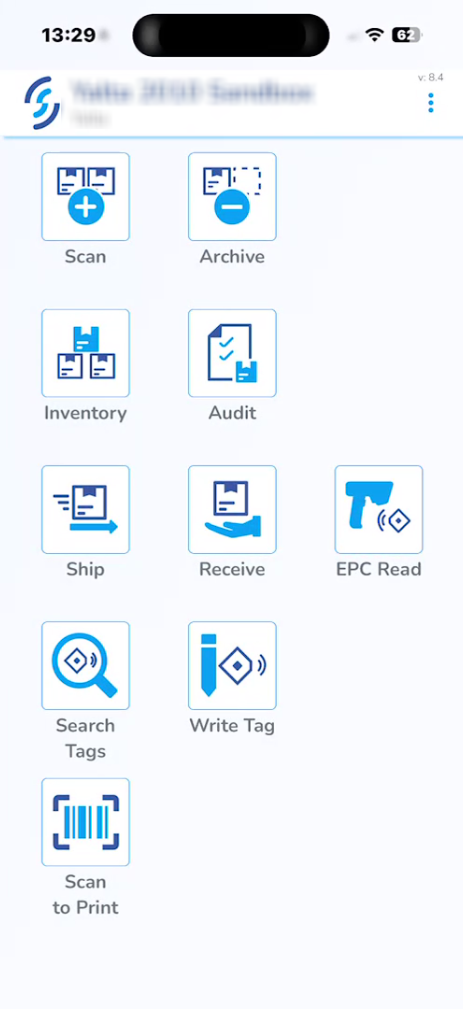
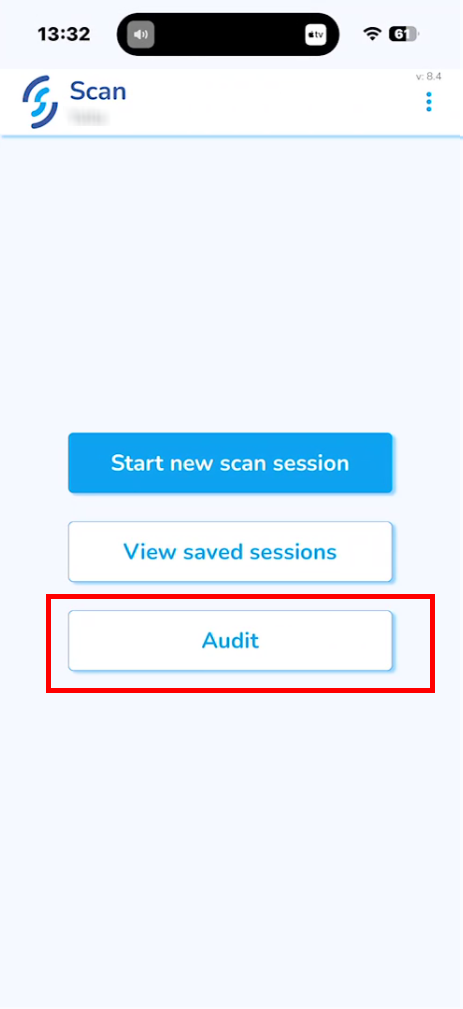
On the homepage, click Scan.
Select Audit.
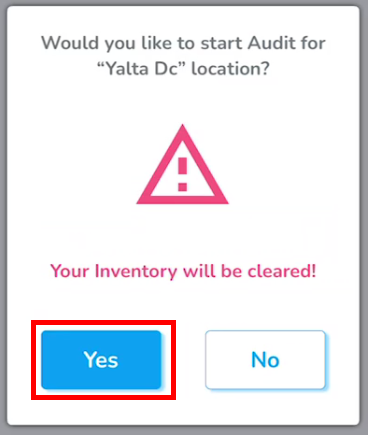
Click Yes when prompted: "Your Inventory will be cleared!"
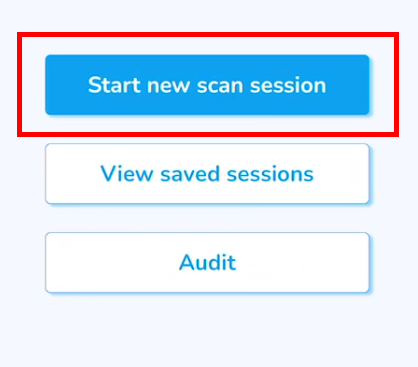
After accepting the prompt, you will be taken back to the Scan menu.
Select Start new scan session.
This step is similar to the regular scan.
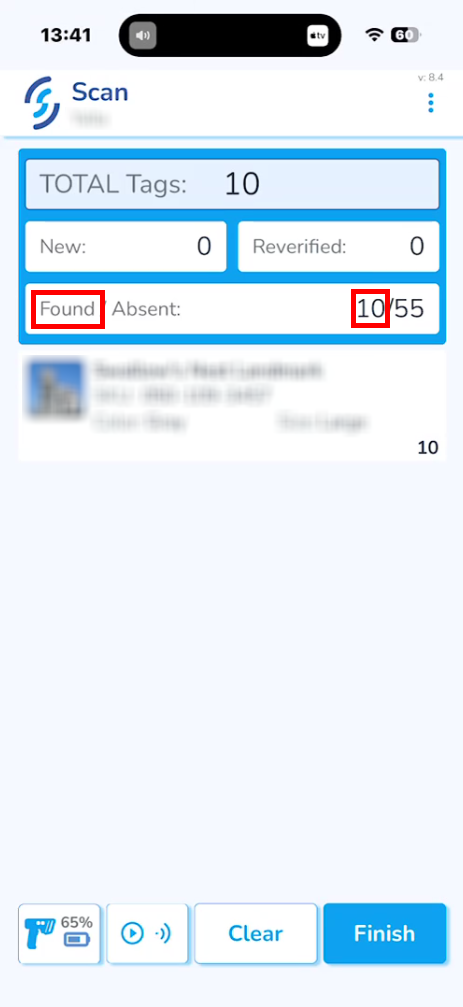
Items that existed in the inventory before it was cleared will be marked as Found.
Items that are already in the active inventory and are scanned during this session will be marked as Reverified and will not be counted towards the main quantity during upload to avoid double-counting.
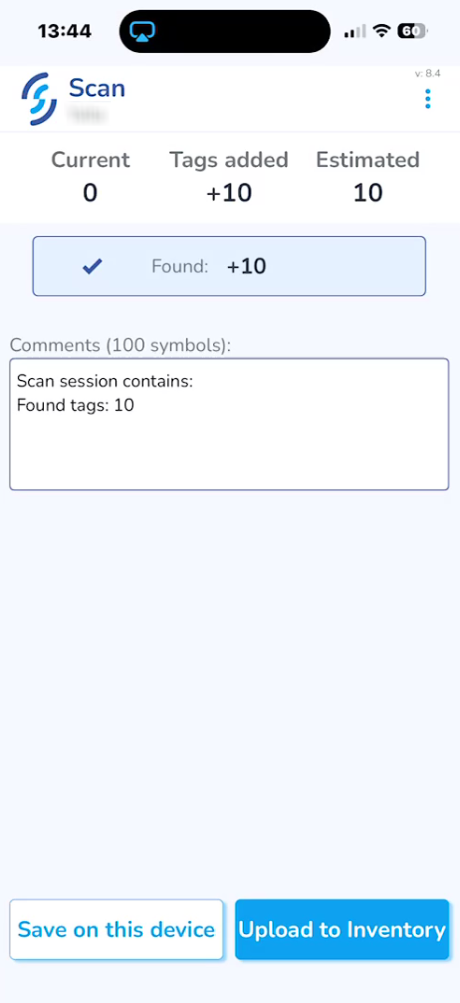
Click Upload to inventory and Ok.
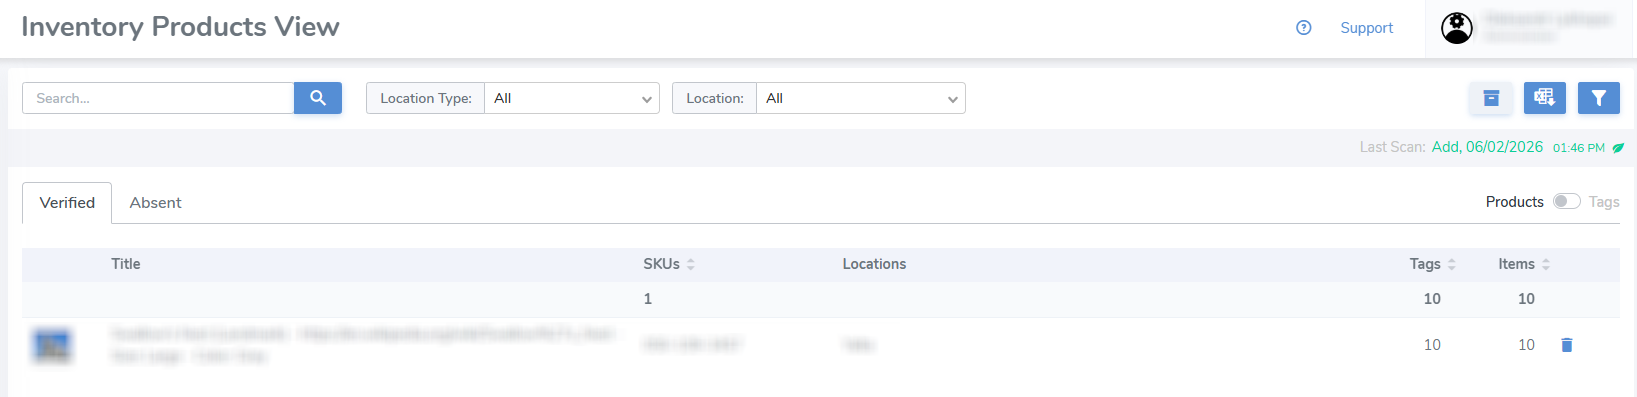
After the scan session is uploaded, go to the SimpleRFID web portal and click Inventory.
All the Found products will be under the Verified tab.
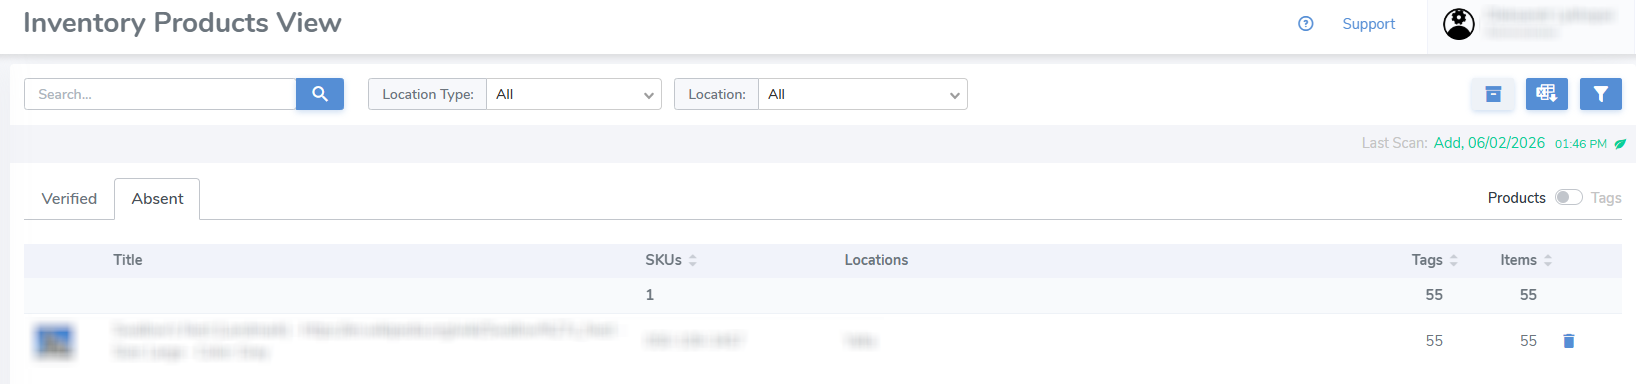
The products that were not found during the audit scan will be under the Absent tab.
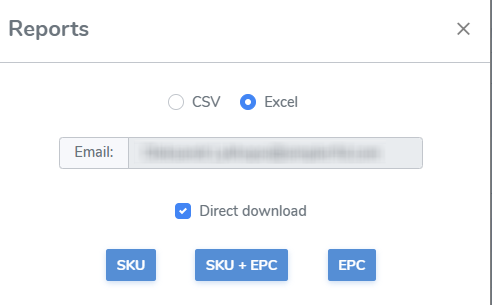
The report of the current inventory can be downloaded by clicking the second button in the top-right corner.
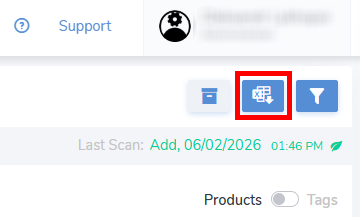
It's possible to download 2 different reports, one for Verified and another for Absent items, which depends on which Inventory tab is currently open.
Each report is meant to represent specific information, but all of them can be downloaded.
The audit scan session can also be viewed and its report obtained via the Scan Sessions tab in the navigation menu.