Processes: Audit Your Inventory
- Auditing with Simple RFID
- Using Simple RFID as a Standalone application
- Overview Article which describes the entire Audit flow
Auditing with Simple RFID
The article provides direction for performing audits using our New Audit Flow. We currently support two audit flows, the "Legacy" flow, which requires a full audit each time, and our New Audit Flow which supports partial/template/complete audits, as well as a resolution process to ensure that required actions are completed. If the web portal side menu does not include the Audit and Resolve & Sync tabs, you are using the Legacy mode. To update the the new audit flow follow the steps found in this article.
If you have questions such as "How do I determine if my inventory is accurate?, or "How do I fix mismatched counts between my RFID counts and Shopify (or other partner)?", as well as, "What's the best way to get my stuff tagged at the beginning?" this is the article for you!
What is an Audit?
An Audit is the process of verifying the accuracy of your inventory. The process involves comparing RFID scans against a Partner expected on-hand counts for your products.
With our New Audit Flow you can spot check a few products (Partial Audit), verify a group of products within a specific brand, category, department, or other predefined group (Template Audit), as well as perform a Full Audit of your entire inventory.
After an Audit is complete, the operator reviews each mismatched product and assigns a Reason for the discrepancy. Depending upon the reason provided, the system generates tasks to be completed. These include RFID related actions such as printing, adding and removing tags, as well as Partner actions including increasing or decreasing inventory quantities.
Audits are the recommended way to maintain accurate inventory and keep your partner system synchronized with your actual stock levels. For new accounts, audits are an excellent way to print tags for products.
Choosing what to Audit
We recommend using different audit types based on your inventory management goals:
- Partial Audits are ideal for spot-checking the accuracy of individual products or small groups of items.
- Template Audits are best for performing cycle counts on targeted inventory, such as high-value merchandise, fast-moving products, specific brands, departments, or other predefined groups.
- Full Audits should be performed periodically to re-establish inventory accuracy across your entire catalog, such as during year-end inventory or tax reporting.
Smaller, more focused audits are generally easier to manage and allow discrepancies to be reviewed, resolved, and corrected more efficiently through the Review & Resolve process.
Steps to perform an Audit
Creating and scanning items in an audit, reviewing mismatches, and performing corrective actions to align the RFID and Partner counts.
Step 1: Create Audit
Create your audit. This can be done via the web portal or mobile app.
You can add products to an audit via integration or manually from a spreadsheet. To enable the option to use a spreadsheet as your data source, navigate to the Customer Profile tab and click the "Enable Spreadsheet audit source."
Step 2: Scan Items In the Audit, Perform Control Scan, and Complete the Audit
- Next, scan the items in the audit to identify mismatches.
- Perform a Control Scan to ensure that "quiet" tags are captured.
- Once you are confident in your scans, Complete the Audit to address mismatches. This can be done from the web or mobile.
Step 3: Review & Resolve Mismatches
Visit the Resolution Center to review and resolve mismatched SKUs,
Step 4: Complete Required RFID tasks and Partner Adjustments
Finally, perform necessary tasks to align the two numbers including RFID tasks, such as printing & adding or removing items, and performing the necessary adjustments in your Partner software.
If your data source was a spreadsheet or manually input, you will export and upload corrections into Partner software.
Using Simple RFID as a Standalone application
If you are have another data source you wish to compare against, use the Auditing Data from a Non-Integrated Source article.
If you simply wish to scan and identify items which are present, then rescan and identify what is no longer present, use this article.
Standalone Process: Reset Inventory & Identify Absent Items
This article provides instruction for users who do not have an external inventory source to compare their RFID scans against. It assists a user to identify what items are in inventory, and what items are no longer present.
If you wish to compare scans against custom source, such as a spreadsheet, use this article: Custom Source Audits. If you are comparing data from an integration (Shopify, Apparel Magic), please use this article: Audit against Integration
Navigate to Menu
If you are using Simple RFID as a stand-alone application and you wish to identify what items are in inventory, and what items that were in inventory but are no longer present, follow these steps.
Open the Simple RFID app on your scanner or phone that is paired with a scanner.

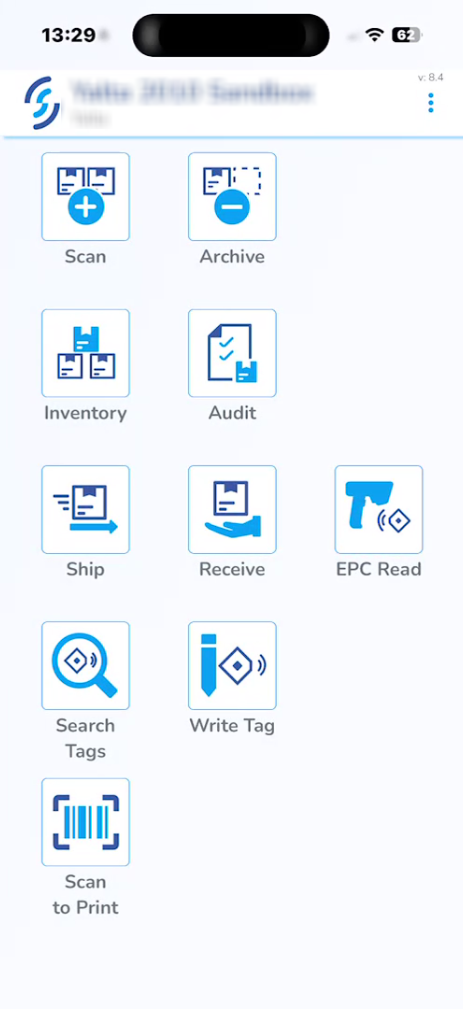
On the homepage, click Scan.
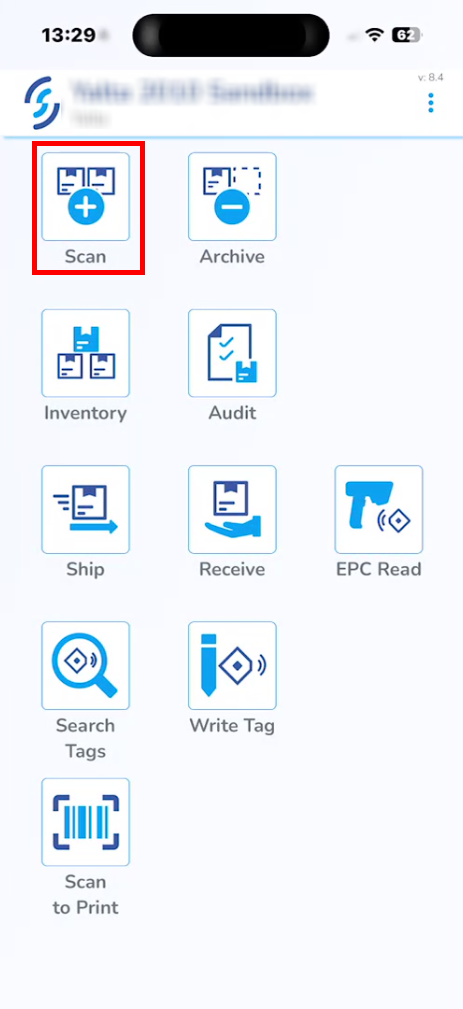
Reset Inventory
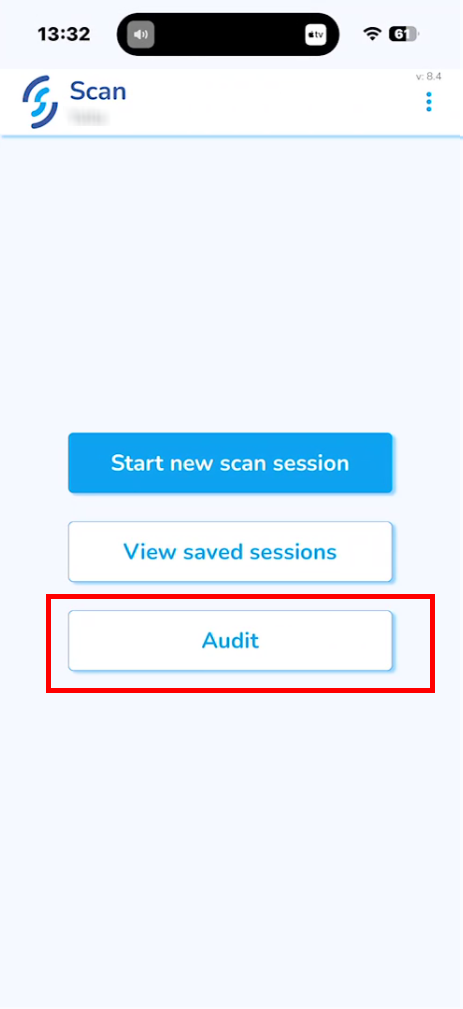
Select Audit. (in this case Audit refers to "Resetting" the inventory
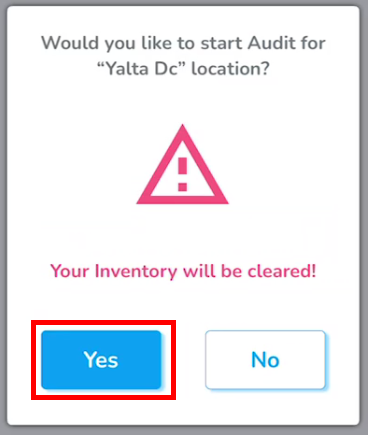
Click Yes when prompted: "Your Inventory will be cleared!"
Scanning Inventory
After accepting the prompt, you will be returned back to the Scan menu.
Select Start new scan session.
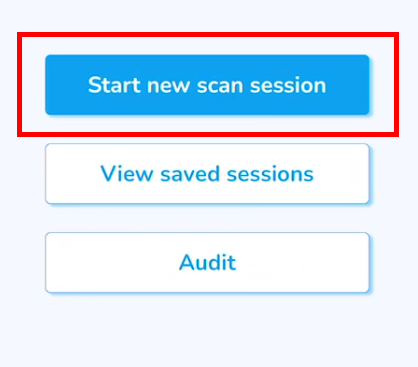
This step is similar to the regular scan.
Items that existed in the inventory before it was cleared will be marked as Found.
Items that are already in the active inventory and are scanned during this session will be marked as Reverified. Verified/Reverified items are not added to your inventory quantity since the serial numbers already exist in the inventory.
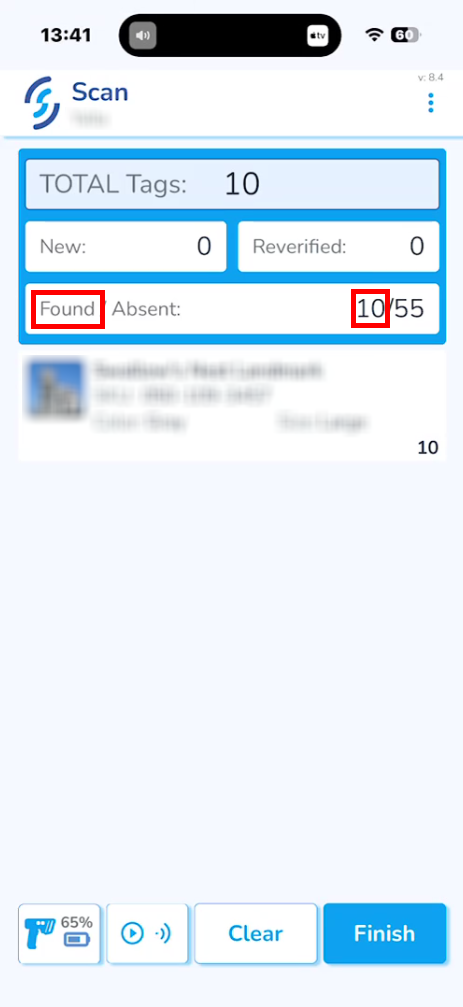
Click Upload to inventory
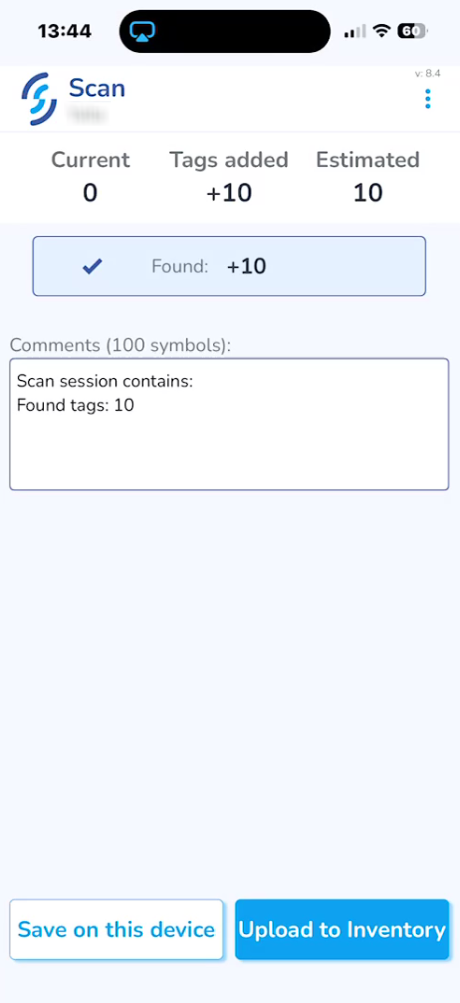
Then click "OK" on the pop-up to confirm the action.
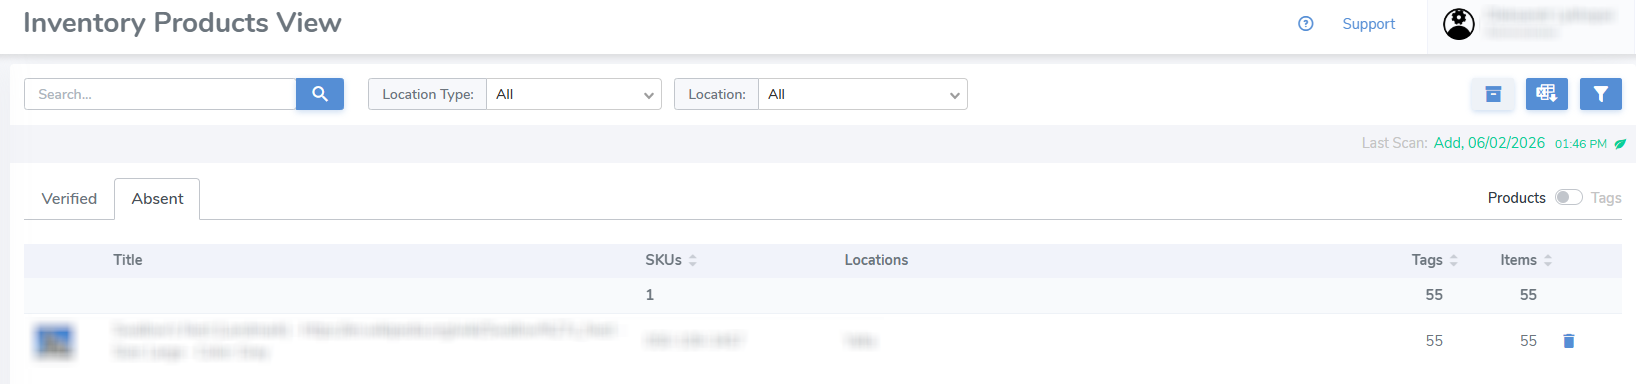
After the scan session is uploaded, go to the SimpleRFID web portal and click Inventory.
All scanned items will be under the Verified tab.
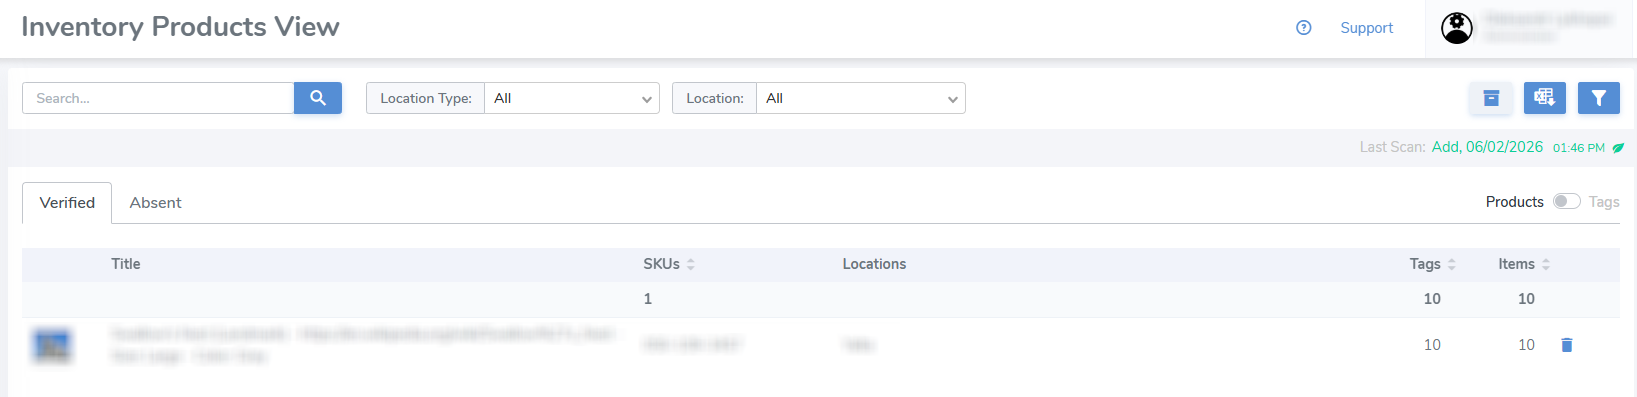
The products that were not scanned during the inventory reset scan will be under the Absent tab.
Generate Report
The report of the current inventory can be downloaded by clicking the second button in the top-right corner.
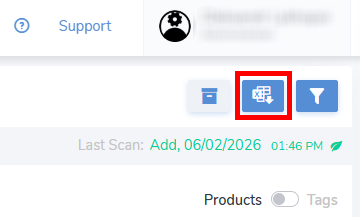
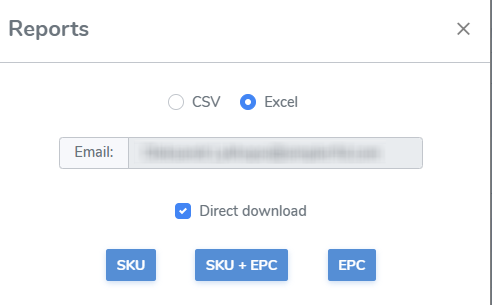
It's possible to download 2 different reports, one for Verified and another for Absent items, which depends on which Inventory tab is currently open.
Each report is meant to represent specific information, but all of them can be downloaded.
The audit scan session can also be viewed and its report obtained via the Scan Sessions tab in the navigation menu.
Overview Article which describes the entire Audit flow
Auditing with Simple RFID
Learn how to verify inventory accuracy, identify discrepancies, and resolve mismatched inventory counts using Simple RFID's New Audit Flow.
Whether you're performing your first inventory count, checking a few products, or reconciling your entire inventory with Shopify or another inventory system, this guide will walk you through the process.
In this article, you'll learn how to:
- Choose the right audit type for your needs.
- Scan inventory and identify discrepancies.
- Review and resolve mismatched inventory counts.
- Complete RFID tasks and inventory adjustments.
- Use audits to help tag products during initial setup.
Before You Begin: New vs. Legacy Audit Flow
Simple RFID currently supports two audit workflows:
- Legacy Audit Flow: Requires a full inventory audit each time.
- New Audit Flow: Supports Partial, Template, and Full Audits, along with a resolution process for identifying discrepancies and completing corrective actions.
How do I know which version I'm using?
If these tabs are missing, your account is using the Legacy Audit Flow.
To switch to the New Audit Flow, follow the instructions in [link to migration article].
What Is an Audit?
An Audit is the process of verifying your inventory accuracy by comparing RFID-scanned quantities against the expected on-hand quantities recorded in your inventory system.
For example, Shopify may report that you have 10 units of a particular product, while your RFID scans identify only 8. An audit helps you identify this discrepancy, determine why it occurred, and take the appropriate corrective action.
Simple RFID compares two key quantities:
- Expected: The quantity your inventory system reports as being on hand.
- Scanned: The quantity identified through RFID scanning.
Any difference between these quantities is flagged for review.
Once scanning is complete, Simple RFID guides you through the resolution process to determine why discrepancies exist and what actions are needed to correct them.
These actions may include printing RFID labels, adding or removing RFID tags, or adjusting inventory quantities in your connected system.
The goal is simple: Ensure that your physical inventory, RFID counts, and inventory records accurately reflect what you have in stock.
Choosing the Right Audit Type
The New Audit Flow supports three types of audits, allowing you to count only the inventory you need.
Partial Audit — Spot-Check Inventory
Use a Partial Audit to verify individual products or small groups of products without counting your entire inventory.
Best for:
- Investigating a suspected inventory discrepancy.
- Verifying the quantity of a particular SKU.
- Checking inventory following a sale, return, or stock movement.
- Performing quick, targeted inventory checks.
Template Audit — Count Specific Groups of Products
Use a Template Audit to verify products belonging to a predefined group, such as a brand, category, department, or product type.
Best for:
- Performing regular cycle counts.
- Auditing high-value merchandise.
- Checking fast-moving inventory.
- Verifying specific brands, departments, or product categories.
Template Audits help you maintain inventory accuracy throughout the year without requiring a complete inventory count.
Full Audit — Verify Your Entire Inventory
Use a Full Audit to verify inventory across your entire product catalog.
Best for:
- Establishing initial inventory accuracy.
- Performing year-end inventory counts.
- Preparing for financial or tax reporting.
- Periodically reconciling your entire inventory.
Our recommendation: Perform smaller, targeted audits regularly and Full Audits periodically. Focused audits are generally easier to manage and allow discrepancies to be identified and resolved more efficiently.
How to Perform an Audit
The New Audit Flow follows four main steps:
Create Audit → Scan Inventory → Review & Resolve → Complete Actions
Step 1: Create an Audit
Begin by creating an audit from the Simple RFID web portal or mobile app.
Choosing an Inventory Data Source
Simple RFID can use expected inventory quantities from a connected partner system, such as Shopify, or from a spreadsheet.
If you are not using an integration, you can enable spreadsheet-based audits:
This allows businesses without a direct integration to use the same audit and resolution workflow.
Step 2: Scan Inventory and Complete the Audit
Once your audit has been created, use your RFID reader to scan the physical inventory included in the audit.
As you scan, Simple RFID compares the detected RFID quantities against the expected inventory quantities.
Products are categorized based on their count status:
- Matched: The scanned quantity matches the expected quantity.
- Under Expected: Fewer items were scanned than expected.
- Over Expected: More items were scanned than expected.
Perform a Control Scan
Before completing your audit, perform a Control Scan by scanning the area again.
This helps capture any RFID tags that may have been missed during the initial scan due to tag orientation, positioning, interference, or other environmental conditions.
A Control Scan helps reduce false discrepancies and improves the reliability of your audit results.
Complete the Audit
Once you're confident that all applicable inventory has been scanned, select Complete Audit from the web portal or mobile app.
Completing the audit finalizes the scanned counts and allows you to proceed with reviewing and resolving discrepancies.
Step 3: Review & Resolve Discrepancies
After completing your audit, navigate to Resolve & Sync and open the Resolution Center.
The Resolution Center displays products with mismatched inventory quantities and allows you to determine why each discrepancy occurred.
Review the expected and scanned quantities for each product, then select the appropriate Reason for the discrepancy.
For example:
- An item is physically in stock but does not have an RFID tag.
- A product has an RFID tag that needs to be removed or replaced.
- Physical inventory is lower than the quantity recorded in your inventory system.
- Physical inventory is higher than the quantity recorded in your inventory system.
Based on the reason selected, Simple RFID determines which corrective actions are required.
These actions generally fall into two categories:
RFID tasks
Tasks must be completed to correct the RFID count, including:
- Printing RFID labels.
- Scanning and adding RFID tags to inventory.
- Scanning and removing RFID tags from inventory.
Inventory Adjustments
Actions needed to correct expected inventory quantities, including:
- Increasing inventory quantities.
- Decreasing inventory quantities.
The Resolution Center helps you identify the underlying issue before making changes, rather than simply adjusting counts without understanding the discrepancy.
Step 4: Complete RFID Actions and Inventory Adjustments
Once discrepancies have been reviewed and resolved, navigate to the appropriate sections within Resolve & Sync to complete the required actions.
Complete RFID Actions
Print any required RFID labels, scan newly tagged products into inventory, and remove tags that should no longer be associated with your inventory.
These actions help ensure your RFID inventory accurately represents your physical stock.
Apply Inventory Adjustments
After completing the necessary RFID actions, review and apply the approved inventory adjustments to your inventory system.
For accounts using a supported integration, Simple RFID can send approved inventory adjustments to the connected partner system.
For accounts using spreadsheets or manually supplied inventory data, export the adjustments and apply them to your inventory records using the appropriate import or update process.
Once the required actions and adjustments are complete, your RFID counts and expected inventory quantities should be aligned.
Using Audits for Initial RFID Tagging
Audits aren't just for maintaining inventory accuracy. They're also an excellent way to get started with RFID.
If you're setting up Simple RFID for the first time, your existing inventory system may already contain the quantities you expect to have in stock, even though those products haven't been tagged yet.
By creating an audit and scanning your existing RFID-tagged inventory, you can identify which products still need tags.
During the Review & Resolve process, you can assign the appropriate reasons for missing RFID counts and generate the required tagging actions.
This provides a structured way to print and apply RFID labels while establishing accurate RFID inventory records.
Tip: For large inventories, consider using Partial or Template Audits to tag and verify inventory in manageable groups rather than attempting to tag your entire store at once.
Best Practices for Accurate Audits
- Audit regularly. Frequent Partial and Template Audits help catch discrepancies before they become larger problems.
- Perform Control Scans. Always scan the area again before completing an audit to reduce the chance of missed tags.
- Resolve discrepancies promptly. Review mismatches and complete required actions while the audit results are still relevant.
- Investigate before adjusting. Determine whether a mismatch is caused by a tagging issue, missing inventory, or an incorrect expected quantity.
- Perform periodic Full Audits. Use Full Audits to establish a comprehensive inventory baseline and confirm overall inventory accuracy.
Frequently Asked Questions
How do I know if my inventory is accurate?
Perform an audit to compare your RFID-scanned inventory against your expected on-hand quantities. Products with matching quantities are identified as Matched, while discrepancies are flagged for review.
How do I fix mismatched quantities between Simple RFID and Shopify?
Complete an audit, review the discrepancies in the Resolution Center, assign the appropriate reasons, and complete any required RFID actions or inventory adjustments.
Do I need to audit my entire inventory every time?
No. The New Audit Flow supports Partial and Template Audits, allowing you to audit specific products or groups without performing a Full Audit.
Can I perform audits without Shopify or another integration?
Yes. Enable Spreadsheet Audit Source in your Customer Profile to use spreadsheet-based expected inventory quantities.
Can I use audits to print RFID tags for products that haven't been tagged?
Yes. The audit and resolution process can help identify products requiring RFID labels and generate the appropriate tagging actions.
Does completing an audit automatically correct my inventory?
No. Completing an audit finalizes the count and begins the discrepancy resolution process. Required RFID actions and inventory adjustments must still be reviewed and completed.
Keep Your Inventory Accurate with Simple RFID
Regular audits help you identify inventory discrepancies, correct tagging issues, and maintain accurate inventory records.
With Simple RFID's New Audit Flow, you can move from identifying a discrepancy to resolving it through one structured process.
Create. Scan. Review. Resolve.