If you don't see your label size available in the RFID Layouts list, please request that it be added via our support
[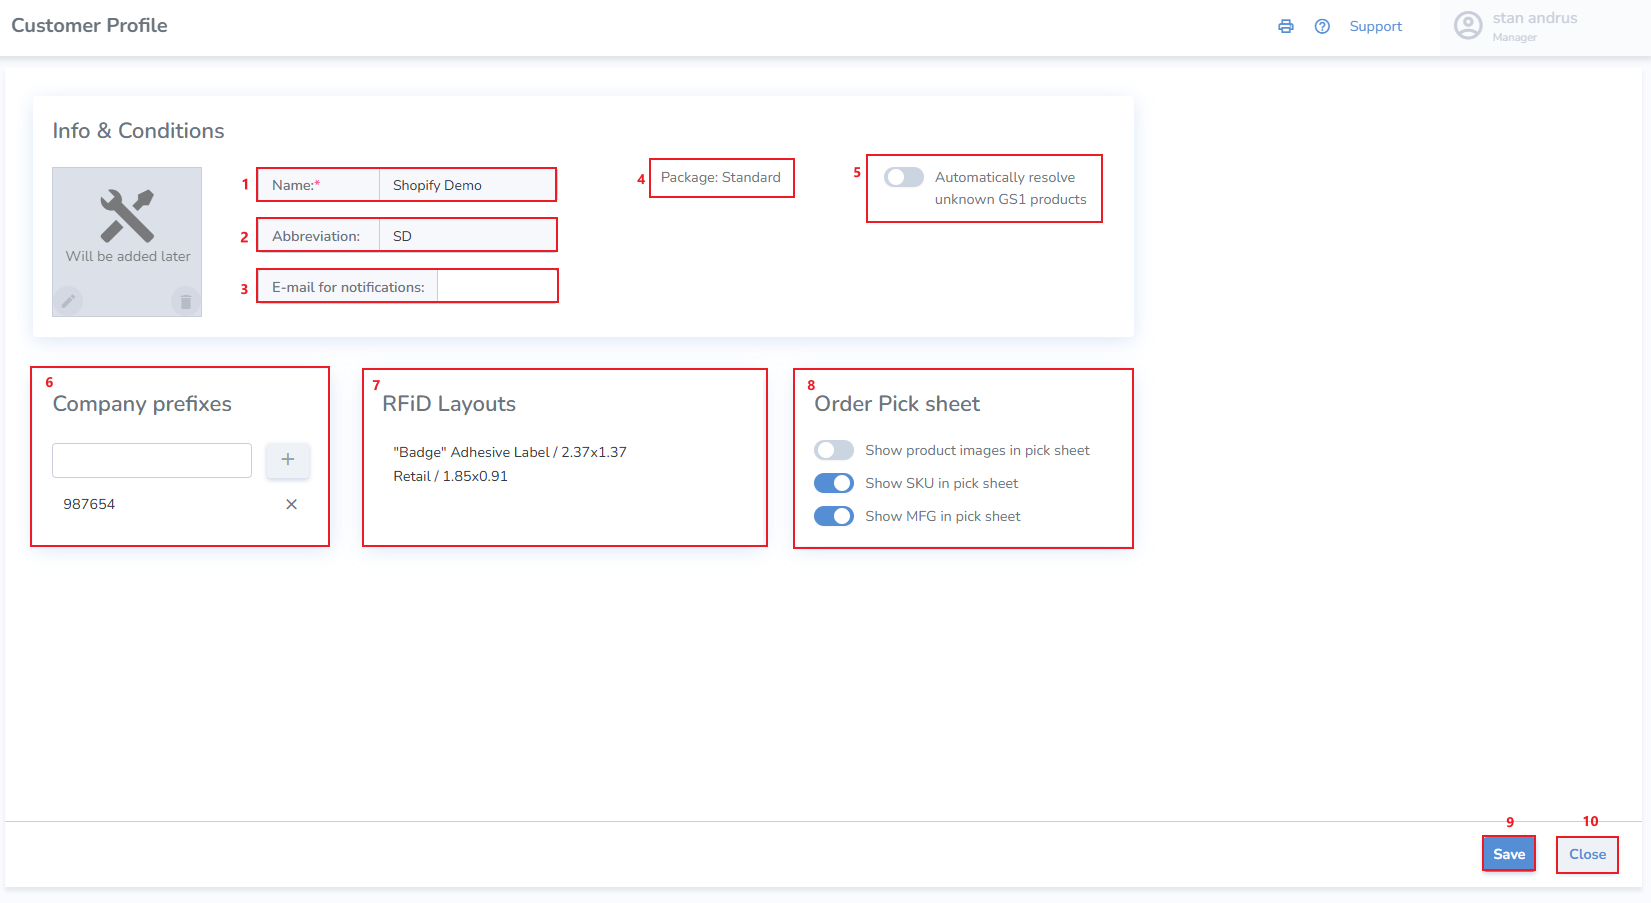](https://kb.simplerfid.com/uploads/images/gallery/2025-05/PVZimage.png) # Printers List Provides a view of all print stations and connected printers. It includes: \- Printer Station Location it is connected to Printers list Print Client Version Settings Icon # Printers > Station Settings This page allows for the assignment and view of all printers including settings. [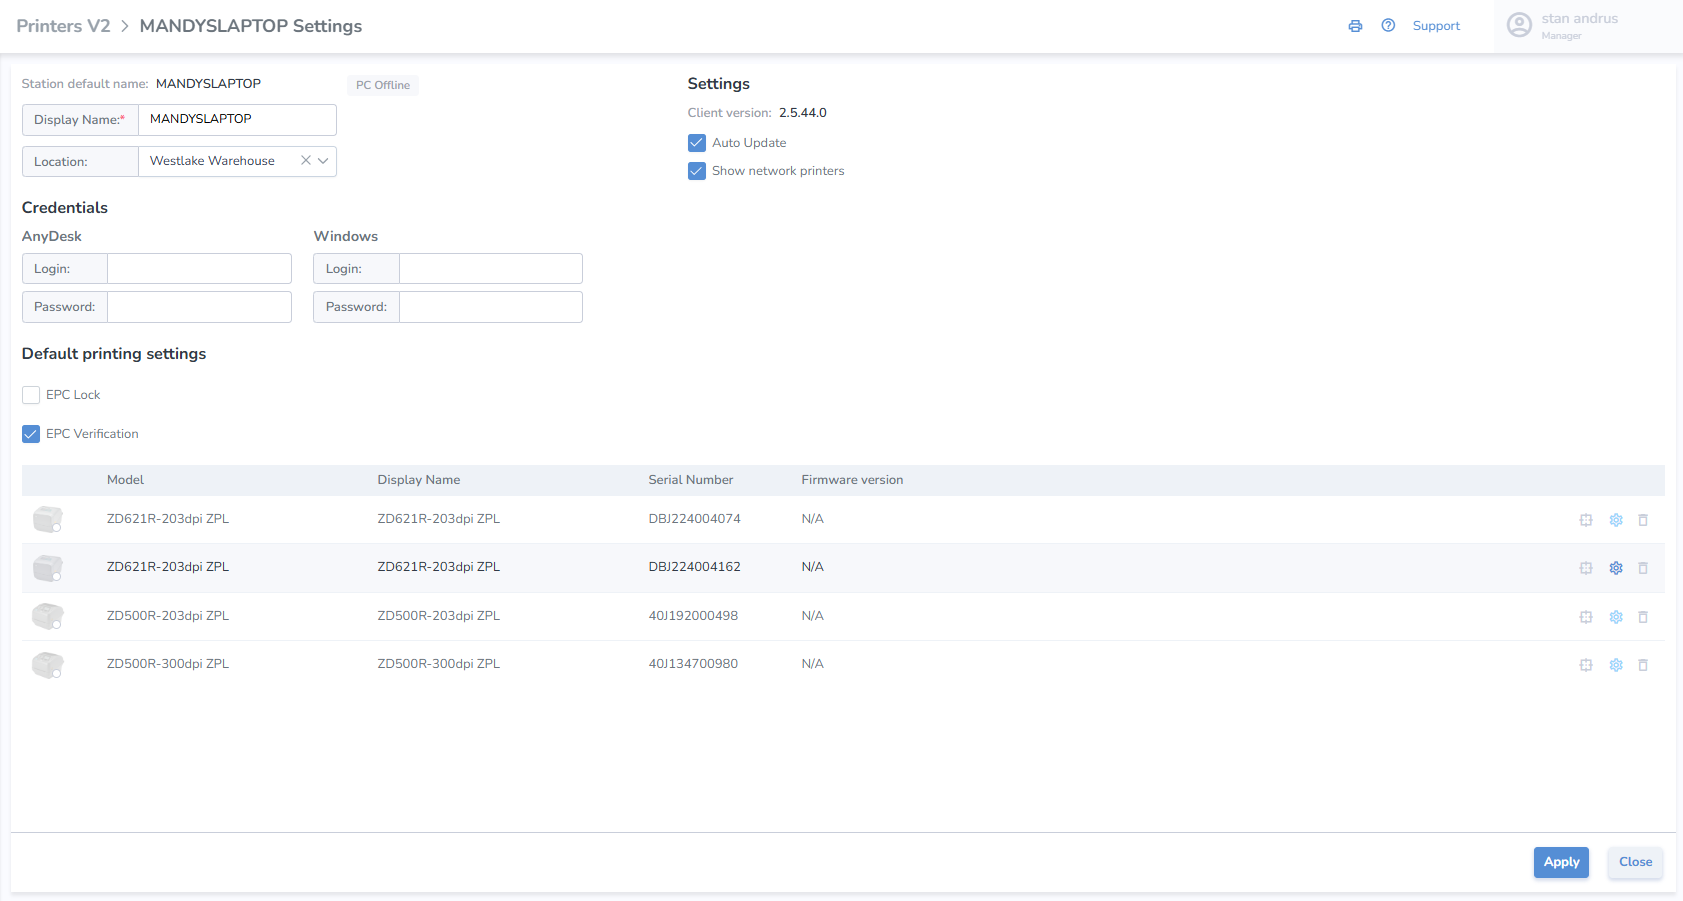](https://kb.simplerfid.com/uploads/images/gallery/2025-05/6kCimage.png) # Label Layouts > All Layouts Label layouts are the label designs which have been created and saved. From this page a user may also create new label designs. 1\. Search window provides ability to search saved designs 2\. Card for each saved design and includes Name, Label size, DPI, Saved date and time, and a preview of the design 3\. "+" button located in the upper right corner of the screen to navigate to the Label Designer to create a new label design 4\. Ability to import an existing design from another label editor [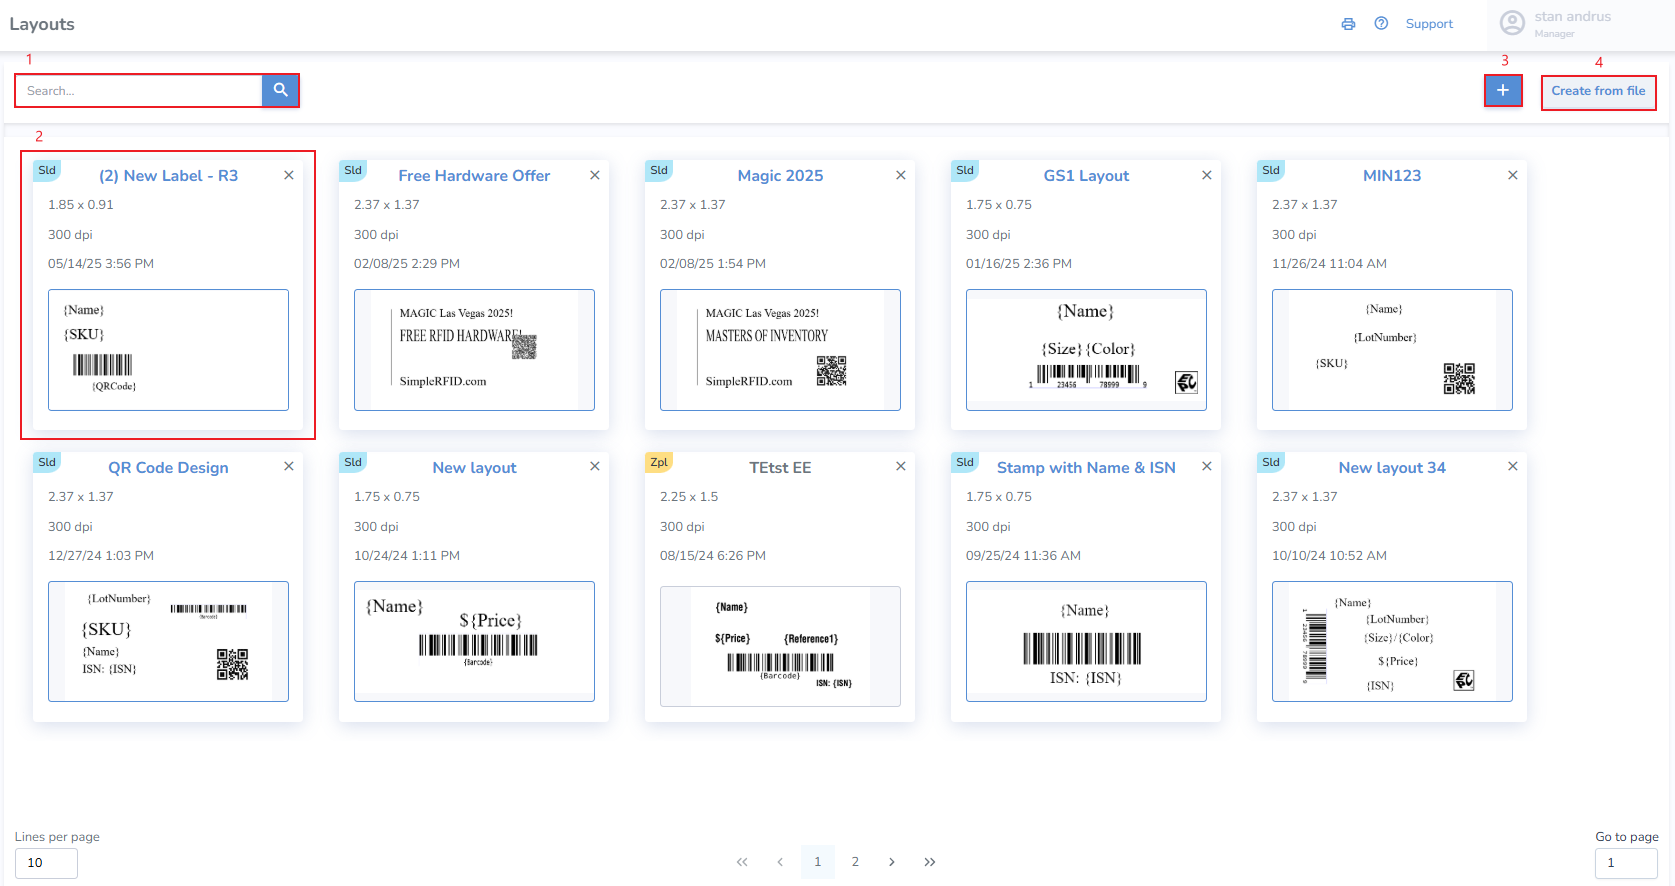](https://kb.simplerfid.com/uploads/images/gallery/2025-05/gJKimage.png) # Label layouts > Label Designer The design editor allows a user to quickly design a label with any properties which appear for the Product, including description, size, color, price, barcode & QR code, image and more. ##### ****Adding Fields to Label Layout**** Add any property from the Edit Product screen to your label by placing the name of the property in curly brackets as a text element in the Label Designer.Is your printed label missing properties? Search the product you are printing and check the fields to confirm that the product contains the field.
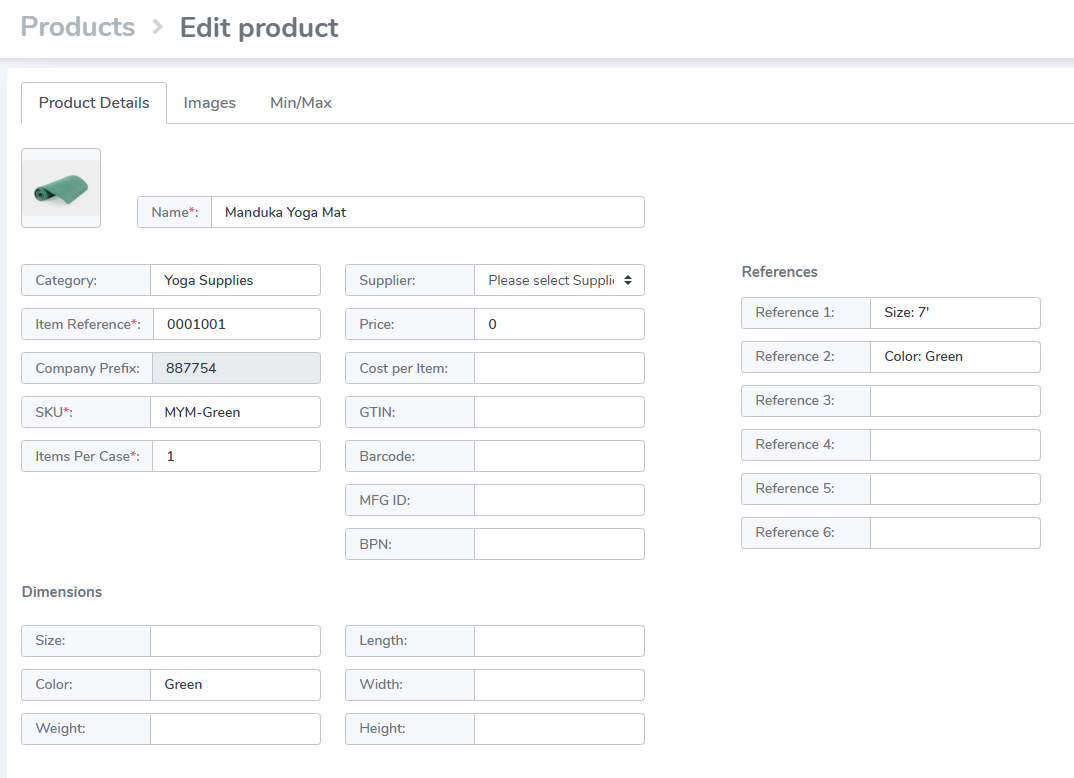
E.g. In the example below: to print "Size: 7'" on the label, you would add a text element with {Reference1}
[](https://kb.simplerfid.com/uploads/images/gallery/2025-06/203image.png) ##### ****Overview of Label Designer**** 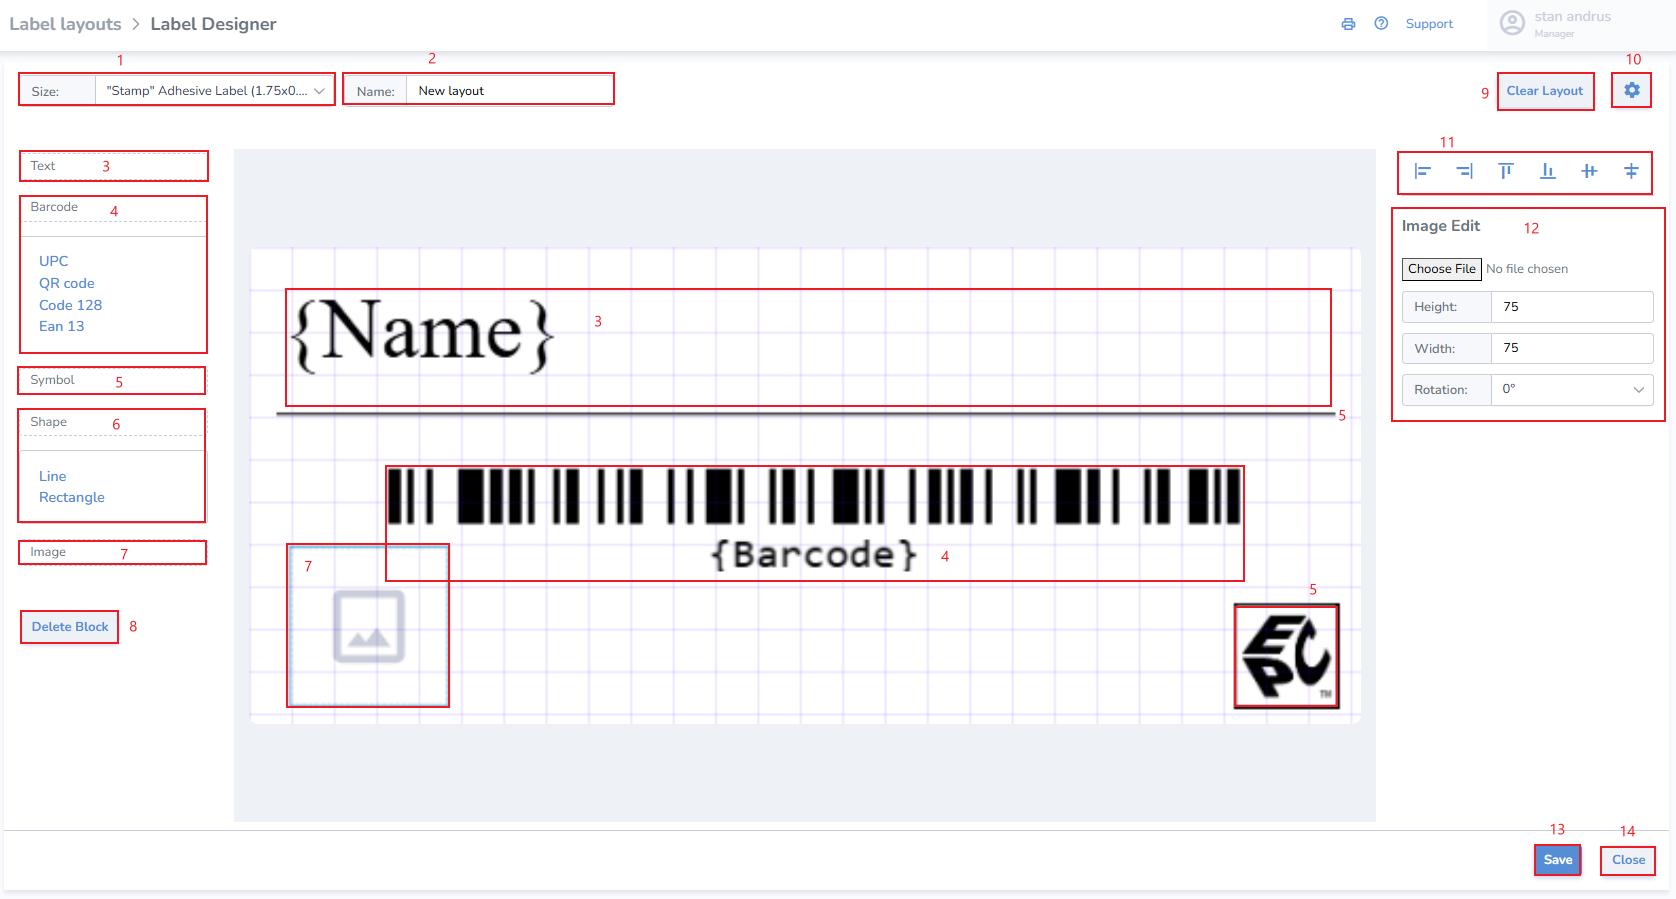****Template**** 1\. Choose label size - Don't see your label size available in the Size dropdown? Email support@simplerfid.com and notify us. 2\. Name Label ****Add Block: Text, Barcode, Symbol, Shape & Image**** 3. ****Text**** - This is any place where text will appear such as name, description, size, color, style, price, etc. in any font desired 4. ****Barcode**** - This allows you to add a barcode or QR codeUnless you have a specific barcode type, such as UPC or EAN, you'll generally want to use ****Code 128**** by default.
5. ****Symbol**** - add EPC global symbol other popular symbols 6. ****Shape**** - add basic shapes to design including line, box, circle 7. ****Image**** - upload a basic image 8\. Delete Block - remove a single block from the canvas 9\. Clear Layout - remove all blocks and clear the canvas 10\. Grid settings - adjust grid lines 11\. Align options 12\. Editor window for selected block 13\. Save button to save design. Once clicked the user is directed back to the Layouts page 14\. Close button to close the design without saving. Once clicked the user is directed back to the Layouts page ##### ****Edit Block**** Click on the Block you wish to edit ##### ****Text**** Click Text Choose the Data source: Text, Property, Custom Text & EPC Text from the right in the Text Edit section - ****Text****: ID, Name, Category, MFG ID, SKU, Price, Item Number, Barcode, QR Code, BPN, & Items Per Tag - ****Font:**** [Choose existing font or add any font](https://kb.simplerfid.com/books/web-portal/page/fonts) - ****Property****: Size, Color, Weight, Length, Width, Height, Full Description - ****Custom Text****: Pulls information from Ref 1-Ref 6 in the Products > Edit Product view - ****EPC Text****: tag level properties which include Items per tag, Cost, Cost per item, Born Date, Expiration Date, Lot Number, Sell by date, EPC, EPC ASCII, ISN, SN, or GTIN [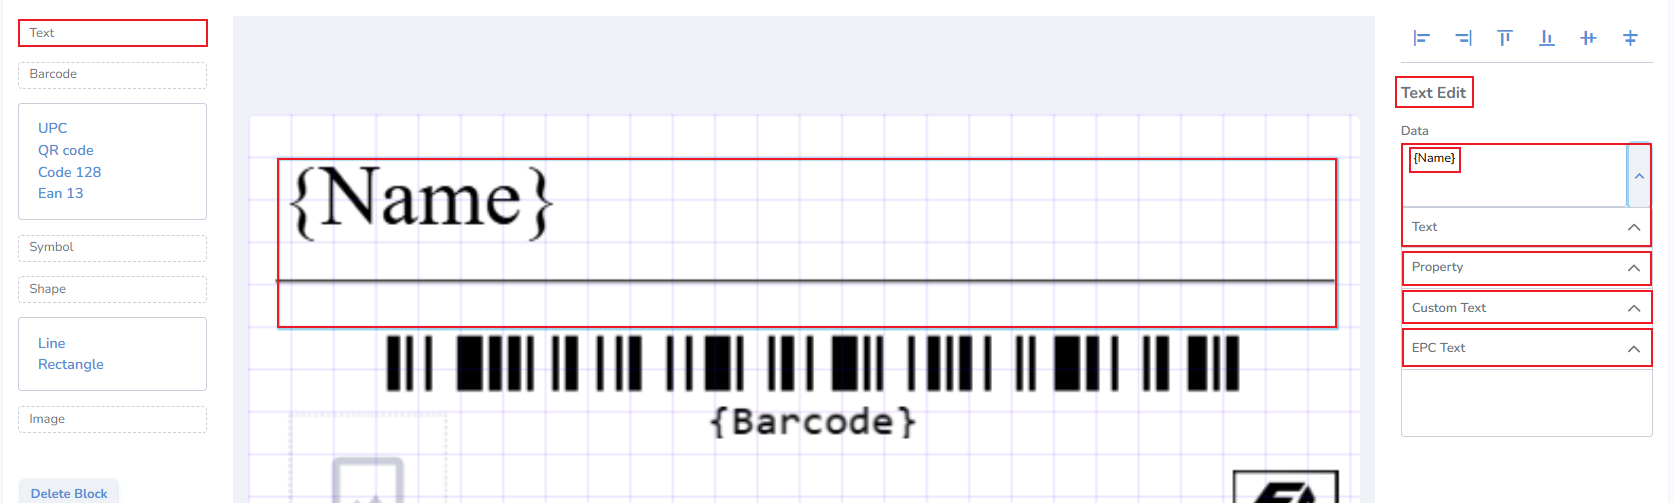](https://kb.simplerfid.com/uploads/images/gallery/2025-05/SiXimage.png) ##### ****Barcode**** Click on the Barcode option on the right to view the Barcode Edit window Choose Data source. This allows you to use any text or number from any field and turn it into a barcode or QR code ##### ****Symbol**** Add a common symbol such as ISO, Trademark, Copyright, or EPC logo [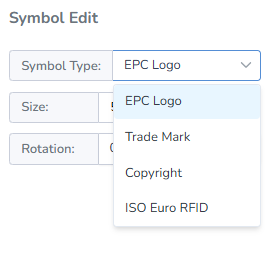](https://kb.simplerfid.com/uploads/images/gallery/2025-05/zQHimage.png) ##### ****Shape**** Add common shape like a box, circle, or line ##### ****Image**** # FontsPlease note that the new font won't appear in the preview, however it will print on the label. Our next improvement will display this new font in the label design template.
# Layouts > Create from file Use an existing design via the Create New Label From File pop-up Click the Create from File button from the Layouts page - Click the "****+****" button and locate your file. Make sure that your file is a valid file type - ****Name**** your Design - Choose the ****label size**** - Choose the ****DPI**** of the original design - Click ****Create****  # Handheld Readers This page provides visibility to all of your Handheld RFID readers connected to your account. It provides visibility to all devices, identifies who last used the device, where they were located, and when it was used. It displays the device firmware to help identify the devices which must be updated. - Model Number - Serial Number of all devices - First connected date - Last connected date - Location it was last at - The user who last used the device - Firmware of the device - find the current firmware version here # Fixed Readers # Users ### ****User:**** ##### ****Create a User**** If you are a regular user (not manager), please contact your manager and ask to create an account. ##### ****Reset Password**** ****1. Go to**** [Login Page](https://portal.simplerfid.com) ****2. Click**** *"Forgot password?"** [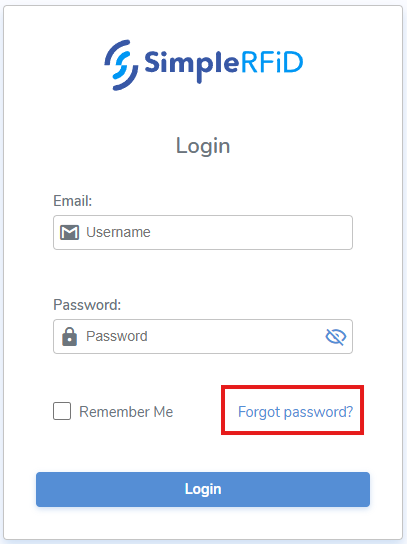](https://kb.simplerfid.com/uploads/images/gallery/2025-06/4skimage.png) ****3. Enter**** **your email** ****4. Click**** **"Send a link to email"** [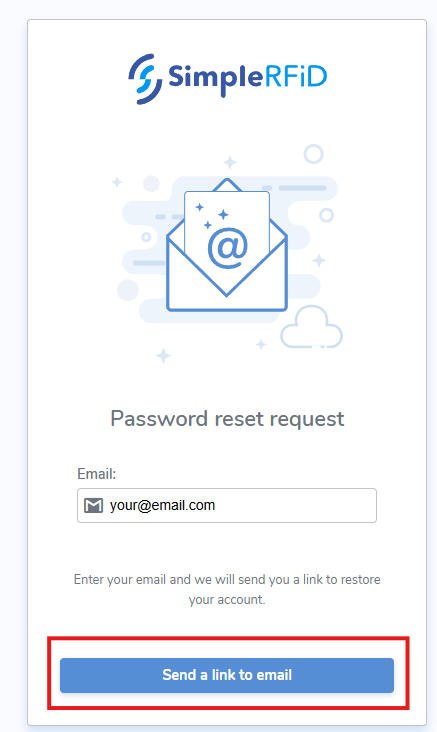](https://kb.simplerfid.com/uploads/images/gallery/2025-06/lHdimage.png) ****5. Open**** **your email inbox** ****6. Open**** **noreply** email ****7. Click**** **"Reset Password"** [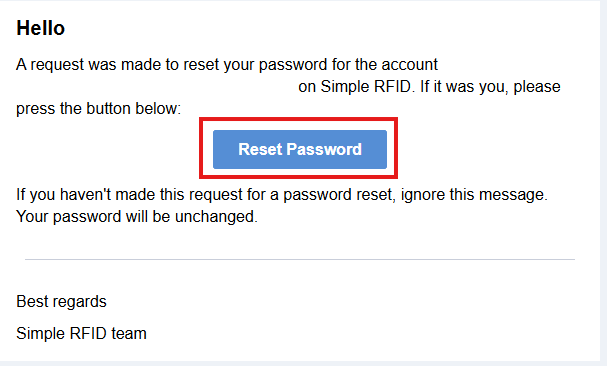](https://kb.simplerfid.com/uploads/images/gallery/2025-06/lnjimage.png) ****8. Enter**** the **new password** twice ****9. Click**** **"Save new password"** ##### ****Deactivate User**** If you are a regular user (not manager), please contact your manager to deactivate your user. ### ****Manager:**** ##### ****Create a User**** 1. ****Go to**** [Users](https://portal.simplerfid.com/manager/users) (logged in as Manager) 2. ****Click**** the “****+****” button to add a new user.  3. ****Enter**** the user’s ****first**** and ****last name****, ****email address****, and optionally a ****phone number****.  4. ****Select**** the ****locations**** this user will have access to.  ****OR**** 4. Give them ****Manager**** access for full access to ****all locations****.  5. Finally, click ****Create****. The user will then receive an email to set their password and log in.
##### ****Resetting User Password**** Same as User. ****OR**** 1. ****Go to**** [Users list](https://portal.simplerfid.com/manager/users) 2. ****Click on**** the desired User to open it 3. ****Click**** **"Reset Password" > "Reset"**A "Reset Password" email should is sent to the user. User will need to Reset the password as above in user's "Reset Password" after step 5.
##### ****Deactivating a User**** 1. ****Go to**** [Users list](https://portal.simplerfid.com/manager/users) 2. ****Click on**** the desired User to open it 3. ****Click**** **"Deactivate User" > "Deactivate"** # Location Framework The Location Framework provides the ability to create properties that can be assigned to tags via a drop-down menu. Although this is called "Location" Framework, these properties can include anything you wish to associate with your items such as: - Sublocations - Create rows, bins, isles, etc. - Flags - Set items to status such as alterations, embroidery, layaway, etc. - Process - Assembly, Packaging, QA, etc. ##### ****List tab**** The Location Frameworks list tab displays all created frameworks. [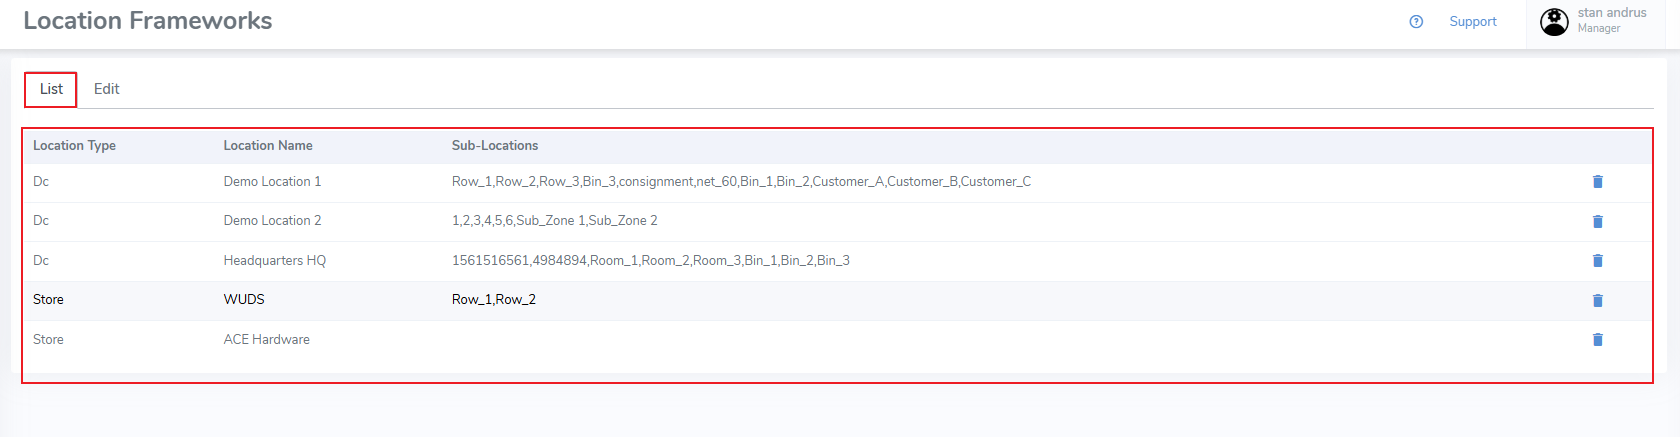](https://kb.simplerfid.com/uploads/images/gallery/2025-05/ECTimage.png) ##### ****Edit tab**** The Edit tab allows for creation of new frameworks and editing of existing frameworks [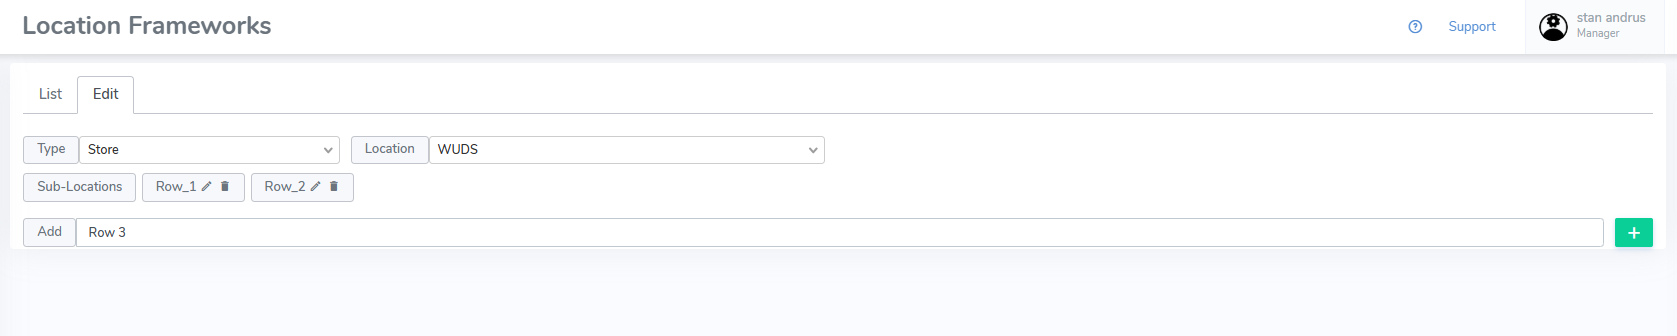](https://kb.simplerfid.com/uploads/images/gallery/2025-05/pRkimage.png) ##### ****Create a Framework**** From the Edit tab: - Type & Location - Select the type & location you wish to apply the framework to - Add - From the add section, enter the values separated by a comma - Click the "+" button to add them ##### ****Edit a Framework**** From the List tab: - Select the desired framework From the Edit tab: - Click the pencil icon to edit an existing value - Click the Trash Can icon to delete the value - Or use the Add row to add a new property These frameworks appear on the web portal Inventory tab [Tag level](https://kb.simplerfid.com/books/web-portal/page/inventory-tag-level-properties) views, and can be edited there. These frameworks can be set from the mobile device [Write Tags](https://kb.simplerfid.com/books/mobile-app/page/write-tags) page when using Single Tag Encoding # Locations This article covers the different types of locations that can be created, and how to create them. Navigate to the Create Locations menu by clicking the User Settings from the top right menu, then selecting Locations. ##### ****Location Types**** There are three types of locations which can be created in Simple RFID. - 'DC' or Distribution Center (Warehouse) - Store (Retail Space) - Supplier (any external vendor) ##### ****Create a Location**** - Set the location type to the entity you wish to create - Click the "+" button located in the upper right corner [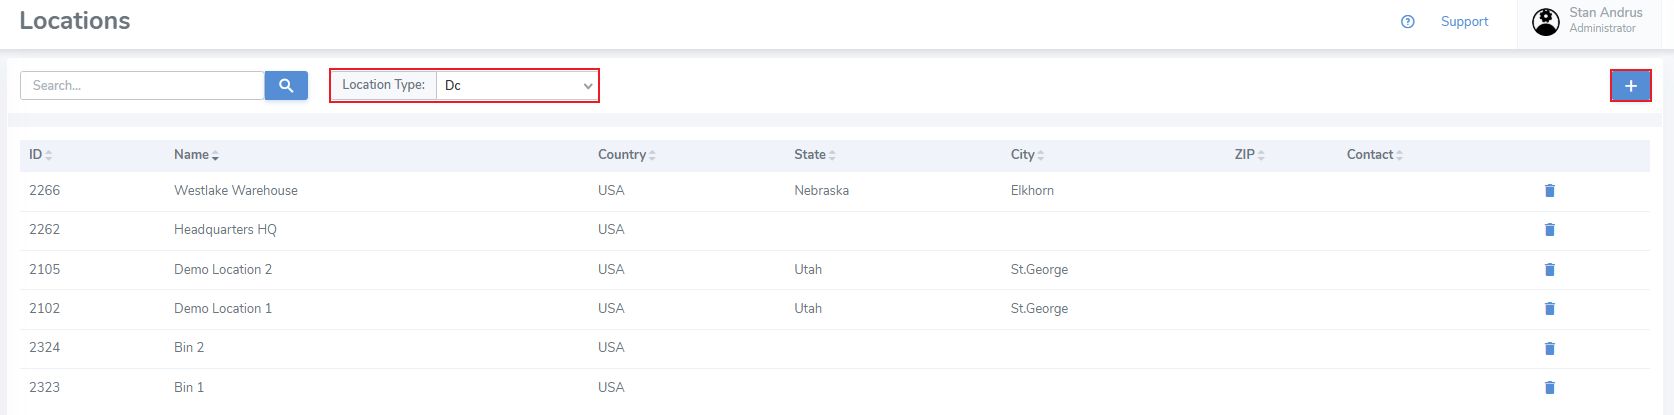](https://kb.simplerfid.com/uploads/images/gallery/2025-06/Q6Uimage.png) Enter information for the location including: - Name - Phone - Email - Contact - Time Zone - Country - Address (including City, State & Zip Code)It's important that your addresses are up-to-date. This address is used to ship supplies.
- Finally click "Save" to save the results [](https://kb.simplerfid.com/uploads/images/gallery/2025-05/xH7image.png)A current bug requires that the page be reloaded to display the new location. Switch the filter to a different location type and return back to what you created and it will appear.
# Resources Access the Resources tab by clicking on the Admin menu (top right corner), then select Resources [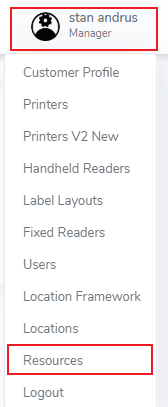](https://kb.simplerfid.com/uploads/images/gallery/2025-05/so5image.png) ##### ****Resources**** The Resources tab provides important links required for setup and maintenance. [](https://kb.simplerfid.com/uploads/images/gallery/2025-05/OFMimage.png) ##### The sections include: ##### ****Printing Utilities**** Download the print client and Zebra tools (Zebra Designer & Setup Utilities) ##### ****Printing Instructions**** Instruction on setup, and common issues ##### ****Printers Support/Drivers**** Drivers for various printer models - MacOS Print Client - ##### ****Applications**** Links to install the mobile app (Play Market & App Store) ##### ****TSL Firmware**** Firmware to update your TSL handheld RFID reader # Logout Instructions of how to log out of the web portal - Click the Admin menu in the top right corner of the screen [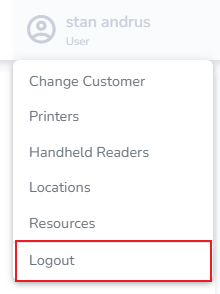](https://kb.simplerfid.com/uploads/images/gallery/2025-05/8jJimage.png) - Click 'Logout' This will forward you to the login screen [](https://kb.simplerfid.com/uploads/images/gallery/2025-05/akTimage.png) # Printer Profile: Calibrate Printer from web The printer profile page contains ****details**** for each connected printer. Users can navigate to this page from the [Available Printers](https://kb.simplerfid.com/books/web-portal/page/menu-bar-available-printers-calibrate-printer-from-web) pop-out menu, or the [Station Settings](https://kb.simplerfid.com/books/web-portal/page/printers-station-settings) ##### ****Printer Profile Details**** - Location the printer is connected to - 'Station' (Host PC) the printer is connected to - Serial Number of the Printer - Firmware Version of the Printer - Date the printer was setup - Printer DPI: 203, 300, or 600 - Connection Method: USB or Ethernet - Print Station connectivity indicator - Printer connectivity indicator - Notes section - Calibrate Printer button - Save button to save changes - Close button to exit the page [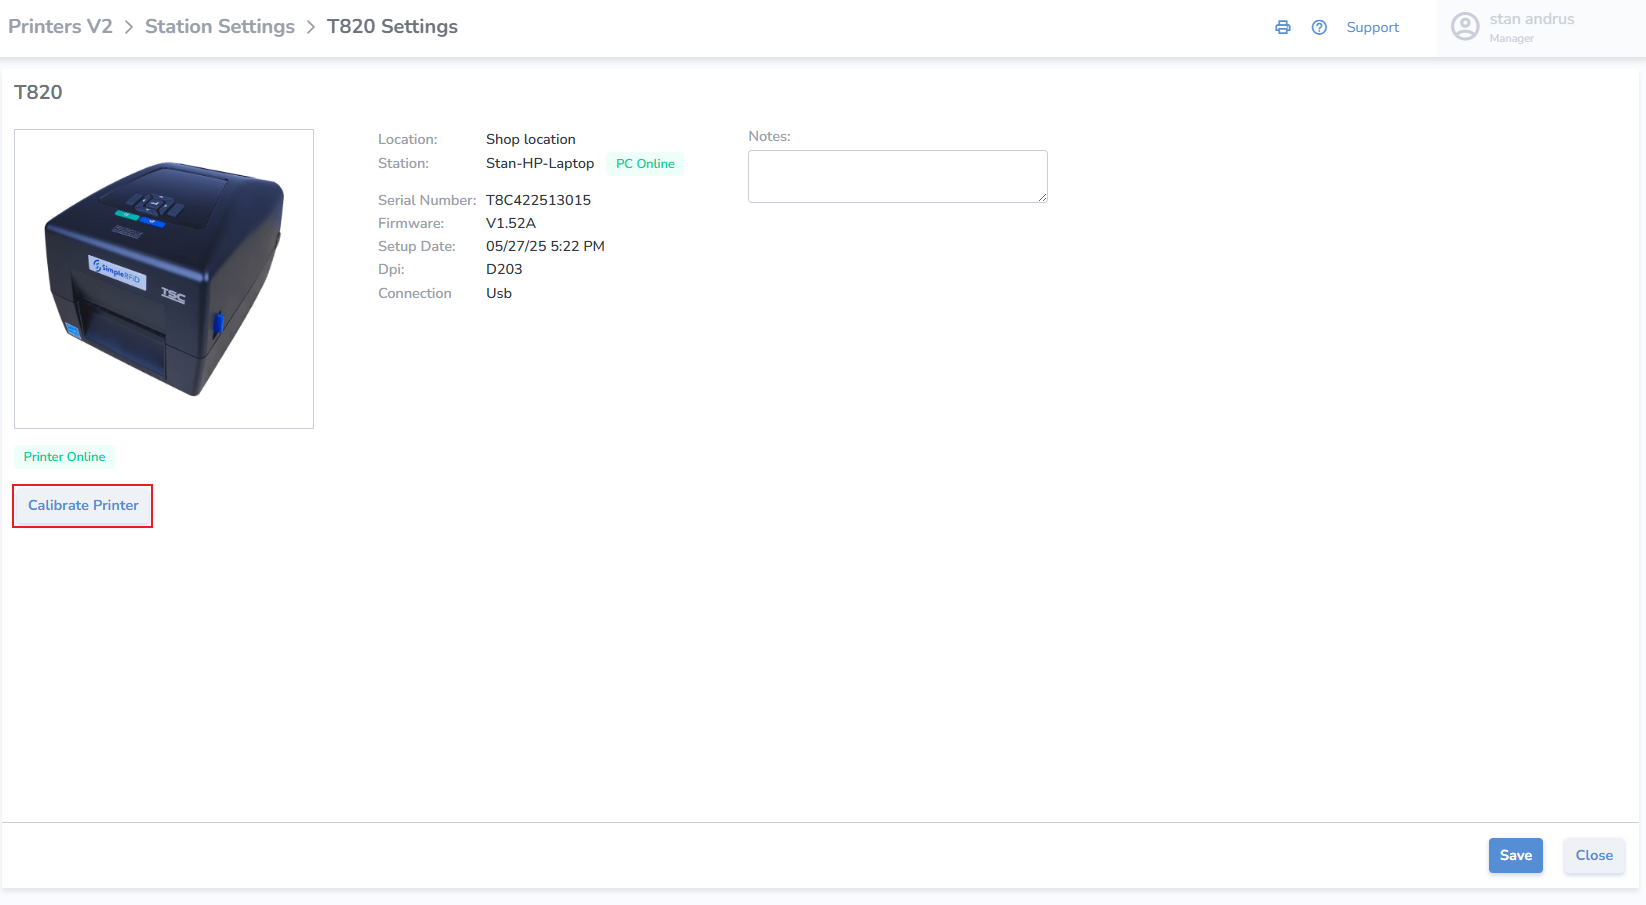](https://kb.simplerfid.com/uploads/images/gallery/2025-05/FLZimage.png) ##### ****Calibrate Printer from Printer Profile**** - Calibrate click the button - Click 'Calibrate' on pop-up [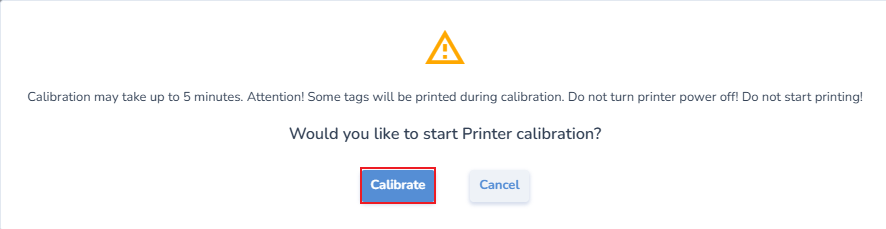](https://kb.simplerfid.com/uploads/images/gallery/2025-05/1Ebimage.png) - Accepting this prompt will then send both the media and ribbon and RFID calibrations to the printer, which will proceed automatically with the following steps: - Media and Ribbon. - Then a pause for roughly 10 seconds. - And then the RF calibration, which will take longer; the labels will periodically inch out of the printer for approximately one minute. At the end of the process it will feed out 2 or 3 labels before stopping completely. - After the calibration has completed: - Open the printer and roll back the labels so the blank tags may be used—precision is not necessary - Un-pause the printer - Now you are ready to print.If the printer continues to VOID labels, repeat the process. If the issue persists, perform a calibration directly from the printer itself.
# Deactivating User To deactivate an account, go to the SimpleRFID web portal and click ****Users****. [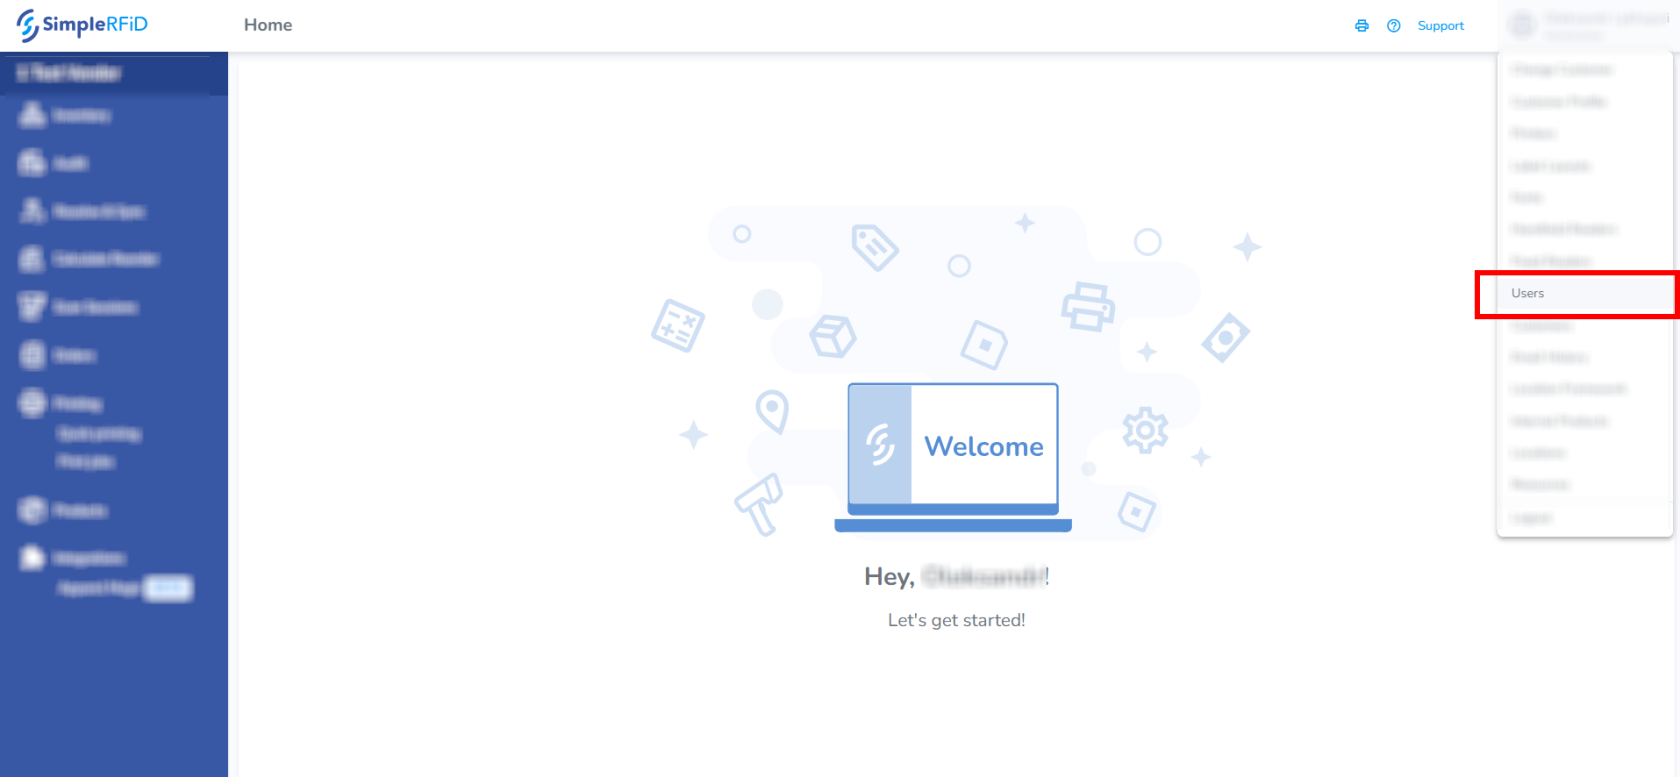](https://kb.simplerfid.com/uploads/images/gallery/2026-05/Agqimage.png)You need to have the ****Manager**** role in the SimpleRFID web portal.
Find the account by typing the name in the search box. Click on the account that appears in the search results. [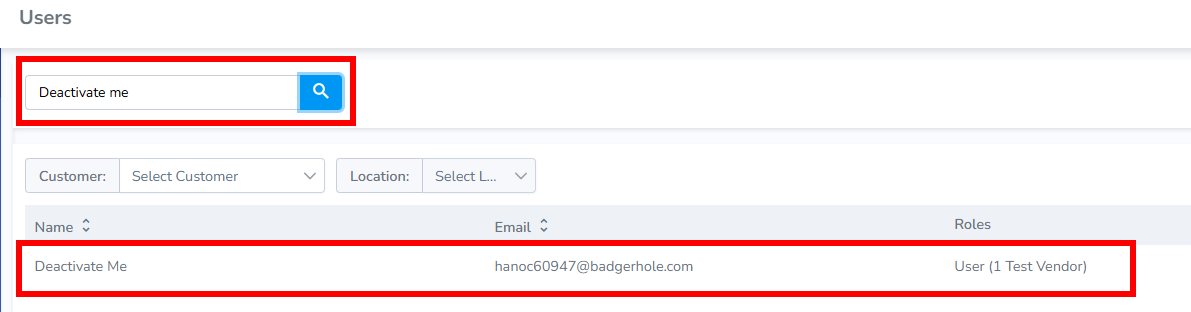](https://kb.simplerfid.com/uploads/images/gallery/2026-05/9oOimage.png) Click ****Deactivate user****. [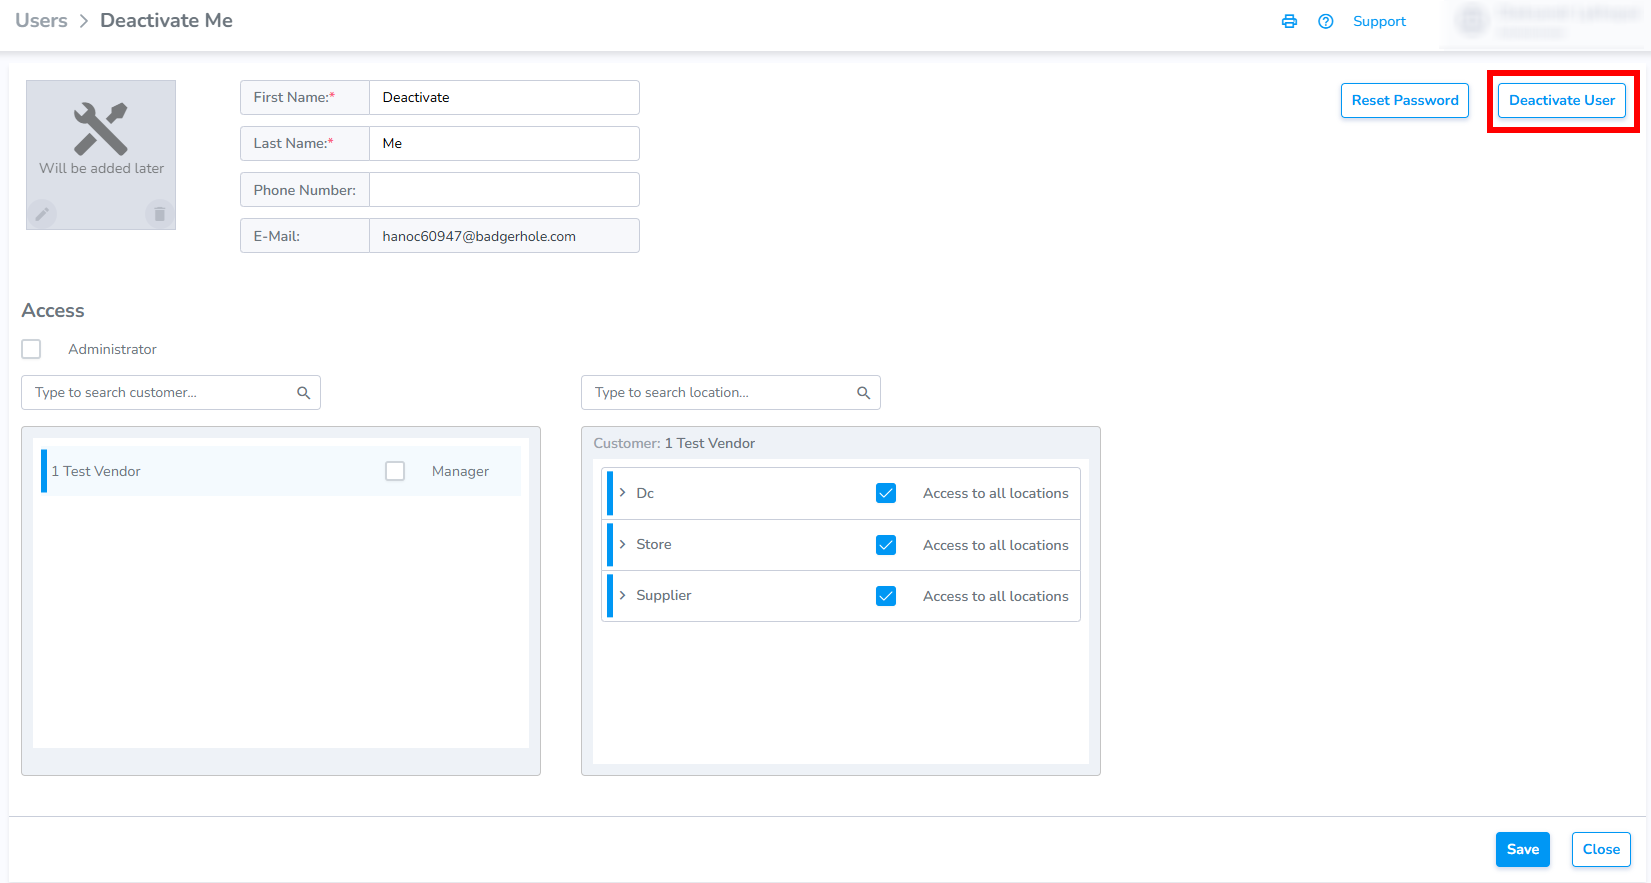](https://kb.simplerfid.com/uploads/images/gallery/2026-05/baGimage.png) Now, we can see that the account is deactivated. [](https://kb.simplerfid.com/uploads/images/gallery/2026-05/f8aimage.png)