Support & Troubleshooting
Everything related to Support (e.g. Installing AnyDesk for screen sharing)
- Support Tool
- Support Tool Installation - Windows
- Refresh Print Client - Windows
- Repair Print Client - Windows
- Upgrading the Support Tool - Windows
- Support Tool Installation - Mac
- Refresh Print Client - Mac
- Repair Print Client - Mac
- Uninstall Print Client
- Troubleshooting
- Printing Issues
- Printer Offline
- Reset Your Printer to Factory Defaults
- Cross Encoding
- Adjusting the Sleep settings on your host PC
- VOIDS
- macOS: Troubleshooting the Print Client
- Printing Alignment Issues
- Uninstalling the Support Tool
- Troubleshooting USB Connection
- Troubleshooting Printer Network Connection
- RFID Scan Troubleshooting Guide
- Windows Host
- Resolving Login Errors | Windows 11
- Powering your Windows Surface Tablet
- Installing AnyDesk
- Switching out of S mode in Windows
- What is the ISN and what is the benefit of printing it on my tags?
Support Tool
Support Tool Installation - Windows
Note: You'll need Administrator permissions to complete this installation.
First, download the support tool.
Once downloaded double click to open the installer, then click Next.

Accept the terms in the Licensing Agreement, then click Next.

Choose the install location, then click Next.

Click Install

Click Yes to allow the app to make changes to your device.

The program will then install, and once completed click Finish.

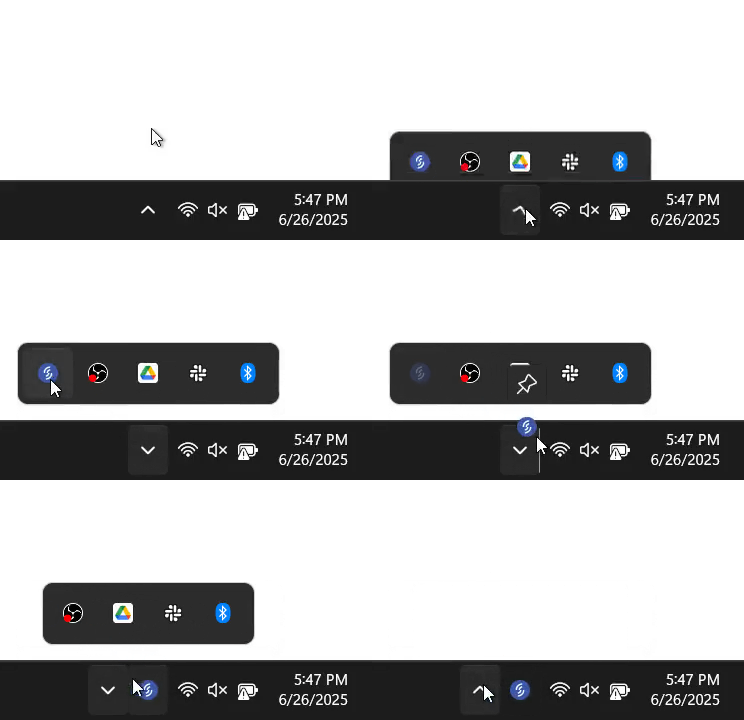
Once installed an icon will appear in your system tray in the bottom right corner of the screen (by the clock). We advise that you drag this icon down so that it appears in the task bar for easier access.
Refresh Print Client - Windows
If you find that your printer disconnects and goes offline you will want to install the Support Tool which will help you get back up and running.
Installation instructions can be found here: Support Tool: Installation
Refreshing the Print Client using the Support Tool
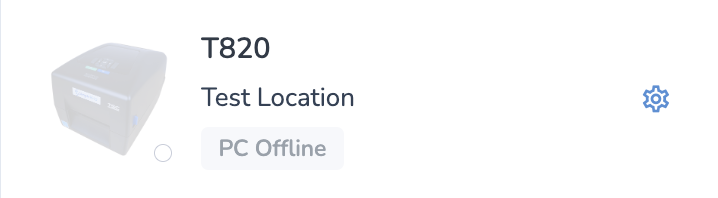
With the Support Tool installed, anytime you find your print client offline (indicated by "PC Offline"):
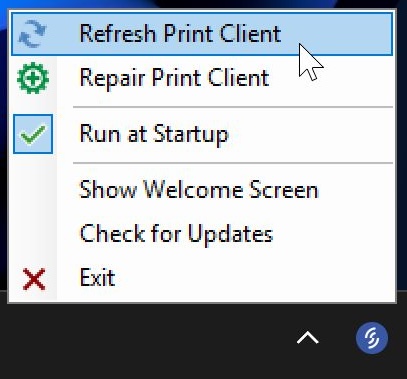
Simply click on the Support Tool icon in your taskbar, then click Refresh Print Client.
Once the client has restarted successfully you will see the following pop-up
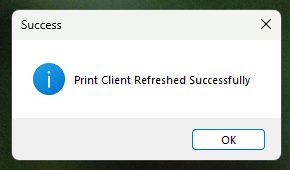
Close this pop-up and wait up to 30 seconds and your printer should reconnect.

Repair Print Client - Windows
Repairing the print client will download and run the installer in order to write over any parts of it that may have been damaged. This is particularly useful if the Refresh Print Client option throws an error.
Please make sure you are using the latest version of the Support Tool; previous versions will reset your station pairing, meaning you will need to contact support to re-attach your station if you use the Repair function on those older versions.
Direct download: Download Support Tool
OR
Github: Download Support Tool

Wait a few minutes after the repair process completes for your station to come online. If you continue to face issues, please contact support.
Upgrading the Support Tool - Windows
You may have previously installed an old version of the Support Tool, which was then called the Print Client Refresh Tool. This version did not support auto-update, so you should uninstall this version and download the latest installer.
Open Settings
Windows 11: Right-click the Start button and choose "Installed apps" (or open Settings > Apps > Installed apps).
Windows 10: Right-click Start and choose "Apps and Features", or go to Settings > Apps > Apps & features.
Find Print Client Refresh Tool
In the list of installed apps, type "Print Client Refresh Tool" into the search box to filter the list and locate it quickly.
Uninstall it
Windows 11: Click the three-dot menu next to the app and select "Uninstall."
Windows 10: Click the app, then click the "Uninstall" button that appears below it.
Confirm any prompts (including a User Account Control/UAC prompt) to proceed.
Wait for uninstall to finish
A separate uninstaller window may open and run automatically. Let it complete, then close any leftover windows. A restart is not usually required, but restart if prompted.
Install the new version
Next, follow the steps in this article to install the latest version of the Support Tool: Support Tool Installation - Windows
Support Tool Installation - Mac
Note: You'll need Administrator permissions to complete this installation.
First, download the support tool.
Open the downloaded .pkg file to launch the installer:
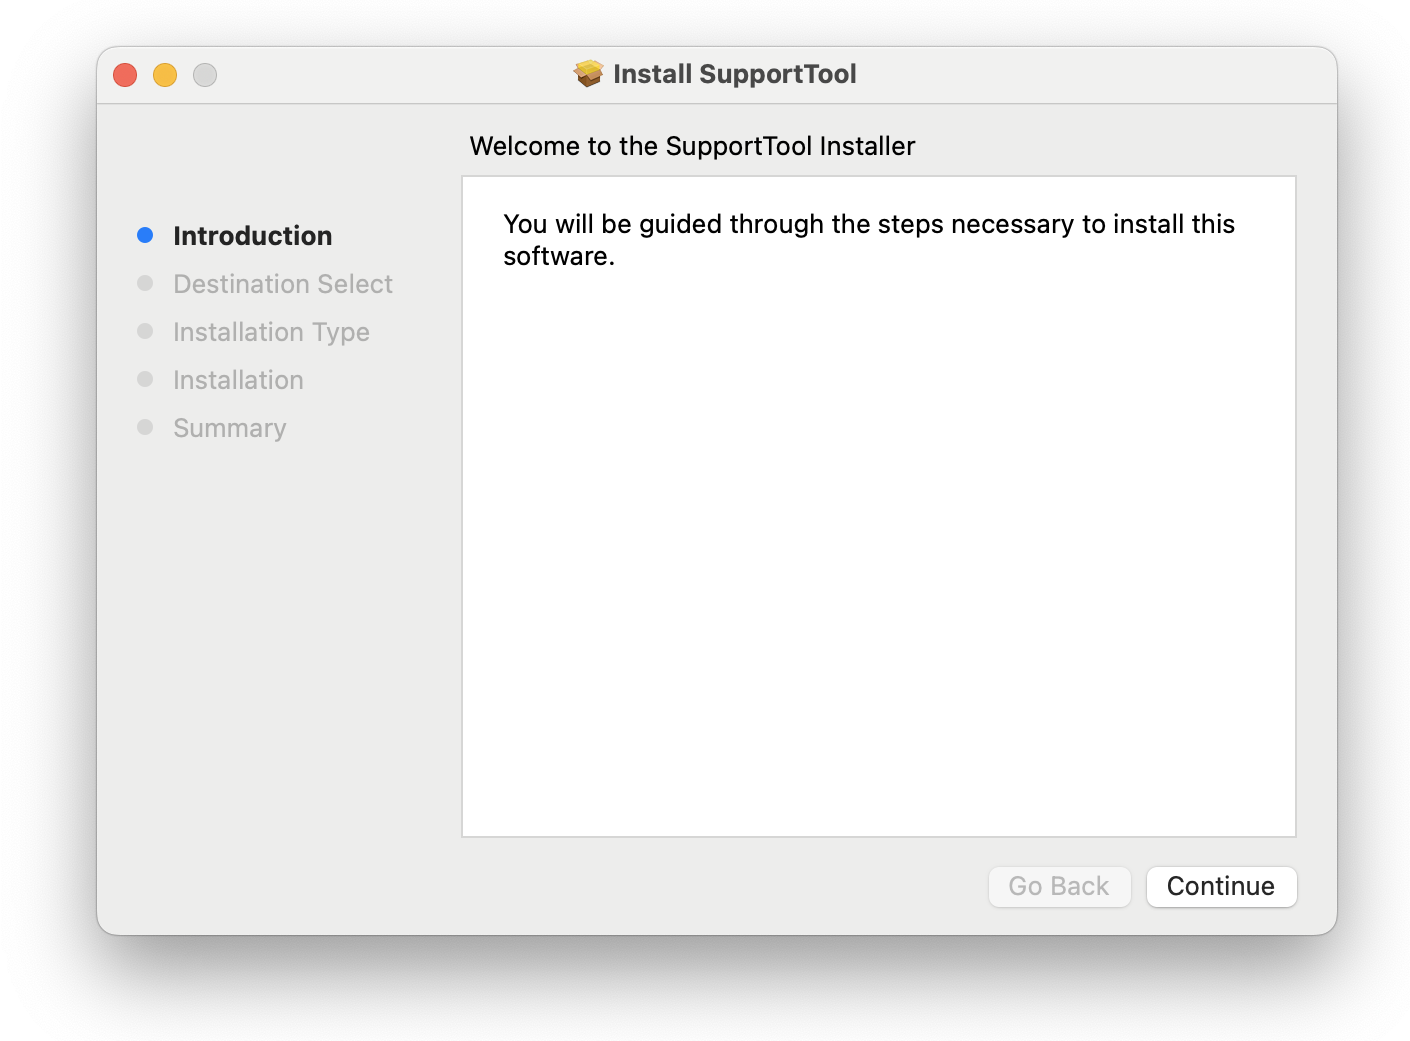
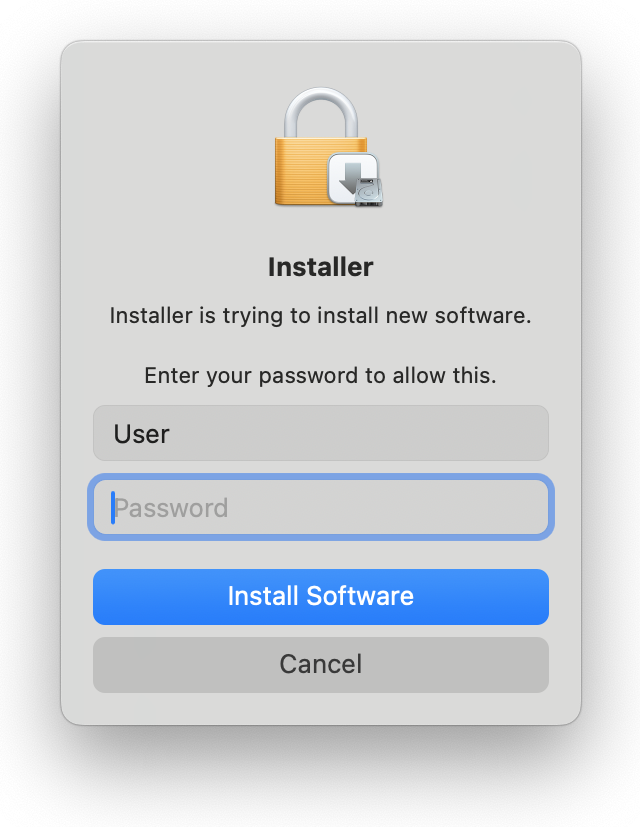
Next, press Continue then Install. You'll be asked to provide your administrator password.
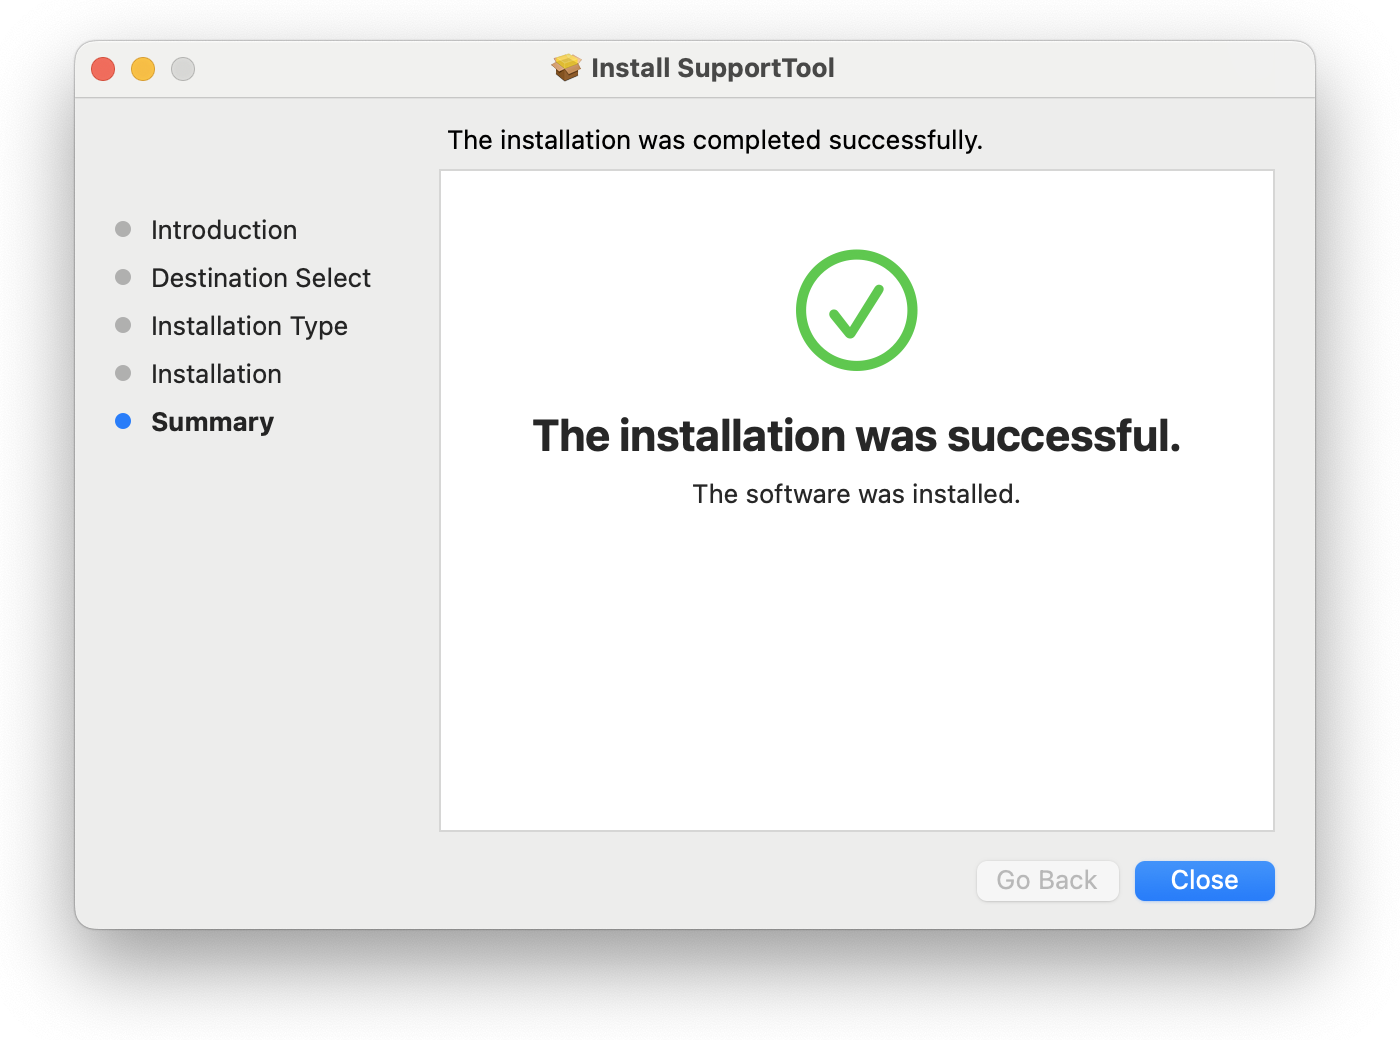
When the installation completes, you'll see a success message:
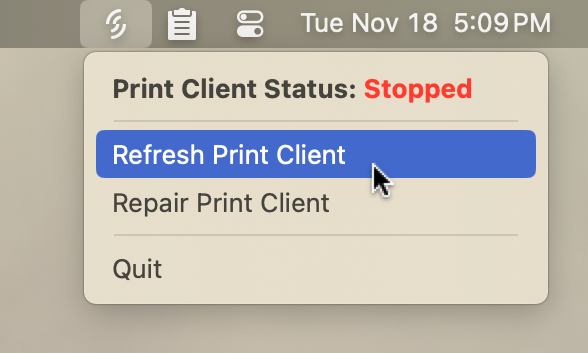
Now you'll see the Support Tool running at the right side of your menu bar, at the top of your screen:

Refresh Print Client - Mac
If you find that your printer disconnects and goes offline you will want to install the Support Tool which will help you get back up and running.
Installation instructions can be found here: Support Tool: Installation
Restarting the Printer using the Refresh Tool
With the Support Tool installed, anytime you find your print client offline (indicated by "PC Offline"):
Simply click on the Support Tool icon in your menu bar, then click Refresh Print Client.
You'll see a progress window which will notify you when the refresh is complete:
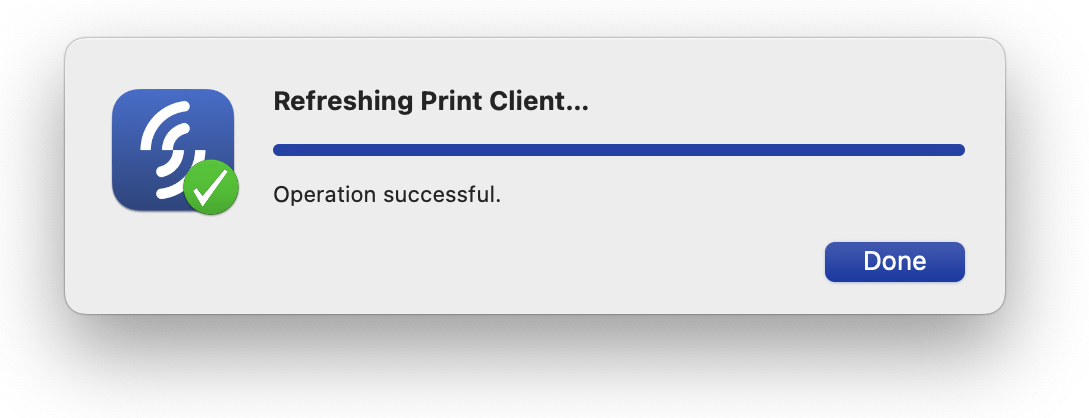
Press Done to close this window, then wait up to 30 seconds and your printer should reconnect.
Repair Print Client - Mac
If the Print Client can't be refreshed, it often indicates an error with the installation. You can use the Repair Print Client option to resolve this issue.
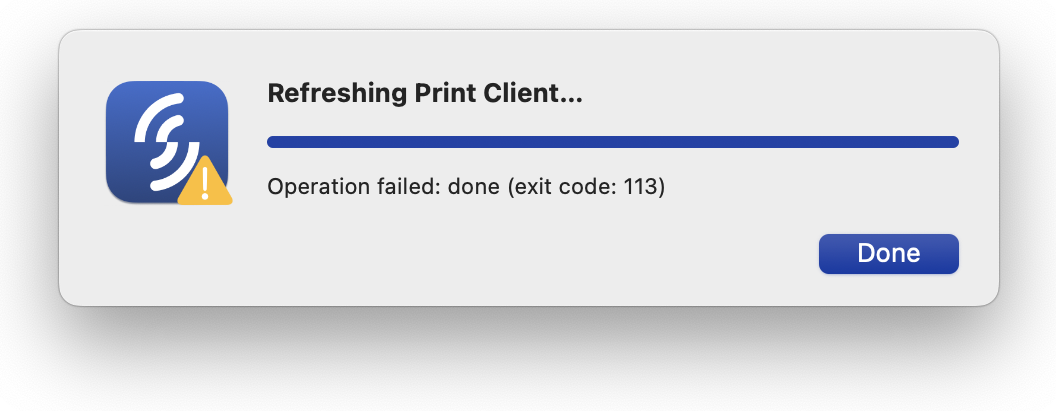
Open the Support Tool on your menu bar, and select the Repair Print Client option:
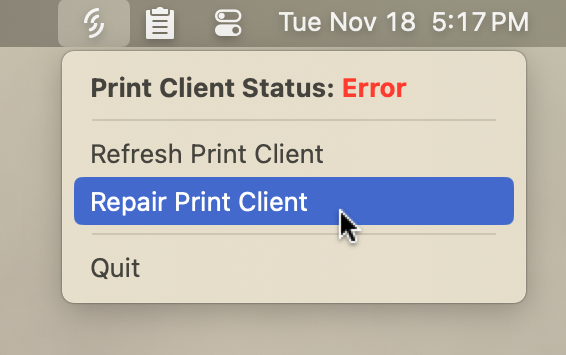
You'll see a progress window with the steps the repair function is completing. Note that depending on your computer's internet speed and performance, the "Downloading installer..." and "Running Print Client installer..." steps may take a couple of minutes.
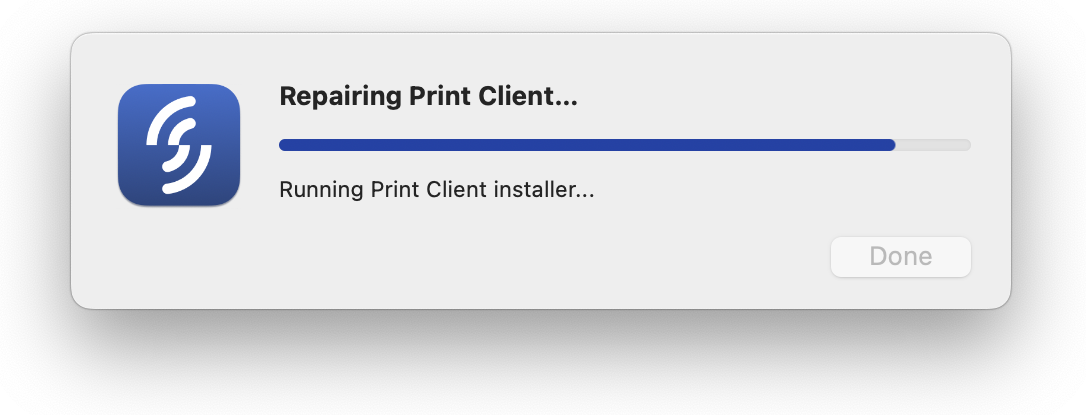
When the repair is complete, the progress window will indicate success:
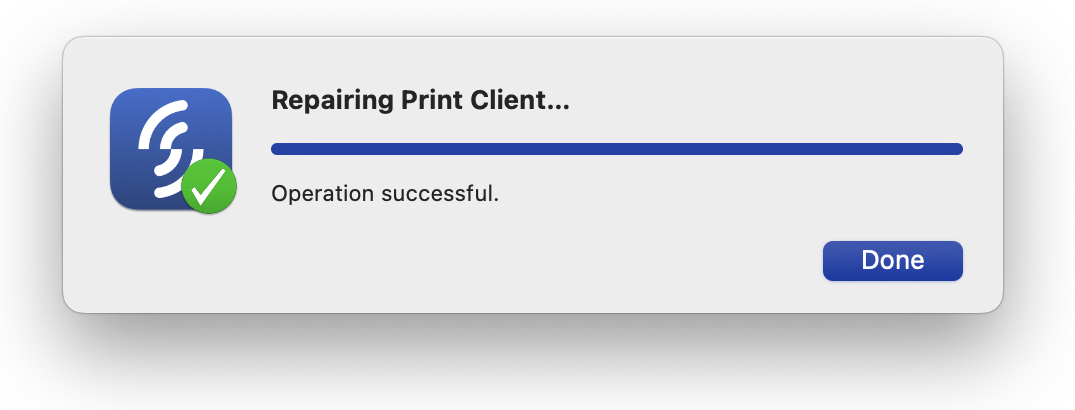
The Print Client should be online and ready to print.
Uninstall Print Client
This article covers the problem with uninstalling the Print Client on Windows 10 and Windows 11 systems.
This error will prevent a new version of the print client from being installed and functioning properly.

First step is to uninstall the Support Tool.
Via Settings -> Apps -> Installed apps.


Or by using the Windows Search and typing "Add or remove programs".

Download the official Program Install and Uninstall troubleshooter from Microsoft.

Launch MicrosoftProgram_Install_and_Uninstall.meta.diagcab

Click Advanced.

Uncheck Apply repairs automatically.

Choose Uninstalling.

Select Simple RFID Print Client Updater and click Next.

Choose Yes, try uninstall.

Make sure that Uninstall and cleanup? is checked. Click Next.

The resolve process might take up to 2 minutes.

Once the resolve process is done, the following screen will appear.

After it's done, you will need to reinstall the Support Tool from here.
The Support Tool will automatically install the Print Client once launched.


The Print Client is now installed correctly.

Troubleshooting
Contact Support
Creating a ticket is the preferred way to contact us
Create a Ticket
The quickest way to contact support is by creating a ticket. You will put in your email and information, and you will receive an email from us within 2 hours. To create a ticket, you can click on the Support button in the top right of the Simple RFID Web Portal

It will bring you to this link
https://support.simplerfid.com/support/tickets/new
Email Support Directly
You can email support@simplerfid.com with any problems you have. The response could take a bit longer than creating a ticket.
Printing Issues
Printer Offline
If you're unable to print, follow these steps to troubleshoot. After each step, check to see if you can print; if you still can't, then move on to the next step.
Before you start, take the time to identify your printer model so you know which instructions apply to you.
Step 1: Make sure the printer isn't paused.
Printers will not print if they're paused. Depending on the model of your printer, you'll see different indicators if the printer is paused.
T800: "OFFLINE" in top-right corner

The OFFLINE text means the printer is paused. Unpause it using the green pause button [ I I ] below the screen.
ZD621R: Pause indicator above screen

If the PAUSE light is lit up yellow, the printer is paused. Unpause it using the Pause button [ I I ] to the right of the screen.
ZD500R: PRINTER PAUSED message flashing on screen
If the printer's screen flashes PRINTER PAUSED, unpause it using the Pause button [ I I ] to the right of the screen.
Step 2: Refresh the Print Client.
Using the Support Tool, select the Refresh Print Client option.
If you haven't installed the Support Tool, follow these instructions:
Windows: https://kb.simplerfid.com/books/support-tool/page/installation
Mac: https://kb.simplerfid.com/books/support-tool/page/support-tool-installation-mac
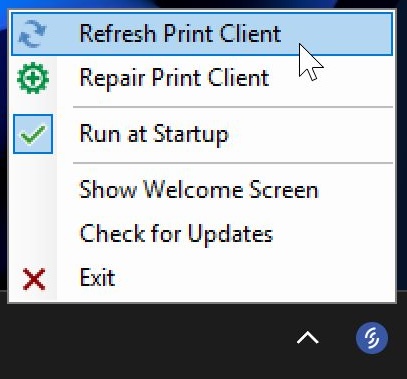
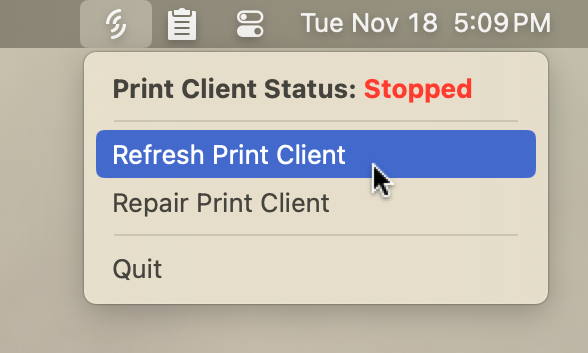
If you find that you have to Refresh the Print Client often, it may help to adjust the sleep settings on your host PC.
Mac:
https://kb.simplerfid.com/books/support-tool/page/refresh-print-client-mac
Step 3: If using USB, check the printer's USB connection.
Occasionally, the Host PC will put certain USB ports to sleep in order to save power.
Unplug the USB cable from both ends then plug it back in.
Please make sure that no USB hubs are used.
If you suspect or find your cable damaged, you can take the cable (USB A>B) from a regular inkjet/laser printer.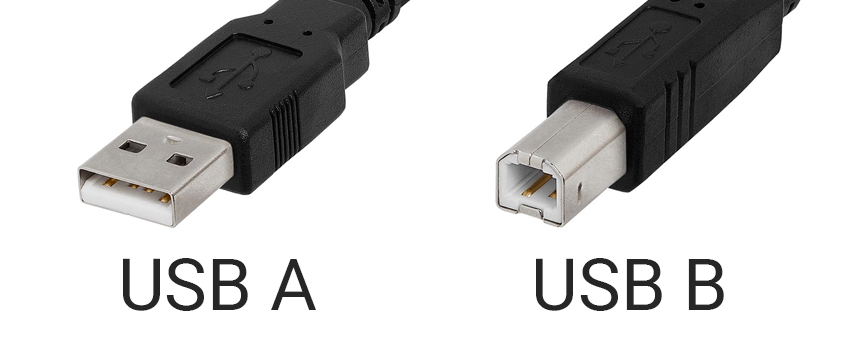
Step 4: Power cycle the printer.
Printers can encounter software errors which cause them to stop responding to the host.
Turn the printer off for 30 seconds, then turn it back on.
- T800: Turn the printer off using the power switch on the back.
- ZD621R: Turn the printer off by holding down the Power button to the left of the screen.
- ZD500R: Turn the printer off using the power switch on the back.
Step 5: Check your PC internal storage drive.
SSD or HDD malfunction or insufficient storage can make Print Client not operate properly.
Check health of your internal storage device and, if needed, replace it.
If a new OS instance is installed, please follow this article: Installing Print Client
Step 6: Repair the Print Client.
Repairing the print client will download and run the installer in order to write over any parts of it that may have been damaged. This is particularly useful if the Refresh Print Client option throws an error.
Please make sure you are using the latest version of the Support Tool; previous versions will reset your station pairing, meaning you will need to contact support to re-attach your station if you use the Repair function on those older versions.
Mac:
https://kb.simplerfid.com/books/support-tool/page/repair-print-client-mac
Wait a few minutes after the repair process completes for your station to come online. If you continue to face issues, please contact support.
Reset Your Printer to Factory Defaults
If you have a printer error due to running out of tags or ribbons, or if it prints "VOID" after calibration, you will want to reset the printer to factory defaults.
This article outlines the process of resetting each printer model to factory default settings.
Printronix Printers
Unlike Zebra printers, Printronix printers require extra configuration after resetting to factory defaults; for this reason, we don't recommend this as a solution for printing issues.
Please contact support if you are experiencing an issue with your Printronix printer that is not solved by calibrating.
Reset the printer to Factory Defaults
1. Turn off the printer
2. Hold Left and Bottom arrow buttons
3. Turn on the printer while holding these buttons
4. Release the buttons after 10-15 seconds after turned on
5. Press Enter key
6. Go to Misc.tools
7. Select Erase All NVRAM
8. Turn the printer off, wait about 10-15 seconds, and then turn it back on.
9. Select the country if asked (e.g. EU)
10. Press green "Pause" button twice if "Redo Calibration" error occurs
11. Configure your printer according to this article: Configuring Your Printronix Printer after a Reset
12. Calibrate the printer (follow this article Calibrate the Printer from the Web Portal or Calibrate manually (Calibrate the printer directly))
Zebra Printers
Desktop Models
ZD500R
- After starting the printer, press the home button
- Using the arrows, navigate to the right and select the “Tools” menu
- In the Tools menu, press the right arrow six times until you see “LOAD DEFAULTS FACTORY”
- Click the button under “LOAD”
- This will reset the printer to factory defaults
- Recalibrate the printer
ZD621R
- After starting the printer, use the touchscreen to click "Menu"
- On the left side of the screen, click "Settings"
- Scroll down and click "Restore Defaults"
- Click on "Restore Printer" and accept the prompt
- This will reset the printer to factory defaults
- Recalibrate the printer
Industrial Models
ZT410R
- After starting the printer, press the Home button
- Using the arrows, navigate to the right and select the Tools menu
- In the Tools menu, press the right arrow six times until you see “LOAD DEFAULTS FACTORY”
- Click the “LOAD” button
- This will reset the printer to factory defaults
- Recalibrate the printer
ZT411R
- After starting the printer, use the touchscreen to click "Menu"
- Click on "Settings"
- Click "Restore Defaults"
- Click on restore printer and accept the prompt
- This will reset the printer to factory defaults
- Recalibrate the printer
R110Xi4
- After starting the printer, use the touchscreen to click "Settings"
- Turn the printer off. Then hold down the Pause & Feed buttons while turning on the printer. Keep these two buttons pressed until the “BLOCK” message appears, releasing them
- This will reset the printer to factory defaults
- Recalibrate the printer
Cross Encoding
What is cross encoding? It's when a printer prints the
Adjusting the Sleep settings on your host PC
If your host PC keeps disconnecting from the Simple RFID website it's likely that your host PC is going to sleep. Here's how to prevent it.
Windows 11
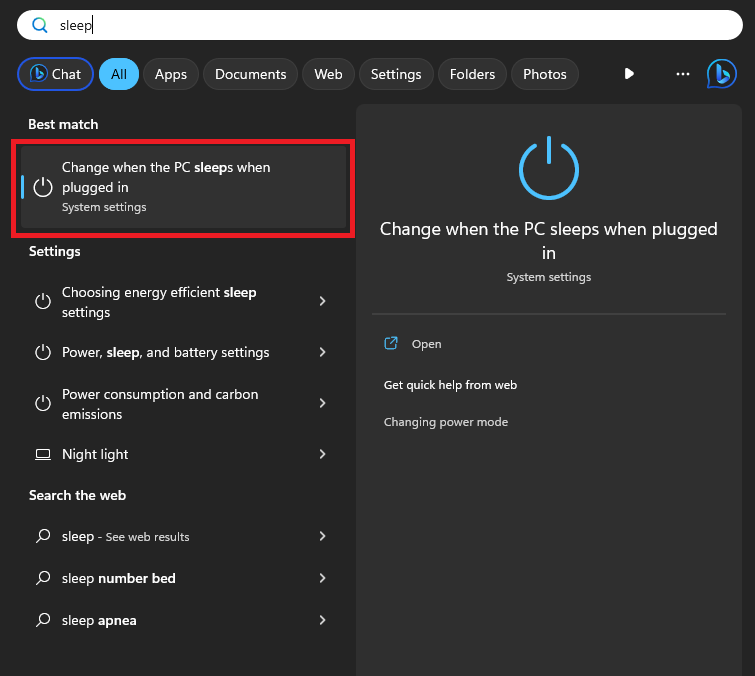
- From the Windows start menu, search "Sleep" and click the following result:
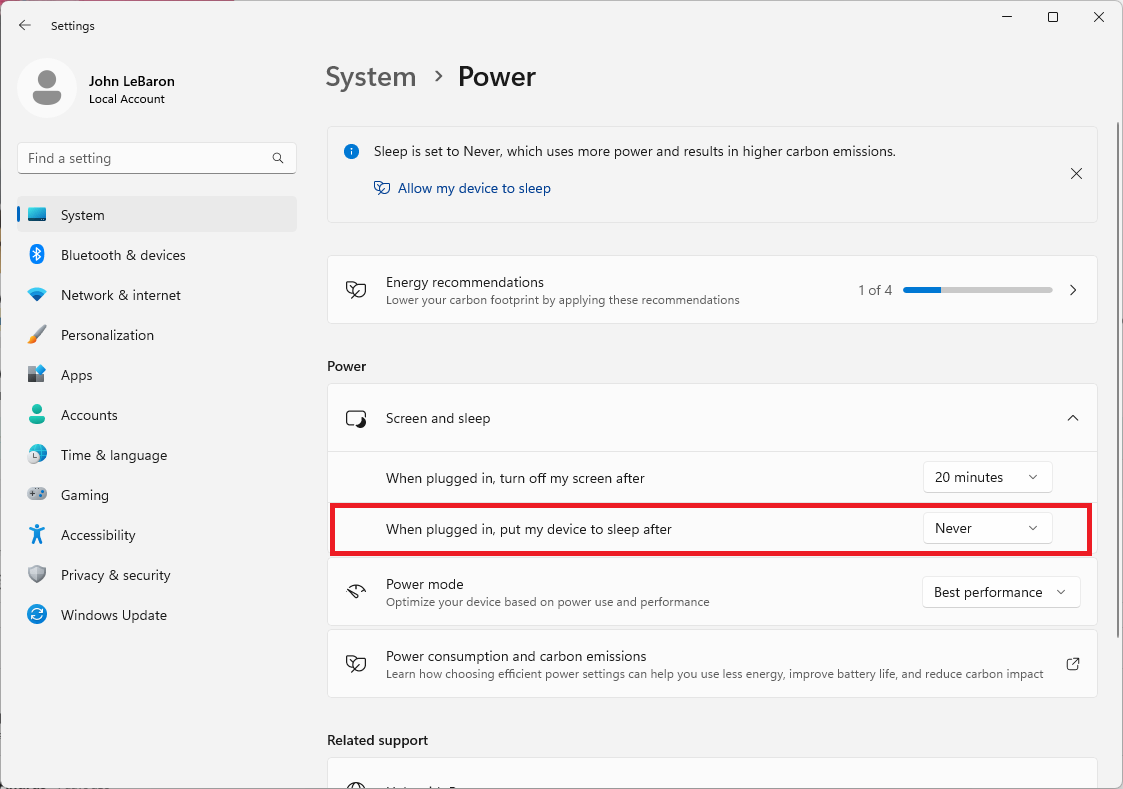
- In the Settings window that appears, set "When plugged in, put my device to sleep after" to "Never":
Windows 10
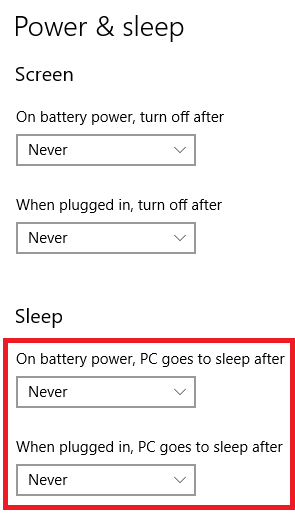
- From the Windows start menu search "Sleep"
- Then in the Settings section set the Sleep options to "Never"
VOIDS
If you see the work "VOID", or a cross-hatch pattern printed across your labels, you will need to perform a calibration.
The default is to only allow Printers to print 3 VOIDS before pausing.
An RFID printer may mark a label as VOID when it encounters issues during the encoding or verification process of the RFID tag. Here are the main reasons this can happen:
RFID Chip Encoding Failure
- The printer tries to write data to the RFID chip, but the write operation fails.
- Causes:
- Defective RFID chip.
- Poor tag placement or misalignment.
- Electrical interference.
RFID Chip Read Failure (Post-Write Verification)
- After encoding, the printer attempts to read back the tag to verify the data was written correctly.
- If the read fails or the data doesn't match, the printer voids the label.
- Common causes:
- Weak tag signal.
- Tag too far from the antenna in the printer.
- Shielding or interference from surrounding materials.
Tag Not Detected
- The printer expects an RFID tag in a label but doesn't detect one.
- This happens when:
- The label lacks an inlay (non-RFID label mistakenly loaded).
- The inlay is out of position relative to the antenna.
- The tag is outside of the printer’s RFID read/write field.
Dirty or Damaged Printhead or Antenna
- A dirty or misaligned antenna can lead to failed encoding.
- This sometimes triggers the VOID process, especially on sensitive settings.
Printer Settings or Configuration Issues
- Mismatched label size, tag type, or encoding format (e.g., wrong EPC scheme).
- Incorrect RFID calibration.
- GS1 SGTIN-96 format errors if strict compliance is required.
Firmware or Software Errors
- If the label format or encoding instruction sent to the printer is corrupted or incomplete, it may cause a void.
- Certain printers have logic to void tags if encoding instructions are incompatible.
Lock Status or Tamper Detection
- If the tag has been previously locked or has tamper detection enabled, the printer may not be able to encode it and will void the label.
If you're seeing excessive VOID tags, it's usually best to:
- Run a calibration on the printer.
- Check the tag placement and ensure that the sensors are in the correct position.
- Ensure the information being encoded does not exceed the tag's EPC memory bank
- Zebra printers only: Reset the printer to factory defaults.
macOS: Troubleshooting the Print Client
UPDATE: The macOS version of the Support Tool has been released, which provides quick access to Refresh and Repair functions. In most cases you should use the Support Tool rather than the commands below.
Introduction
The macOS Print Client is currently in beta. As such, it has a couple of known issues:
- The print client will not run if certain USB storage devices are plugged into the Mac
- The print client does not support Printronix printers via USB; use a network connection
Troubleshooting
The following commands can be copy/pasted into Terminal to take action on the print client.
These commands require Administrator access to the Mac. When using sudo, you'll periodically be prompted for your password in order to escalate your privileges. These commands can also be used in a root shell by omitting sudo.
As always, please exercise caution when using the terminal, especially with elevated privileges. Make sure you fully understand any command you're using, otherwise you may damage your system.
Get ClientId from PrintClientDatabase
The ClientId is the station's unique identifier when communicating with our servers. This value can be useful for identifying a station when troubleshooting.
sudo sqlite3 /var/root/Library/Application\ Support/Simple\ RFID/PrintClient/PrintClientDatabase.db "SELECT ClientId from RegistrationData"Refresh Print Client
sudo launchctl kickstart -k system/com.simplerfid.printclientThe print client (and its updater) are handled as services by launchd in macOS. The above command instructs launchd to refresh the print client by "kickstarting" the process, with -k indicating that the process should be killed if it is already running.
If you receive the error Could not find service "com.simplerfid.printclient" in domain for system, the print client is not installed, or has been manually disabled. Install or re-enable the print client to continue.
Disable Print Client
sudo launchctl bootout system/com.simplerfid.printclient
sudo launchctl bootout system/com.simplerfid.printclient.update
sudo launchctl bootout system/com.simplerfid.printclient.updater.selfupdateThese three commands stop the print client and its updater processes, and unload the services from the system domain. This will prevent the print client from starting or updating automatically.
While not recommended, these commands can also be used independently of each other to control specific components.
Re-enable Print Client
sudo launchctl bootstrap system /Library/LaunchDaemons/com.simplerfid.printclient.plist
sudo launchctl bootstrap system /Library/LaunchDaemons/com.simplerfid.printclient.update.plist
sudo launchctl bootstrap system /Library/LaunchDaemons/com.simplerfid.printclient.updater.selfupdate.plistThese three commands load the print client and updater services back into the system domain, effectively re-enabling them all. Since these services are not currently in the domain, we provide the full path to each service's plist.
After this is complete, launchd will continue launching these services automatically on their respective intervals.
Run Print Client manually
(cd "$(printf '%s\n' /Applications/SimpleRfid/PrintClient.[0-9]* | sort -V | tail -n1)" && sudo ./SimpleRFID.PrintClient)The parentheses start a subshell where we temporarily cd into the target directory, run the command, and then automatically return to the original directory when the subshell exits.
The print client should function exactly the same as if it was started by launchd, except you may be able to see some output from the application, for troubleshooting purposes. If you close the terminal window or press Ctrl-\, the process will terminate.
Uninstall Print Client
: # Unload the services from the system domain
sudo launchctl bootout system/com.simplerfid.printclient
sudo launchctl bootout system/com.simplerfid.printclient.update
sudo launchctl bootout system/com.simplerfid.printclient.updater.selfupdate
: # Delete the plist files defining the services
sudo rm -f /Library/LaunchDaemons/com.simplerfid.printclient.plist
sudo rm -f /Library/LaunchDaemons/com.simplerfid.printclient.update.plist
sudo rm -f /Library/LaunchDaemons/com.simplerfid.printclient.updater.selfupdate.plist
: # Delete the SimpleRfid folder in /Applications containing the print client and updater
sudo rm -rf /Applications/SimpleRfid
: # Delete temporary files
sudo rm -rf "/tmp/Simple RFID"
: # Delete the receipts for previous installs
pkgutil --pkgs | grep com.simplerfid.printclient.updater | xargs -n1 sudo pkgutil --forgetThese commands should remove the print client from your system. You can always install the print client again using the installer from the Resources page on the web portal.
Clear the Print Client's local database
Don't do this unless you've been instructed to by our support team. Clearing the database will require us to re-assign the station to your account and you won't be able to print until then.
sudo rm -rf "/var/root/Library/Application Support/Simple RFID"Download and install Print Client via command line
: # Download the latest installer from GitHub
curl -L0 -o /tmp/PrintClient.Updater.arm64.pkg https://github.com/simplerfid/printclient-updater/releases/latest/download/PrintClient.Updater.arm64.pkg
: # Run the installer
sudo installer -pkg /tmp/PrintClient.Updater.arm64.pkg -target /These commands download the latest installer and run it from the command line with no GUI.
Depending on your internet speed, your terminal may sit for a while at installer: Installing at base path / while the updater downloads the latest print client files. When the process is complete, you should see installer: The install was successful.
Printing Alignment Issues
Uninstalling the Support Tool
It may be necessary to reinstall the Support Tool to ensure you have the latest version on your computer.
To do this, log in to the computer that has the Support Tool installed. Then go to Settings > Apps > Installed apps
In the search bar that says "Search apps", type in "Simple RFID Support Tool".

Older versions of the Support Tool were named "Print Client Refresh Tool". If "Simple RFID Support Tool" does not pop up, then try this name. If neither of the names shows anything, then go straight to downloading the Support Tool here: https://kb.simplerfid.com/books/support-tool/page/support-tool-installation-windows
Click on the 3 dots on the right, and select "Uninstall". Now install the support tool and refresh the Print Client.
Please note that this will create a new Printer Station, so you will need to contact support here: https://support.simplerfid.com/support/tickets/new
Troubleshooting USB Connection
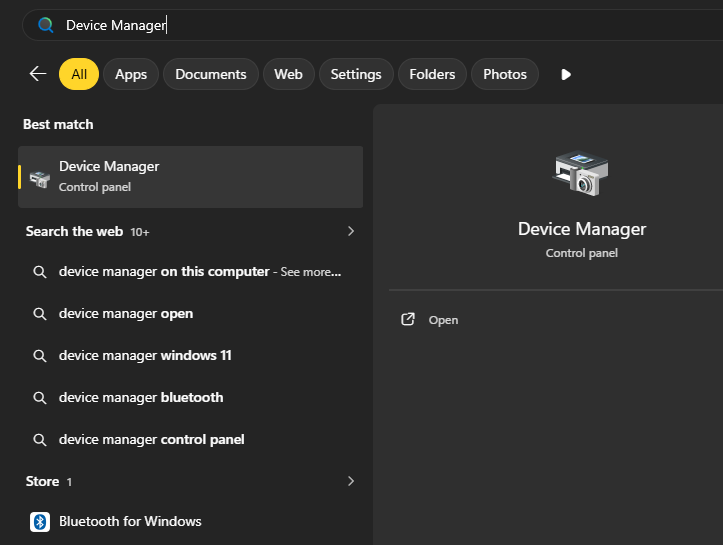
In the Windows Search bar, type Device Manager and open it.
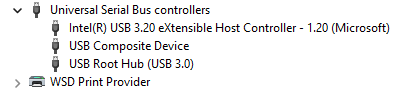
Expand the Universal Serial Bus controllers section in the Device Manager window.

Right-click the device with the warning icon, which is USB Root Hub (USB 3.0), and click Disable device.
Wait a couple of seconds for the same device to appear with the "down arrow" icon, then right-click it and select Enable Device.

a couple of seconds for the same device to appear with the "down arrow" icon, then right-click
Now, the USB Root Hub (USB 3.0) should appear with the regular icon and work properly.
Troubleshooting Printer Network Connection
I'm trying to network my Printronix printer to my network but it's showing no IP address, only 000.000.000.000
An IP address of 000.000.000.000 means the Printronix isn't getting an IP address from your network. In most cases, either the Ethernet connection isn't actually established or the printer is set to DHCP but isn't receiving an address from the router.
Since you're networking one of your Printronix RFID printers, I'd check it in this order:
First: Make sure that you have a stable internet connection.
- Check the Ethernet cable first. Make sure it's connected from the printer's Ethernet/LAN port directly to your router, switch, or an active wall jack. Look at the Ethernet port on the back of the printer—you should normally see link/activity lights. If there are no lights, that's our first clue.
- On the printer display, go into Settings/Configuration → Network → Ethernet (the exact wording varies by T-Series vs. TH-Series).
- Make sure Ethernet is enabled and the IP assignment is set to DHCP / Automatic, not Static.
- If DHCP is already enabled, restart the printer with the Ethernet cable connected and give it about 60–90 seconds after it fully boots.
- Check the network/IP screen again. You want something like
192.168.1.123,192.168.0.123, or10.x.x.xinstead of000.000.000.000.
RFID Scan Troubleshooting Guide
Before following these troubleshooting steps, make sure you have the latest version of the app installed; search the App Store or Play Store for an update.
Additionally, if using a TSL reader, please follow these troubleshooting steps (including updating the firmware) to eliminate potential hardware issues.
When troubleshooting RFID performance, test one variable at a time. Isolating each potential cause makes it easier to identify the root of the problem and prevents multiple changes from masking the actual issue. This systematic approach leads to faster, more accurate troubleshooting.
Issue: Tag is scanning as "Unknown"
This issue relates to scans displaying an SGTIN string (for example: sgtin-96:511099.0001804.1) instead of product names
Possible Causes:
- Product does not exist in Simple RFID
- Mobile app product database is out of date
Troubleshooting Steps:
- Confirm that the product appears in the Products page of the web portal.
- If the product doesn't appear, try reimporting from the partner system.
- If using Shopify:
- From the mobile app: Force Reload Products
Issue: Tags Are Scanning Incomplete or Not at All
This issue occurs when tags do not appear in scan results.
Possible Causes:
- Tag persistence is in effect
- The tag is damaged
- The tag was not encoded properly
- The tag is applied to or placed on signal-disruptive materials
- Tags are tightly packed or touching one another
- Material is shielding the tag from seeing the RF signal
- Duplicate serial numbers exist, making multiple tags
Troubleshooting Steps:
1. Test for Tag Persistence
- Wait approximately 1 minute (sometimes may take up to 5 minutes) and attempt to scan the tag again.
- If the tag scans successfully after waiting, the issue is likely related to tag persistence.
Use scanning mode "Speed" to avoid tag persistence
2. Test on a Neutral Surface
- Move the tag to a neutral surface and attempt another scan.
- If the tag scans successfully, the original surface or environment is likely causing interference.
A neutral surface is any surface confirmed not to interfere with RFID signals. To verify a neutral surface, test it using a known working RFID tag first.
3. Use the EPC Read Feature
- Use the EPC Read feature in the mobile app to directly read the tag’s EPC value.
- If an EPC value appears:
- Check if the tag is encoded. If it begins with "E2" then it has not been encoded as a product.
- If no EPC value appears:
- The tag may be damaged.
- If an EPC value appears:
4. Check for Dense Tag Environments
Issue: Tag Performance Is Reduced or Inconsistent
This issue includes:
- Reduced read distance
- Inconsistent scans
- Tags only scanning from certain angles
- Tags requiring close-range scans when they normally scan from farther away.
- For example, tags that normally scan from 10 feet away may only scan from less than 1 foot away.
Possible Causes:
Troubleshooting Steps:
1. Identify Environmental Interference
- Determine whether performance issues occur only with specific products or materials.
- Questions to consider:
- Do tags scan properly on some items but not others?
- Does read range decrease on certain materials?
- Are scans inconsistent only in specific environments?
2. Test on a Neutral Surface
- Move the tag to a neutral surface and scan again.
- If performance improves, environmental interference is likely the cause.
A neutral surface is any surface confirmed not to interfere with RFID signals. Verify the surface using a known working RFID tag before testing.
3. Inspect Tag Placement
- Check the physical placement of the RFID tag.
- Avoid:
- Mounting tags directly on metal surfaces
- Placing tags underneath products
- Stacking RFID tags on top of each other
- Applying tags behind reflective packaging materials
- Reposition the tag and retest scan performance.
4. Confirm Reader Power
5. Perform an Audit
- Perform an audit to confirm accuracy (using an Integration)
- Perform an audit against Custom Source (such as a spreadsheet)
Additional Best Practices
- Test one tag at a time whenever possible.
- Compare against a known working tag to isolate environmental issues.
- Avoid folding, creasing, or damaging RFID tags during application.
- Keep tags separated when testing read performance.
- Use the same scanner and scan settings during troubleshooting for consistent results.
Windows Host
Resolving Login Errors | Windows 11
"401: You have no rights to access this. Please Login"
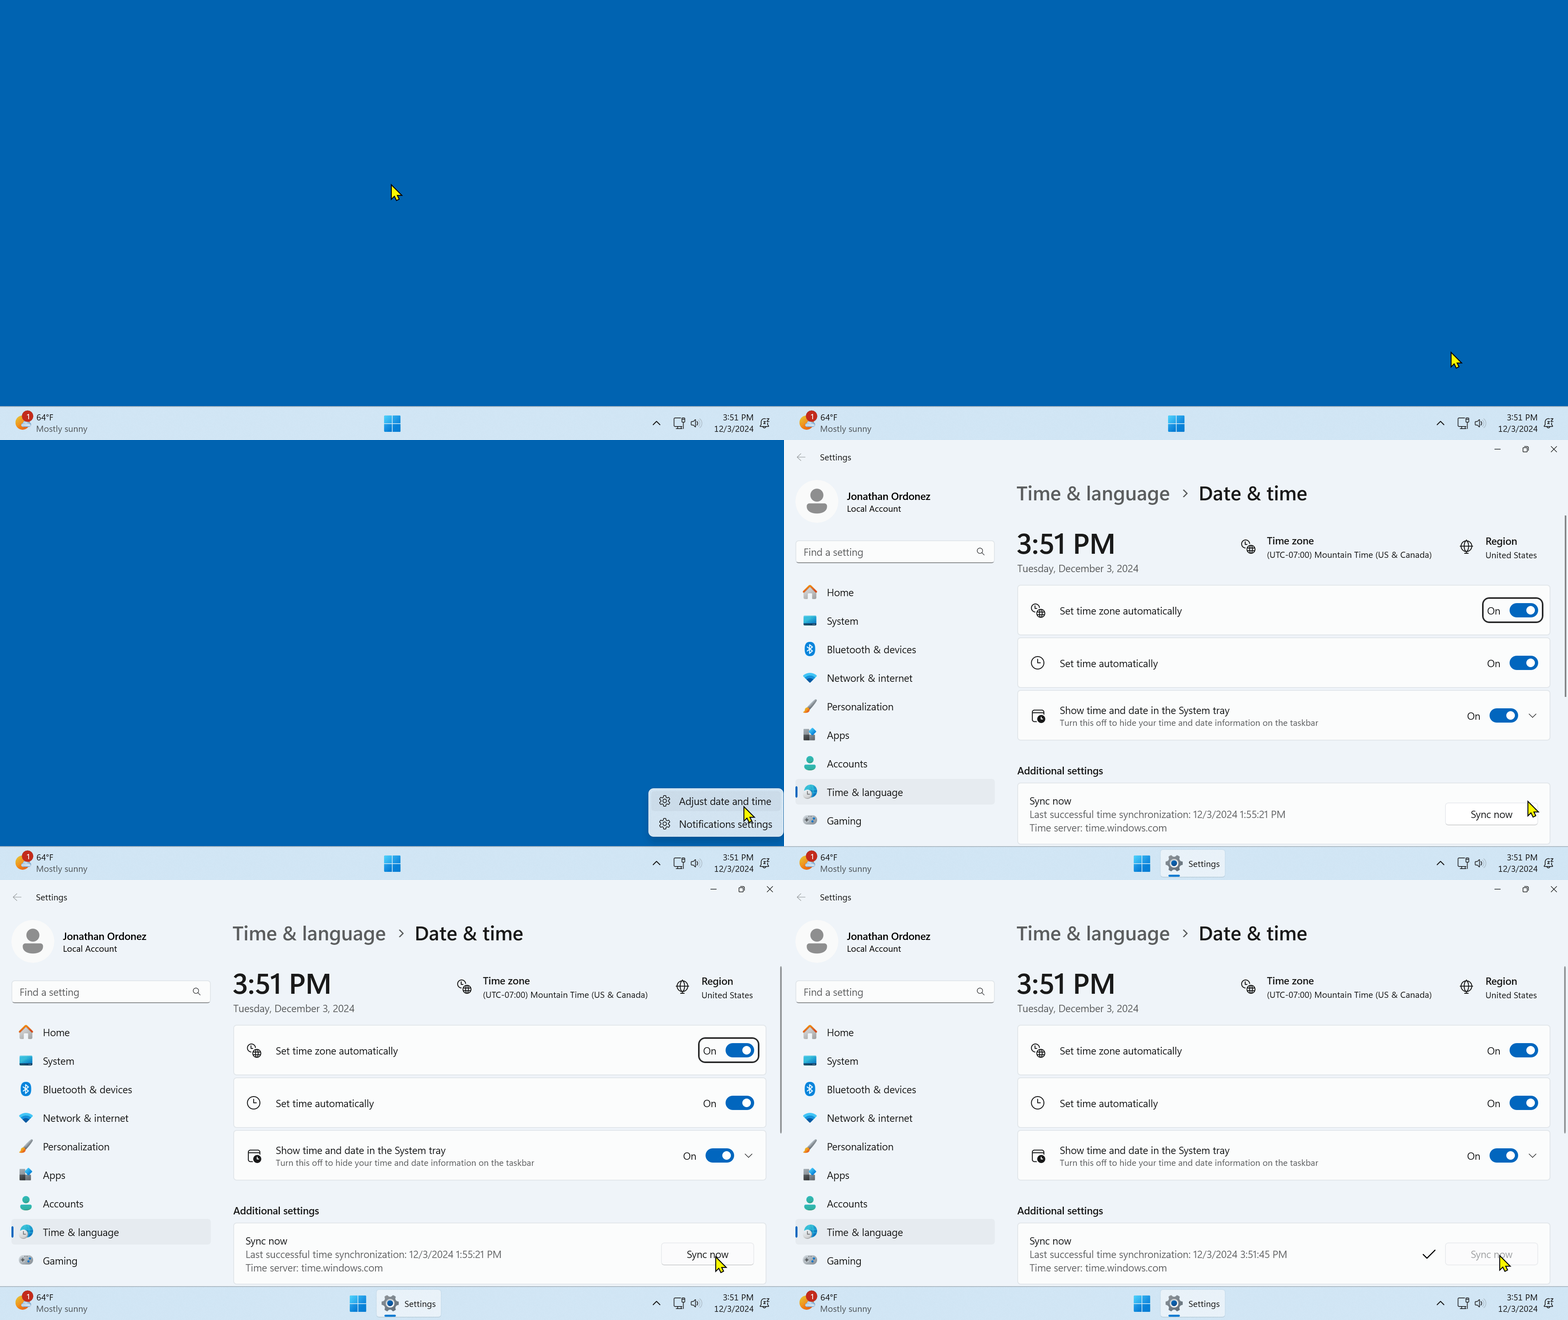
If you see this (401) error, please try logging in again using your email and password. If you still encounter this error, your computer's system time is probably set incorrectly.
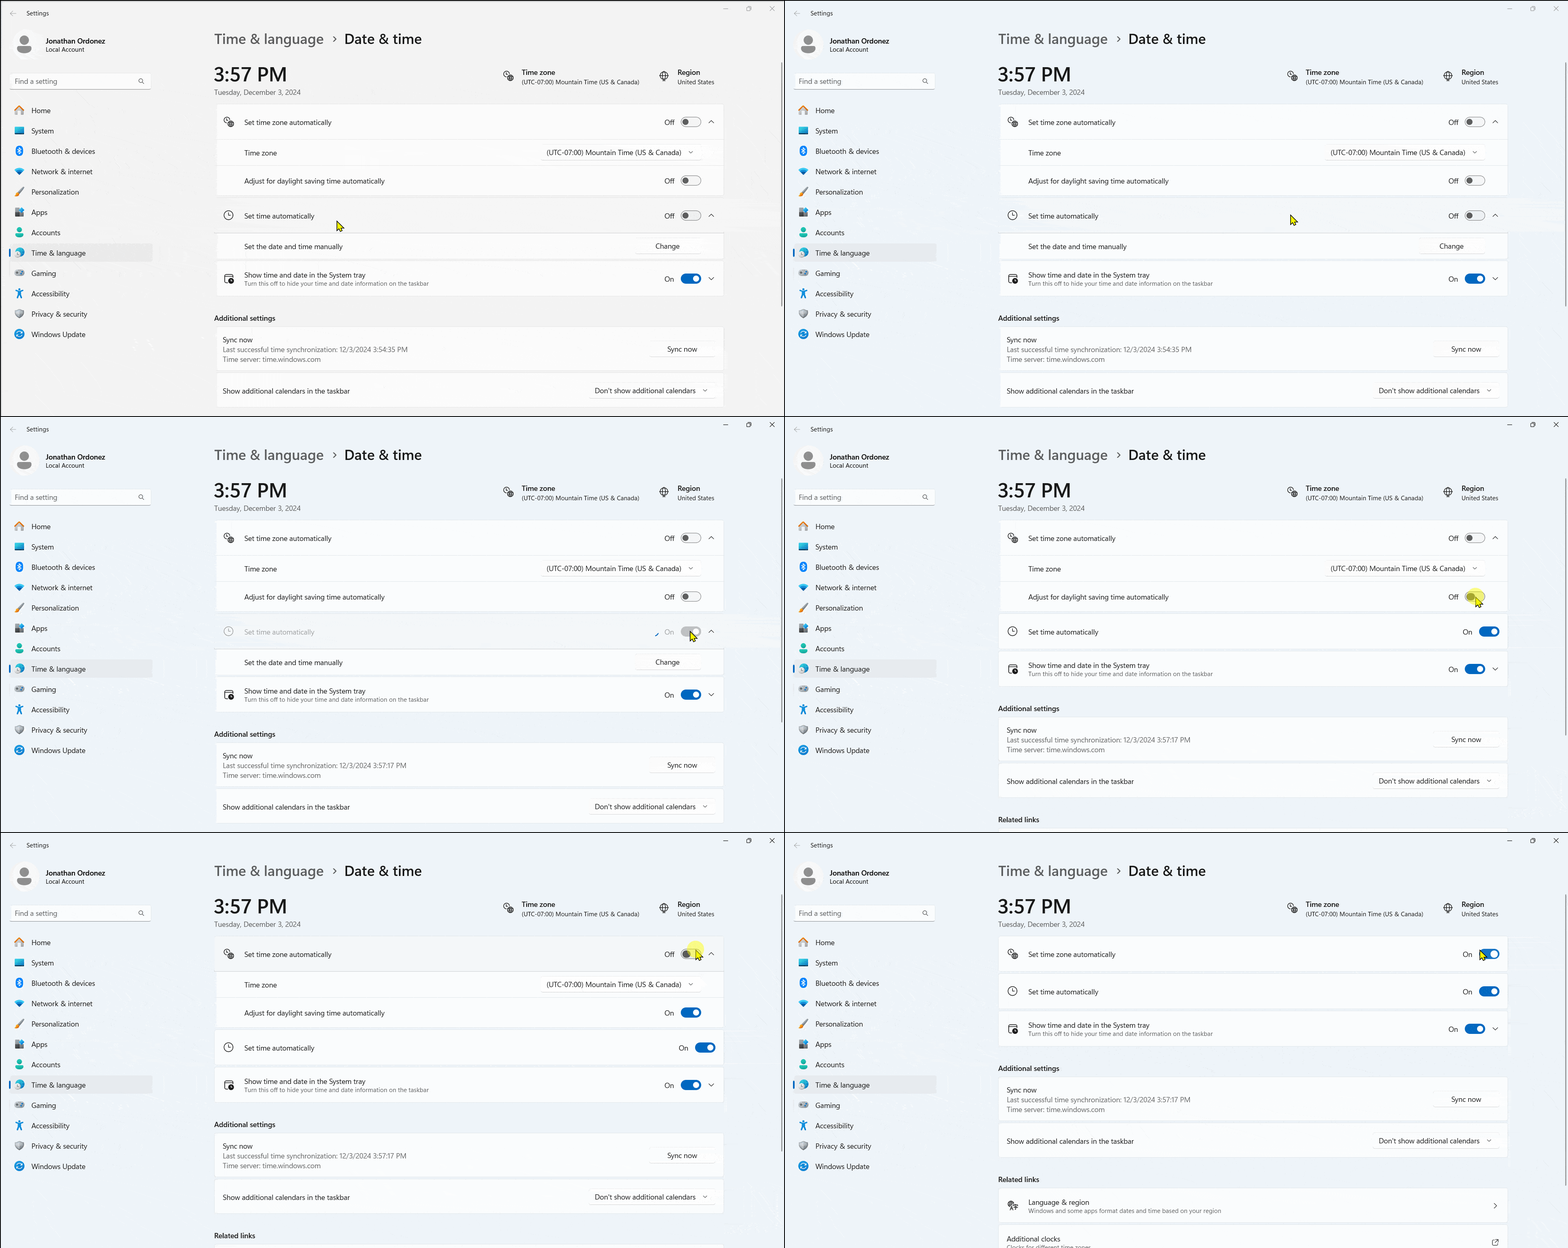
Follow these instructions to set your time:
Windows 11
Optional (Recommended)
1. If not already checked, turn on the toggles for 'Set time zone automatically' and 'Set time automatically' near the top of the window
Powering your Windows Surface Tablet
Use the Windows charger to power
Please ensure that the power is connected to a wall AC power source. If the power on the tablet is low Windows will halt processes which includes services (including the Simple RFID Print Client) which will make the printer offline.

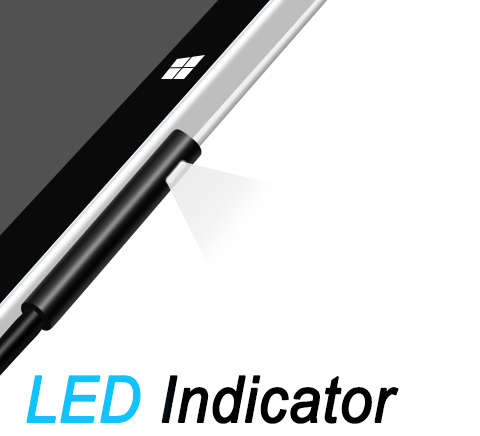
The charger uses a magnet to connect.

An LED indicator on the side of the charger will light up when connected.
The Surface tablets have just 1 USB port which is used to connect the printer, therefore the USB cannot be used to power the tablet.
Installing AnyDesk
Install AnyDesk
Installing AnyDesk and setting a password to allow unattended access allows Simple RFID to help guide you through the printer set-up process as well as troubleshoot issues.
- Install the software.
Switching out of S mode in Windows
Windows 11 in S mode is designed for security and performance, exclusively running apps from the Microsoft Store. If you want to install an app that isn't available in the Microsoft Store, you'll need to switch out of S mode.
Windows 11 in S mode is only available in the Windows 11 Home edition. If you have the Pro, Enterprise, or Education editions of Windows 10 in S mode, Windows Update will not offer Windows 11 because S mode is not available in those editions of Windows 11. Therefore, if you have the Pro, Enterprise or Education editions of Windows 10 in S mode, you'll need to switch out of S mode to upgrade to Windows 11.
Switching out of S mode is one-way. If you make the switch, you won't be able to go back to Windows 10 or Windows 11 in S mode. There's no charge to switch out of S mode.
- On your PC running Windows 11 in S mode, open Settings > System > Activation.
- In the Switch to Windows 11 Pro section, select Go to the Store. (If you also see an "Upgrade your edition of Windows" section, be careful not to click the "Go to the Store" link that appears there.)
- On the Switch out of S mode (or similar) page that appears in the Microsoft Store, select the Get button. After you see a confirmation message on the page, you'll be able to install apps from outside of the Microsoft Store.
What is the ISN and what is the benefit of printing it on my tags?
The ISN is a valuable piece of data that can be printed on your labels. This article explains the advantages of printing it.
What is the ISN? The ISN is an acronym for Internal Serial Number and is the serial number programmed into the tag.
Benefits of ISN when Printing
Printing the ISN provides visual identification of the tag's programmed serial number, and can help to verify the exact tag's data when printing and scanning.
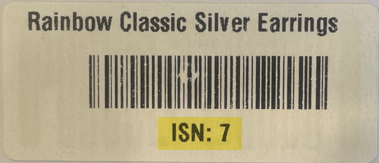
Where to View the ISN from The Web Portal
Printing Page
Printing
From the Printing page click the Print Job. This will open the Product & Tags view pop-out of the side menu.
The Product view appears on top and displays the range of serial numbers, the Tags view appears on the bottom and displays the ISN per tag.
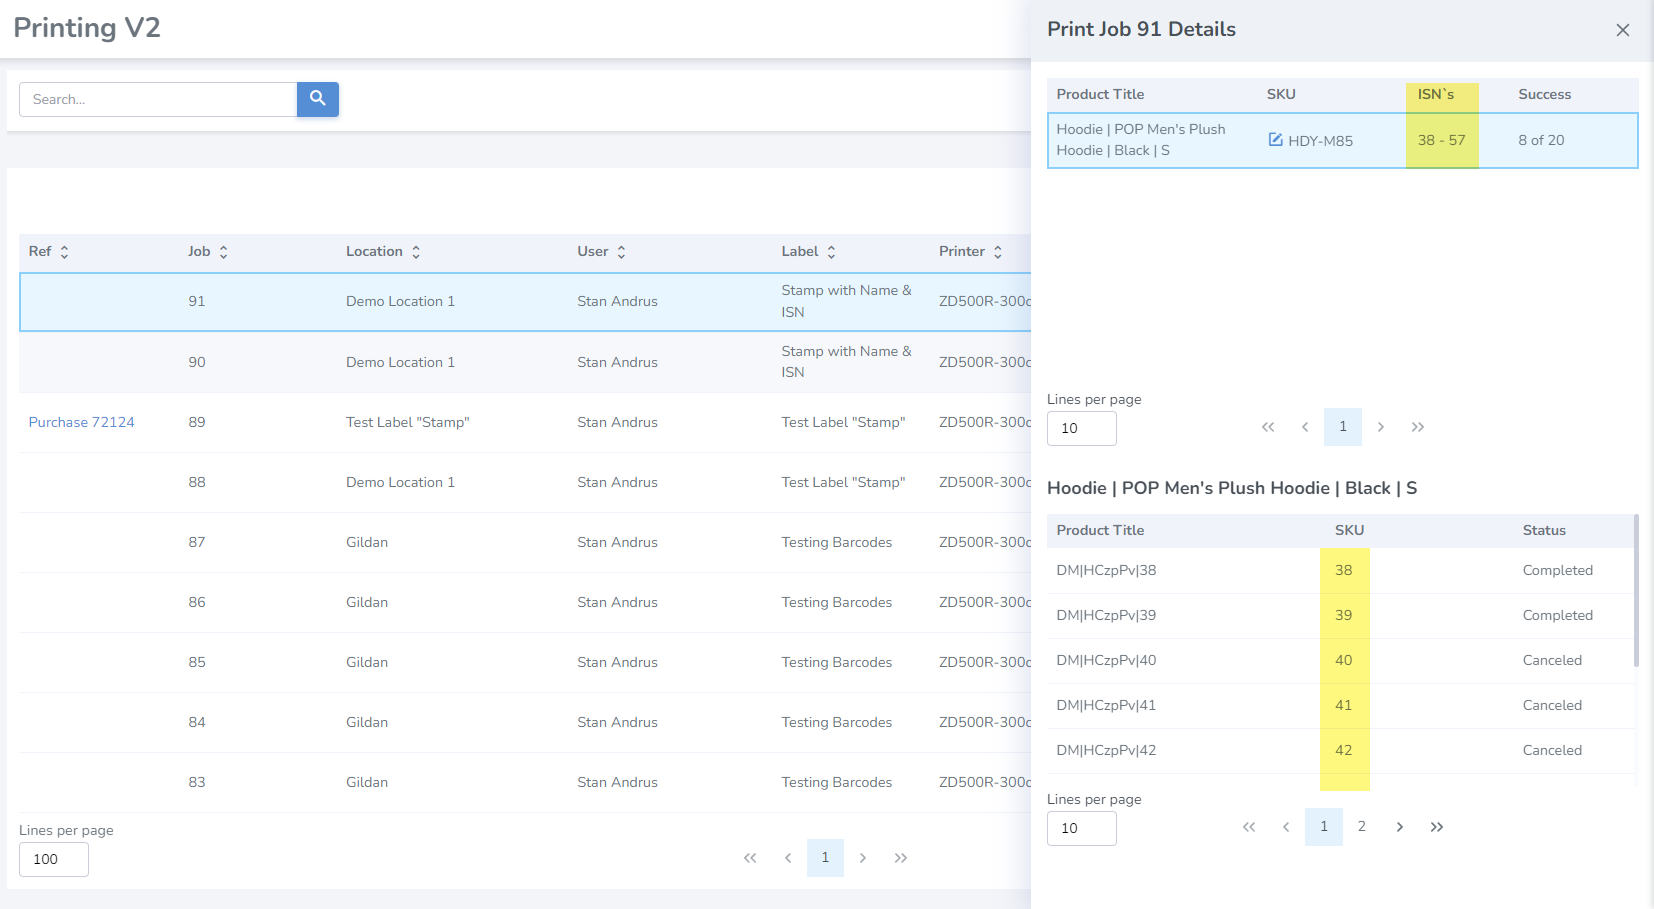
The ISN allows you to quickly identify which labels are faulty so that they can be discarded and new labels printed.
Inventory Page & Downloads
Inventory > Products View
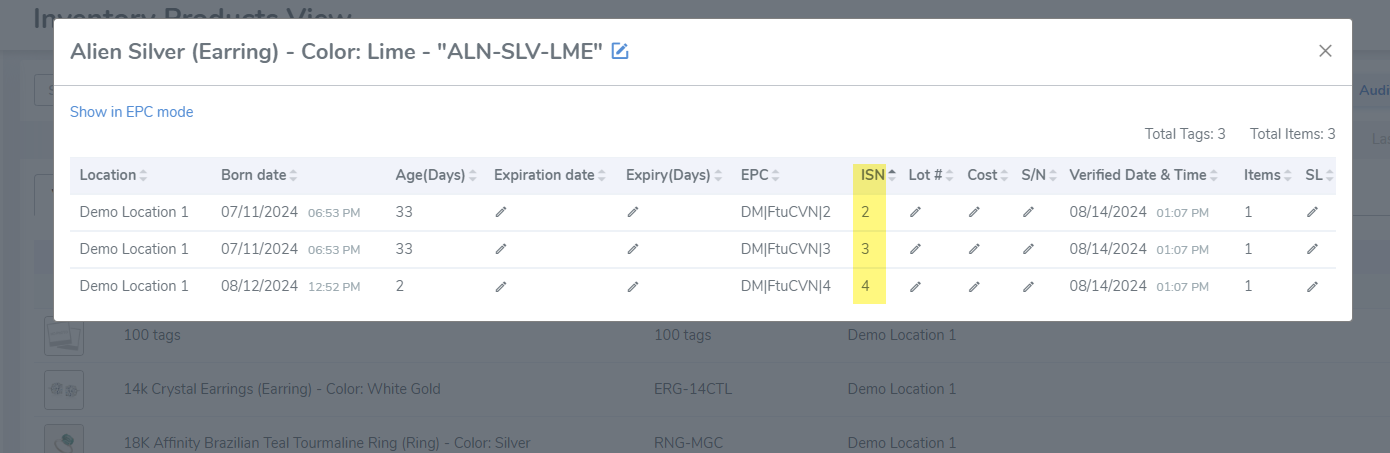
Once the labels have been scanned and uploaded, users can view the ISNs via the Inventory tab. The Inventory displays all scanned items since the most recent audit, thus providing a merged view of several scans. The default Inventory view is by Products.
To view the ISN for a Product click on the desired product to view the Tags. This opens a pop-up window displaying the Tags and the related ISNs.
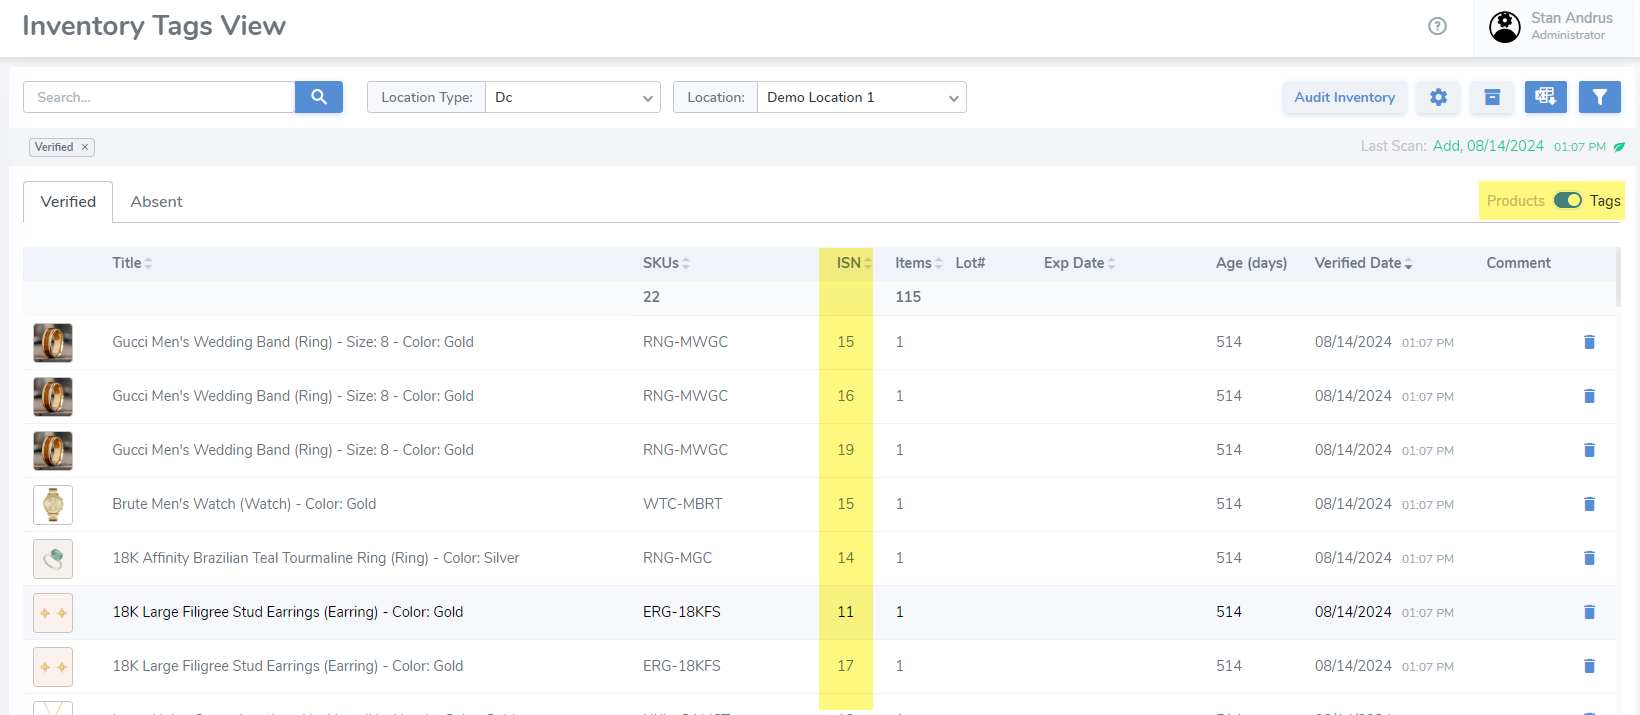
By sliding the view selector from Products to Tags a user can view the inventory page by Tags. The displays one tag per row.
Inventory Downloads
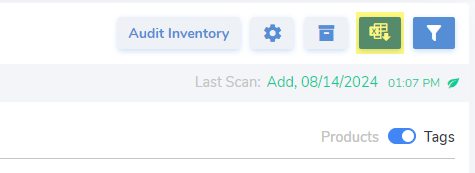
From the inventory page a user can download the related spreadsheets. The ISN is available from the SKU + EPC & EPC downloads:
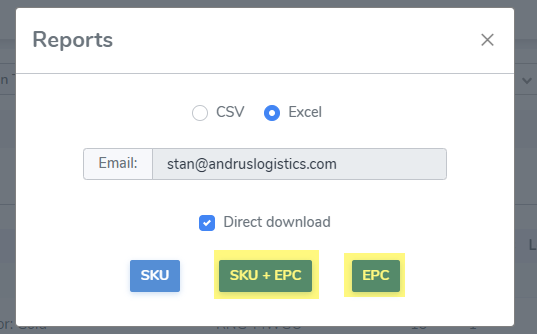
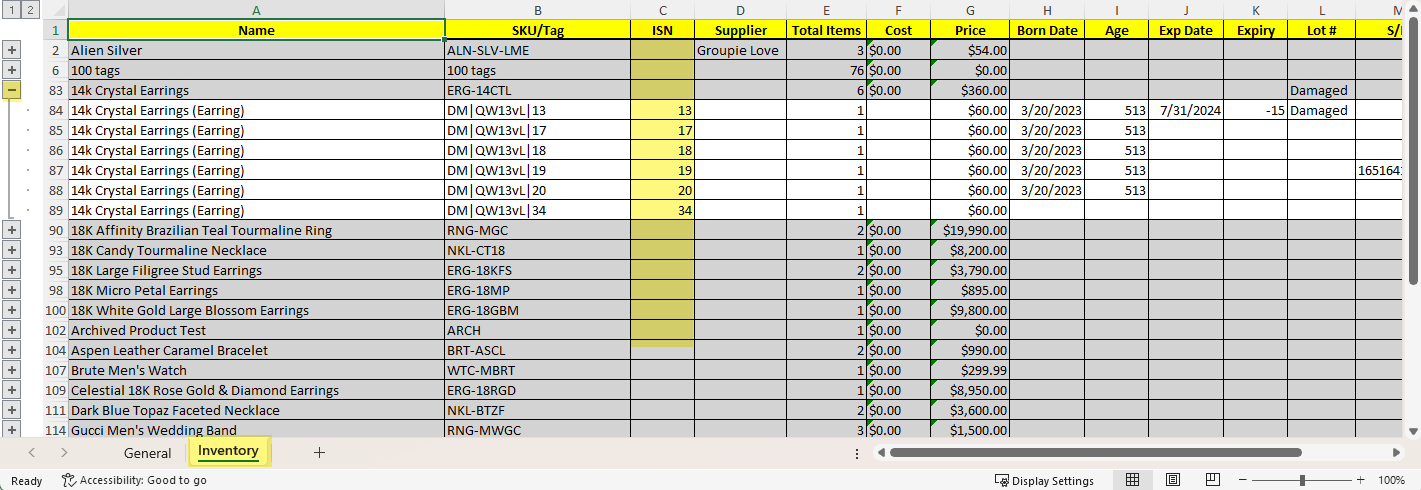
SKU + EPC Download
This report collapses the Tag level data inside the Product. To view the ISNs from this report click on the Inventory tab, then click on the "+" button of the Product you wish to view Tags for to view the ISN column.
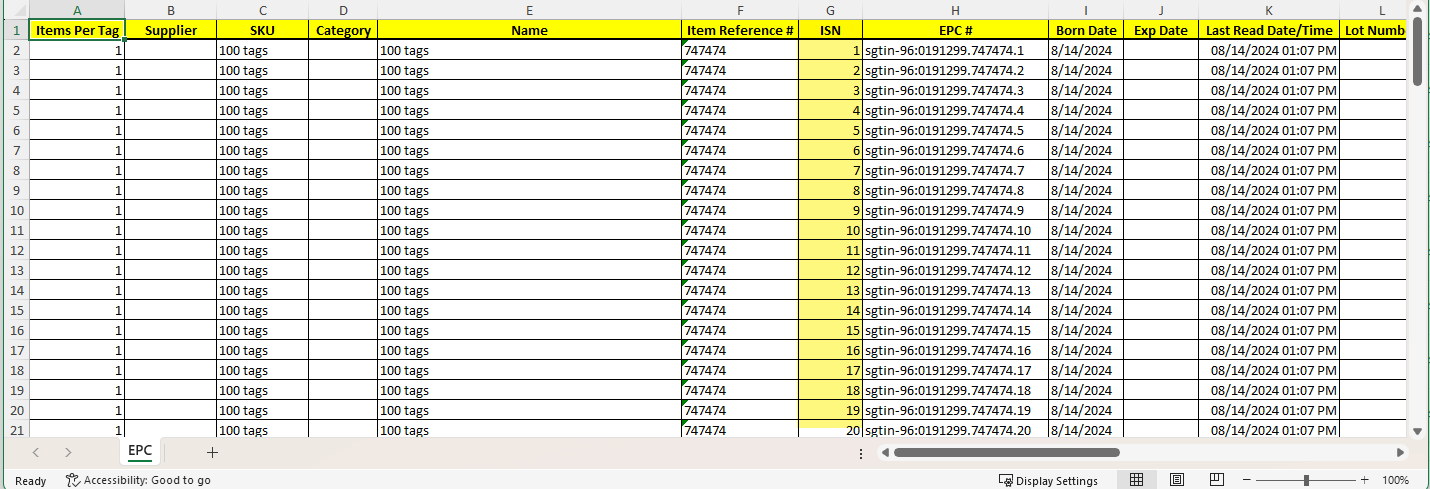
EPC Download
The EPC download provides a Tags level view and includes the ISN.
Scan Sessions Downloads
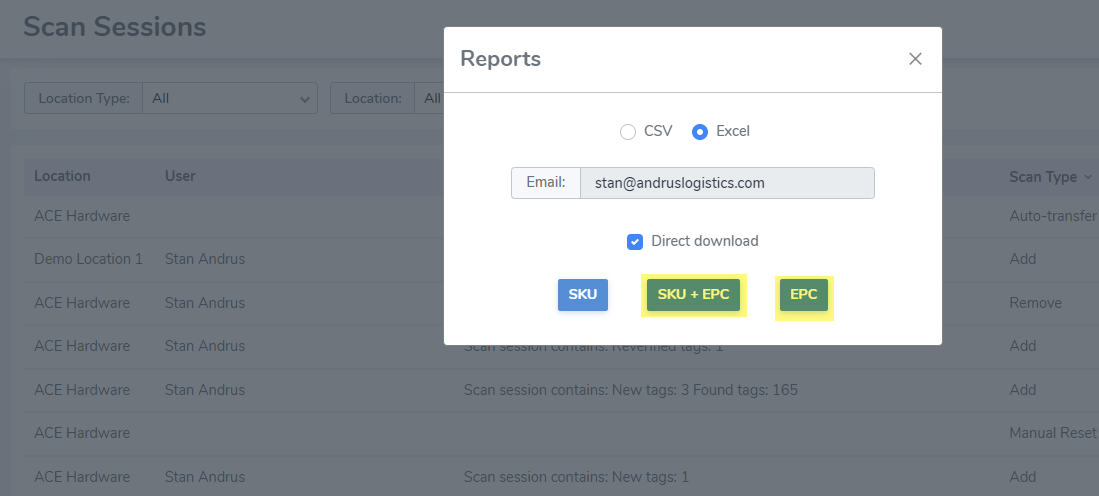
The Scan Sessions tab provides a record of every scan performed. From the same spreadsheets SKU + EPC and EPC you can view the ISNs for uploaded items.
If you have any questions regarding the ISN please reach out to us.