If you don't remember your password, click "Forgot Password", then enter your email address and click "Send a link to email". You should then receive an email with a link to reset your password.
If your account hasn't yet been created, contact your manager or support@simplerfid.com
# Resetting Password Instructions for how to reset your password. From the login screen click 'Forgot password?' ##### ****Password Reset**** - Enter the associated email address - Click ****Send a link to email**** [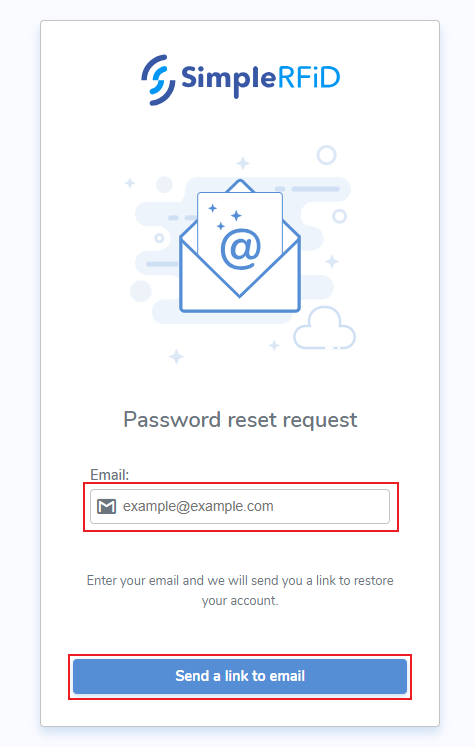](https://kb.simplerfid.com/uploads/images/gallery/2025-05/71Kimage.png) ##### ****Reset Notification**** Once sent, a notification will appear advising that the email has been sent. The pop-up also contains a link to '****Resend the code to email****' [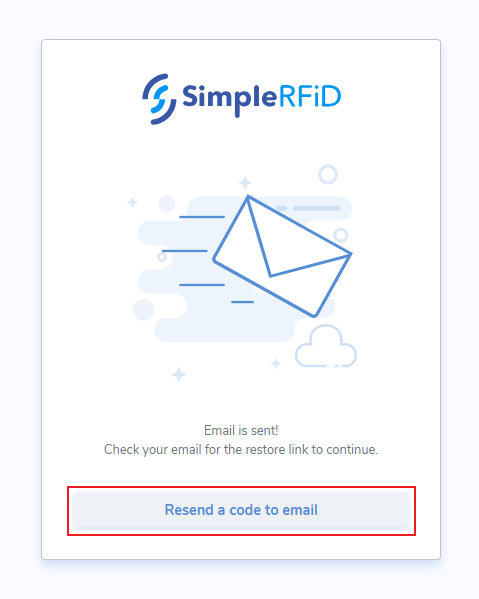](https://kb.simplerfid.com/uploads/images/gallery/2025-05/DcXimage.png) ##### ****Reset Email**** An email will then be sent to the associated email with a button to reset your password - Click 'Reset Password' [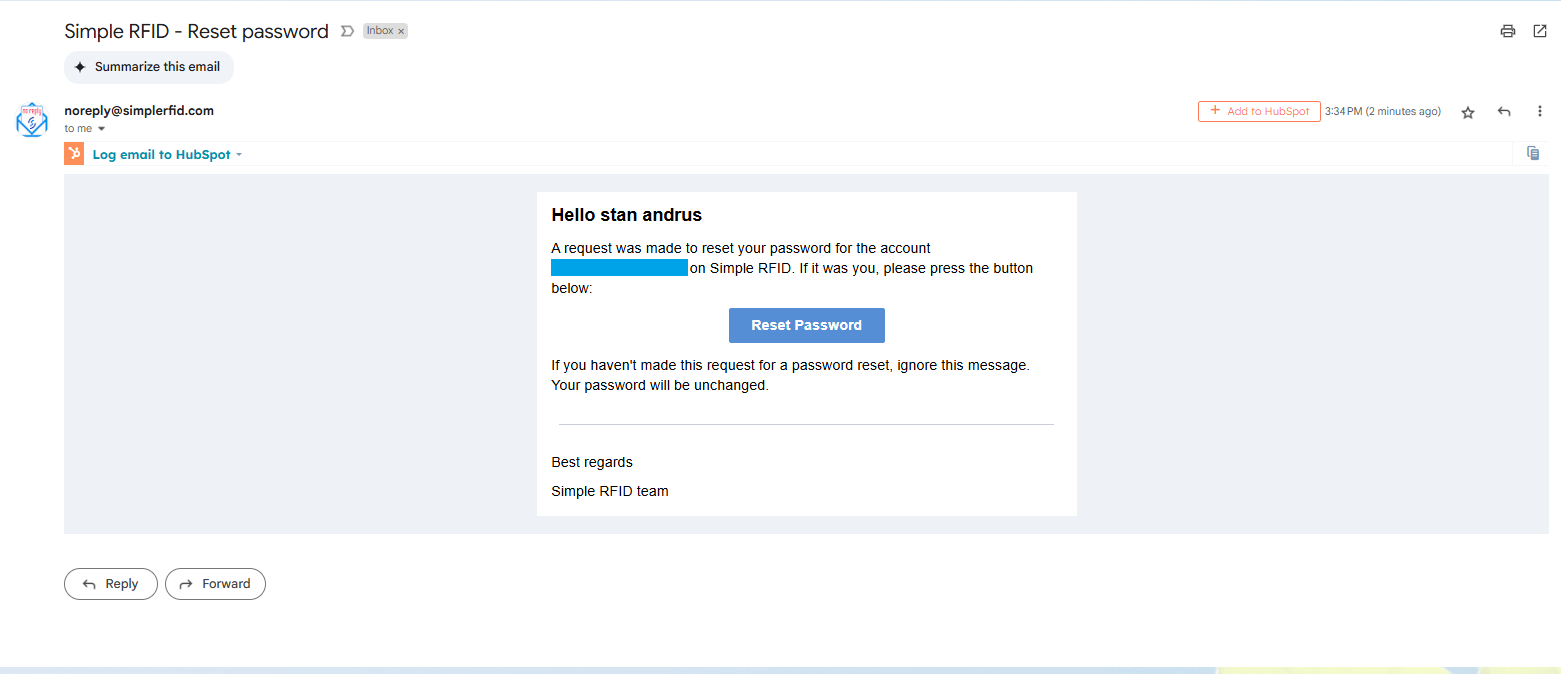](https://kb.simplerfid.com/uploads/images/gallery/2025-05/z8gimage.png) ##### ****Change Password screen**** - Enter password - Repeat password - Click 'Save new password' [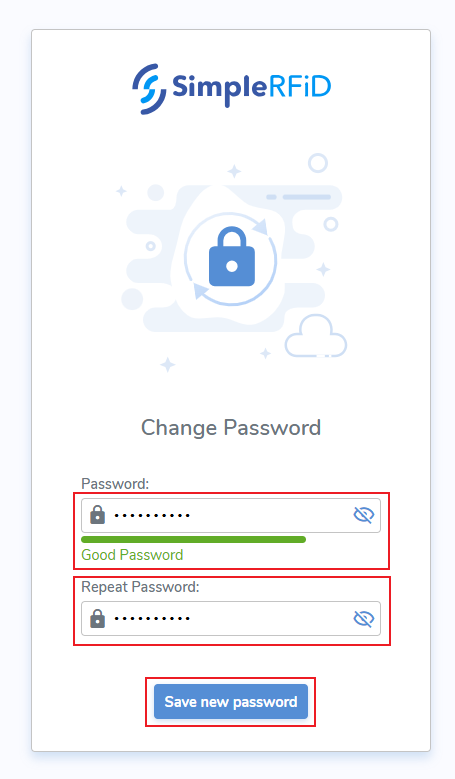](https://kb.simplerfid.com/uploads/images/gallery/2025-05/JSOimage.png) ##### ****Confirmation Notification**** A pop-up message will confirm that your password was changed successfully [](https://kb.simplerfid.com/uploads/images/gallery/2025-05/oVFimage.png) # Logout [To logout follow these steps](https://kb.simplerfid.com/books/software-web-portal/page/logout) in the Admin menu # Left Navigation Menu Left menu containing core set of features # Navigation Menu The Navigation Menu appears on the left side of the web portal. It includes the following tabs: - [Inventory](https://kb.simplerfid.com/books/software-web-portal/chapter/navigation-menu-inventory) - [Inventory Compare](https://kb.simplerfid.com/books/software-web-portal/page/web-portal-inventory-compare) - [Audit](https://kb.simplerfid.com/books/software-web-portal/chapter/navigation-menu-audit) - Resolve & Sync - [Calculate Reorder](https://kb.simplerfid.com/books/software-web-portal/chapter/navigation-menu-calculate-reorder) - [Scan Sessions](https://kb.simplerfid.com/books/software-web-portal/chapter/navigation-menu-scan-sessions) - [Orders](https://kb.simplerfid.com/books/software-web-portal/chapter/navigation-menu-orders) - [Printing](https://kb.simplerfid.com/books/software-web-portal/chapter/navigation-menu-printing) - [Products](https://kb.simplerfid.com/books/software-web-portal/chapter/navigation-menu-products) The menu collapses if the page is shrunk [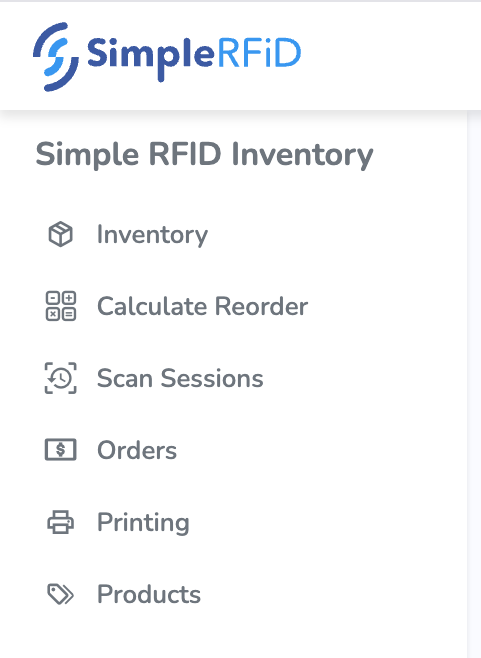](https://kb.simplerfid.com/uploads/images/gallery/2025-09/0bTscreenshot-2025-09-15-at-11-41-09-am.png) Down to [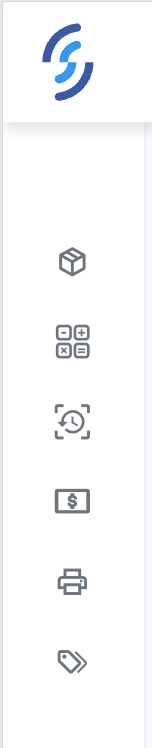](https://kb.simplerfid.com/uploads/images/gallery/2025-09/screenshot-2025-09-15-at-11-40-26-am.png) # Navigation Menu: Inventory Inventory views including Verified, Absent, & Archived # Inventory ControlsThese page views & controls exist for all three inventory statuses, Verified, Absent & Archived.
##### ****Inventory views**** 1\. Location selector: Allows for a Specific location, or All Locations view #### ****2. Inventory Statuses: (2A) Verified, (2B) Absent, and (2C) Archived**** 3\. Downloader: Option to download reports for any status in Excel or CSV 4\. Filters: Ability to customize views #### ****5. Products vs. Tags view**** It provides the user with two basic views; Product, which groups the tags into the related product, & Tags which displays each tag on its own row. ##### ****Products View**** Allows you to view inventory grouped by product (SKU). ##### ****Tags View**** A row for every item. [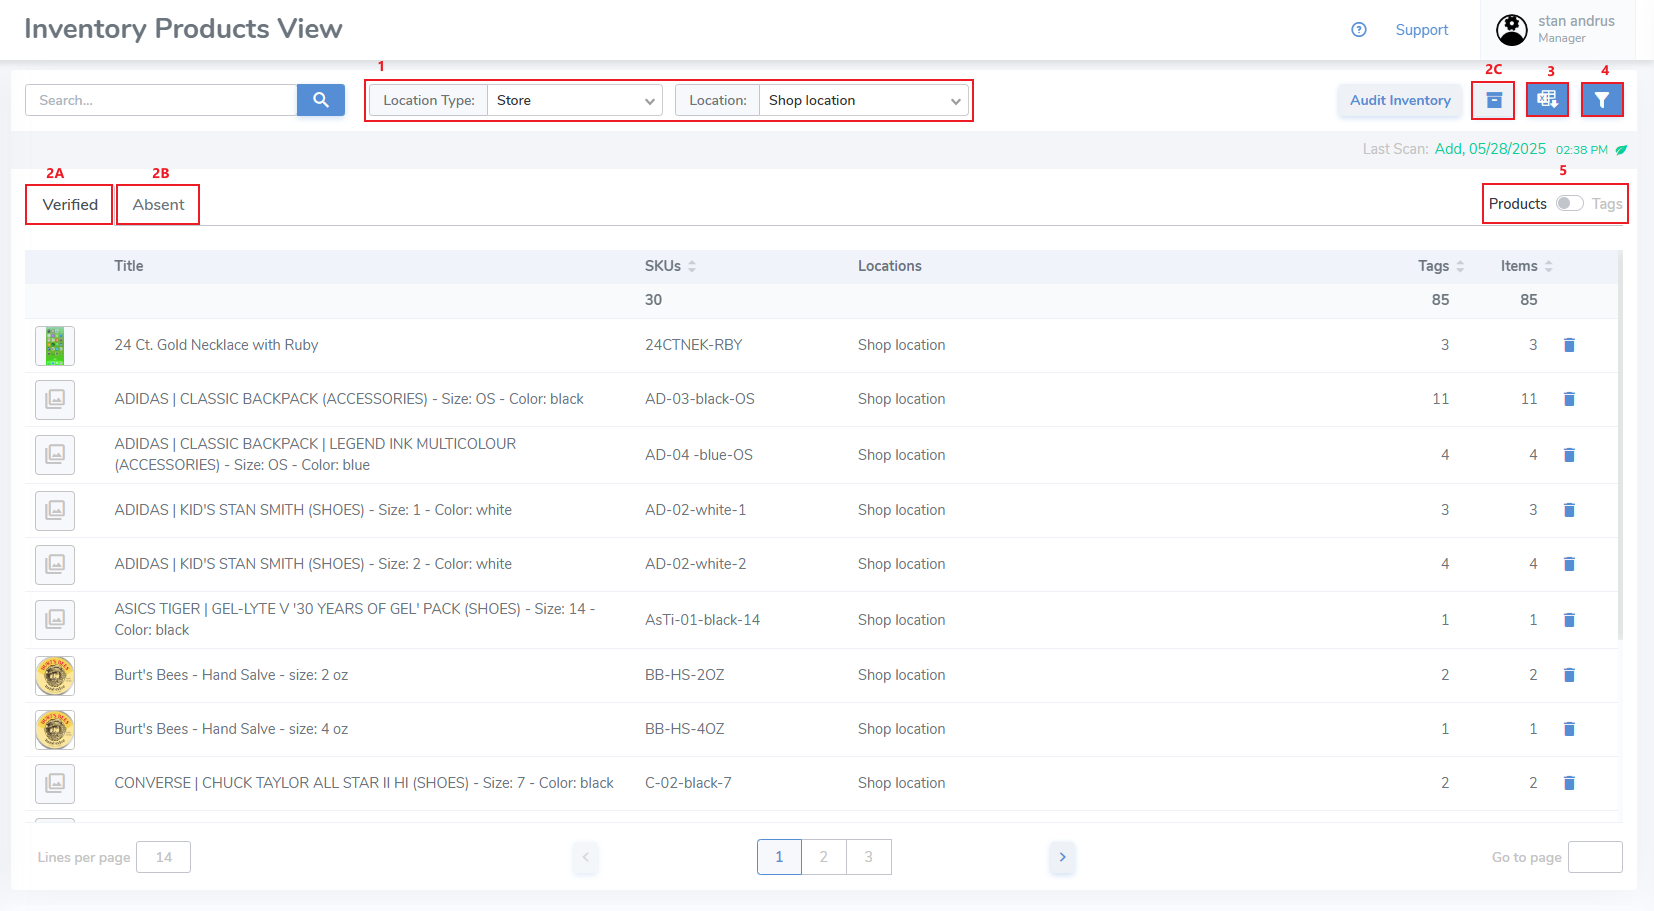](https://kb.simplerfid.com/uploads/images/gallery/2025-05/WNpimage.png) ##### [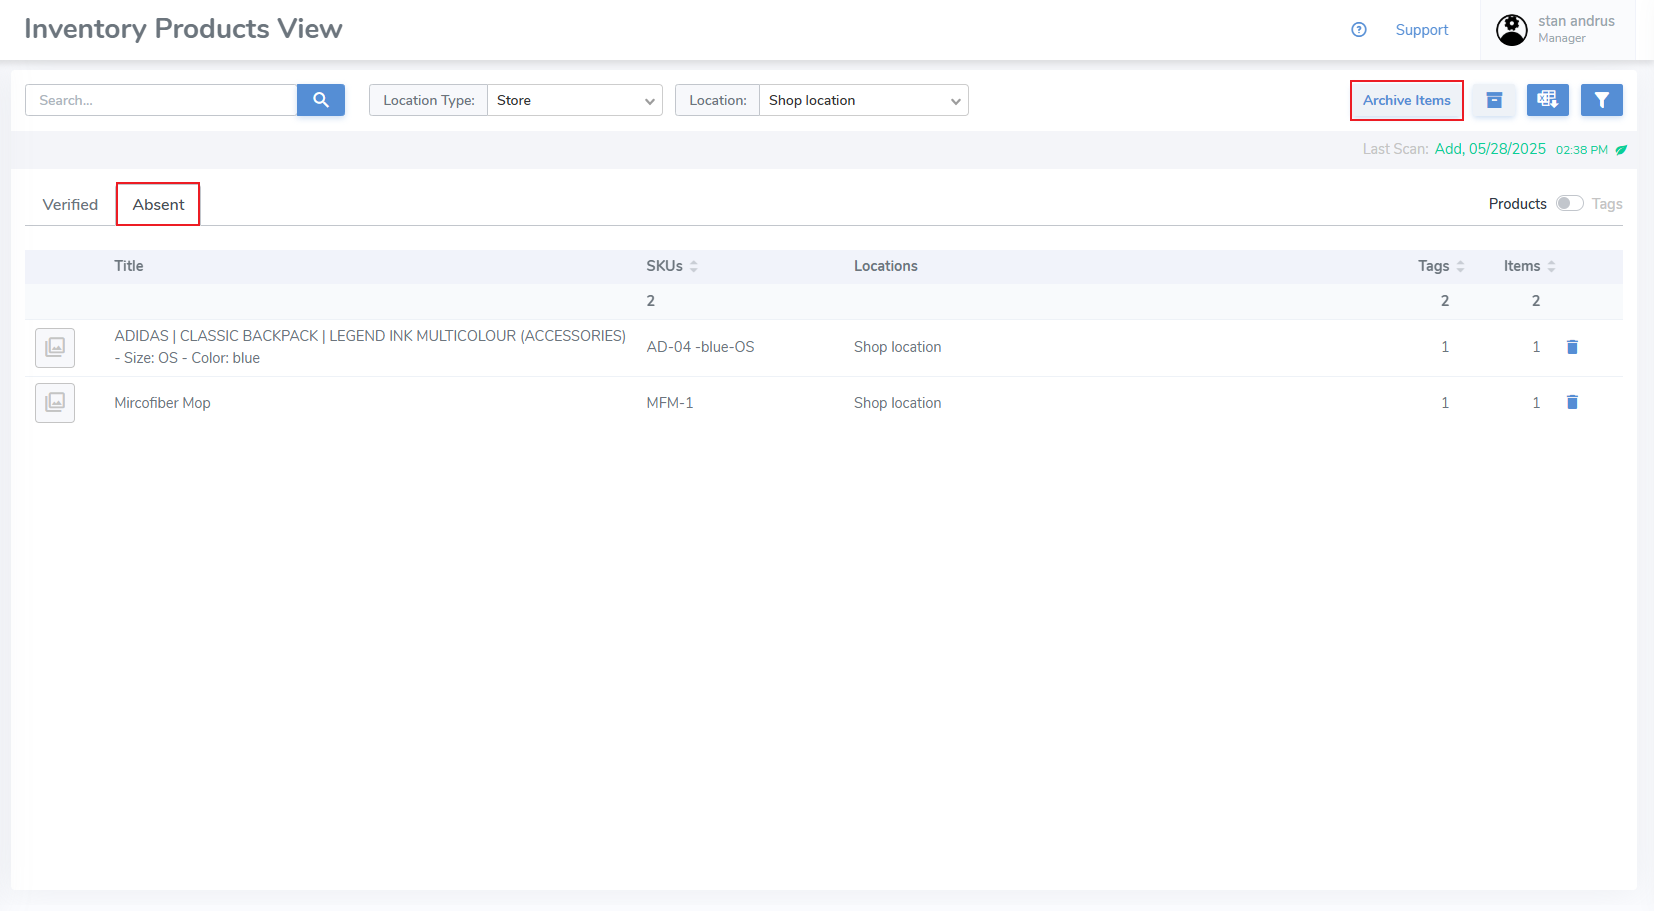](https://kb.simplerfid.com/uploads/images/gallery/2025-05/aMRimage.png) ##### ****Verified Filter**** Ability to filter inventory by supplier, the verified date, ability to display expired items, filter by age and expiration, and sort by [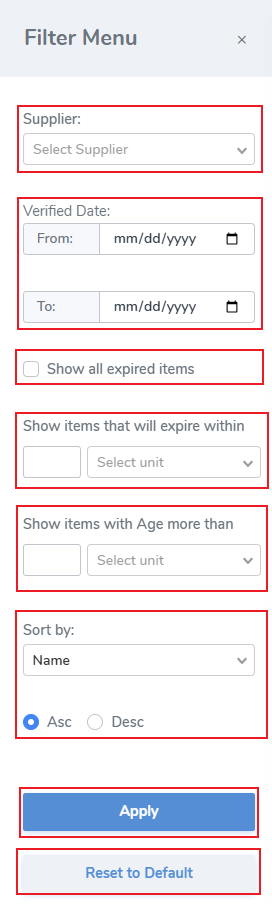](https://kb.simplerfid.com/uploads/images/gallery/2025-05/p8Qimage.png) ##### ****Absent Filter**** [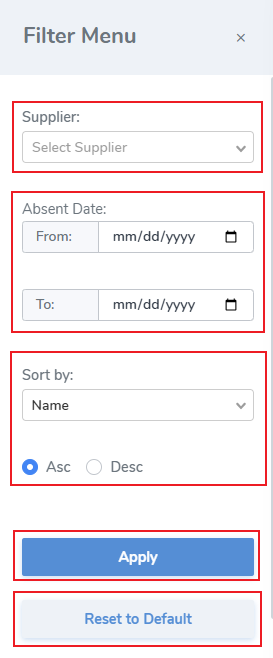](https://kb.simplerfid.com/uploads/images/gallery/2025-05/cSvimage.png) # Reset Inventory from Web Portal Clear all Verified items by marking them Absent from the web portal.Clicking the "Audit" button on this page Reset's the inventory, moving "Verified" items to "Absent" status. Items remain Absent until scanned.
##### ****Marking Items Absent**** A complete audit requires a user to rescan all items to confirm inventory - Click the "Audit Inventory" button [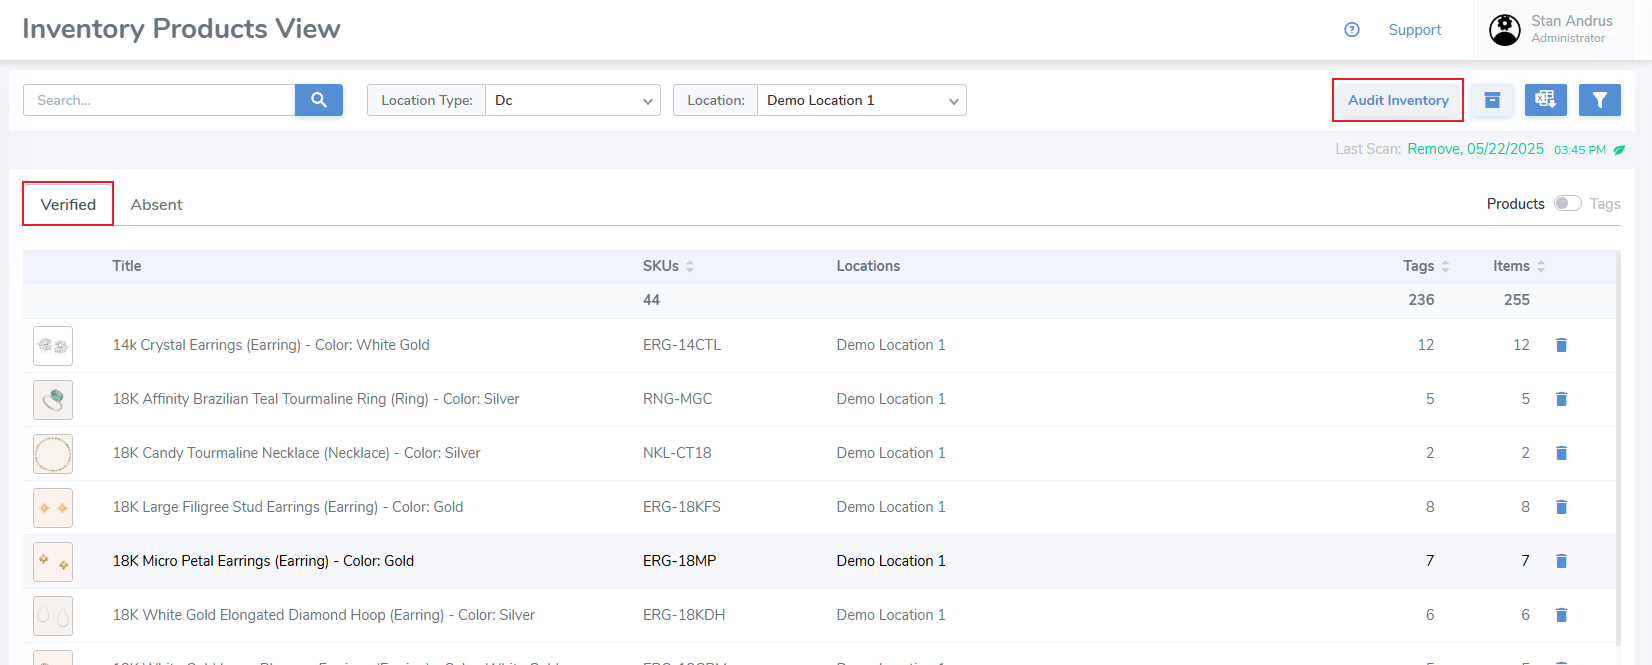](https://kb.simplerfid.com/uploads/images/gallery/2025-05/Sl5image.png) - A pop-up will appear requesting that you confirm the action [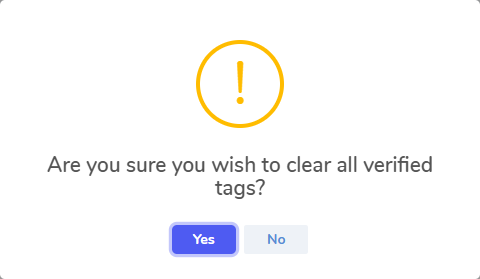](https://kb.simplerfid.com/uploads/images/gallery/2025-05/wFqimage.png) Click "Yes" to begin the audit A second pop-up will appear notifying that "Audit Inventory started" [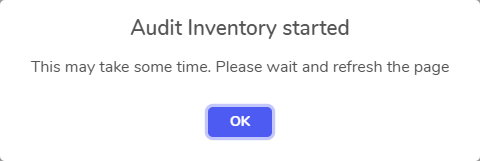](https://kb.simplerfid.com/uploads/images/gallery/2025-05/7Tcimage.png) Click 'OK' to close the prompt Refresh the tab and you will see that the Verified tab is empty and these items have been moved to Absent status For this reason it's a good idea to view the absent list before starting an audit. If you fail to do so, no worries. As each item is move to absent it's date & time is recorded so you can easily identify when items were moved to this status. [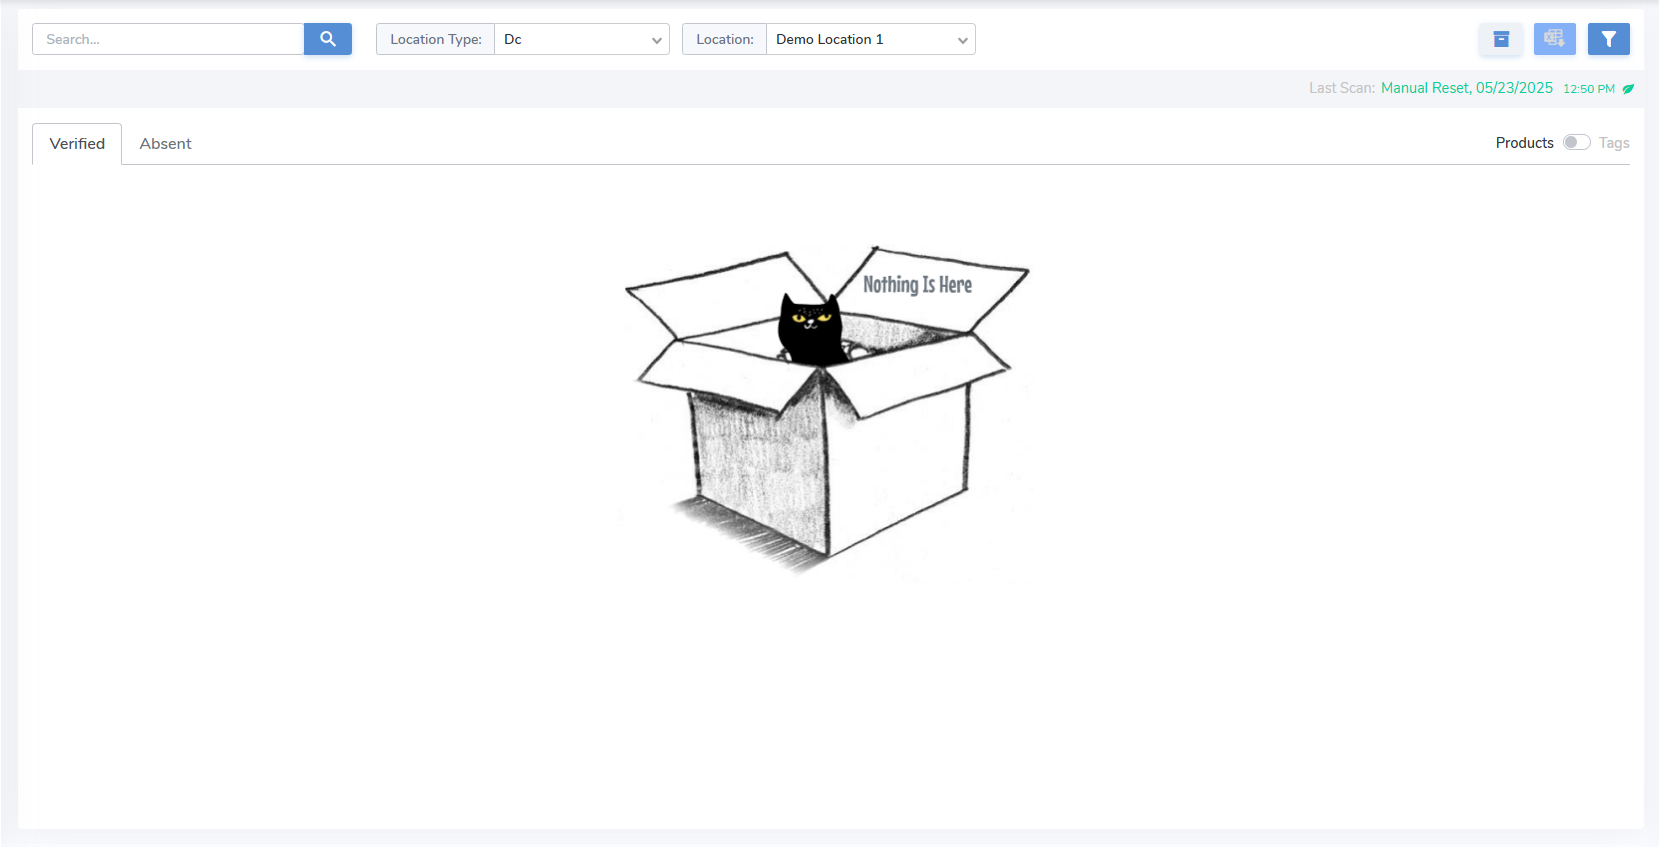](https://kb.simplerfid.com/uploads/images/gallery/2025-05/oehimage.png) From the Scan Sessions tab a record of the start of the audit will appear [](https://kb.simplerfid.com/uploads/images/gallery/2025-05/Orgimage.png) This means that from the mobile app you don't need to click 'Audit', instead simply begin [scanning](https://kb.simplerfid.com/books/software-mobile-app/page/mobile-app-scan) and adding items. ##### ****Partial Audit**** A partial audit allows you to audit a single item or a few items.It is recommend that you clear your Absent list and move items to Archived before performing a Partial Audit. Not doing so make it much more difficult to view the exact items being captured.
- Search for a specific product you wish to verify 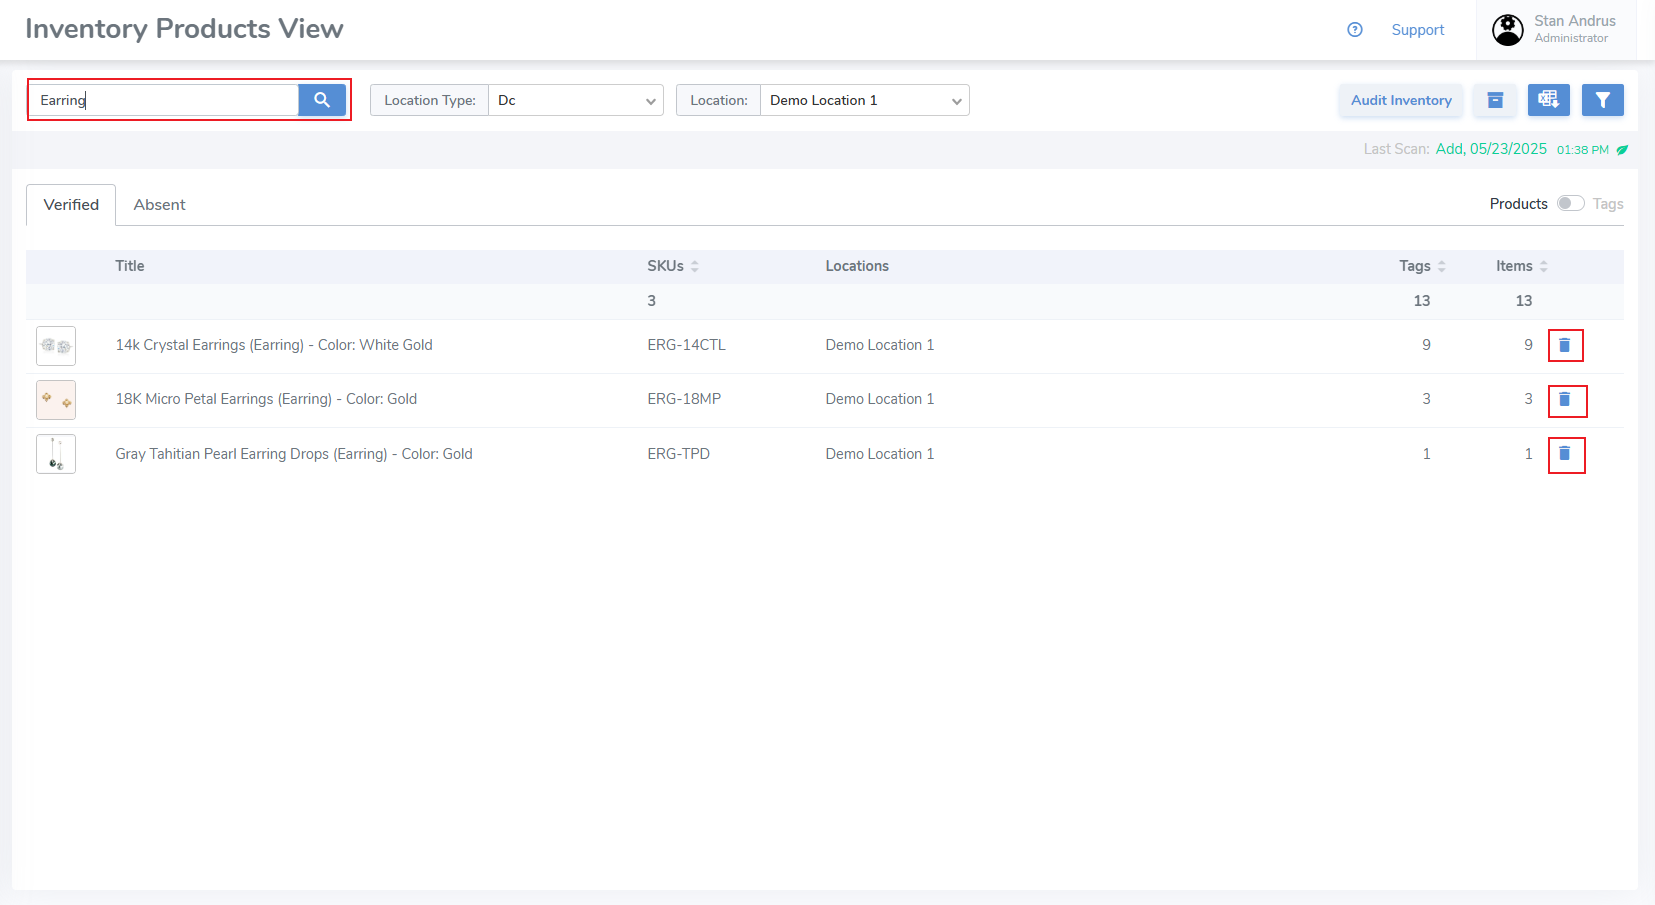- Click the Trash Can icon on the far right for all of these items. This will move only these items to Absent. Hover over the Trash Can to view message [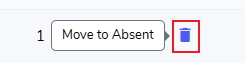](https://kb.simplerfid.com/uploads/images/gallery/2025-05/34timage.png) - After clicking, you will see a pop-up message requiring you to confirm [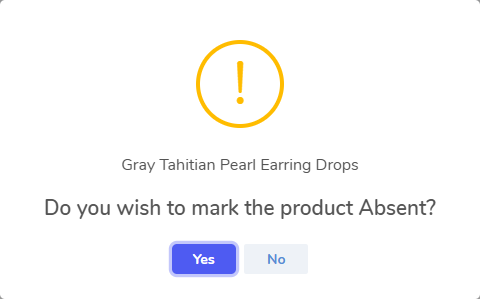](https://kb.simplerfid.com/uploads/images/gallery/2025-05/Zx1image.png) This will move the selected items to Absent status [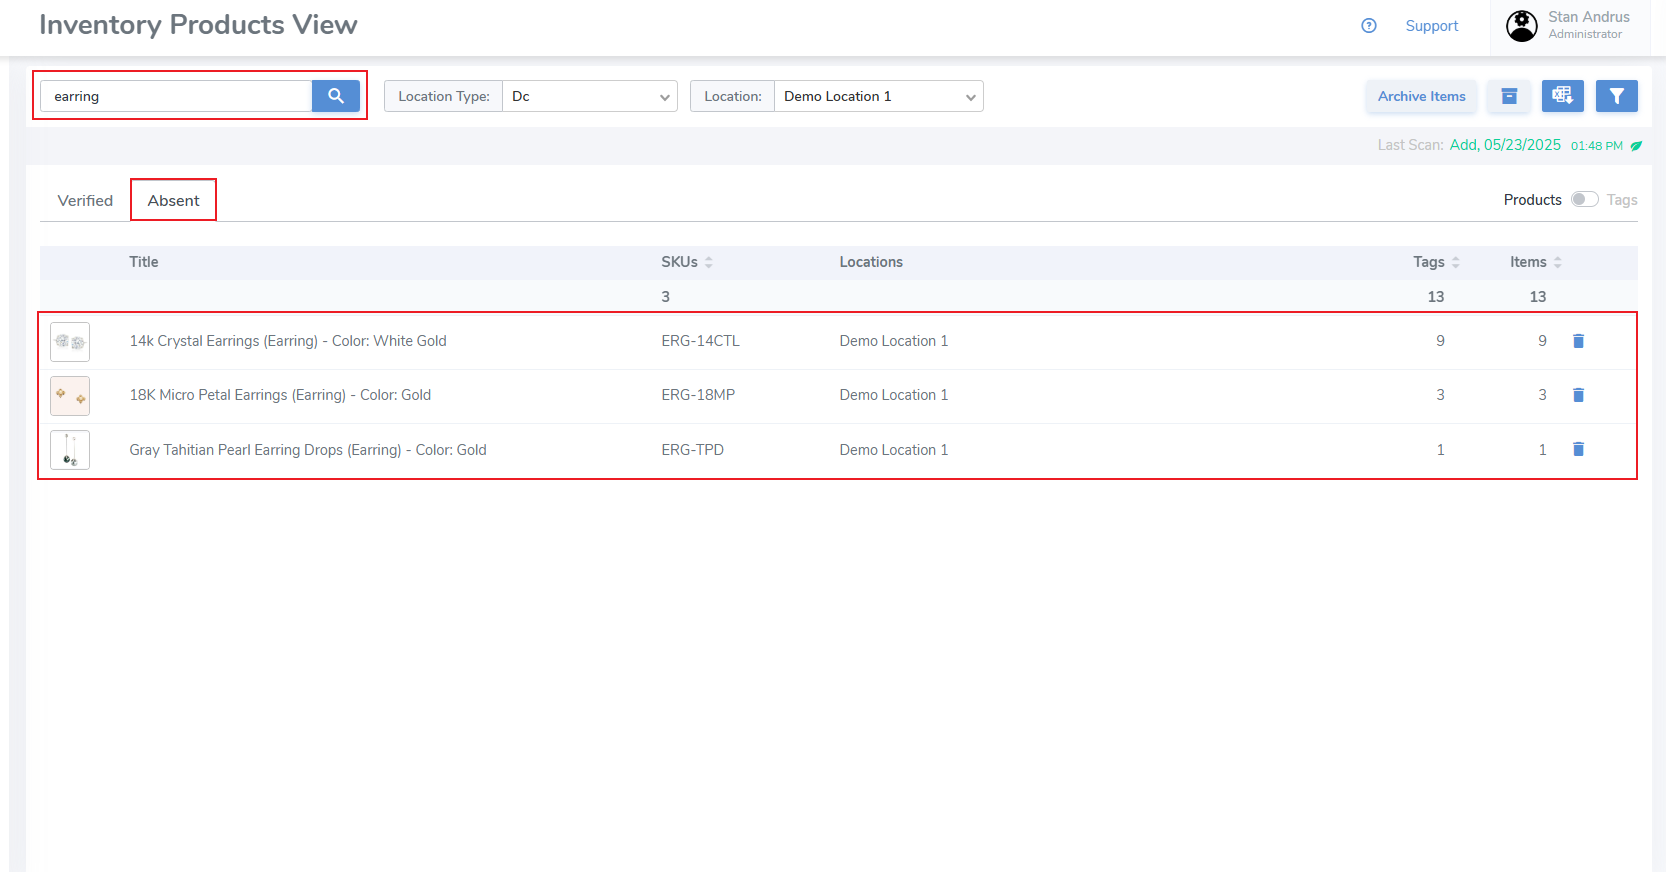](https://kb.simplerfid.com/uploads/images/gallery/2025-05/SbXimage.png) - [Rescan the items](https://kb.simplerfid.com/books/software-mobile-app/page/mobile-app-scan) using the mobile app. [They will appear as "Absent" in the scan](https://kb.simplerfid.com/books/software-mobile-app/page/mobile-app-scan-summary-statuses) # Inventory: Verified ##### ****Verified Status**** The Verified Inventory displays the current labels in the on hand inventory - Select Location - If you have access to more than one location, select your location or select 'All' to view inventory for all locations - Products / Tags switcher - provides ability to view inventory by product and [individual tag level detail](https://kb.simplerfid.com/books/software-web-portal/page/inventory-tag-level-properties) - Products & Tags level switcher - View items grouped by quantities [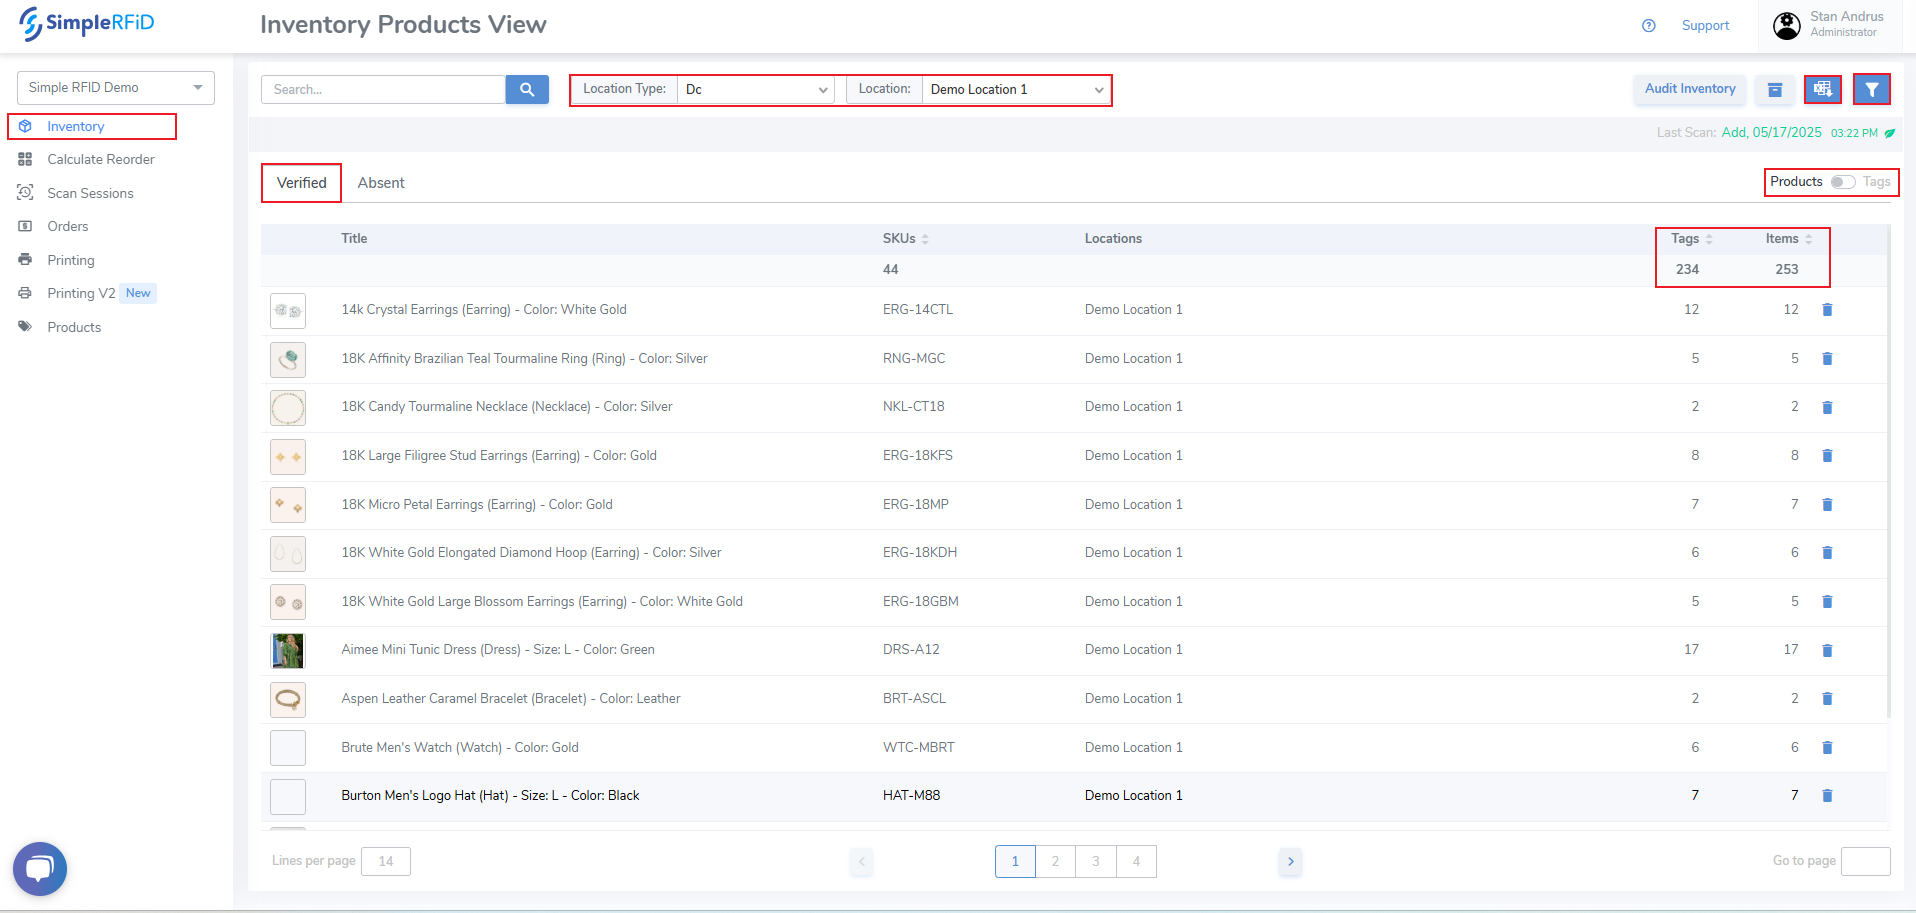](https://kb.simplerfid.com/uploads/images/gallery/2025-05/WDYimage.png) ##### ****Move Verified Items to Absent**** You can move items to Absent by product or tag: ****By Product**** - From the Products view, click the Trash-can icon on the far right of the product you wish to move all items to Absent status. Then accept the pop-up prompt. ****By Tag**** - Change to the Tags view. Then click the Trash-can icon on the far right of the Tag you wish to move to Absent status. Then accept the pop-up prompt. # Inventory: Absent ##### ****Absent Status**** View and manage Absent items from the web portal. Absent items are any item that was once verified, however has not scanned since an audit. You can view this "Absent" date, which is the audit date when the tag was no longer scanned. ##### ****Archive Absent Items**** - ****Archive by Product level**** - Move all items to Archived by Product by clicking the "Archive Items" button. Then accept the pop-up prompt. - ****Archive by Tag level**** - Archive a single Tag by clicking the Trash Can icon on the far right side. Then accept the pop-up prompt. [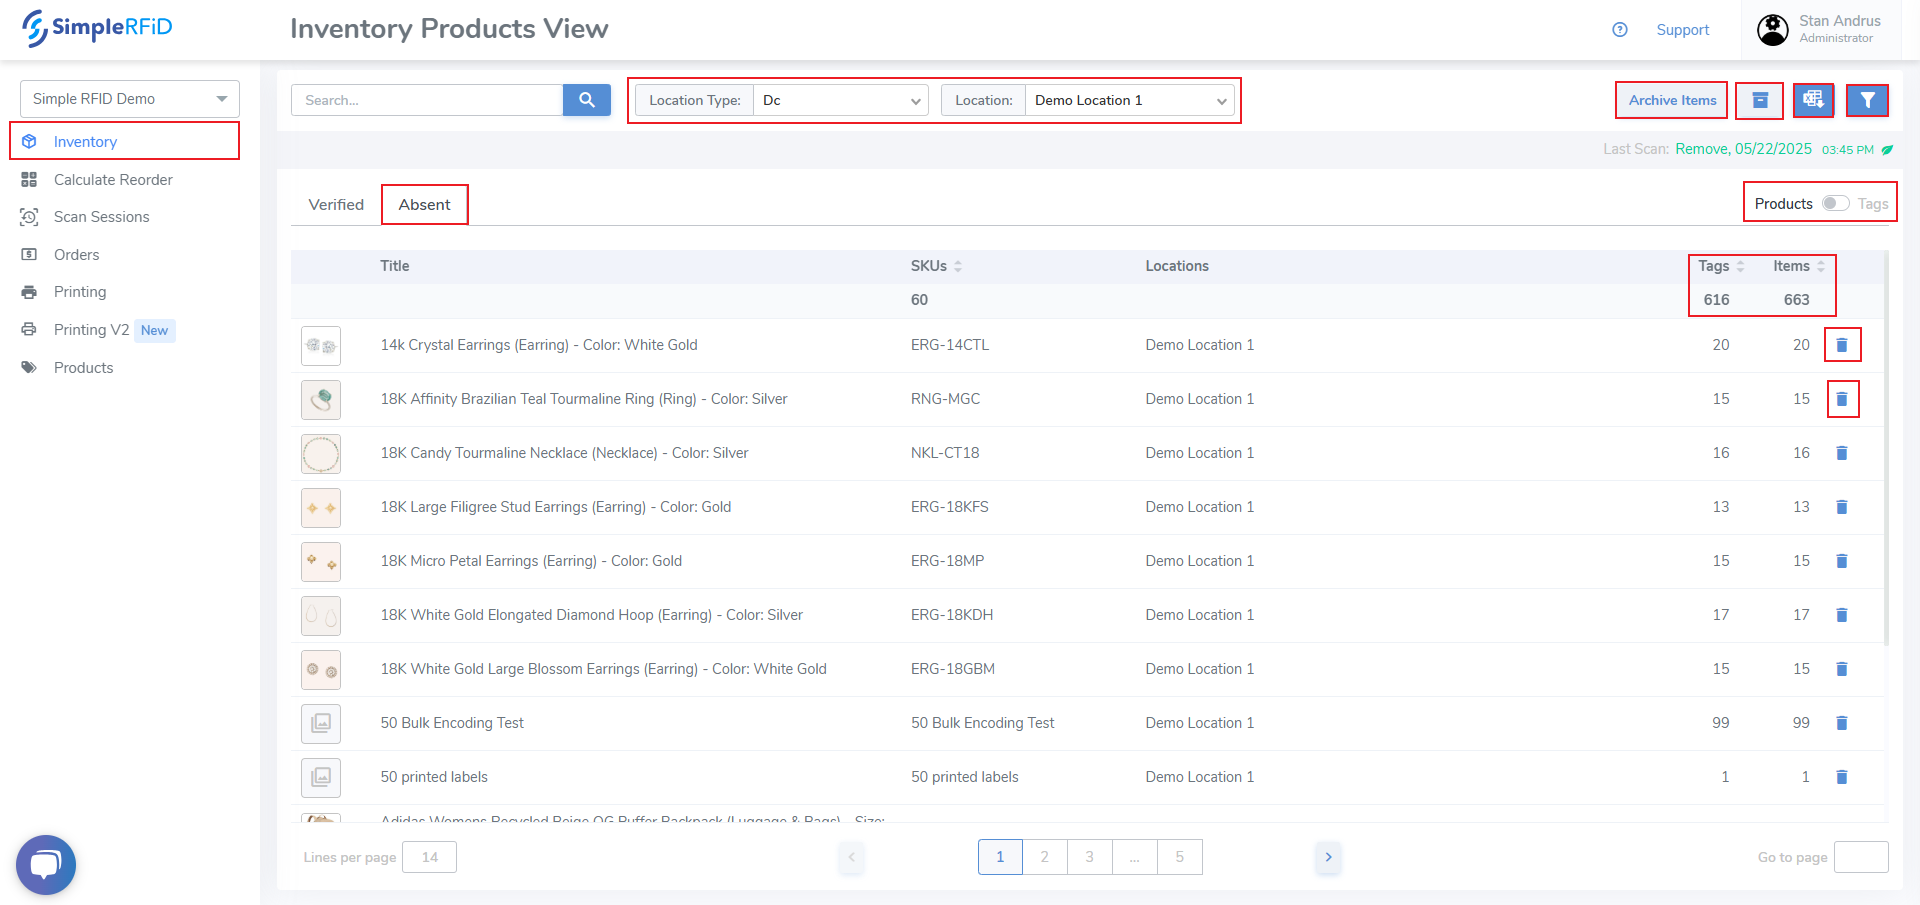](https://kb.simplerfid.com/uploads/images/gallery/2025-05/JvFimage.png) - Clicking an individual Product opens the Item View pop-up. This pop-up displays the Absent date of each tag. [](https://kb.simplerfid.com/uploads/images/gallery/2025-05/E21image.png) - Archive individual items by sliding the Products / Tags switcher to Tags view. From this page individual items can be archived the trash can icon. From this view you can see the Verified Date which is the last time the tag was scanned, and the Absent Date which is the first audit the tag was no longer found to be in inventory. [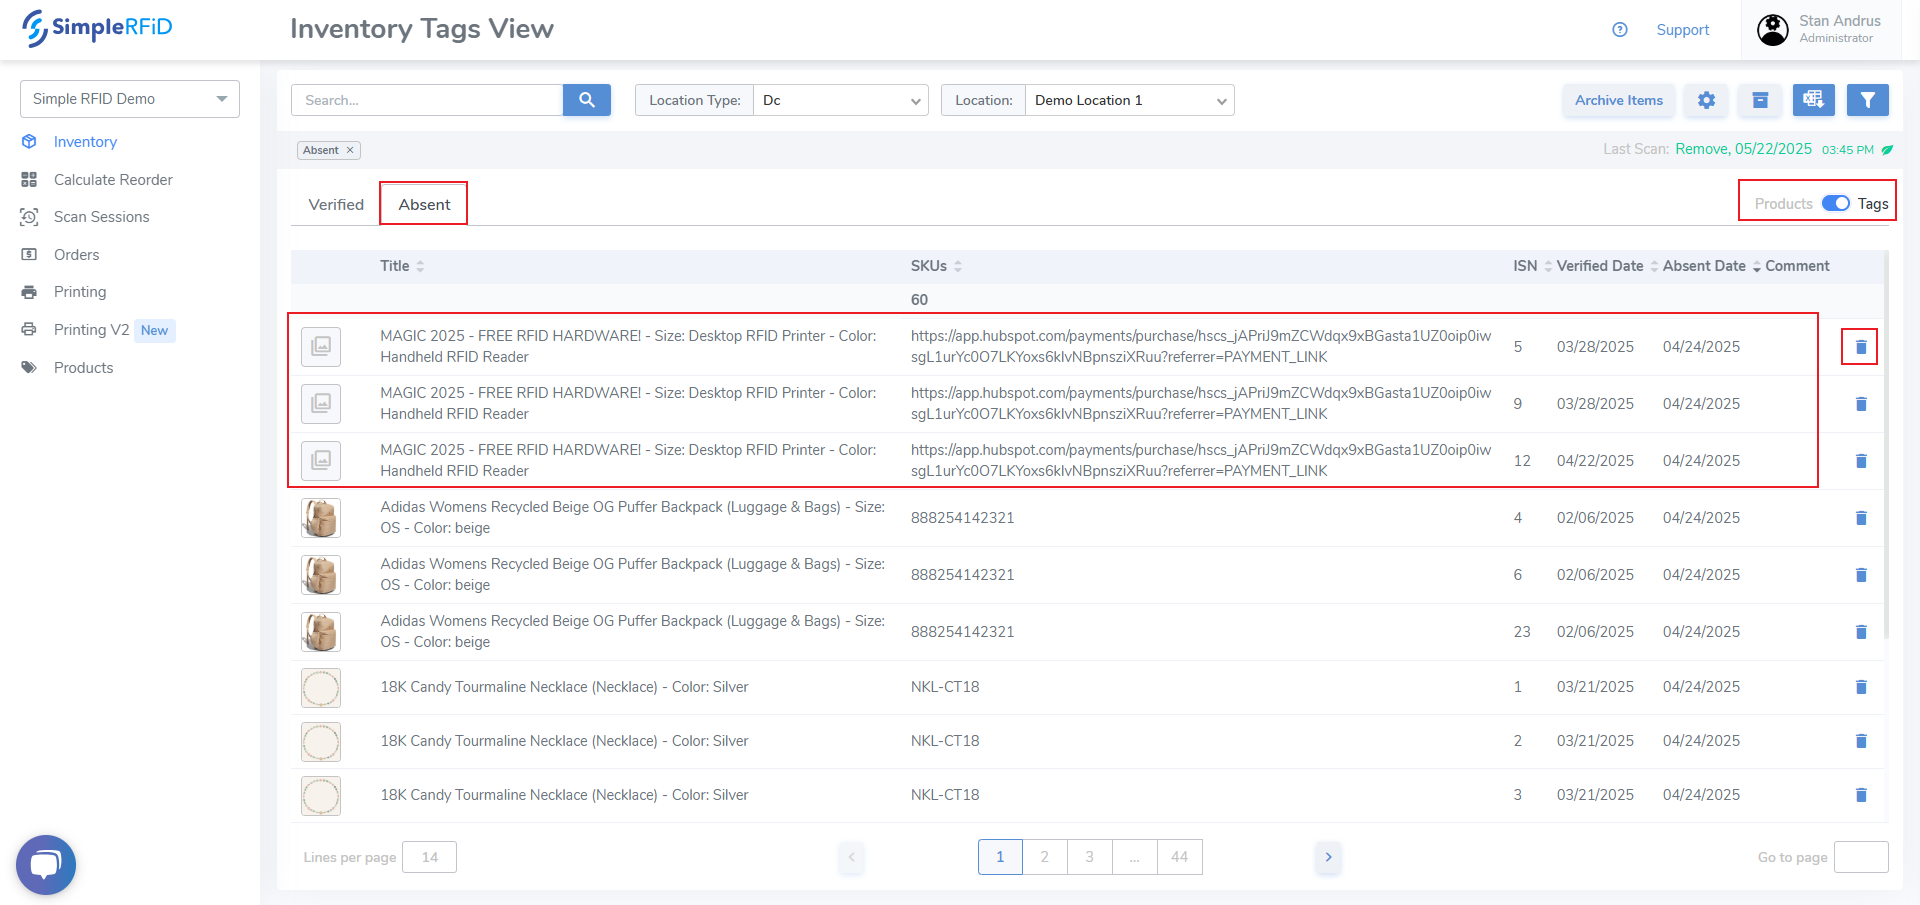](https://kb.simplerfid.com/uploads/images/gallery/2025-05/vGlimage.png) - Click an individual item and view the item's card which includes this date as well. [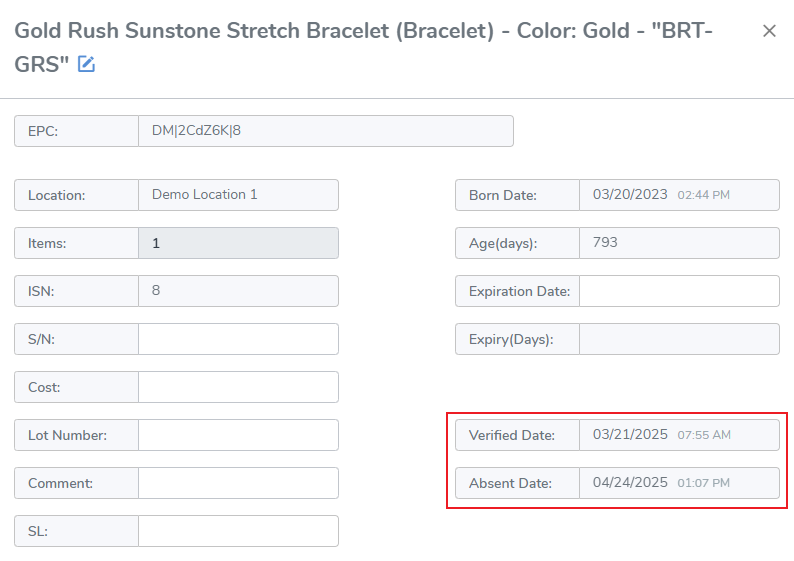](https://kb.simplerfid.com/uploads/images/gallery/2025-05/biFimage.png) # Inventory: Archived To access the Archived list click on the bankers box icon, found in the upper right corner of the Inventory Products View. ##### ****Accessing Archived**** [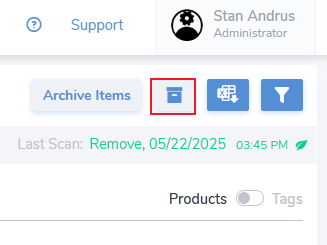](https://kb.simplerfid.com/uploads/images/gallery/2025-05/t6timage.png) - Once clicked you will view the Archived list - You may view Archived Inventory by single location, or by all archived items - As with other inventory views you can view the Archived items by Product view & by Tags view. - Tags remain in Archived State for 2 years after which they are purged. ##### ****Archived > Products view**** 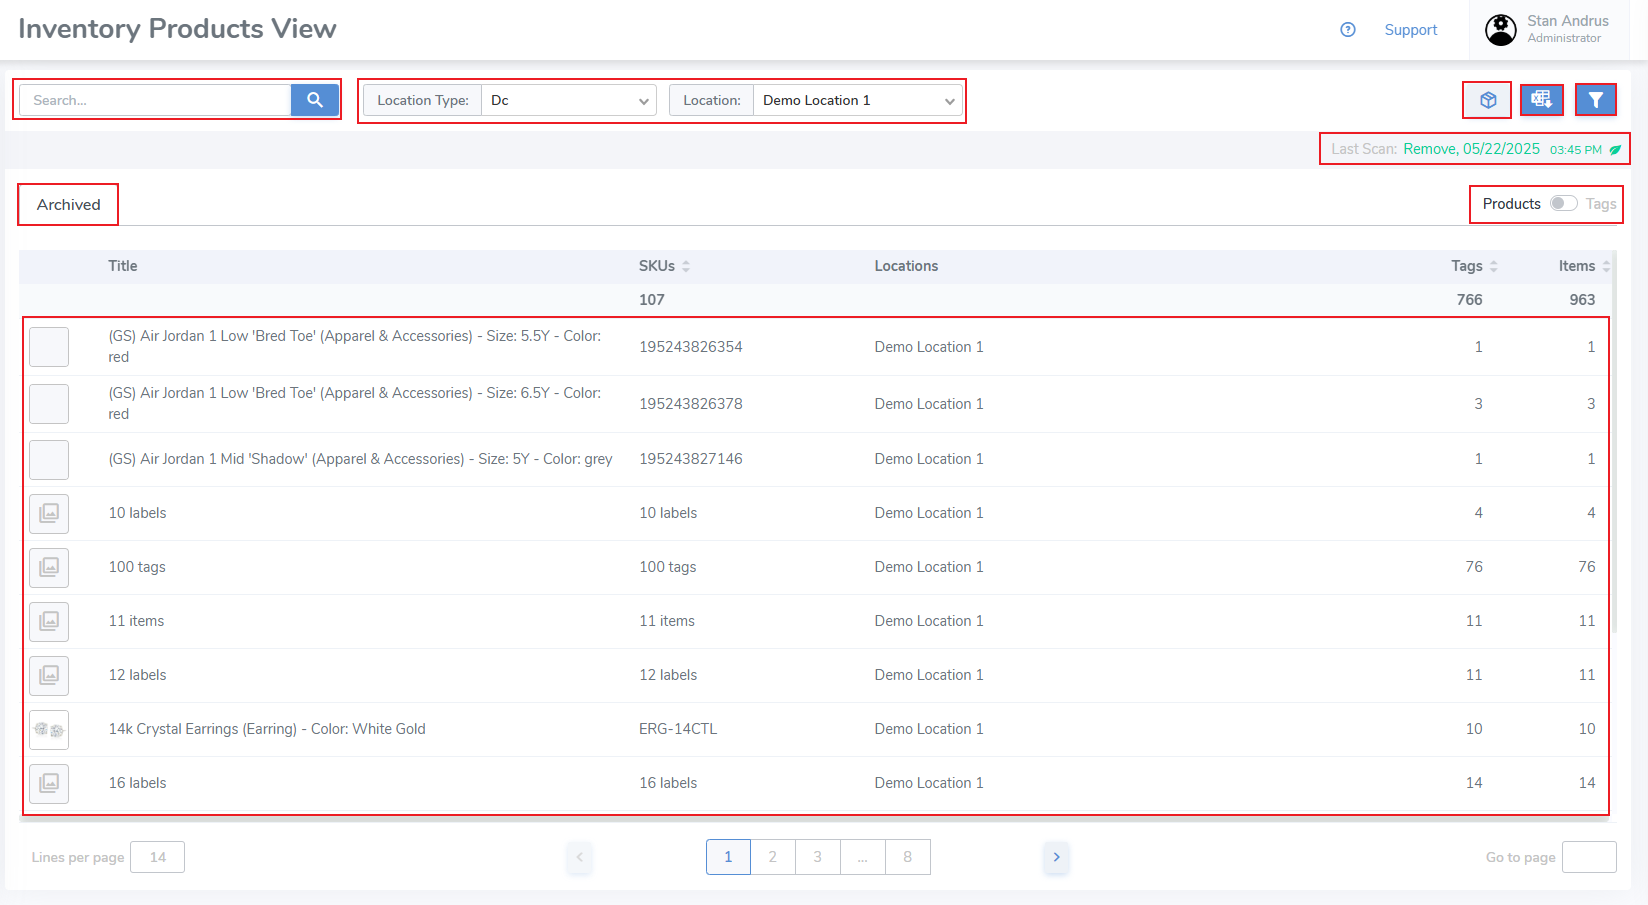##### ****Archived > Products View Pop-up**** - From the Archived view you can click an individual Product to view the Archived Pop-up view. This pop-up displays item level data and includes the Archived date & time. [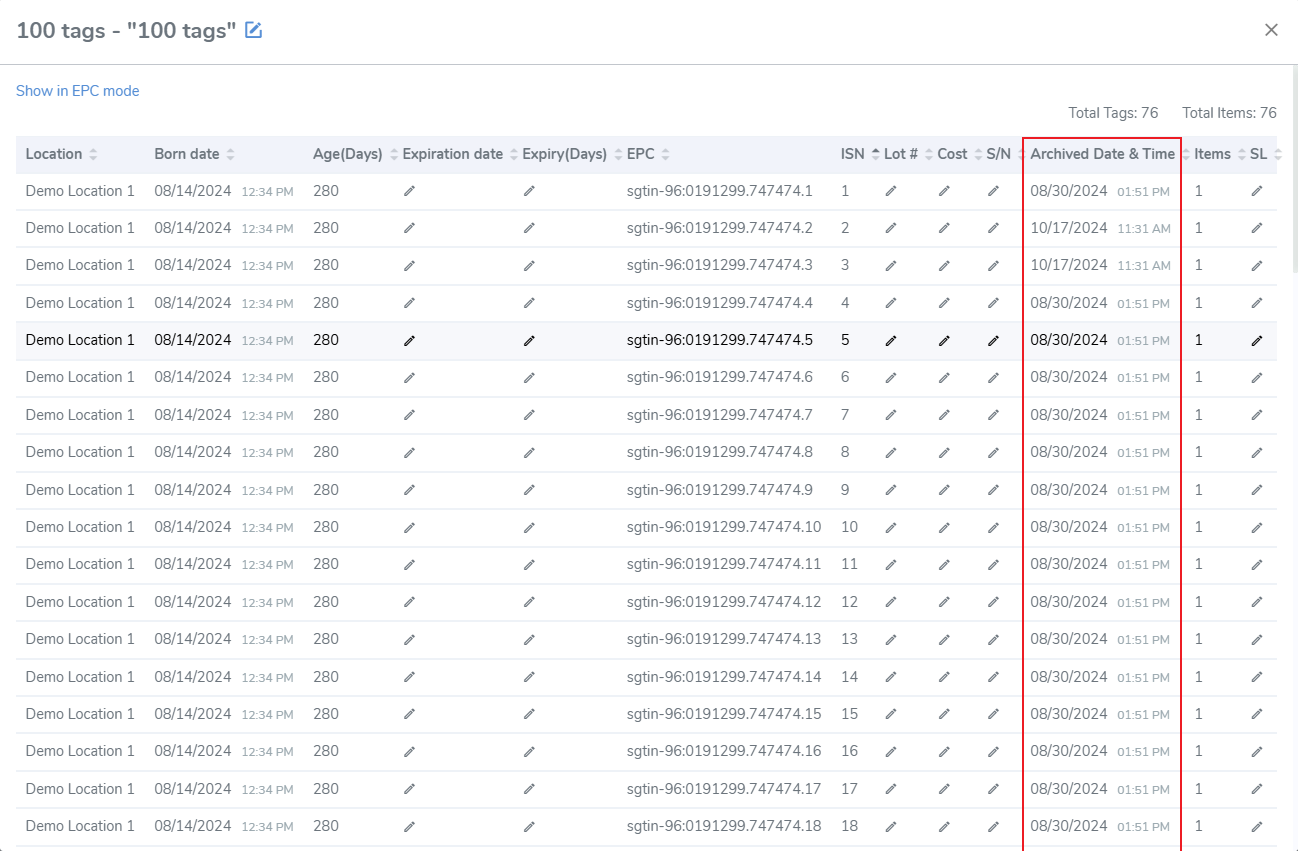](https://kb.simplerfid.com/uploads/images/gallery/2025-05/mNoimage.png) ##### ****Archived > Tags View**** Or view inventory by Archived Tags level to see individual items [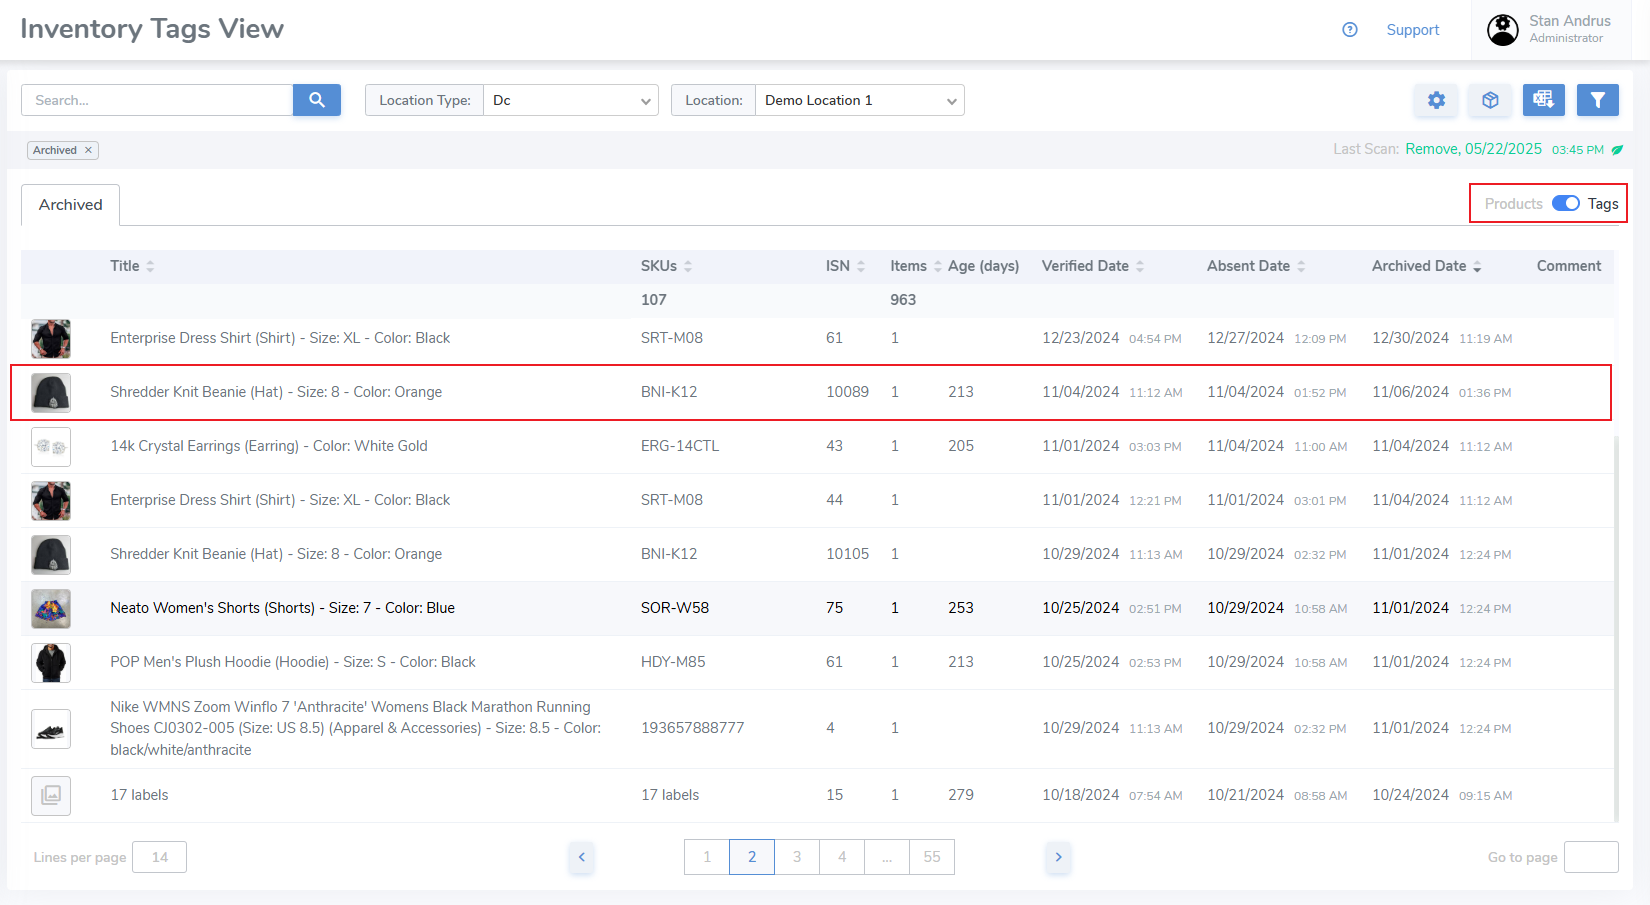](https://kb.simplerfid.com/uploads/images/gallery/2025-05/ykYimage.png) ##### ****Archived > Tags View Pop-up**** - Clicking an individual item opens that item's pop-up which displays Verified, Absent & Archived dates. If item item doesn't have an Absent date it is because it was archived via a scan or a sales order verification. [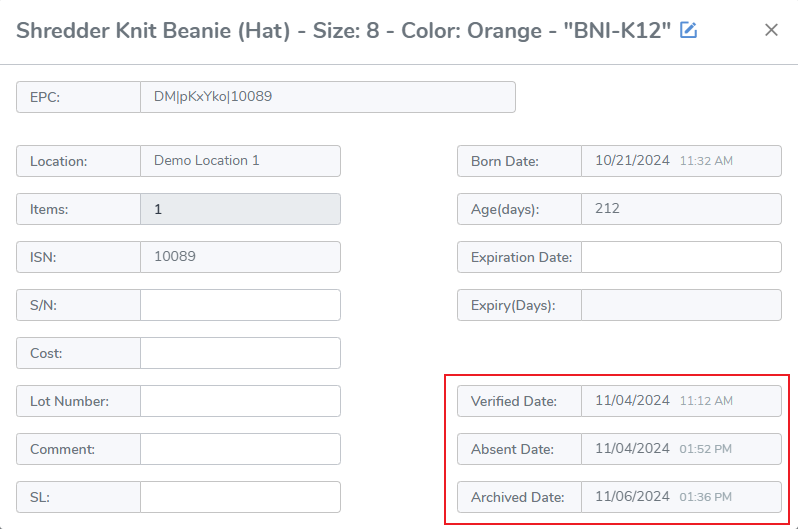](https://kb.simplerfid.com/uploads/images/gallery/2025-05/WOXimage.png) # Inventory: Tag Level Properties View & edit tag level properties from both the ****Products & Tags**** views ##### ****Products view**** [](https://kb.simplerfid.com/uploads/images/gallery/2025-06/Jk3image.png) - From the Product's level view click on any Product ##### ****Products View: Tags Level Pop-up**** This displays tag level details for each Product. From this pop-up a user can edit information for a product including Expiration Date, Lot #, Cost, S/N, and SL (Sublocation). [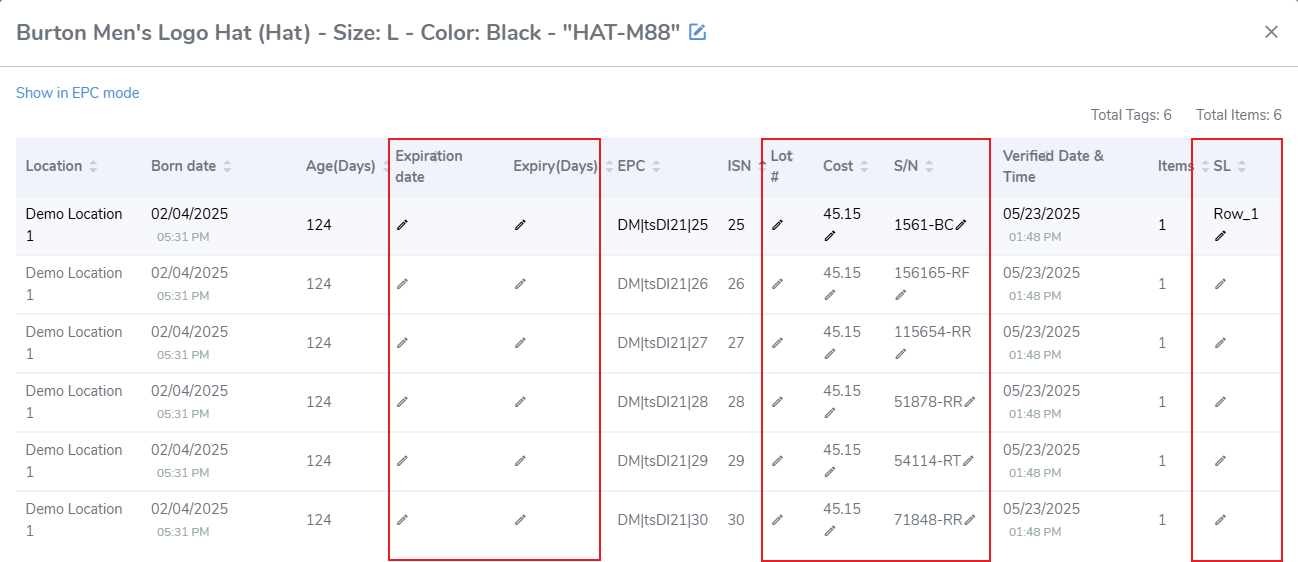](https://kb.simplerfid.com/uploads/images/gallery/2025-06/WTHimage.png) ##### ****Product View Tags Pop-up: Adjusting the "Items Per Tag"**** Items created for anything greater than 1 can be edited from the Products view pop-up. To edit the case quantity: - Click on the value [](https://kb.simplerfid.com/uploads/images/gallery/2025-06/tIpimage.png) - Edit the value - Click out of the cell and it will save [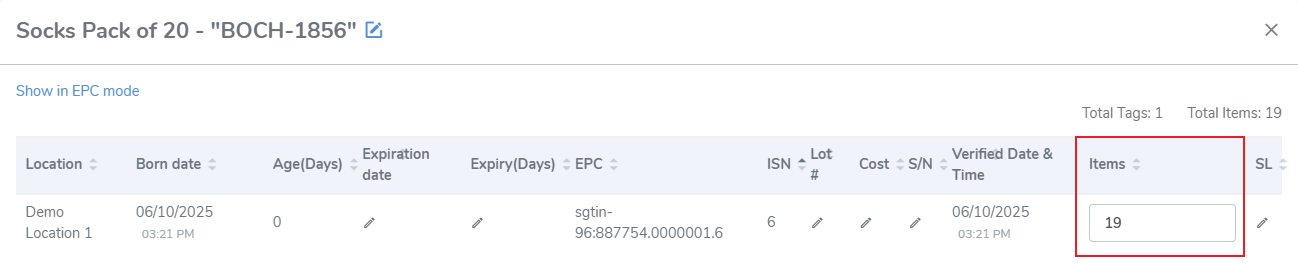](https://kb.simplerfid.com/uploads/images/gallery/2025-06/bPsimage.png) ##### ****Inventory: Tags View**** The Inventory Tags view displays item level details, one row for one item. From this view a user can see the internal serial number (ISN) of the tag, and the number of items each tag represents. Other properties can be added to the display from the settings icon located to the right of the Audit Inventory button. [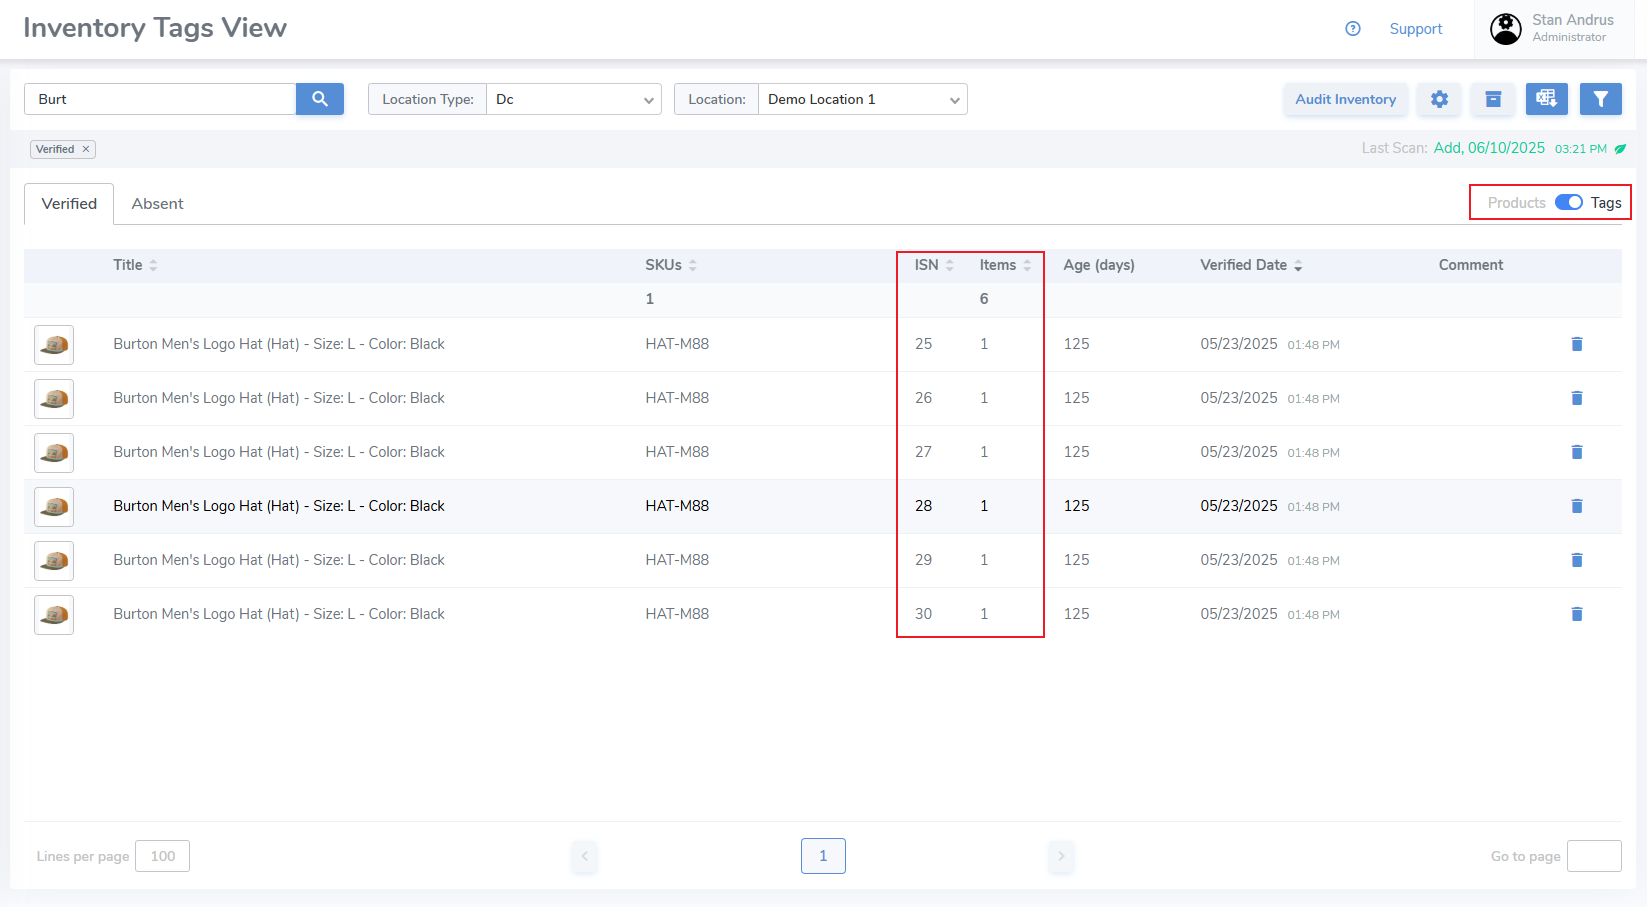](https://kb.simplerfid.com/uploads/images/gallery/2025-06/P0Rimage.png) ##### ****Tags View: Individual Item Pop-up**** Click on the row to view an individual item. In the below example you can see that the ISN is number 25, and the tag represents 1 item. From this pop-up edit any of the tag level properties, including Sublocation. Additionally, you may enter a "comment" related to the item. [](https://kb.simplerfid.com/uploads/images/gallery/2025-06/MvDimage.png) ##### ****Tags View: Adjusting the "Items Per Tag"**** For an item that is a multiple quantity you can click on the row [](https://kb.simplerfid.com/uploads/images/gallery/2025-06/6Q3image.png) ##### ****Tags View: Item Level Pop-up**** From the individual item pop-up, edit the Items quantity [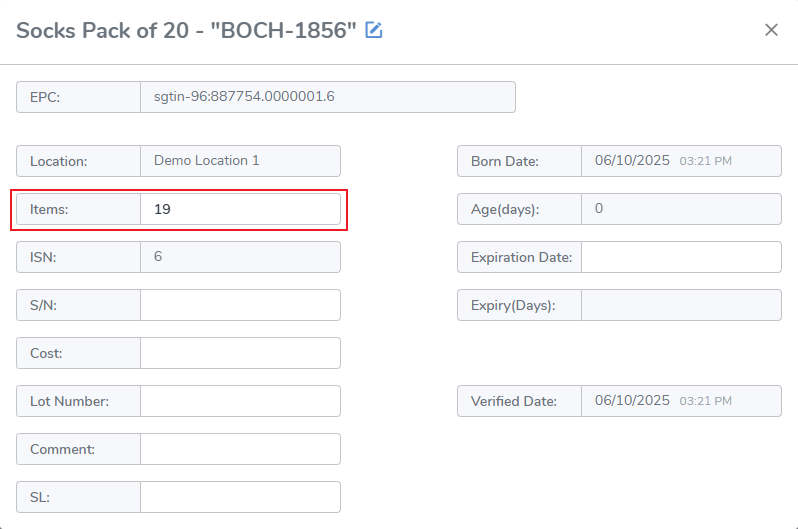](https://kb.simplerfid.com/uploads/images/gallery/2025-06/J7vimage.png) # Navigation Menu: Inventory Compare (Currently hidden) Use the Inventory Compare page to view RFID vs Partner counts, filter items, generate print jobs, and create audits. To access this page search portal.simplerfid.com/inventory-compare # Web Portal: Inventory CompareThis page is currently hidden and can be accessed by manually searching via the URL: portal.simplerfid.com/inventory-compare
From the inventory compare page a user can view RFID and Partner inventory numbers. This provides a simple interface which allows a user to review their products and initiate important actions. The compare page contains the following elements: - Search window - Location Selector - Filters for: Over expected, under expected, matched, and out of stock - Checkboxes on the right to select a record(s) Configurable Columns The page also allows the user to configure the product elements and display what matters to the user. Click on the configuration icon on the right corner - Choose the properties you wish included - Drag the property to the order you wish it to appear [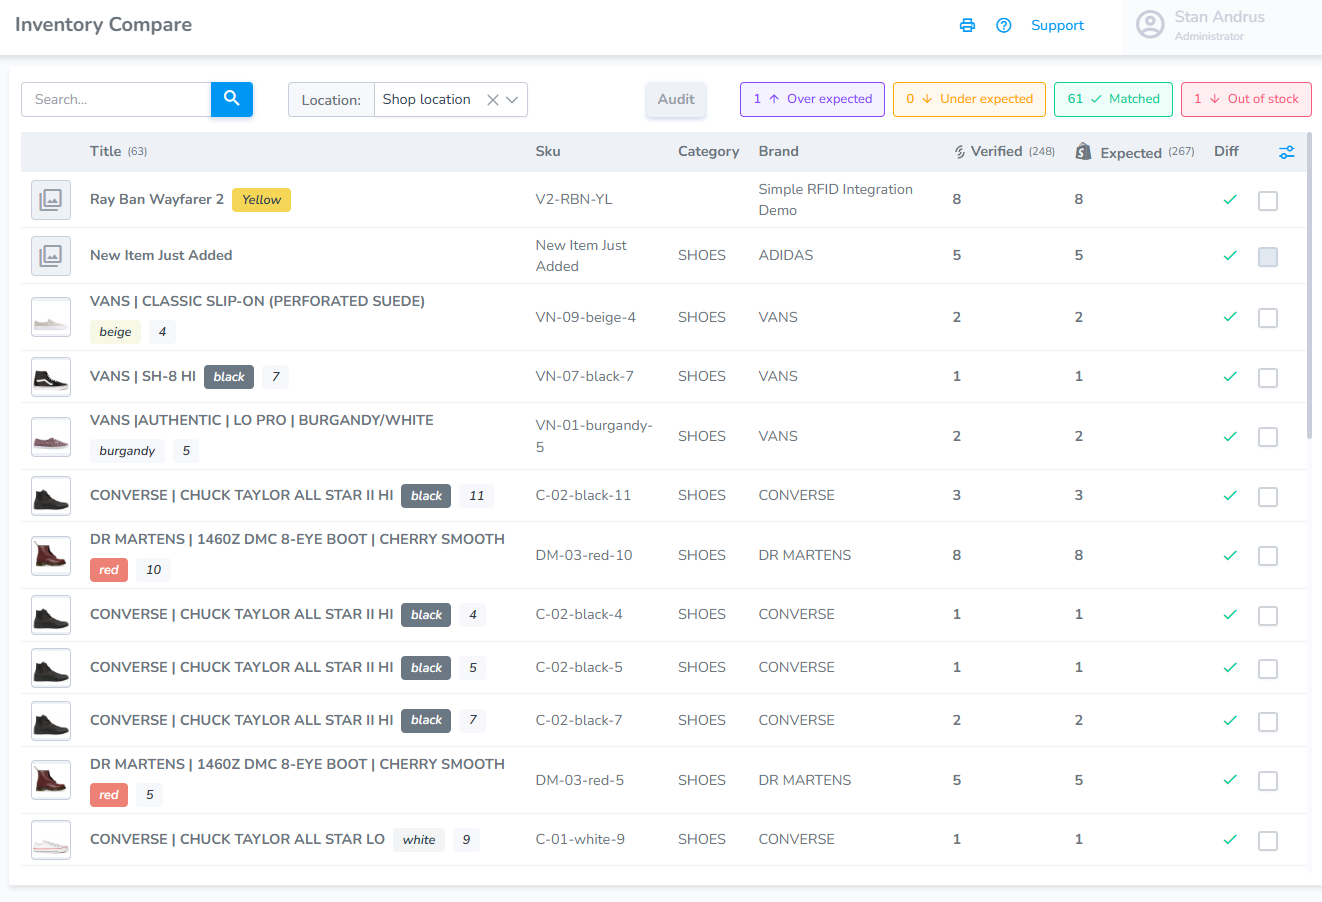](https://kb.simplerfid.com/uploads/images/gallery/2026-07/1rgimage.png) #### ****Starting an Audit from the Inventory Compare page**** To begin an audit from the Inventory Compare page: Select the products you wish to include checkbox Click the Audit button [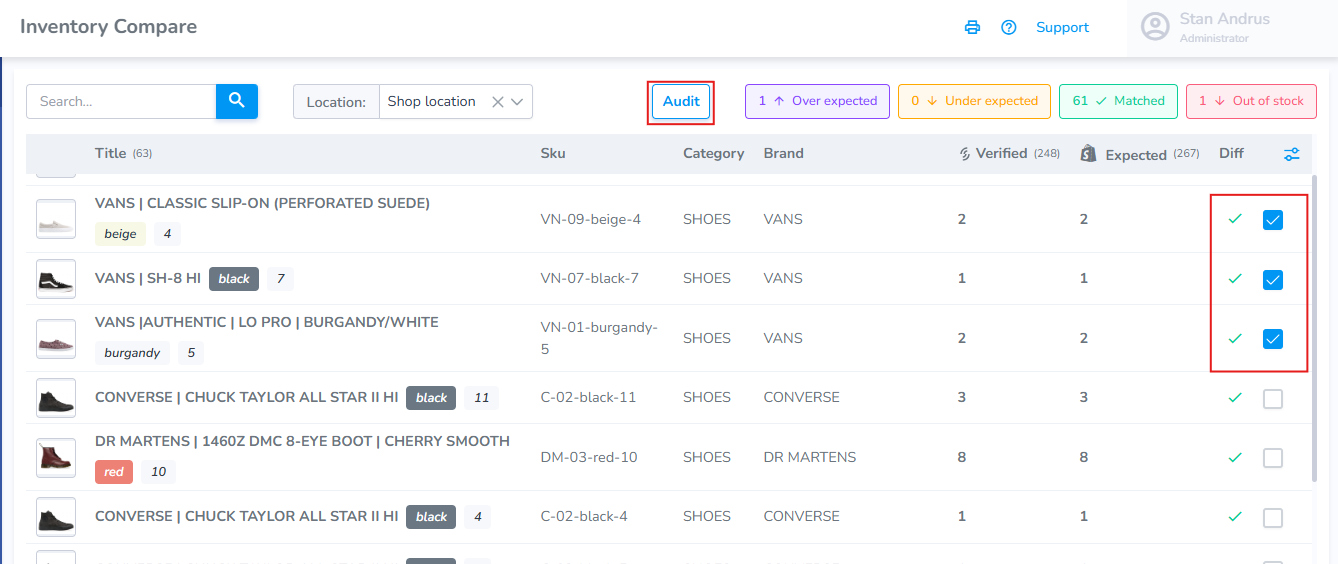](https://kb.simplerfid.com/uploads/images/gallery/2026-07/teCimage.png) After clicking Audit" you will be redirected to the Audit page with the associated products added to the Draft audit. Click "Start Audit" to Open the audit and begin scanning. [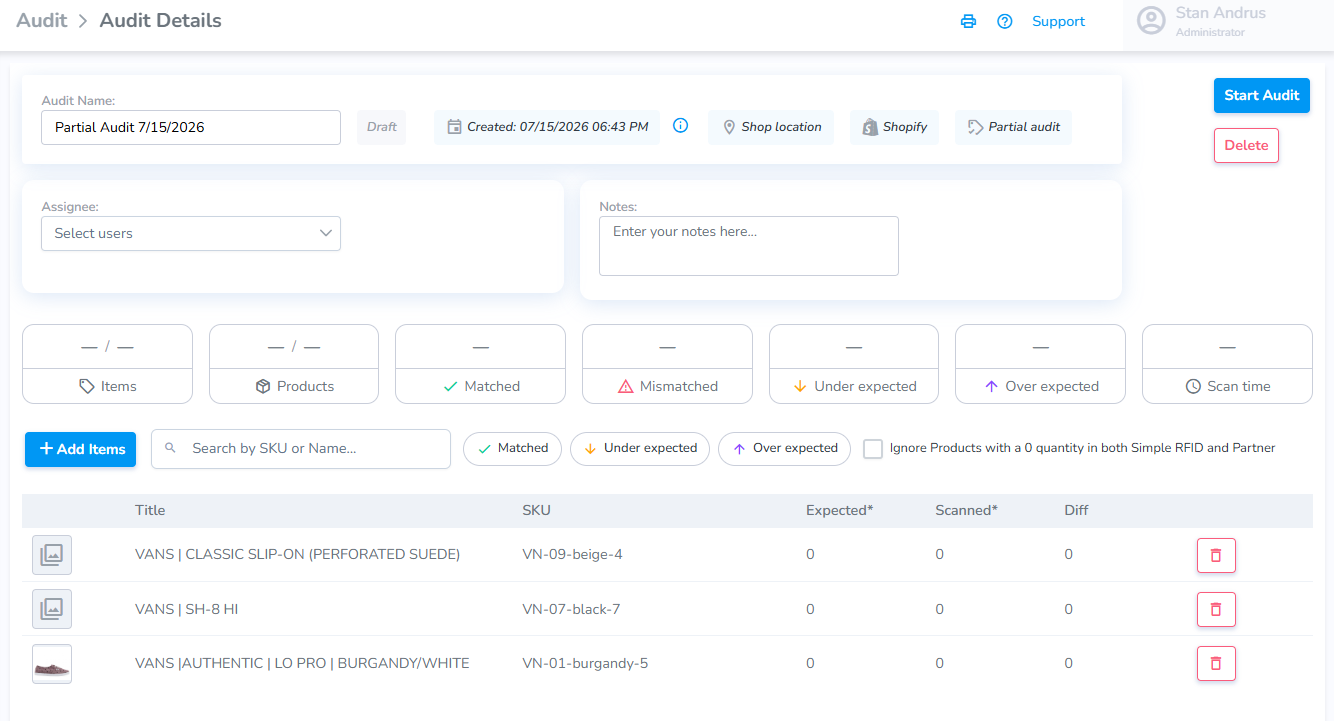](https://kb.simplerfid.com/uploads/images/gallery/2026-07/GXnimage.png) #### ****Printing from the Inventory Compare page****This feature is not yet available and is under development.
# Navigation Menu: Audit # Web Portal: Audit: View, Create, Start, Close ## All Audits View The ****Audit**** page in the Simple RFID Web Portal serves to create, manage, and review inventory audits. To access the page, select ****Audit**** from the left navigation menu. The Audit page displays a list of all Audits. Click any Audit to view its details, progress, and results. Use the top filters to quickly locate an Audit: - ****Location**** – Filter by location. - ****Type**** – Filter by the type of Audit: ****Full****, ****Partial****, or ****Template****. - ****Status**** – Filter by the Audit's status: ****Draft****, ****Open****, or ****Completed****. - ****Date**** – Filter to view Audits created or performed within a specific date range. To create a new Audit, click the ****blue + (plus)**** button in the upper-right corner of the page. [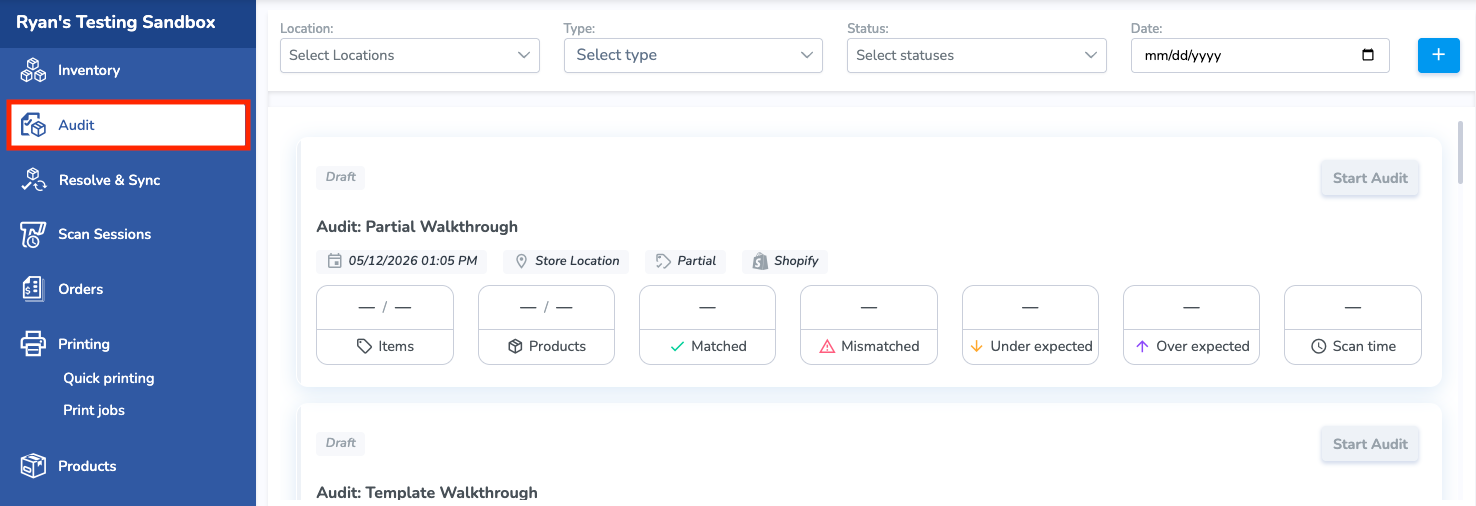](https://kb.simplerfid.com/uploads/images/gallery/2026-05/Zz0brave-screenshot-portal-simplerfid-com-1.png) --- ### ****Create a New Audit****You can also create an Audit from the [Mobile App](https://kb.simplerfid.com/books/software-mobile-app/page/software-mobile-app-create-an-audit-from-the-mobile-app)
After clicking the + button the ****Create New Audit**** pop-up window will appear. Here you'll enter the ****Name**** of the Audit, the ****Source**** of the comparison, the ****Location**** where the audit is being conducted, and the ****Products**** being audited: [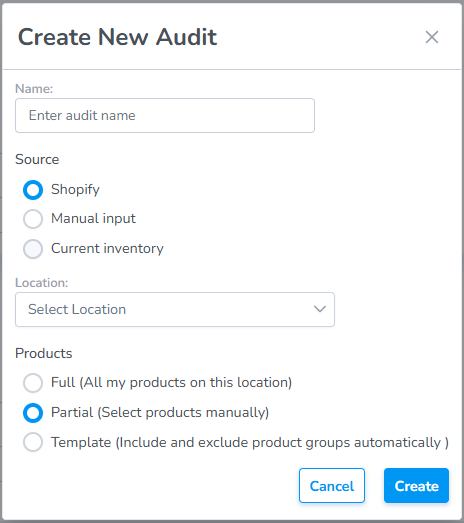](https://kb.simplerfid.com/uploads/images/gallery/2026-07/image.png) ****Name****: - This is a free text field to name the audit anything you choose. If you choose to keep this field blank the system will auto-generate an Audit Name for you. ****Source:**** - ****Integrated Platform:**** Shopify, Apparel Magic, etc. - ****Manual Input:**** This option allows you to enter your own data (manually or uploaded from a spreadsheet). To learn how to add your own data source to an audit please follow the [steps found in this article](https://kb.simplerfid.com/books/processes-audit-your-inventory/page/create-audit-scan-identify-mismatches). - ****Current Inventory:**** Not yet implemented. ****Location:**** - Choose the location where the audit is being conducted ****Products****: - ****Full****: All of the products in your location - ****Partial****: Specific products that you define - ****Template****: Products from a reusable template you define Click "****Create****" to create - The Audit will be created in ****Draft**** status. - Once created, inside the ****Audit****, you can ****Assign**** a user, add ****Notes**** for future reference, or ****Delete**** the audit. [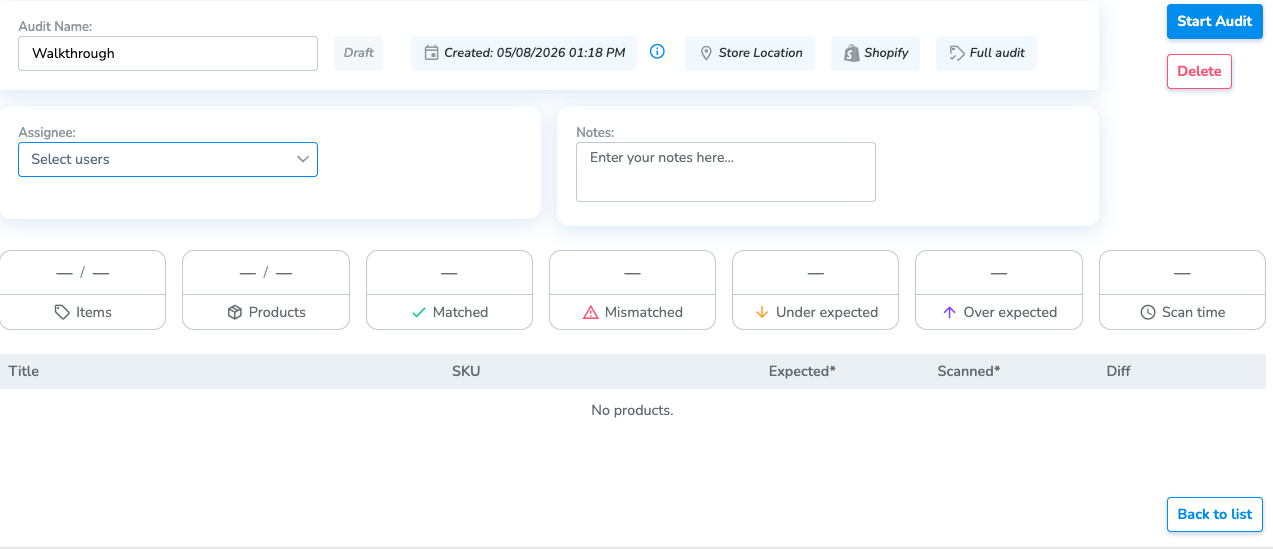](https://kb.simplerfid.com/uploads/images/gallery/2026-05/i6Eimage.png) --- ### ****Add Products to an Audit********No Integration?:**** Enter ****YOUR data**** (****manually**** or ****uploaded from a spreadsheet****) into the Audit using the [steps found in this article](https://kb.simplerfid.com/books/processes-audit-your-inventory/page/create-audit-scan-identify-mismatches).
#### The instructions below relate to Adding Products to an Audit via an integrationProduct inventory quantities are not displayed until you click ****Start Audit****. When the Audit is Started, Simple RFID retrieves the on hand inventory quantities from the selected ****Source**** (such as Shopify or Apparel Magic). These quantities become the baseline for comparing your RFID scan results during the Audit.
****Important:**** Once you click ****Start Audit****, the Audit is locked. You will no longer be able to add or remove products from the Audit.
### Full Audit If you select ****Full****, you do not need to add products. Clicking ****Start Audit**** loads all active products from the selected ****Source**** and ****Location**** automatically into the Audit along with their on hand inventory quantities. ### Partial Audit If ****Partial**** is selected, the Audit will include an ****Add Items**** button. Click ****Add Items**** to search for and select the specific products you want to include in the Audit. Once you have added all desired products, click ****Start Audit**** to load their current inventory quantities and begin the Audit. [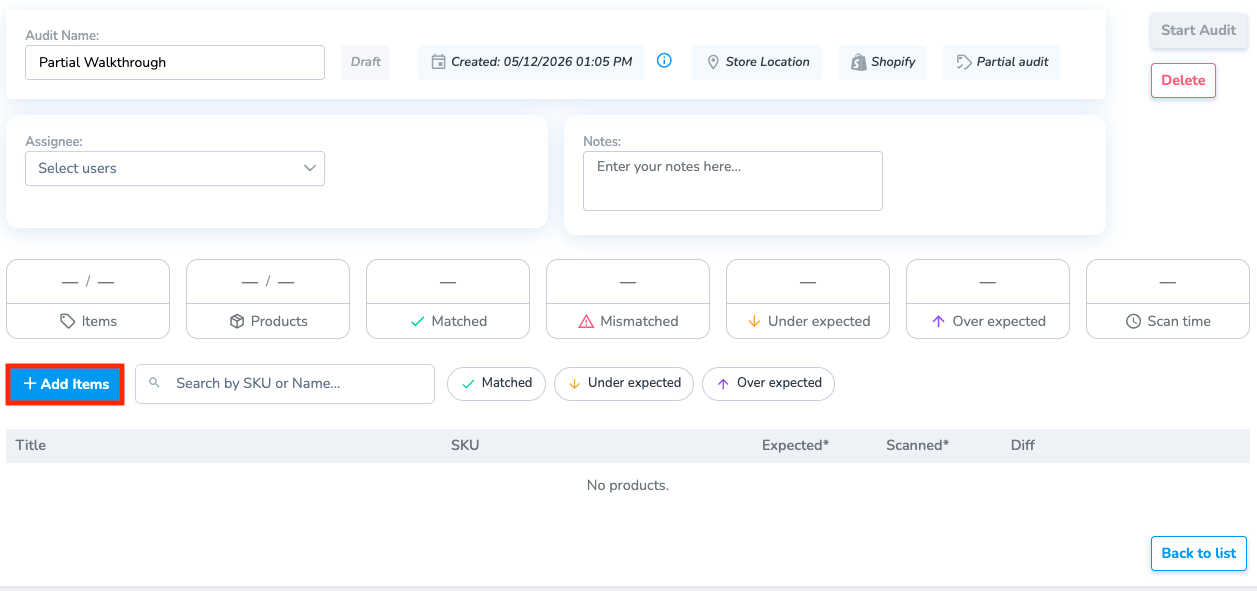](https://kb.simplerfid.com/uploads/images/gallery/2026-05/CNebrave-screenshot-portal-simplerfid-com-2.png) ### Template Audit If you wish to add or exclude products from a specific category, brand or price select ****Template.**** To create a new template or modify template settings: - Click the ****Configuration**** icon in the ****Templates for Product groups**** window to open the ****Templates**** side menu. [](https://kb.simplerfid.com/uploads/images/gallery/2026-05/brave-screenshot-portal-simplerfid-com-3.png) ### Managing Audit Templates Use the controls in the Templates window to create and manage your saved Audit Templates: - Click the ****+ (Plus)**** button to create a new template. - Click the ****Pencil**** icon to edit an existing template. - Click the ****Trash**** icon to permanently delete a template. - Click ****Use Template**** (or ****Include****) to apply the selected template to the current Audit. 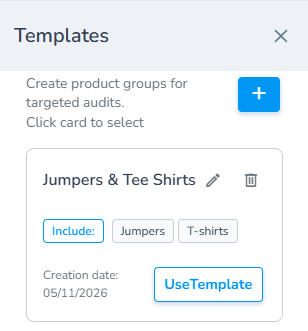### Creating a New Template When creating a new template, provide the following information: - ****Name**** – A descriptive name for the template. - ****Description**** – An optional description to help identify the template's purpose. - ****Categories**** – Select the product categories to include in or exclude from the template.Category values are populated from the product ****Type**** field in Shopify. Products are included in the template based on the categories you select.
[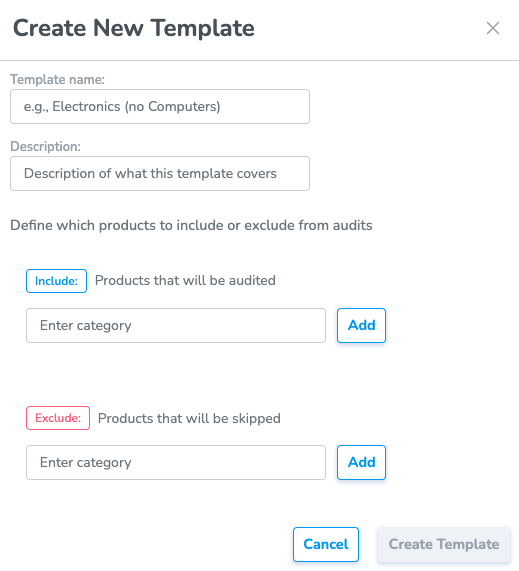](https://kb.simplerfid.com/uploads/images/gallery/2026-05/brave-screenshot-portal-simplerfid-com-4.png) When you have finished configuring the template, click ****Create Template**** to save it. After applying the template to the Audit, click ****Start Audit**** to retrieve the current ****On Hand**** inventory quantities for the selected products. ## Start Audit (Status: Open) Once all desired products have been added to the Audit, click ****Start Audit**** to move the Audit to ****Open**** status. The Audit grid displays information for each product including: - ****Expected**** – Displays the current ****On Hand**** inventory quantity retrieved from the selected source (such as Shopify or Apparel Magic). This serves as the baseline for comparison during the Audit. - ****Scanned**** – Initially displays 0 for every product because no RFID tags have been scanned. As RFID tags are scanned and uploaded, this value updates to reflect the total number of tags detected for each product during the current Audit. - ****Diff**** – Displays the difference between the ****Expected**** and ****Scanned**** quantities, allowing you to quickly identify inventory discrepancies. [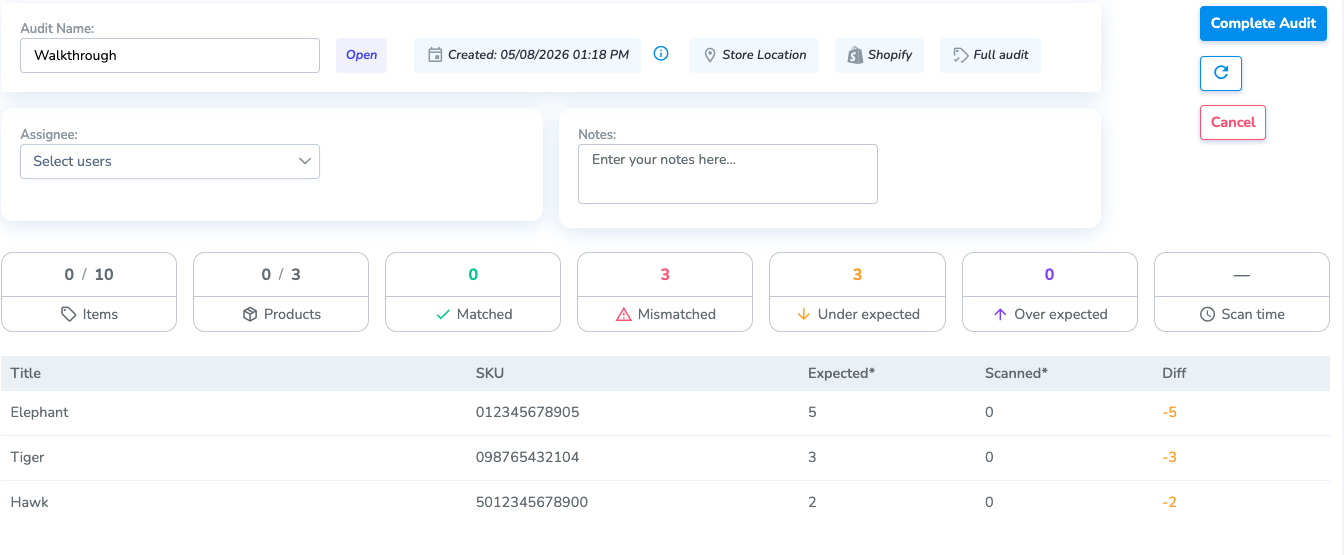](https://kb.simplerfid.com/uploads/images/gallery/2026-05/VcUimage.png) --- ## ****Scanning Items in Audit from Mobile App**** Next the user will open the mobile device and scan the products. Please view the [Mobile App: Audit: Scan Items in Audit](https://kb.simplerfid.com/books/software-mobile-app/page/mobile-app-audit-scan-items-in-audit) article to view these steps. --- ## Closing an Audit (Status: Completed) After all RFID scans have been completed and uploaded, refresh the Audit page in the Simple RFID Web Portal to view the latest results. The Audit displays the updated ****Expected****, ****Scanned****, and ****Diff**** values for each product, allowing you to quickly identify ****Matched****, ****Over Expected****, and ****Under Expected**** inventory counts. These results highlight any discrepancies between your partner system's inventory (such as Shopify or Apparel Magic) and the inventory detected through RFID scanning. [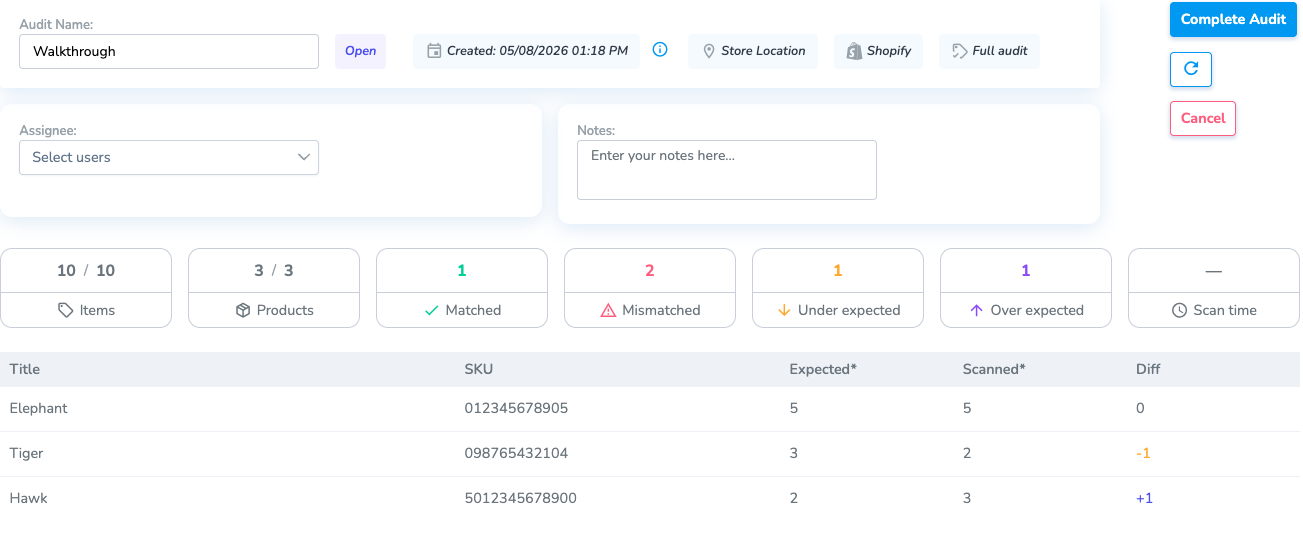](https://kb.simplerfid.com/uploads/images/gallery/2026-05/zHOimage.png) - When you have finished scanning and verified the Audit results, click ****Complete Audit****.Completing the Audit changes its status to ****Completed**** and prevents any additional RFID scans from being uploaded.
--- ## ****Manage Mismatches**** After the Audit has been completed, navigate to the [Resolve & Sync](https://kb.simplerfid.com/books/software-web-portal/page/web-portal-resolution-center-review-resolve-mismatches) page to review all mismatches via the Manual Review process to determine the appropriate corrective actions that need to be completed. # Web Portal: Manual Input: Adding Products Manually to an Audit ## Source: Manual InputDo you want to create an audit using data from another system? This article walks through the steps to load your own data into an audit.
#### Steps To create an audit using our own data source, follow the same steps found in the Audit with an Integration article with a few small exceptions: From the ****Create New Audit**** pop-up: - Select ****Manual input**** as your Source - The Products selector will defaults to ****Partial**** [](https://kb.simplerfid.com/uploads/images/gallery/2026-07/GEHimage.png) - Finally, click "****Create****" to create The Audit will be created in ****Draft**** status. ## Add Products Manually/Spreadsheet to an Audit****Important:**** Once you click ****Start Audit****, the Audit is locked. You will no longer be able to add or remove products from the Audit.
Next, add products to your audit via two methods: - ****+ Add Items**** button to search and add items manually - ****Import from Excel**** button to upload a spreadsheet 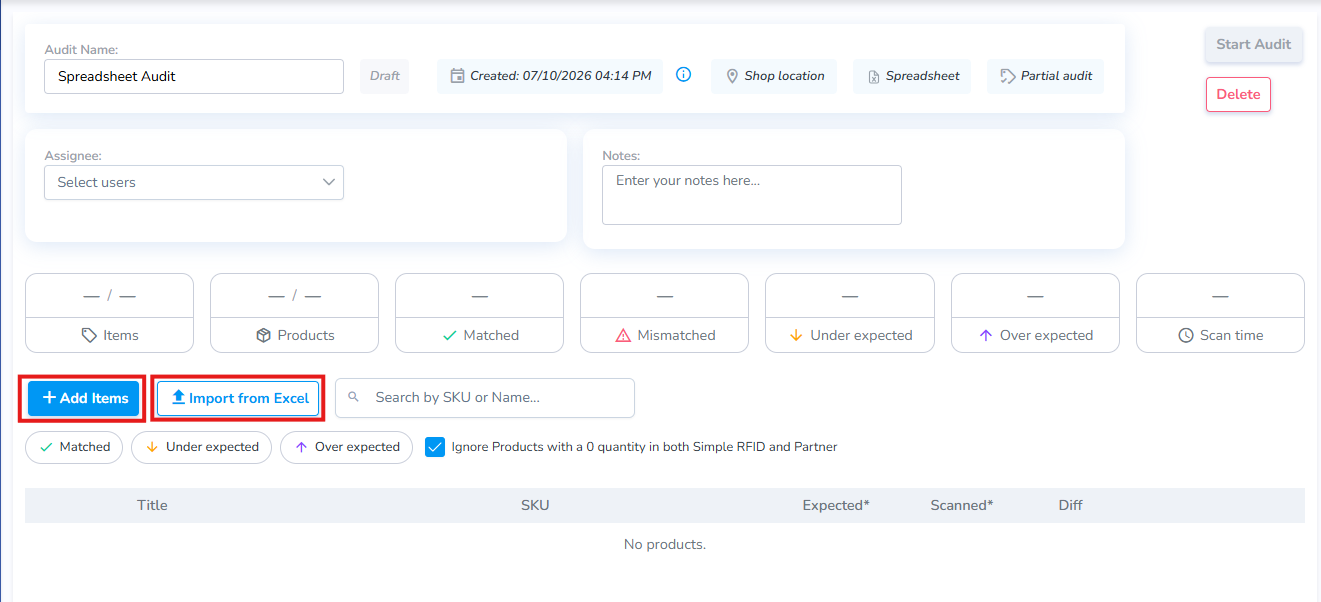### ****+ Add Items Manually**** Clicking ****+ Add Items**** opens the ****Add Items**** pop-up window which allows the user to search for and select the specific products to include in the Audit. [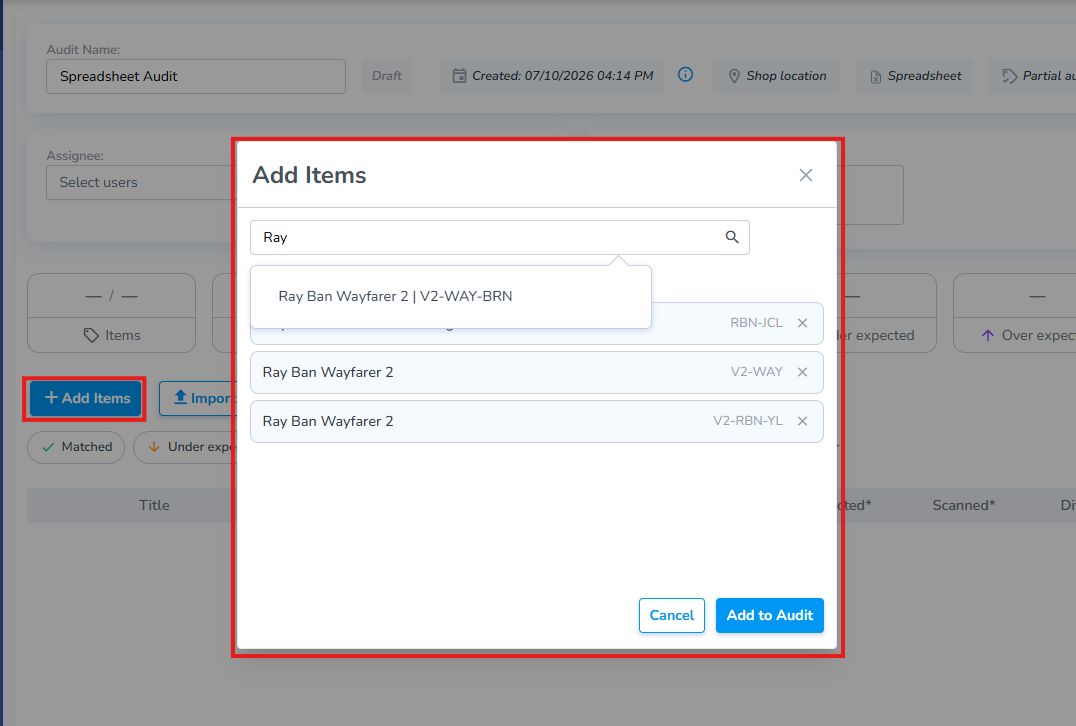](https://kb.simplerfid.com/uploads/images/gallery/2026-07/0jqimage.png) ### ****Import from Excel**** Clicking the Import from Excel button opens the Import Pop-up. You can use the template provided to enter details, or use your own sheet and map the corresponding columns. #### Use the Simple RFID Template - From the pop-up window click "Get Template" to download a formatted spreadsheet - The sheet contains two columns: SKU and Expected quantities [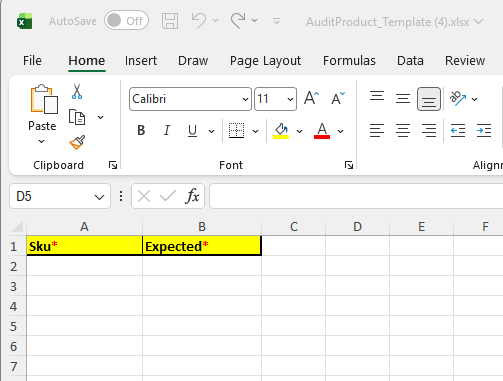](https://kb.simplerfid.com/uploads/images/gallery/2026-07/dJrimage.png) #### Use your Own Spreadsheet and Map Columns Click the ****Custom column mapping**** link to associate the corresponding columns from your own spreadsheet. Choose ****Match by Title**** if your sheet contains an identifiable column header [](https://kb.simplerfid.com/uploads/images/gallery/2026-07/8Oeimage.png) Choose ****Match by Index**** if you wish to map by the column letter: A, B, C, etc.[](https://kb.simplerfid.com/uploads/images/gallery/2026-07/gC5image.png) [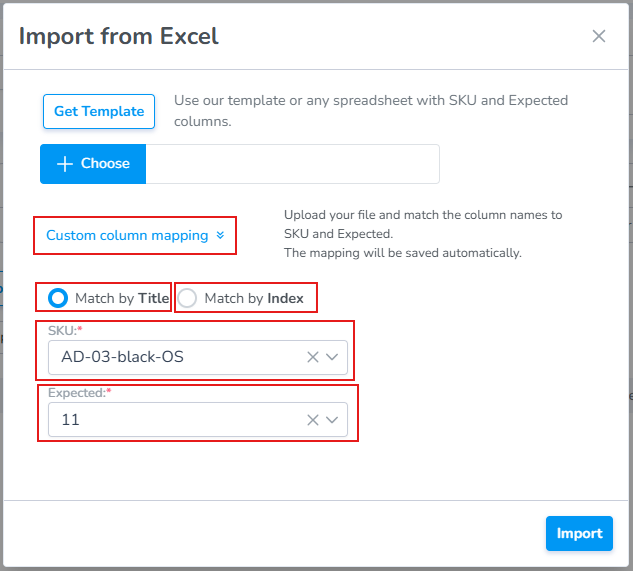](https://kb.simplerfid.com/uploads/images/gallery/2026-07/IkQimage.png) Finally, click Import to add the products to your audit. # Navigation Menu: Resolve & Sync # Web Portal: Resolution Center: Review & Resolve Mismatches This article describes the process of reviewing mismatches generated from an inventory audit, determining truth, then performing necessary RFID tasks and inventory adjustments to align the two numbers. The tab contains 4 tabs: Mismatches, ### ****Mismatches**** The Mismatches tab contains a list of the items to review from your audit. The user must review and choose who to trust: ****Trust RFID Count**** - If you trust your RFID it means: - If the RFID count is greater than the Partner Count = increase Partner Count to match the RFID. - If the RFID count is less than the Partner Count = decrease Partner Count to match the RFID. ****Trust Partner Count**** - If you trust your Partner Count it means: - If the RFID is greater than the Partner Count = Perform an "Archive" scan on tags to reduce RFID count to match Partner. - If the RFID is less than the Partner Count = Print and/or scan tags to increase RFID count to match Partner. ****Manual Count -**** If you trust neither the RFID or Manual Count it means: - The physical count may differ from both the RFID and the Partner Counts, therefore you must perform a manual count, then enter this count. - If this count differs from both the RFID and Partner Counts tasks will be generated to adjust both RFID and Partner. ****When should you choose each Source of Truth?**** ### ****RFID Count**** Choose the ****RFID Count**** if you trust that every item has been tagged with RFID and that all tagged items were successfully scanned. This option is often preferred when: - If the Partner Count is more than the RFID Count: You want to avoid ****overselling**** by ensuring inventory is not overstated. - If the RFID Count is more than the Partner Count: The partner system quantity is too low and want to increase it to match the verified RFID scan. - You have confidence in your RFID tagging and scanning process. When ****RFID Count**** is selected as the source of truth, all generated tasks will be ****Adjustments**** to the partner system to match the RFID inventory. --- ### ****Partner Count**** Choose the ****Partner Count**** if you trust that the inventory quantity in your partner software is accurate. This option is commonly used when: - You are first implementing RFID and have not yet established confidence in your RFID data. - You believe the partner system reflects the correct inventory (because you recently counted) - You wish to align your RFID inventory with your existing records. When ****Partner Count**** is selected as the source of truth the result will be ****RFID tasks****, such as printing missing RFID labels or performing Add or Archive scans to match the partner inventory. --- ### ****Trust Neither / Manual Count**** Perhaps you don't trust either your RFID or Partner counts. In this instance you must physically count the items to determine the truth. If the manual count differs from both, ****both RFID and Partner tasks will be created****. --- ##### Assigning a Reason Users have the option of assigning a reason for each action to help in categorizing issues. --- #### ****Accessing the Resolution Center**** Once an audit is completed, all mismatched products are moved to the ****Resolution Center****. From there, users can access mismatches either: - Directly from the audit by selecting ****Resolution Center****, or - From the left navigation menu by selecting ****Resolve & Sync**** [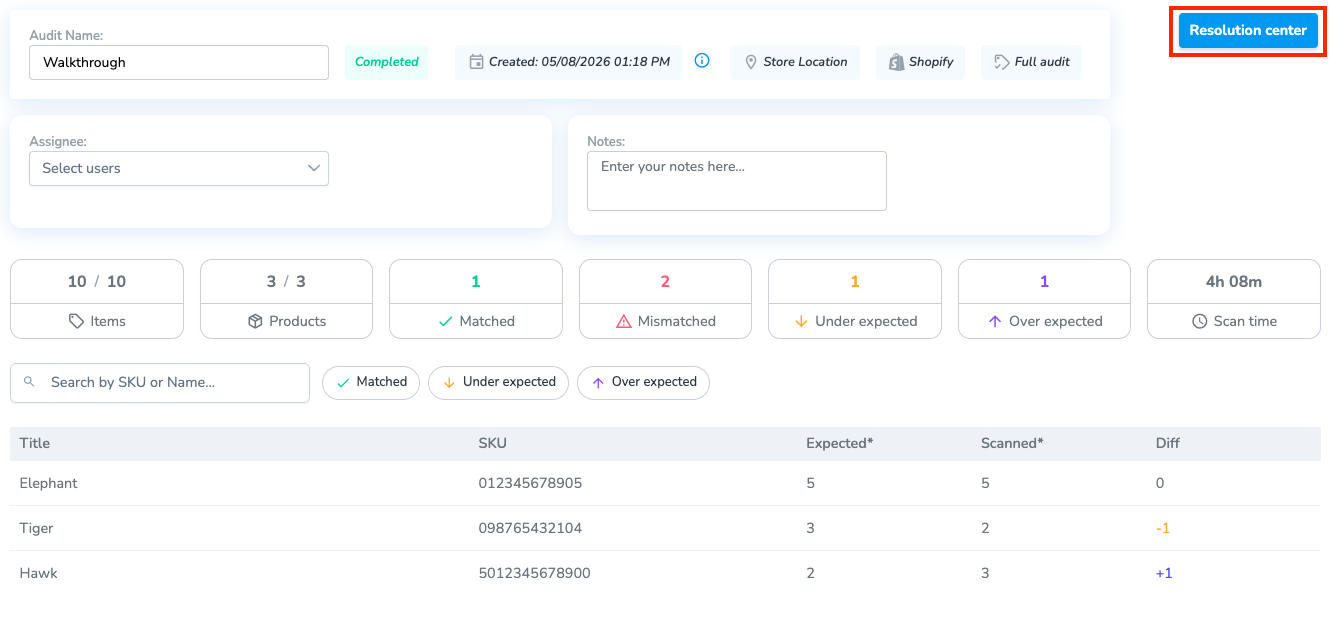](https://kb.simplerfid.com/uploads/images/gallery/2026-05/Z9Tbrave-screenshot-portal-simplerfid-com.png) ### ****Steps**** ### 1. ****Review Mismatches**** 1. ****Choose the product(s) you wish to review by clicking the checkbox(es) on the far right.**** 2. ****Next, click "Review" to manage the products.**** [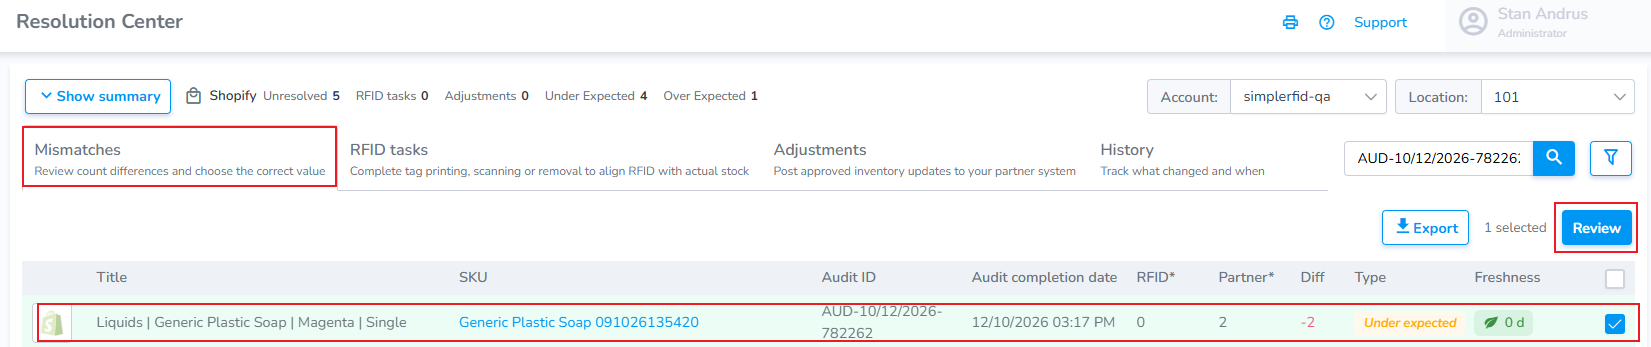](https://kb.simplerfid.com/uploads/images/gallery/2026-10/Of2image.png) --- ### ****2. Determine what to Trust**** ****1. Choose either RFID Count, Partner Count, or Manual Count**** - If Manual Count is selected you must enter the count ****2. After selecting the option, below each product card is displayed the "Generated Actions" which indicates what required actions will be.**** ****3. Finally, click the "Generate Actions" button at the bottom right.**** [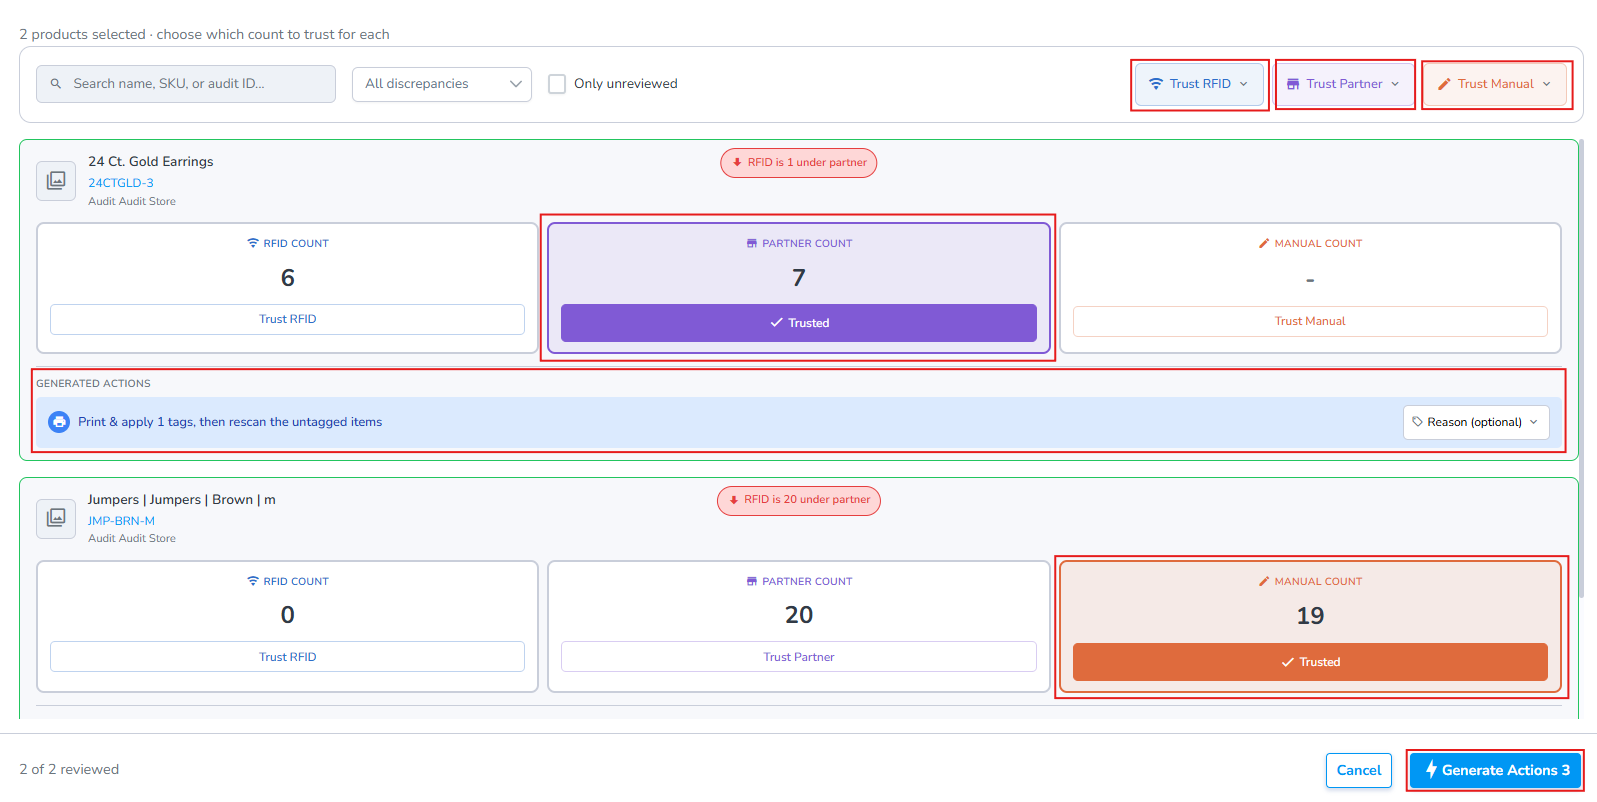](https://kb.simplerfid.com/uploads/images/gallery/2026-08/Yyrimage.png) ### ****3. Generate Actions**** ##### ****Complete Required RFID tasks & Partner Adjustments**** ****Once the "Generate Actions" button is clicked,**** [****RFID**** ](https://kb.simplerfid.com/books/software-web-portal/page/web-portal-resolve-sync-complete-rfid-partner-corrective-tasks)****tasks and**** [****partner adjustments****](https://kb.simplerfid.com/books/software-web-portal/page/web-portal-resolution-center-review-and-resolve-mismatches) ****are created (If you are auditing against a spreadsheet you'll use the spreadsheet export and perform adjustments**** [****Uploading corrections****](https://kb.simplerfid.com/books/software-web-portal/page/web-portal-resolve-sync-update-partner-counts-manually)****).**** # Web Portal: Resolution Center: Complete RFID tasks After ****Mismatches**** have been reviewed in the ****Resolution Center****, actions are required to align the RFID and Partner Count: ****These RFID tasks**** include ****Printing RFID tags****, performing an ****Add****, or ****Remove (Archive) Scans**** to align the RFID with the partner count. ## RFID tasks Click on the RFID tasks tab #### ****Print Missing Tags**** ****If the tags have not been printed**** ****- Click on the records you wish to print**** ****- Click the Print button**** ##### ****Associate Already Printed Tags**** ****If the tags have already been printed**** ****- Click on the records you wish to associate**** ****- Click the chevron, then click Select already printed tags**** #### - [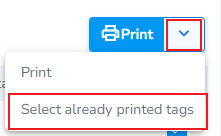](https://kb.simplerfid.com/uploads/images/gallery/2026-10/Skdimage.png) --- #### ****Perform Add or Remove (Archive) scans**** ****Finally, you will perfor********Note:**** To update RFID inventory, use the mobile app to perform ****Add**** scans (to increase the RFID count) or ****Archive**** scans (to decrease the RFID count). Printing actions must be completed from the RFID tasks tab or by the associated print job generated for the action.
****Coming Soon:**** The next version of the mobile app introduces a dedicated ****Pending Actions**** tab that consolidates all required RFID actions into one place. Instead of switching between multiple screens, users will be able to view and complete ****Add****, ****Archive****, and ****print actions**** from a single workflow. [Here's a preview](https://kb.simplerfid.com/books/software-mobile-app/page/mobile-app-rfid-actions-pending-actions).
--- # Web Portal: Resolution Center: Review and Resolve Mismatches ### Make Adjustments to Partner InventoryIf you are auditing data from a spreadsheet or non-integrated source, follow [these instructions](https://kb.simplerfid.com/books/software-web-portal/page/web-portal-resolve-sync-update-partner-counts-manually) to complete inventory adjustments.
#### ****Apply Adjustments**** 1\. Check the boxes on the right 2. Click the ****Sync**** button to updated counts [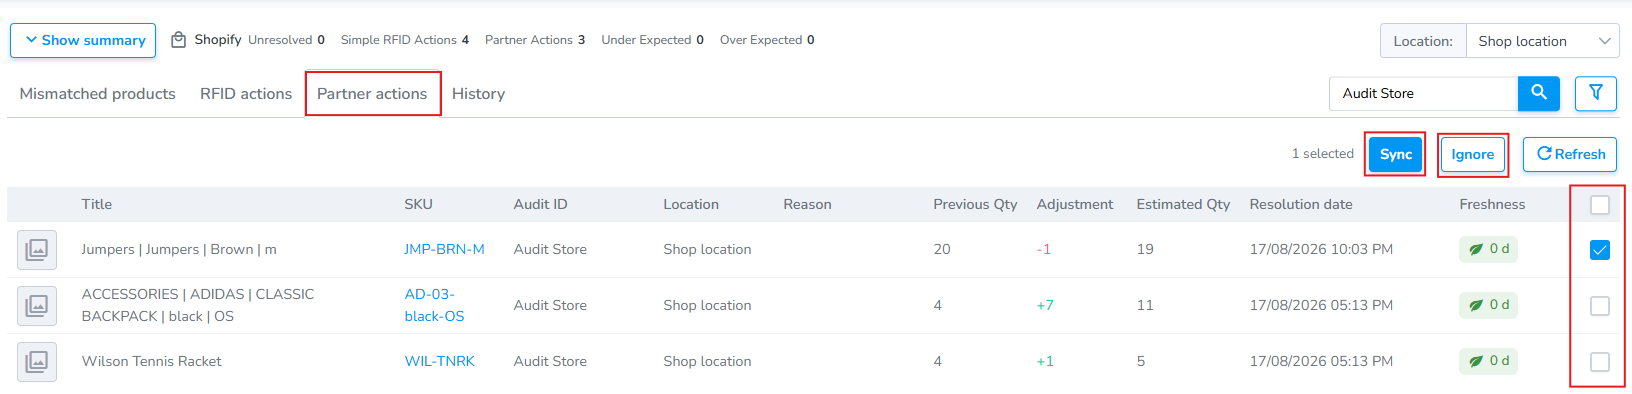](https://kb.simplerfid.com/uploads/images/gallery/2026-08/jWXimage.png) ##### ****Ignore**** Use the Ignore button to clear items from the ****Adjustments**** list without making changes to the partner quantity. #### # Web Portal: Resolve & Sync: Update Partner Counts ManuallyIf you are using a 3rd party source to audit, this article walks through the final step in the process--updating the partner system via spreadsheet import.
### Partner Corrections Now that you have reviewed your mismatched products, generated RFID tasks, and identified products which require an inventory correction you can export a spreadsheet with the corrections for upload into your third party source. #### Including Corrections in Exported Sheet Generate a spreadsheet containing corrections in two ways: - Click on the checkboxes on the right, then click Export Corrections to include specific records - Click the drop-down arrow, then click "Export all" to include all records in the export [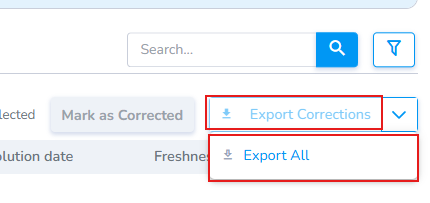](https://kb.simplerfid.com/uploads/images/gallery/2026-07/Gorimage.png) - Inventory corrections are generated as a spreadsheet. - Sheet is exported,, then upload into partner system. [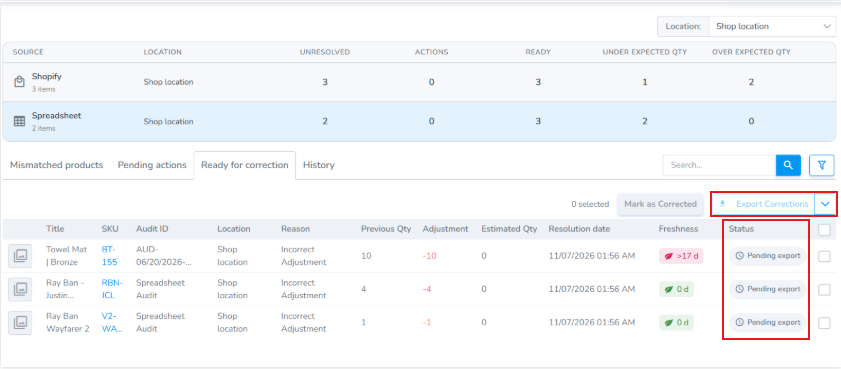](https://kb.simplerfid.com/uploads/images/gallery/2026-07/5OMimage.png) #### Product Correction Export - Take the correction sheet and upload it into your partner system [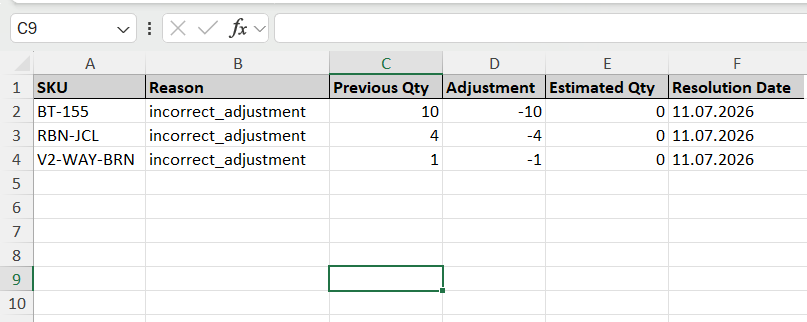](https://kb.simplerfid.com/uploads/images/gallery/2026-07/Bb6image.png) #### Mark as Corrected Once partner system has been updated the user "Mark(s) as Corrected" to indicate that the partner system has been updated. [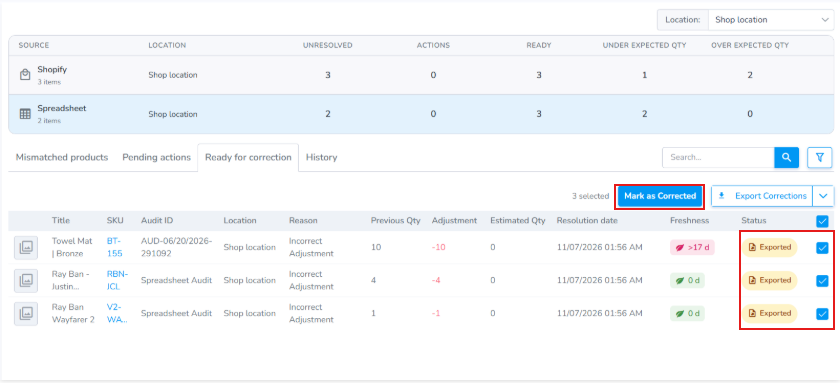](https://kb.simplerfid.com/uploads/images/gallery/2026-07/lZLimage.png) #### History tab Click on the History tab to view the products which have been updated. They will be marked as "Corrected." [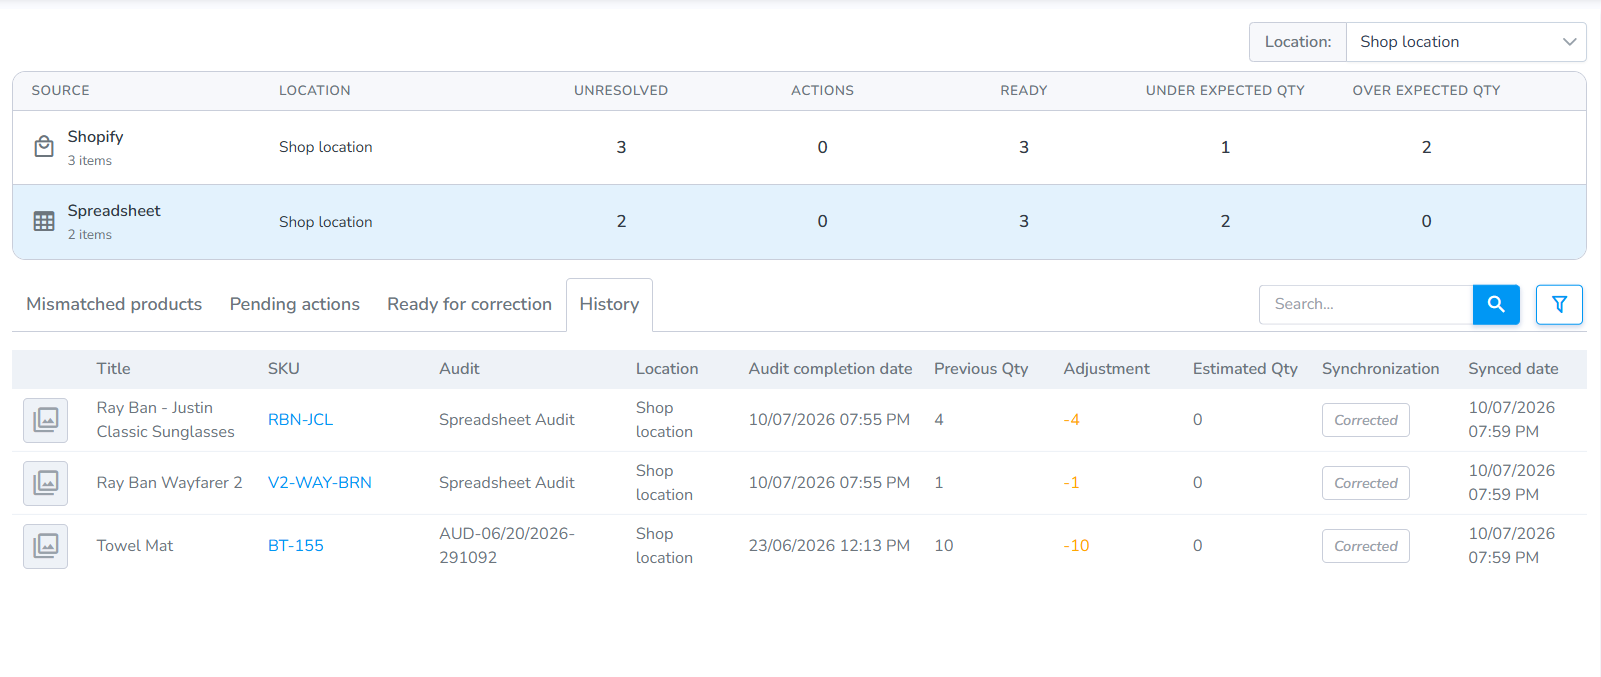](https://kb.simplerfid.com/uploads/images/gallery/2026-07/ETnimage.png) #### # Navigation Menu: Calculate Reorder Set Min & Max thresholds to streamline reordering # Calculate Reorder ## Manage your inventory using Min/Max templates to create Orders. Creating Stock Templates is a great way to manage on-hand inventory. These templates allow you to set inventory thresholds which provide the framework for what should be on-hand and what you need to order. ****Original Stock Template**** 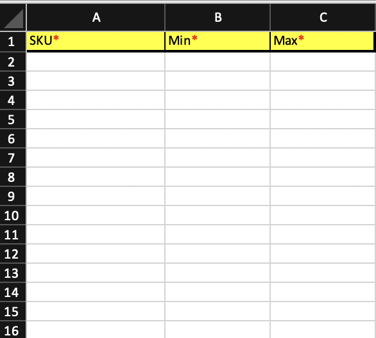 [How to Create a Stock Template](https://support.simplerfid.com/support/solutions/create-stock-template.html) - Go to the "Calculate Reorder" feature 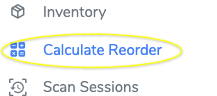 - Select the Template 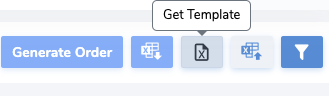 - Fill out the template then upload 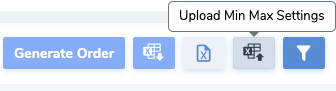 - Wait for the icon to say "Successful" then confirm order has been sent as-well as other features   # Setting Thresholds The Calculate Reorder tab allows users to set thresholds for what they wish to have in stock, and allows them to set a par of how much they must restock. ##### ****Set Thresholds from Product profile**** From the Products tab, search for the item you wish to set pars Locate it and open it [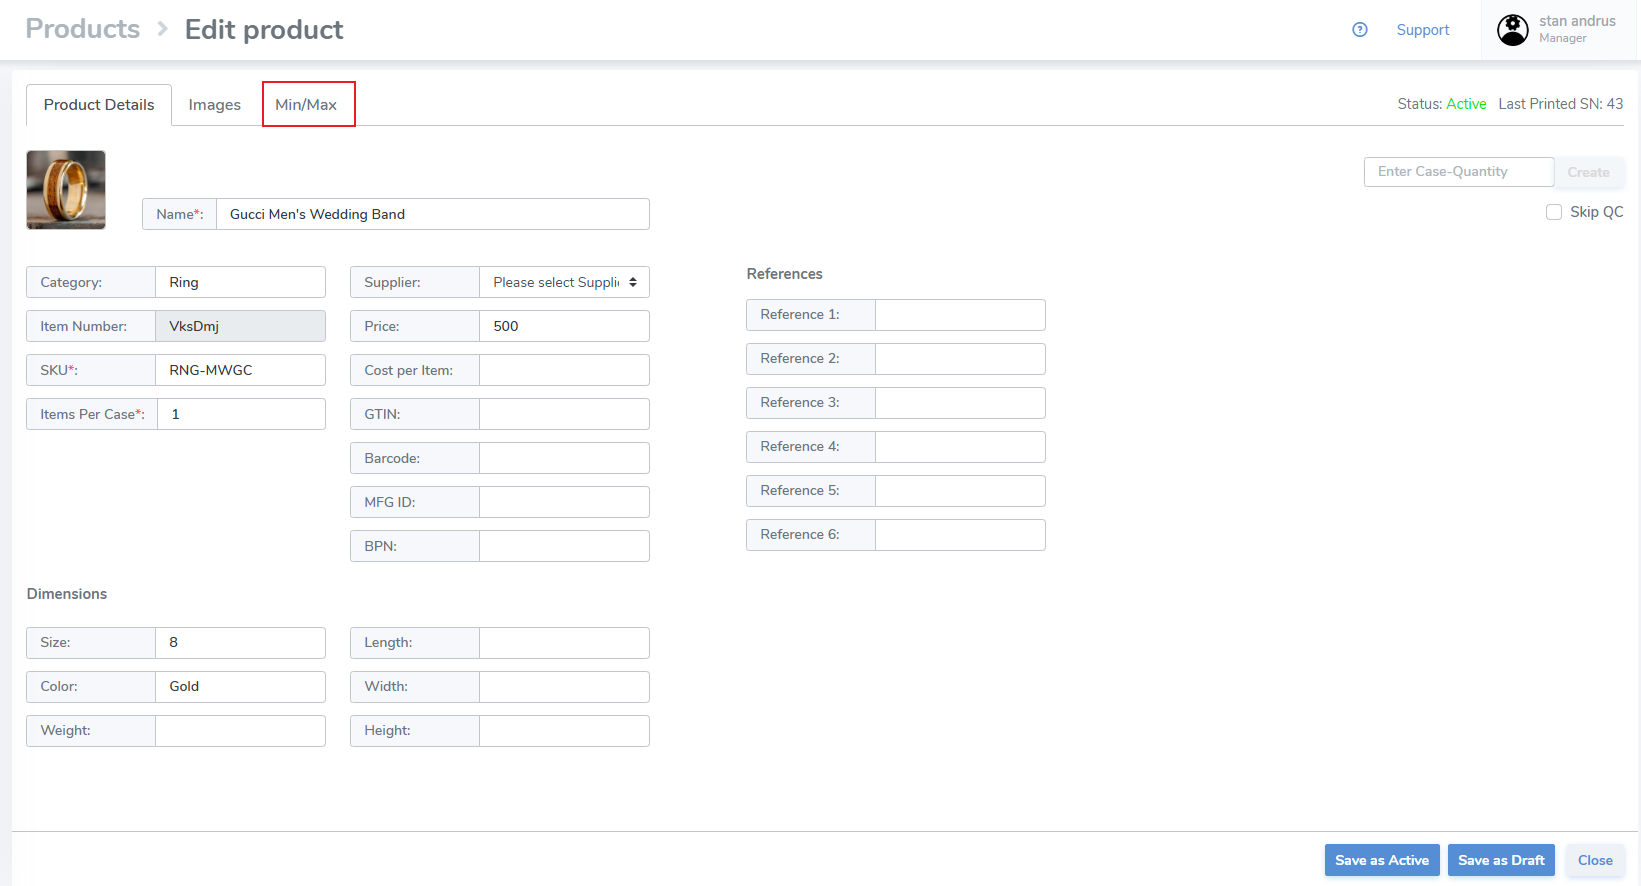](https://kb.simplerfid.com/uploads/images/gallery/2025-05/oWAimage.png) Click on the Min/Max tab - Choose the Location Type for the location(s) you wish to set thresholds, or choose 'All' to include all entity types - Click the checkboxes on the left - At the top enter the Min and Max - Click 'Apply' - The quantities will be applied to the location(s) and will be 'enabled' [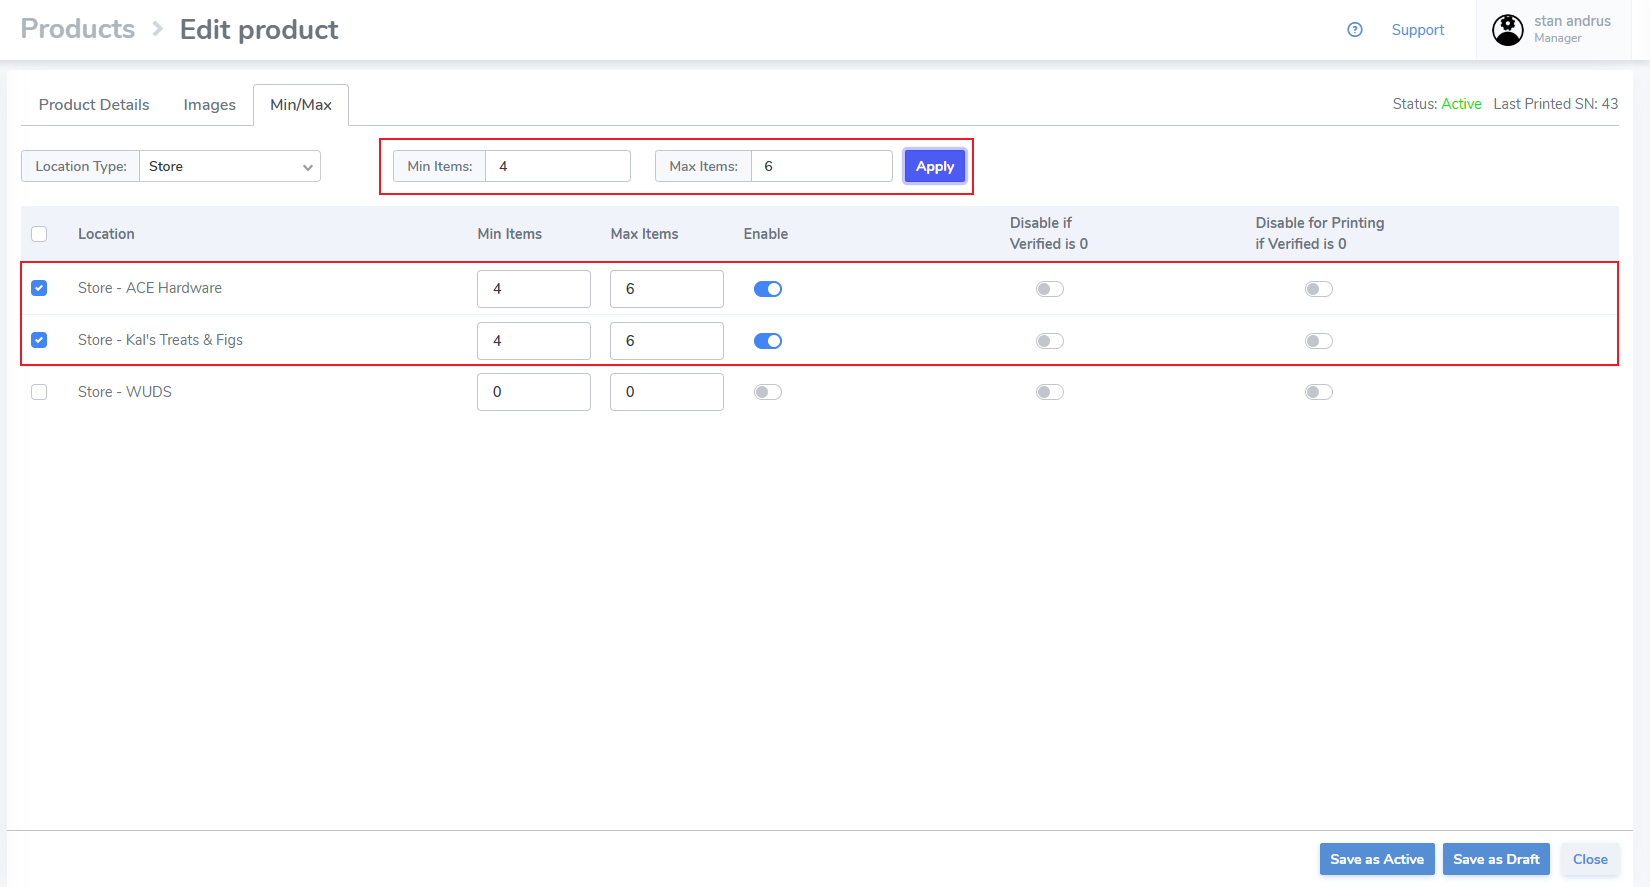](https://kb.simplerfid.com/uploads/images/gallery/2025-05/REuimage.png) Settings to Disable if Verified is 0 and Disable for Printing if Verified is 0 will be explained in a later article. - Click "Save as active" ##### ****Set from Calculate Reorder**** ****To quickly identify items that have not been assigned a Min & Max click the filter icon**** [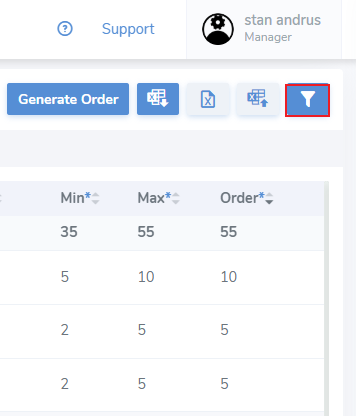](https://kb.simplerfid.com/uploads/images/gallery/2025-05/KRzimage.png) This will open the side filter menu 1\. Supplier - Set the supplier filter if products have been assigned a supplier to quickly filter them 2. Limit the items [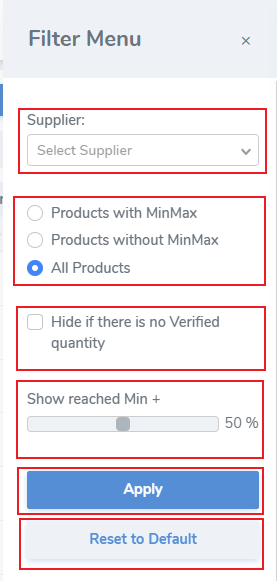](https://kb.simplerfid.com/uploads/images/gallery/2025-05/Yt8image.png) ##### ****Template Uploader**** [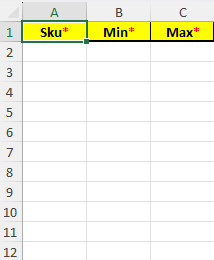](https://kb.simplerfid.com/uploads/images/gallery/2025-05/hJ6image.png) # Update Min/Max Values via Spreadsheet ##### Instructions on how to update min/max values for products via spreadsheet. To set min-max values via spreadsheet, navigate to the calculate reorder page and click on the "Get Template" button to download the template excel sheet. [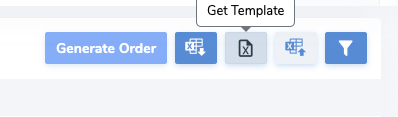](https://kb.simplerfid.com/uploads/images/gallery/2026-09/rae25.png) Next, fill in the required fields. Save the spreadsheet. [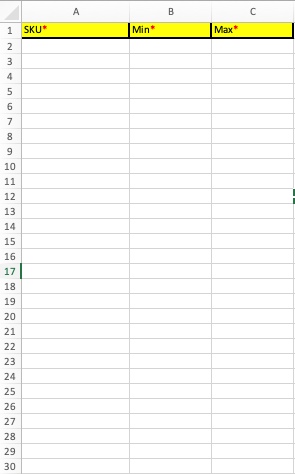](https://kb.simplerfid.com/uploads/images/gallery/2026-09/26.png) Click on the "Upload Min Max Settings" button. [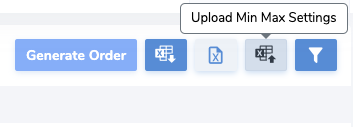](https://kb.simplerfid.com/uploads/images/gallery/2026-09/frZ23.png) Select the location type (DC, Store, or Supplier), and select the specific location you wish to update. [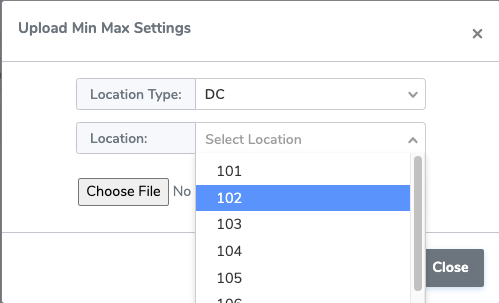](https://kb.simplerfid.com/uploads/images/gallery/2026-09/0Qb24.png) Upload the saved template and click OK to apply changes. [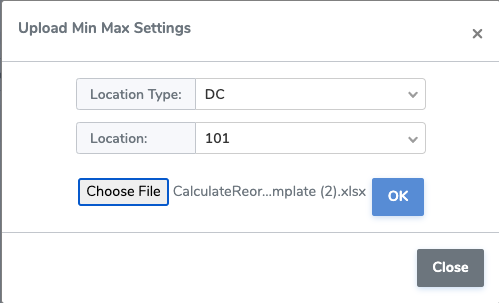](https://kb.simplerfid.com/uploads/images/gallery/2026-09/vmF22.png) Note that this method only updates the specified SKUs at one location. # Navigation Menu: Scan Sessions View & Download all Scan Sessions # Scan Sessions View and download any scan session [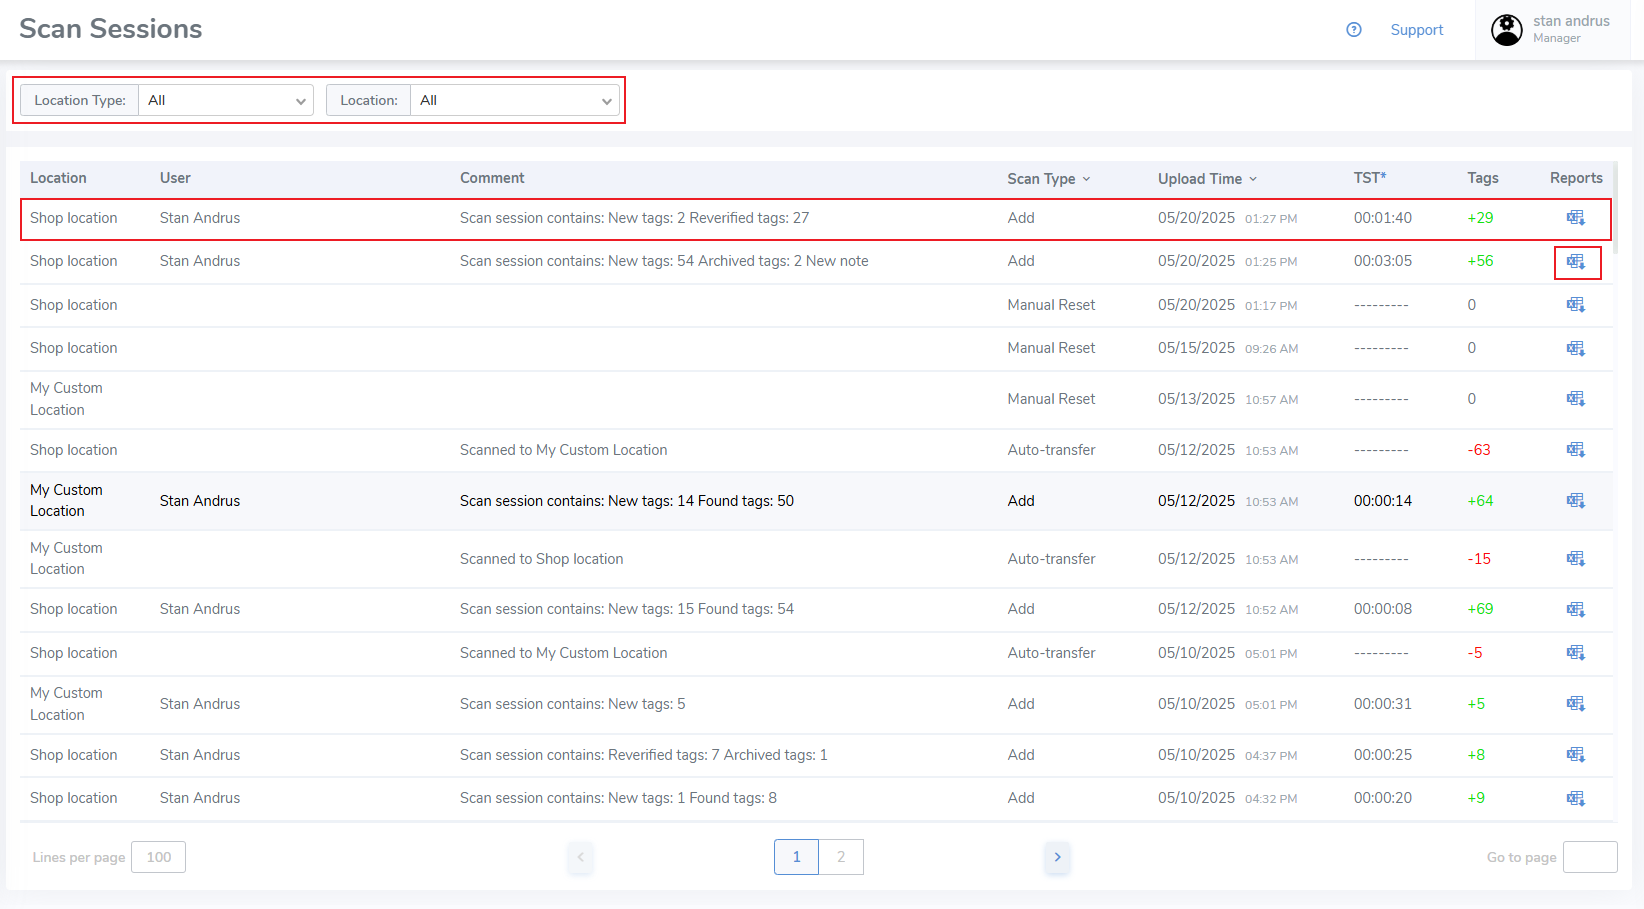](https://kb.simplerfid.com/uploads/images/gallery/2025-05/pyyimage.png) # Navigation Menu: Orders Create, View, Edit & Manage Orders # Create Multiple Orders using Spreadsheet UploadFirst select the order type for which you wish to create orders. Only orders of the same type can be uploaded.
For this example we are creating ****Purchase Orders**** - Select order type [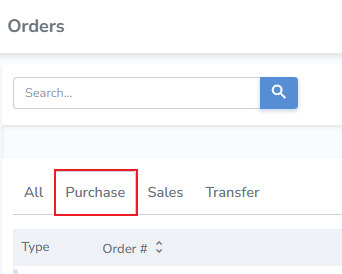](https://kb.simplerfid.com/uploads/images/gallery/2025-06/image.png) - Next, click the "Import Orders" button [](https://kb.simplerfid.com/uploads/images/gallery/2025-06/6Sbimage.png) Orders can be imported using a template provided by Simple RFID, or you can use your own spreadsheet. --- ##### ****Import using Simple RFID Template**** [](https://kb.simplerfid.com/uploads/images/gallery/2025-06/FM3image.png) The sheet contains: - ****Order Number (required)**** - ****Origin (required)**** - ****Destination (required)**** - ****SKU (required)**** - ****Quantity (required)**** - Lot Number - Exp Date - cost - Born Date - Serial Number - Sell By Date Input details for the sheet. [](https://kb.simplerfid.com/uploads/images/gallery/2025-06/G8qimage.png) - Click the "+ Choose" button - Locate your file on your computer [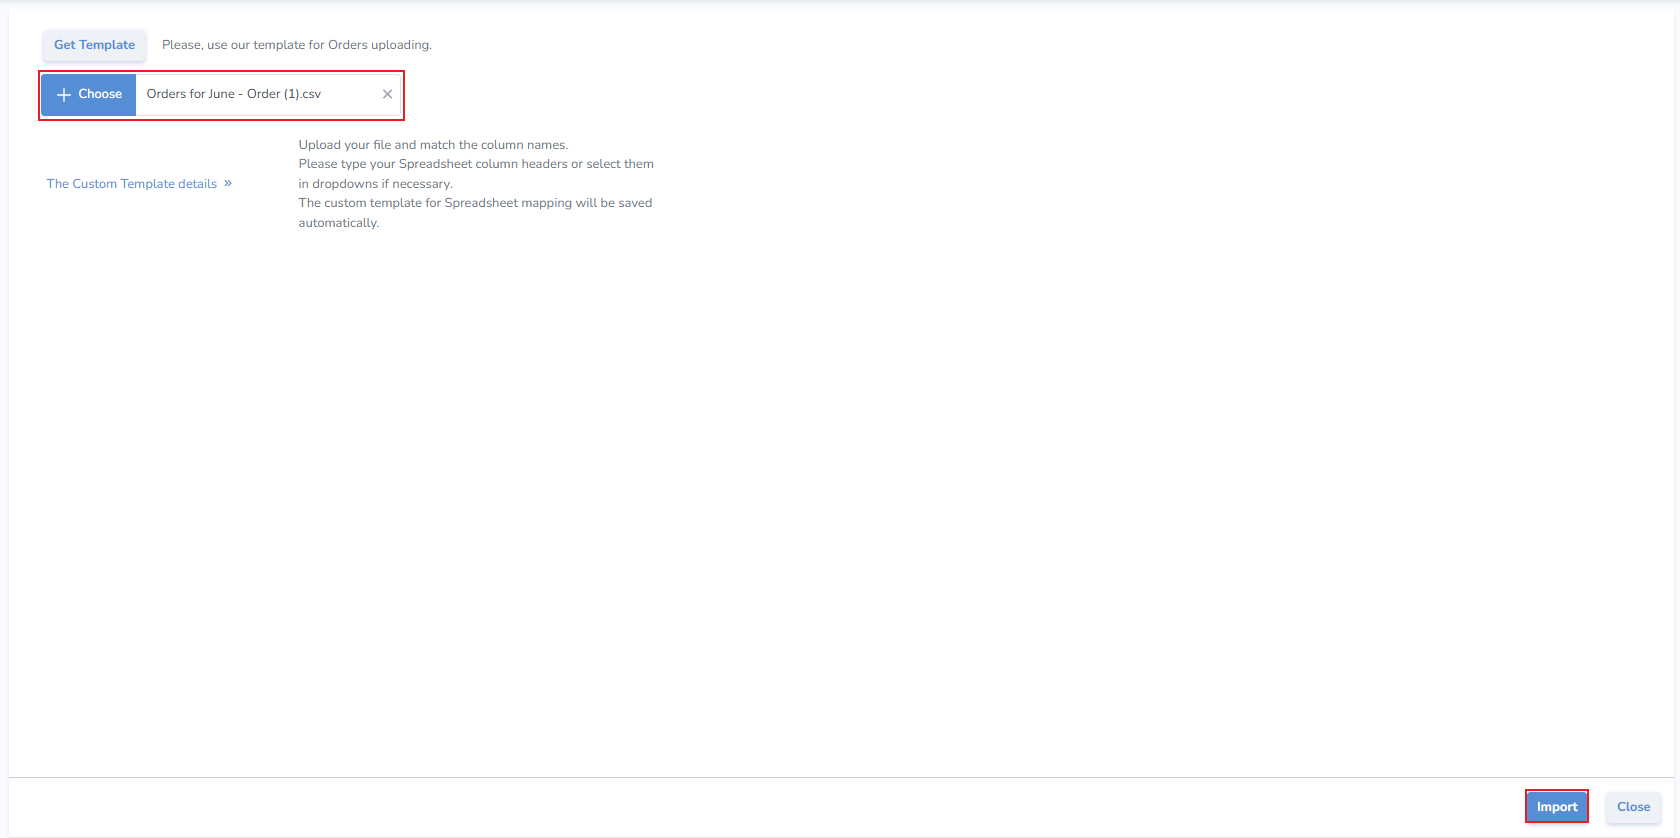](https://kb.simplerfid.com/uploads/images/gallery/2025-06/NYjimage.png) - Click Import ##### ****Import Using Your Own Sheet**** If the information for your orders already exists on a sheet you can use your own spreadsheet to create the orders. ****It's critical that the sheet contain all required fields:**** - ****Order Number (required)**** - ****Origin (required)**** - ****Destination (required)**** - ****SKU (required)**** - ****Quantity (required)**** After selecting the order type [](https://kb.simplerfid.com/uploads/images/gallery/2025-06/image.png) - And clicking the "Import Orders" button [](https://kb.simplerfid.com/uploads/images/gallery/2025-06/6Sbimage.png) - Click the "+ Choose" button - Locate your file on your computer [](https://kb.simplerfid.com/uploads/images/gallery/2025-06/NYjimage.png) - Next, click on the "The Custom Template Details" button to expose the field mapping - Choose whether you wish to map by Title (such as SKU, Quantity, etc.), or if you wish to map by Index (Column Headers A, B, C) - Choose the related Simple RFID field - Click Import [](https://kb.simplerfid.com/uploads/images/gallery/2025-06/vV9image.png) --- ##### ****Import Orders view**** We can see the two orders from our spreadsheet. Any validation errors must be resolves before the orders can be saved. For our example we wrote "Warehouse" on our spreadsheet, however the location is named "Warehouse Location" [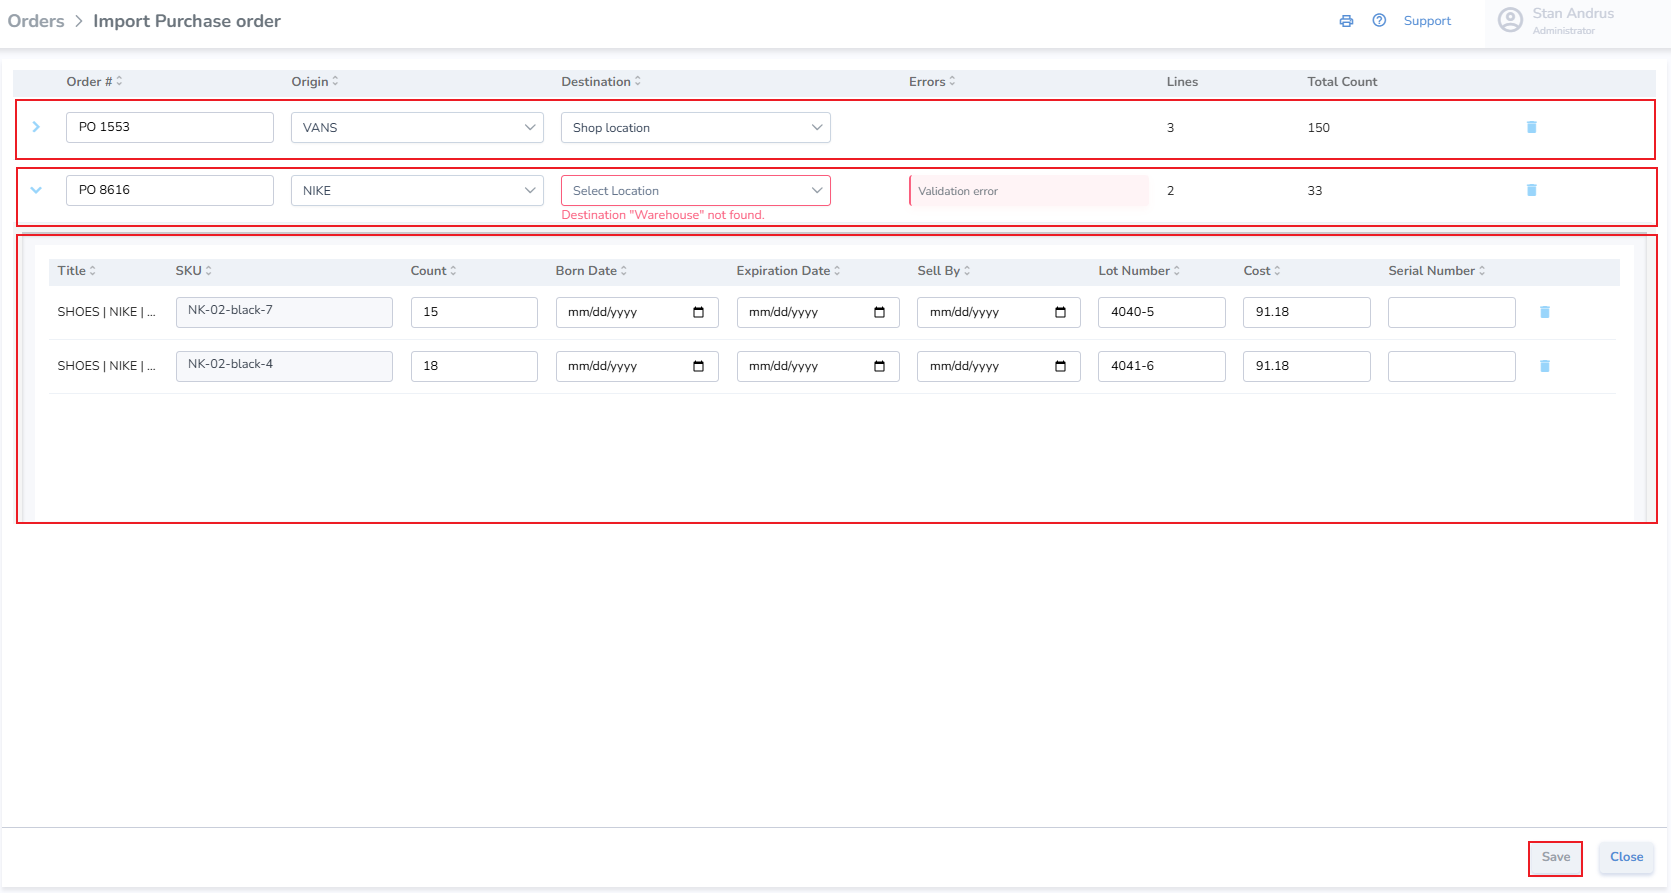](https://kb.simplerfid.com/uploads/images/gallery/2025-06/97Himage.png) - Once the validation error has been resolved, click the Save button [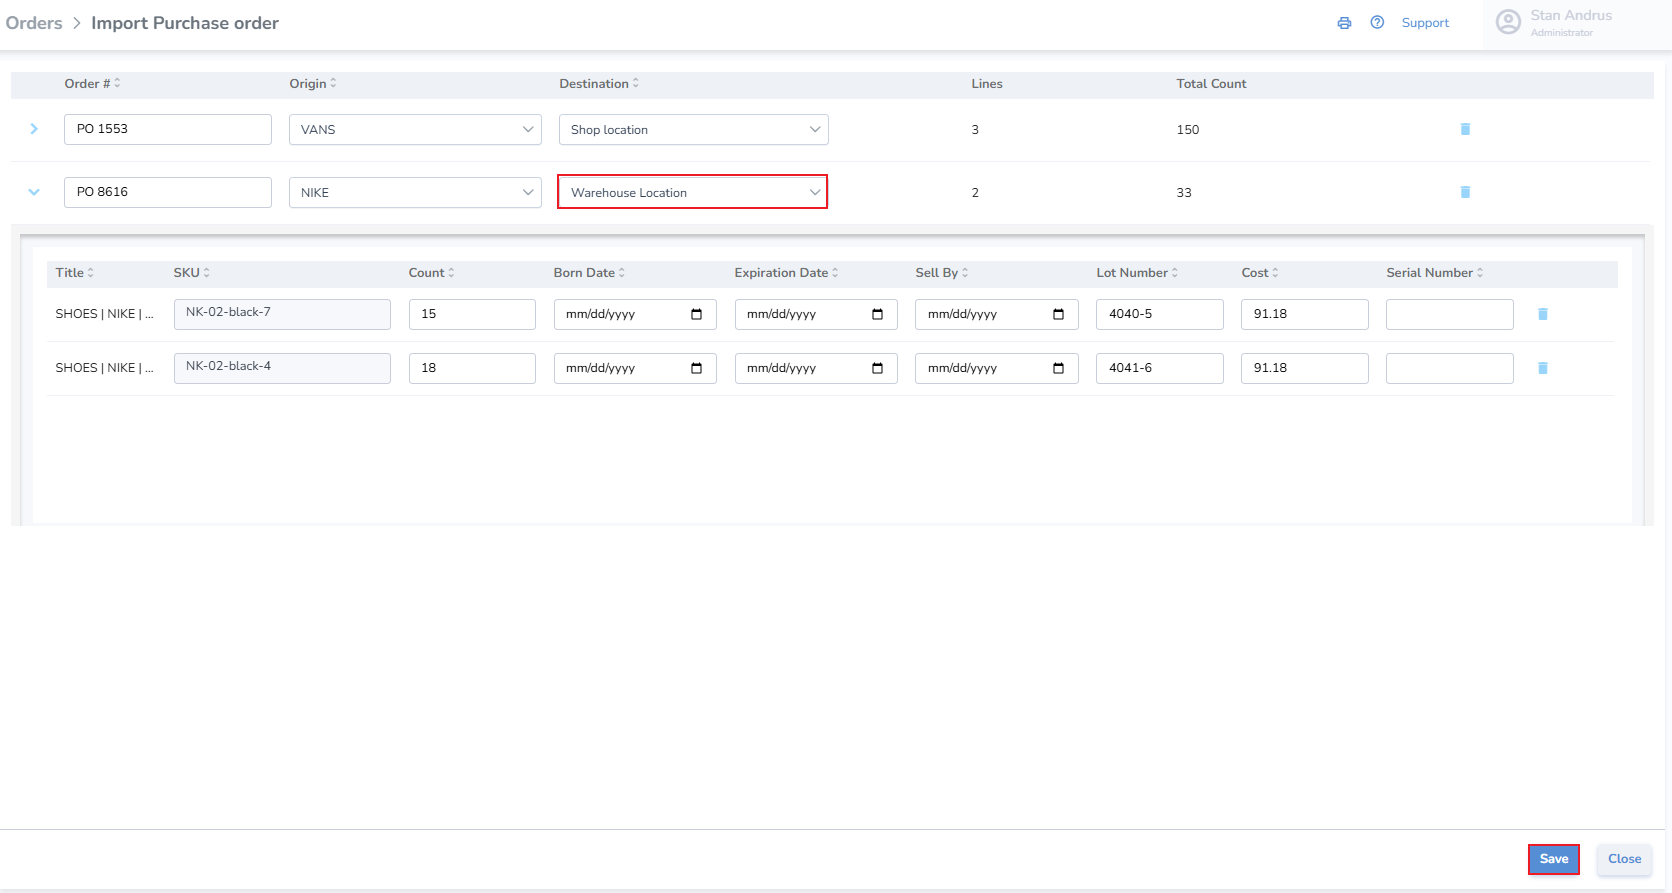](https://kb.simplerfid.com/uploads/images/gallery/2025-06/hgVimage.png) Our orders have now been created and are in Receiving status, able to be printed and received. [](https://kb.simplerfid.com/uploads/images/gallery/2025-06/YmPimage.png) ##### # Generating Print Jobs from an OrderAny order type (Sales, Transfers, Purchases) can be converted into a print job to quickly print RFID labels for the items
This article outlines how to convert each order type into a print job ##### ****Converting a Sales Order into a Print Job**** 1. ****Update**** the order status to "Shipping" 2. ****Click**** Save 3. ****Open**** the order again A "Print" button will appear in the top right corner of the Order [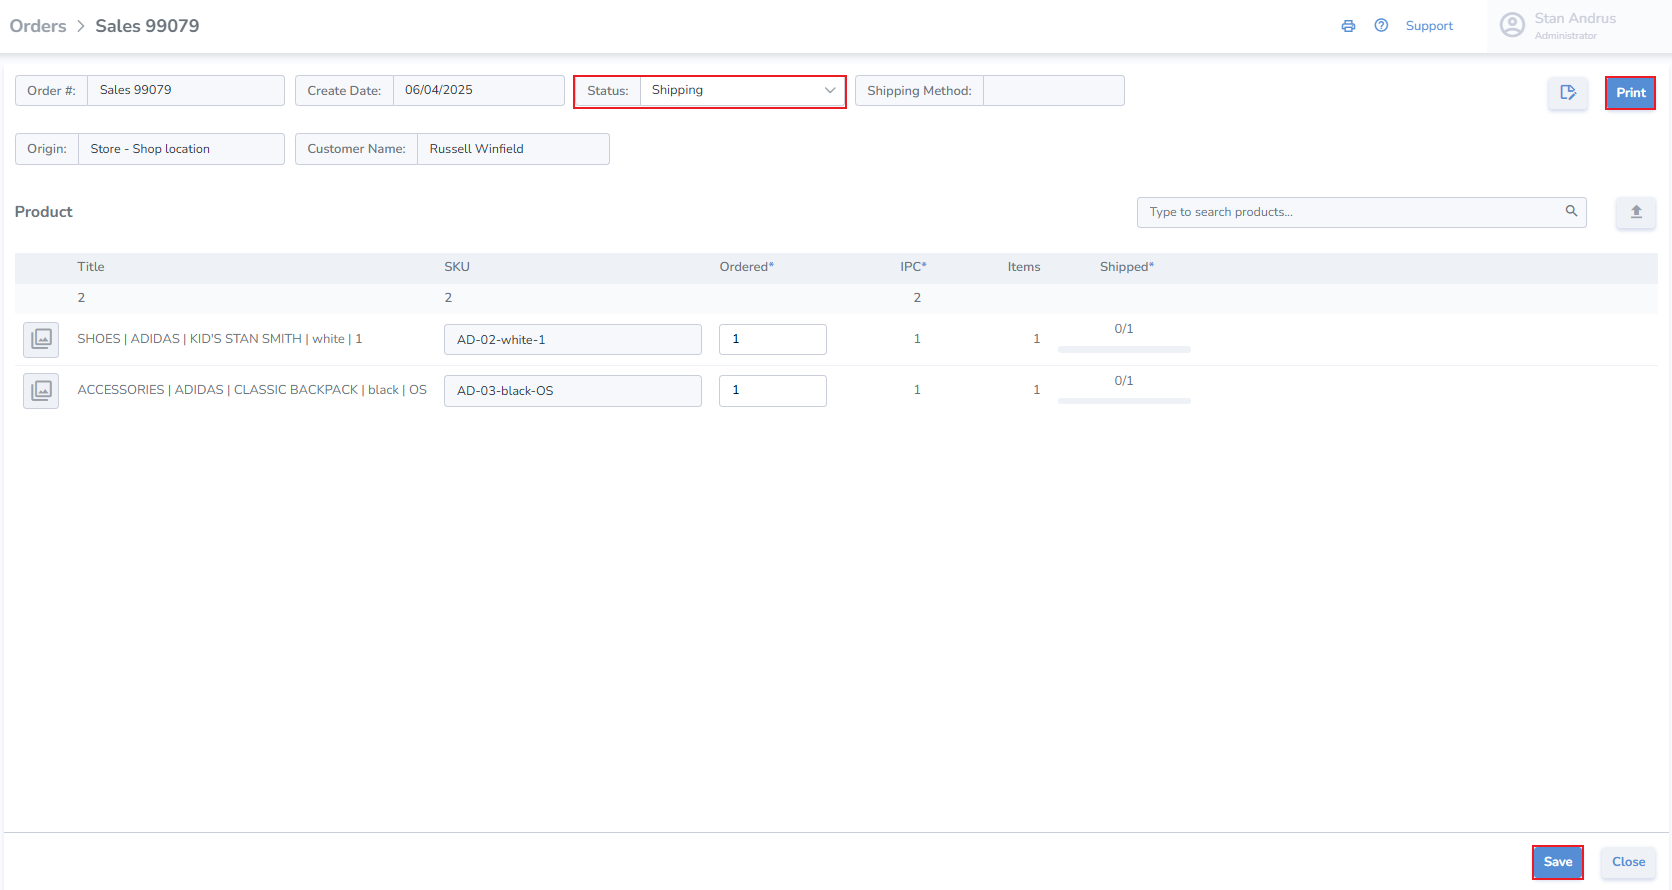](https://kb.simplerfid.com/uploads/images/gallery/2025-06/sT1image.png) 4. ****Click**** Print The order details are loaded into the print interface 1. ****Choose**** the Printer 2. ****Choose**** the Label design 3. ****Click**** Postpone to save the job [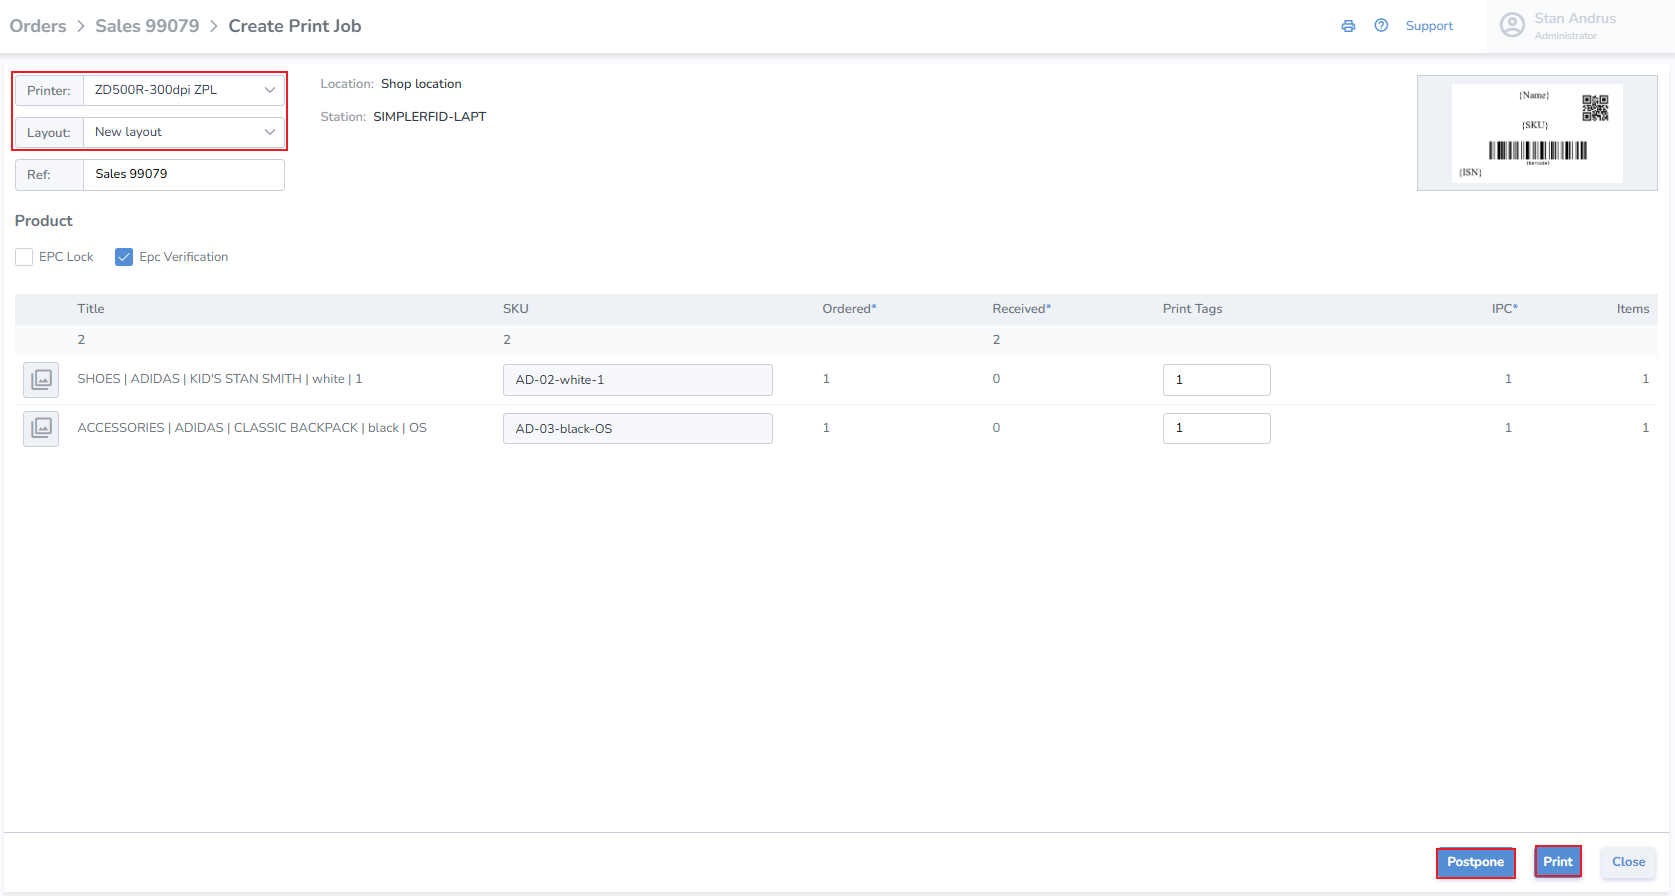](https://kb.simplerfid.com/uploads/images/gallery/2025-06/tLSimage.png) 4. ****Click**** Print to initiate the job immediately ##### ****Converting a Purchase Order into a Print Job**** 1. ****Update**** to Receiving Status 2. ****Click**** Print ##### ****Converting a Transfer Order into a Print Job**** 1. ****Update**** to Shipping Status 2. ****Click**** Print # Sales Order ##### ****Create Sales Orders**** Orders can be created manually, one by one, or in bulk via [spreadsheet upload](https://kb.simplerfid.com/books/software-web-portal/page/create-multiple-orders-using-spreadsheet-upload). --- ##### ****Create a Sales Order manually**** - Click the "+" button located on the Orders page [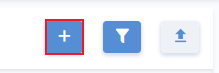](https://kb.simplerfid.com/uploads/images/gallery/2025-06/Cfuimage.png) - From the pop-up window, select Sales [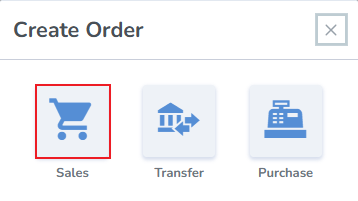](https://kb.simplerfid.com/uploads/images/gallery/2025-06/YwXimage.png) --- ##### ****Create Sales Order**** - Order Number - the system generates an order number, or enter your own - Origin - select the location where the order is being fulfilled - Destination - enter the customer's name - Add Products & Quantities - search and add products manually, or upload them via spreadsheet upload [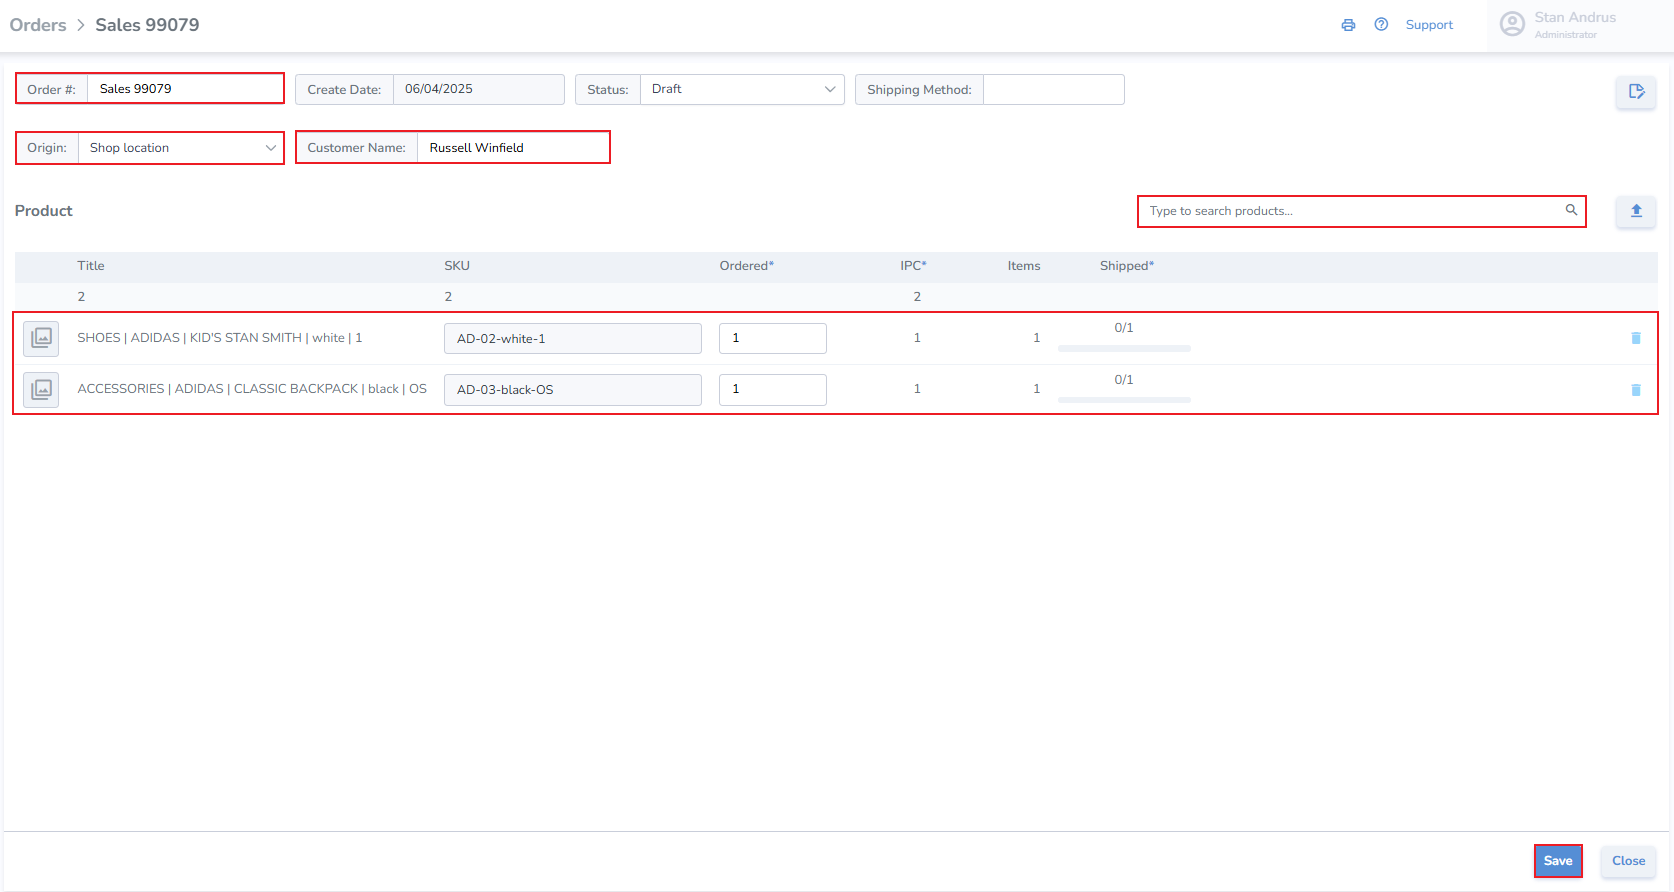](https://kb.simplerfid.com/uploads/images/gallery/2025-06/kTPimage.png) - Click Save - Once the Sales order is updated to ****Shipping status****, [labels can be printed for the order](https://kb.simplerfid.com/books/software-web-portal/page/generating-print-jobs-from-an-order) - The Sales Order can also be [verified for accuracy](https://kb.simplerfid.com/books/software-mobile-app/page/mobile-app-verify-accuracy-of-sales-orders). - Once the order has been verified, a progress bar will display the completeness of the order [](https://kb.simplerfid.com/uploads/images/gallery/2025-06/VGRimage.png) # Transfer Order ##### ****Create Transfer Orders**** Orders can be created manually, one by one, or [in bulk via spreadsheet upload](https://kb.simplerfid.com/books/software-web-portal/page/create-multiple-orders-using-spreadsheet-upload) --- ##### ****Create a Transfer Order manually**** - Click the "+" button located on the Orders page [](https://kb.simplerfid.com/uploads/images/gallery/2025-06/Cfuimage.png) - From the pop-up window, select Transfer [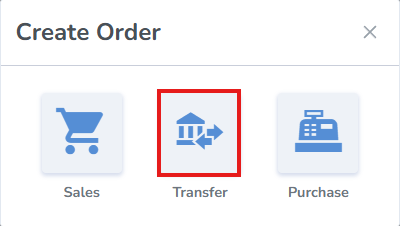](https://kb.simplerfid.com/uploads/images/gallery/2025-08/image.png) --- ##### ****Create Transfer Order**** - Order Number - the system generates an order number, or enter your own - Origin - select the location where the order is being fulfilled - Destination - select the location where the order will be received - Add Products & Quantities - search and add products manually, or upload them via spreadsheet upload [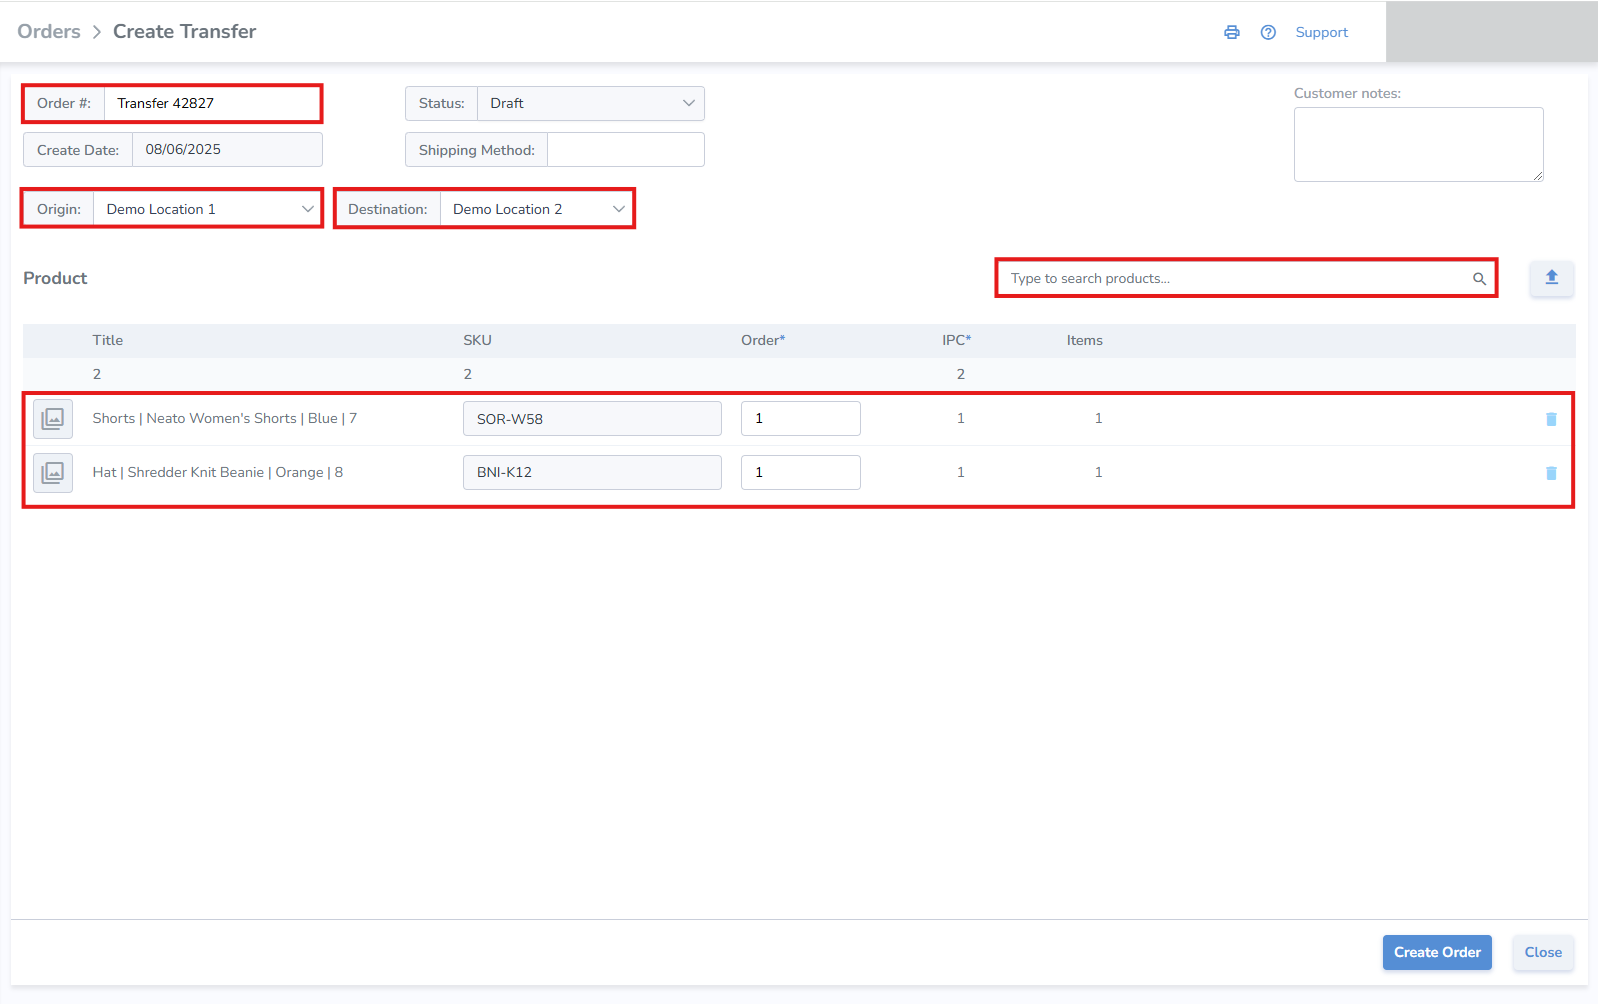](https://kb.simplerfid.com/uploads/images/gallery/2025-08/EHaimage.png) - ****Click**** Save - Once the Transfer order is updated to ****Shipping status****, [labels can be printed for the order if needed](https://kb.simplerfid.com/books/software-web-portal/page/generating-print-jobs-from-an-order) - The Transfer Order will need to be verified using[ mobile Ship and Receive](https://kb.simplerfid.com/books/software-mobile-app/page/mobile-app-ship-receive-transfers) - Once the order has been verified on Ship or Receive, a corresponding progress bar will display the completeness of the order [](https://kb.simplerfid.com/uploads/images/gallery/2025-08/gCJimage.png) # Purchase OrderCreating Purchase Orders enables labels to be printed for ordered items, then scanned to confirm all items are received complete.
--- ##### ****Create Purchase Orders**** Orders can be created ****manually****, one at a time, or [in bulk via spreadsheet upload](https://kb.simplerfid.com/books/software-web-portal/page/create-multiple-orders-using-spreadsheet-upload). --- ##### ****Create a Purchase Order manually**** To view only ****Purchase Orders****, click the ****Purchase**** tab. - Click the \[+\] button [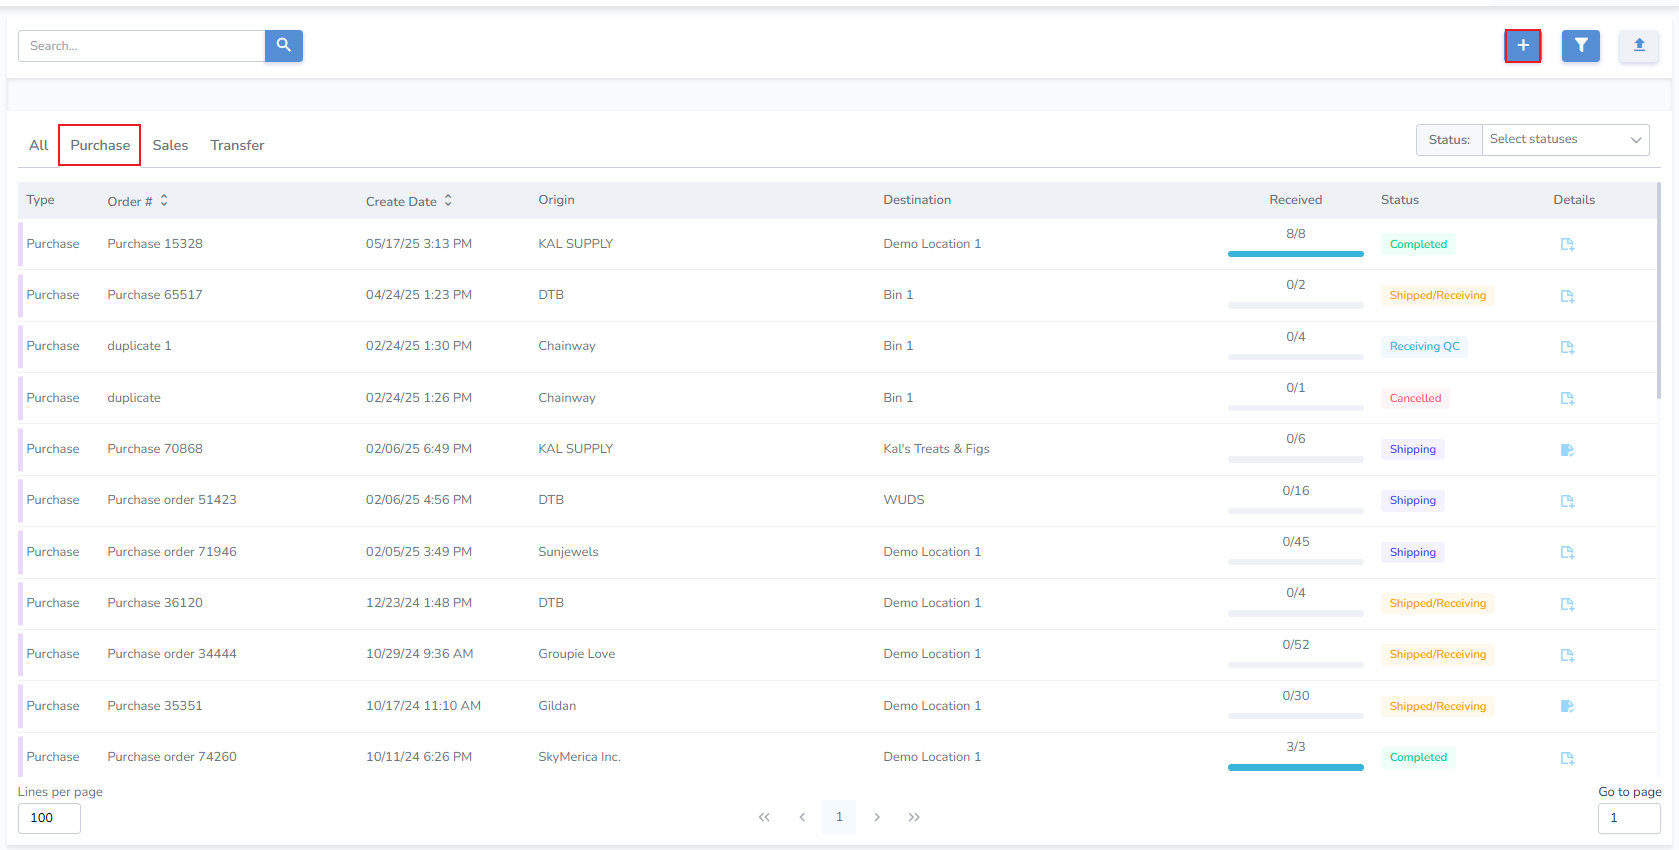](https://kb.simplerfid.com/uploads/images/gallery/2025-06/N0Eimage.png) - From the Pop-up select ****Purchase**** [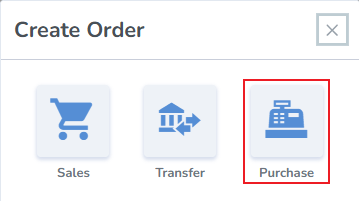](https://kb.simplerfid.com/uploads/images/gallery/2025-06/vZXimage.png) --- ##### ****Create Purchase page**** - Order Number - the system generates an order number, or enter your own - Origin - select the location of the Supplier which fulfilled the order. - Destination - select the location where the order will be received (your Distribution Center (DC) or Store location) - Add Products & Quantities - search and add products manually, or upload them via spreadsheet uploadIf the desired Supplier is not present, create them from the Locations tab.
[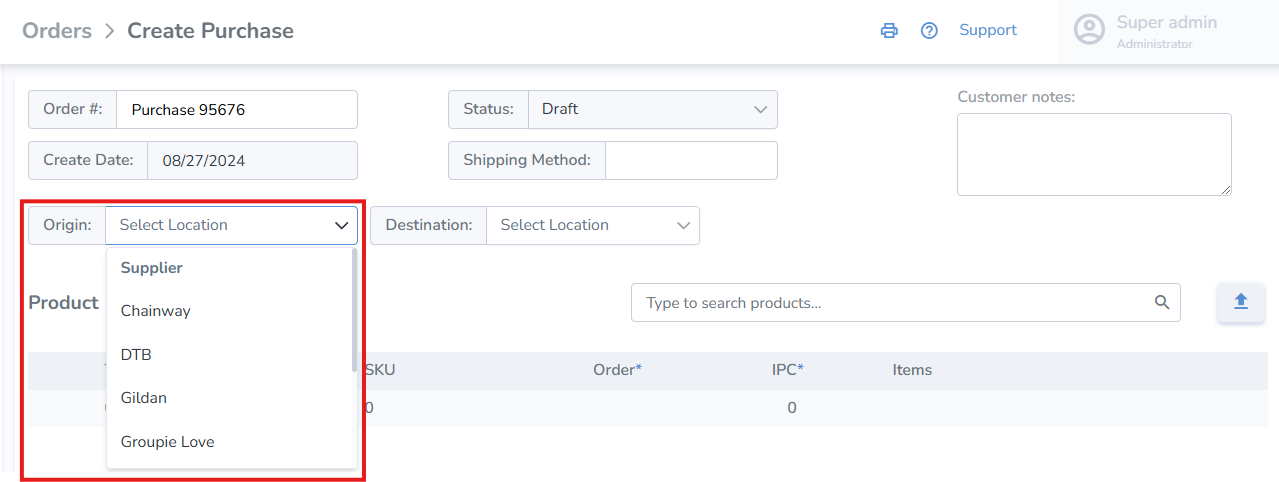](https://kb.simplerfid.com/uploads/images/gallery/2025-09/Z3himage.png) - ****Click**** Save - Once the Purchase order is updated to ****Shipping status****, [labels can be printed for the order](https://kb.simplerfid.com/books/software-web-portal/page/generating-print-jobs-from-an-order) - The Purchase Order can also be verified for accuracy using [mobile Receive](https://kb.simplerfid.com/books/software-mobile-app/page/mobile-app-ship-receive-transfers#bkmrk-receive-transfer).Please set the order status to ****Shipped/Receiving**** to make "Verify" button appear in the order Products tab on Mobile.
- Once the order has been verified on Ship or Receive, a corresponding progress bar will display the completeness of the order [](https://kb.simplerfid.com/uploads/images/gallery/2025-09/g1Kimage.png) # Navigation Menu: Printing Print RFID labels # Create Print Job Manually Select ****Printing**** from the navigation menu on the left. [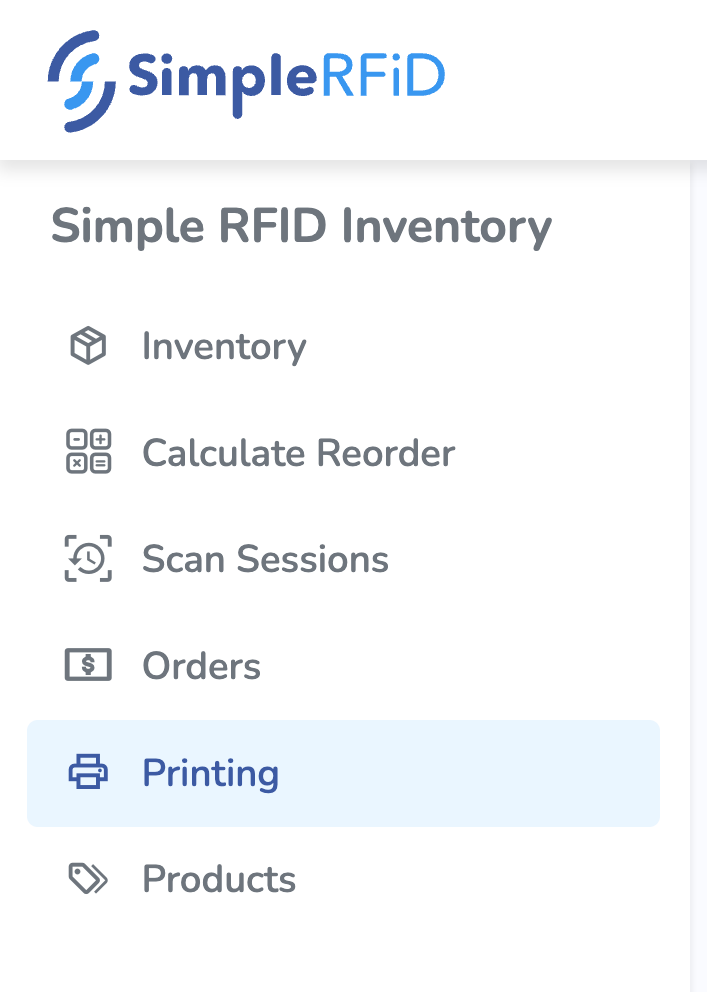](https://kb.simplerfid.com/uploads/images/gallery/2025-09/mrlscreenshot-2025-09-15-at-11-20-58-am.png) - Click the “+” button located in the top right corner of the screen [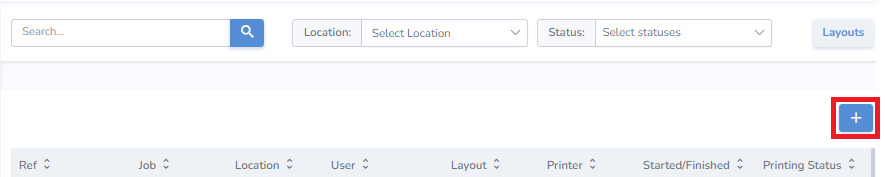](https://kb.simplerfid.com/uploads/images/gallery/2025-05/o5bimage.png) 1. Select the printer you wish to print to 2. A. Select the desired layout. B. A preview of the label appears to the right 3. Ref provides a window to enter a related reference field 4. Print Job settings to enable EPC lock and/or enable EPC Verification for the job. These settings can be permanently enabled from the Printer Profile page. 5. Search and add the item(s) you wish to print from the search bar on the right. 6. [Uploader to to upload print job details](https://kb.simplerfid.com/books/software-web-portal/page/add-details-to-print-job-from-excel) 7. Once added, you can change the quantity of tags you'd like to print for the item. 8. ****Print**** - When ready, click '****Print****' at the bottom right of the page to print immediately. 9. ****Postpone**** - If you would like to print the labels at a later time, click '****Postpone****' and start printing later. 10. ****Close**** - If you would like to cancel the print job altogether, click '****Close****' and no information will be saved. [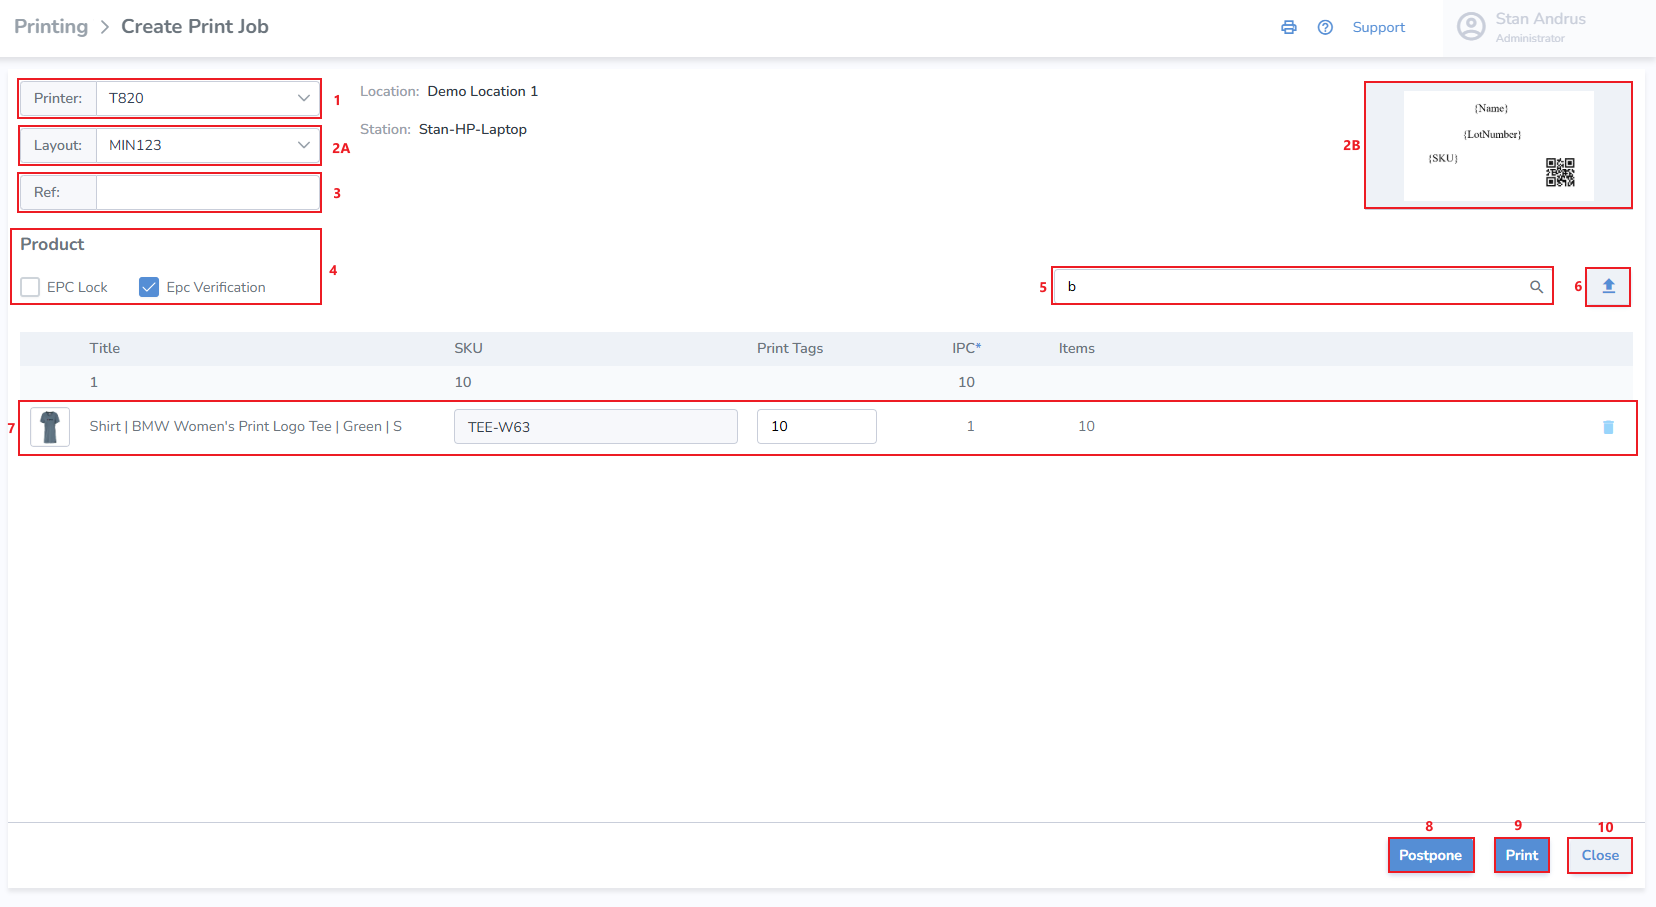](https://kb.simplerfid.com/uploads/images/gallery/2025-09/2WGimage.png)From this point, you can add optional tag-specific information such as born date, expiration date, sell by date, lot number, serial number, or cost. None of it is required, but if you do not change anything, the tag’s default born date will be the day it is printed. To add this information, click on the name of the item once and the details panel will pop up on the right
#### #### # Add Details to Print Job from Excel **Add details to a print job using a spreadsheet. Use our formatted spreadsheet template, or use your own template.** Inside the ****Printing > Create**** Print Job page, click the upload button on the right [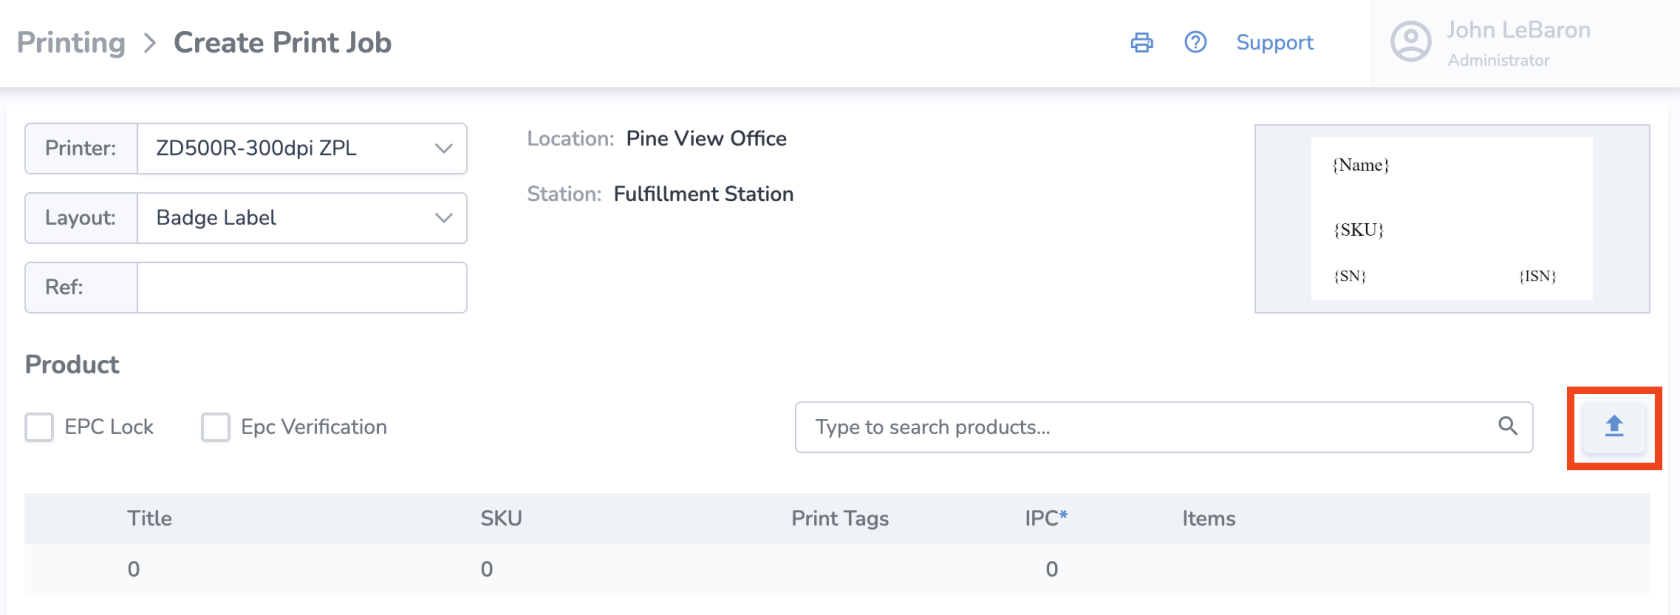](https://kb.simplerfid.com/uploads/images/gallery/2025-09/5rHimage.png) If you'd like to use our spreadsheet template and input data there, in the new pop up window, click on the “Get Template” button. Then fill out the information for your print job and save the spreadsheet.  - Back on the web, click the '+ Choose' button and select the file with the information you saved - Once the file has been selected, click 'Import' 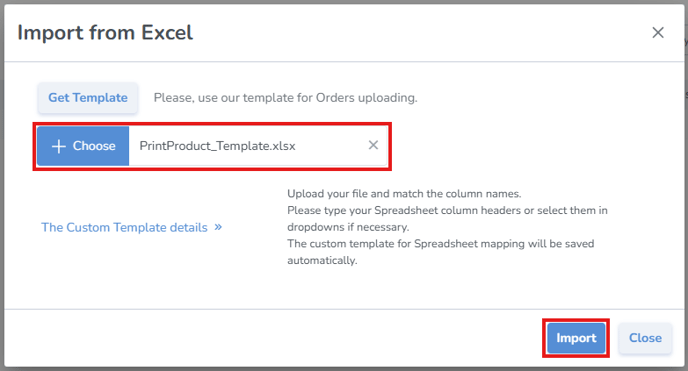 ****Next, if you're using your own existing spreadsheet instead of the template,**** click "The Custom Template details" and select which columns contain the corresponding information. It will then add all the items to the print job, which you can print immediately or postpone.Note: If any of the information from the uploaded spreadsheet is invalid, you'll see this validation error on that item in the list
A good practice is to scan the labels and upload them to verify that all tags have been printed correctly.
##### # Print Actions: Postpone & Resume, Cancel, Reprint ##### ****Postpone & Resume**** Perhaps you want to save your print job and print it later. To do this, instead of clicking "Print" from the Print Controller, click "Postpone." [](https://kb.simplerfid.com/uploads/images/gallery/2025-06/Smcimage.png) This will create a saved Print Job which will appear on the Print History [](https://kb.simplerfid.com/uploads/images/gallery/2025-06/sMTimage.png) On the main ****Printing**** page, you can see the ****Printing Status**** of each job in the listed history. ##### ****Start**** - To start a print job, click the start button under the 'Actions' column [](https://kb.simplerfid.com/uploads/images/gallery/2025-05/8veimage.png) ##### ****Pause**** - To pause a print job, click the [](https://kb.simplerfid.com/uploads/images/gallery/2025-05/KVDimage.png) ##### ****Cancel**** [](https://kb.simplerfid.com/uploads/images/gallery/2025-05/q4timage.png) - To cancel the job, click the strike-through circle icon ##### ****Reprint**** - To reprint a print job, click the "reprint" icon [](https://kb.simplerfid.com/uploads/images/gallery/2025-05/k69image.png)Clicking reprint will create a new job with the same details
[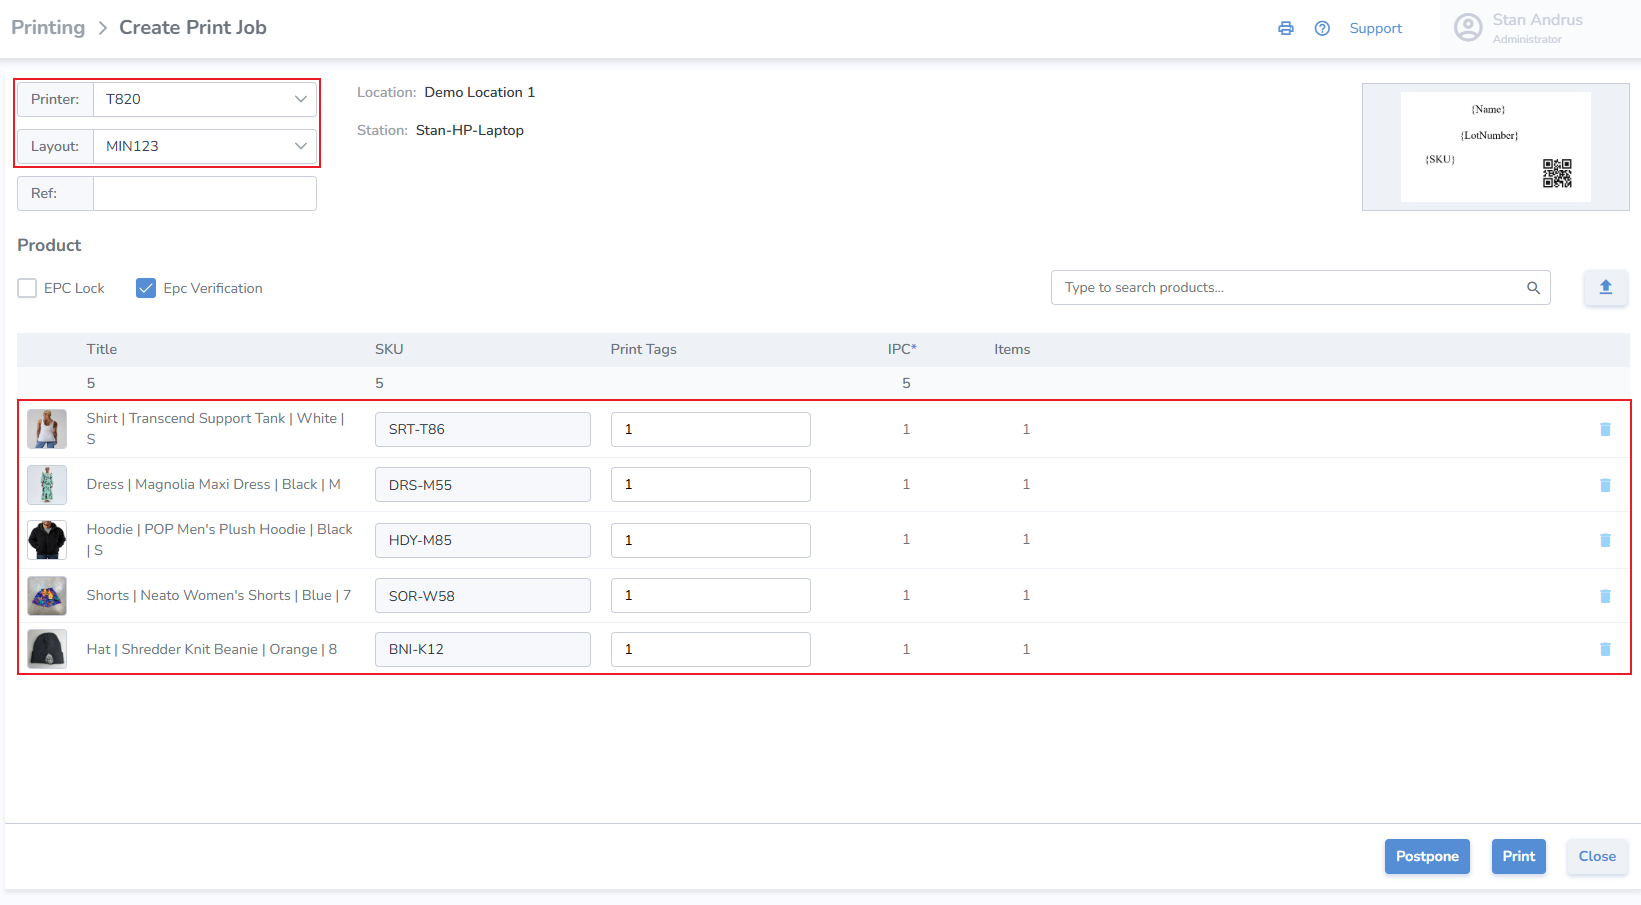](https://kb.simplerfid.com/uploads/images/gallery/2025-09/rCsimage.png) - Click Postpone to save the job in postponed status - Click Print to initiate the print job immediately - Click Close to exit without saving # Print History The print history displays a comprehensive record of all completed, postponed, and pending jobs. It includes a 'Print Actions' column that allows you to pause, cancel or reprint jobs. [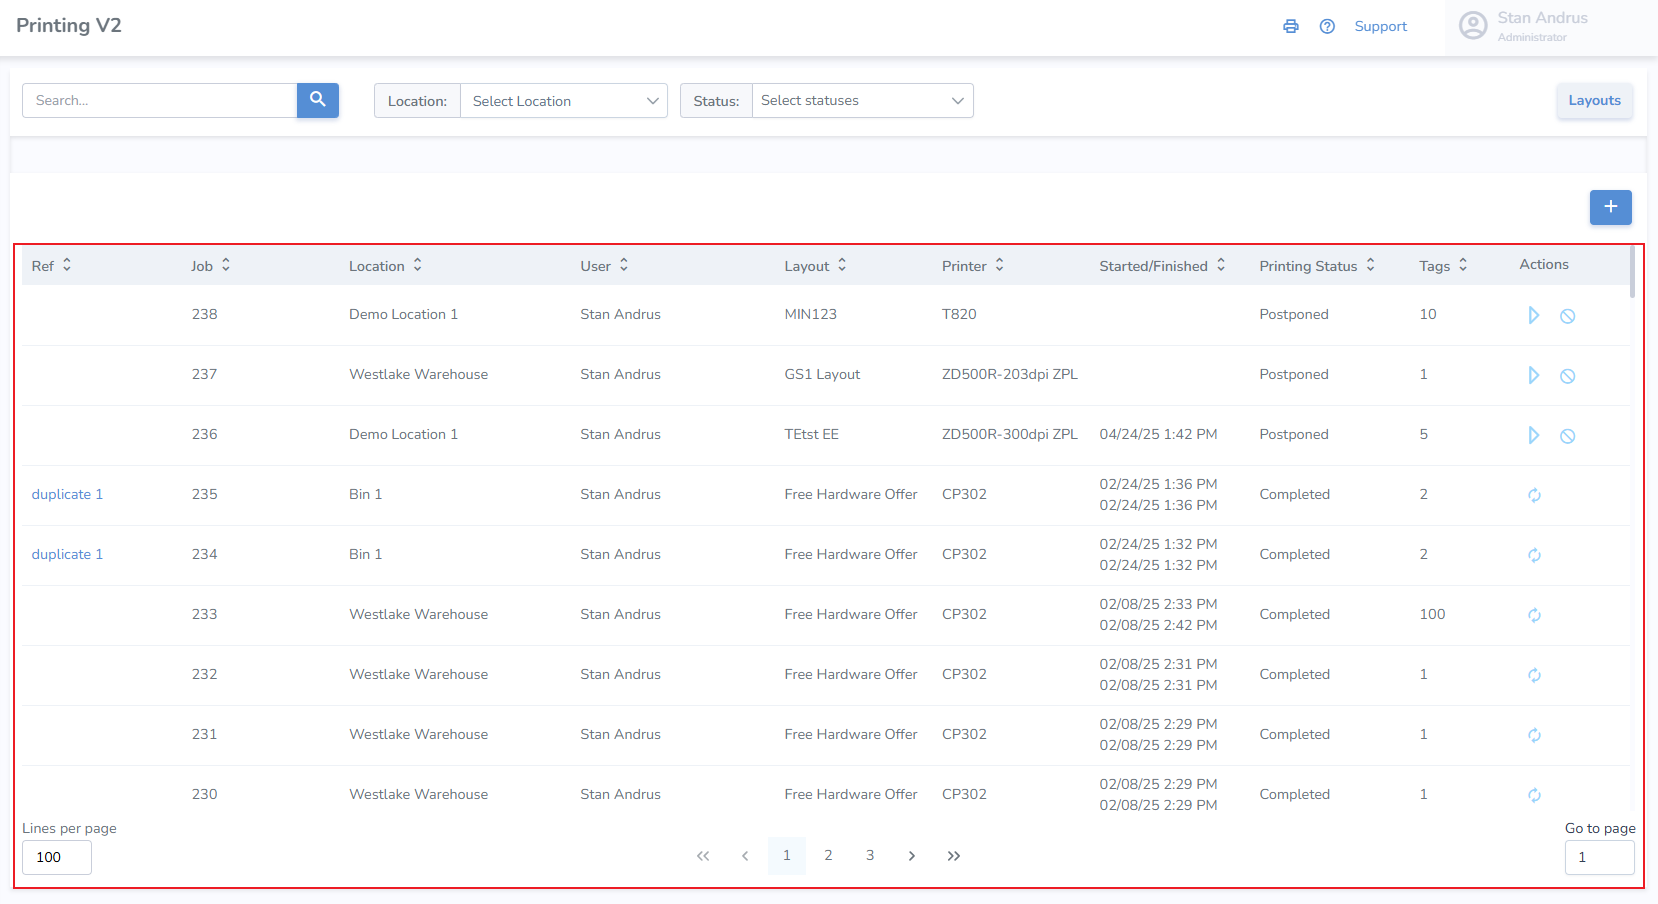](https://kb.simplerfid.com/uploads/images/gallery/2025-05/7Waimage.png) # Installing Print Client ### ****Step 1. Connect the printer to the device****The printer can be connected to the PC via ****Network**** or ****USB****. Network method is generally more reliable, and therefore preferred if possible.
****WARNING: MACOS DEVICES**** The macOS version of the Print Client is currently in beta. As such it has the following limitations: ****- The macOS Print Client requires Apple Silicon (M1 or later).**** Macs with Intel processors are not compatible. ****- The macOS Print Client does not support Printronix printers via USB.**** Zebra printers can be connected via USB, but Printronix printers can only be connected via local network. ****- The macOS Print Client will not work if certain USB storage devices are connected.**** This can include flash drives, external hard drives, or even mobile phones. If you disconnect these devices, the print client will run.
#### Network method If connecting via network, use the provided CAT6 cable, or a network cable of your own, to attach the printer to your network. [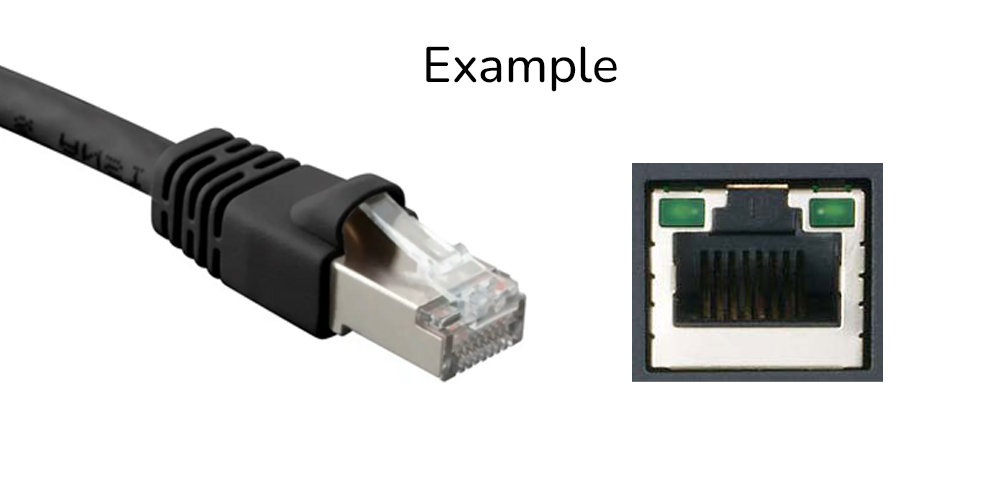](https://kb.simplerfid.com/uploads/images/gallery/2026-01/image.png)The printer must be on the same subnet as the host PC in order to be detected by the Print Client.
#### USB method If connecting via USB, plug the provided USB cable into your PC and printer. The ****USB-A**** connector should be plugged into the PC, while the ****USB-B**** connecter should be plugged into the printer: 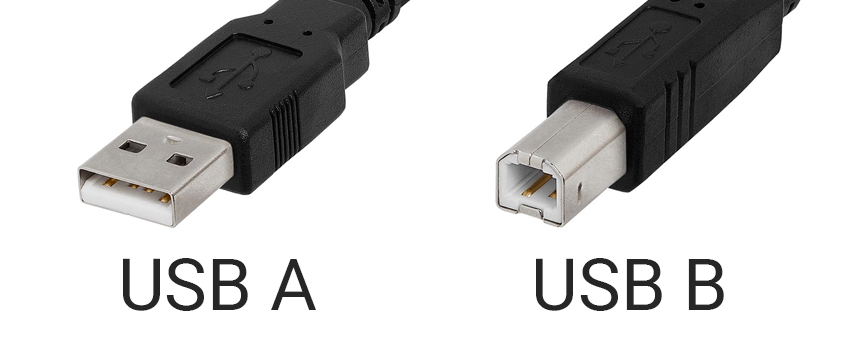Last, for the USB method, you'll need to [change the Interface setting](https://kb.simplerfid.com/books/hardware-readers-printers/page/printronix-change-interface) on the printer to USB.
Such cable type is often used by regular inkjet/laser printers as well.
--- ### ****Step 2. Install Print Client****If you are connecting a Printronix printer via USB, you must use the Windows version currently. macOS only supports Printronix printers via network connection.
#### ****Download the Print Client:**** 1. ****Login**** to the [web portal](https://portal.simplerfid.com/) 2. ****Click**** on your account name in the top-right corner 3. ****Click**** "Resources" 4. On the resources page, under Printing Utilities, ****click**** **"*****Set-up Print Client Windows*****"** ****or**** **"*****Set-up Print Client macOS*****"** to download 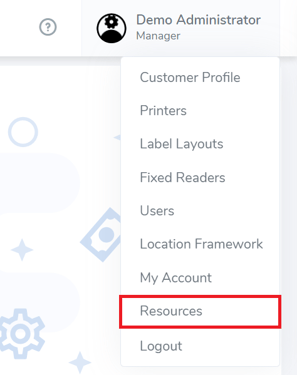 [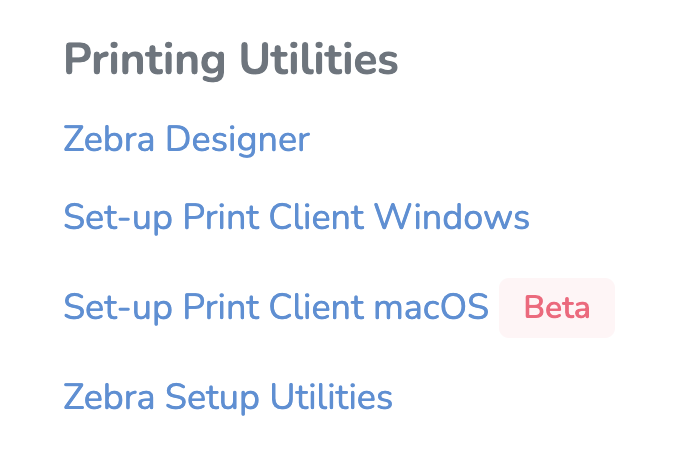](https://kb.simplerfid.com/uploads/images/gallery/2025-09/Bbjimage.png) #### ****Install Client**** 1. ****Open**** the downloaded file (****PrintClient.Updater.Installer.msi**** or ****PrintClientUpdater.Installer.pkg****). This will launch the installer. 2. ****Follow**** the steps in the installer. You will need to provide Administrator approval to complete the installation. 3. Enter your ****Registration Key**** when prompted. You can find this key on the web portal, on the ****Customer Profile**** page under ****Printing Settings****. ****If you don't have access to the key, reach out to your manager.**** ****If you are not prompted to enter the key, finish the installation, then**** [****reach out to Simple RFID support****](https://support.simplerfid.com/support/tickets/new) ****to connect your printer.**** [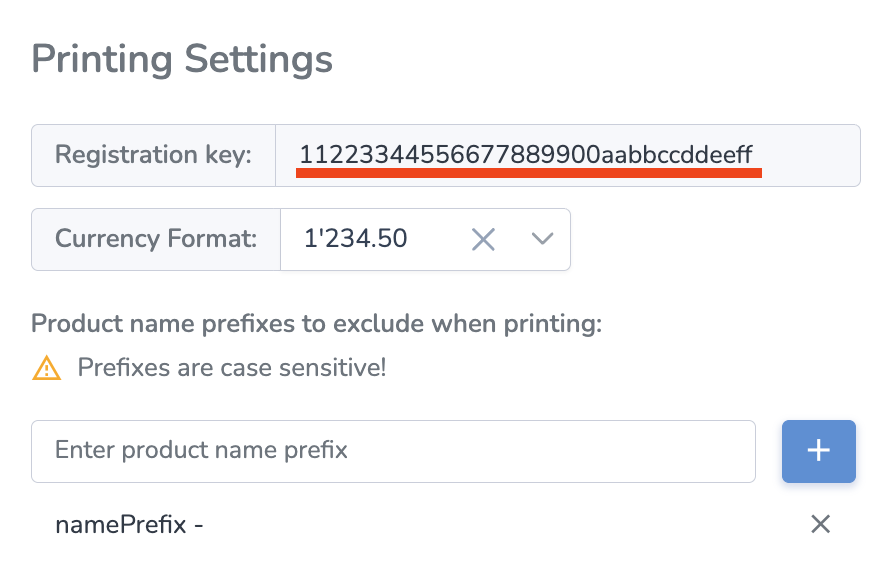](https://kb.simplerfid.com/uploads/images/gallery/2026-02/fBqscreenshot-2026-02-16-at-3-11-50-pm.png) [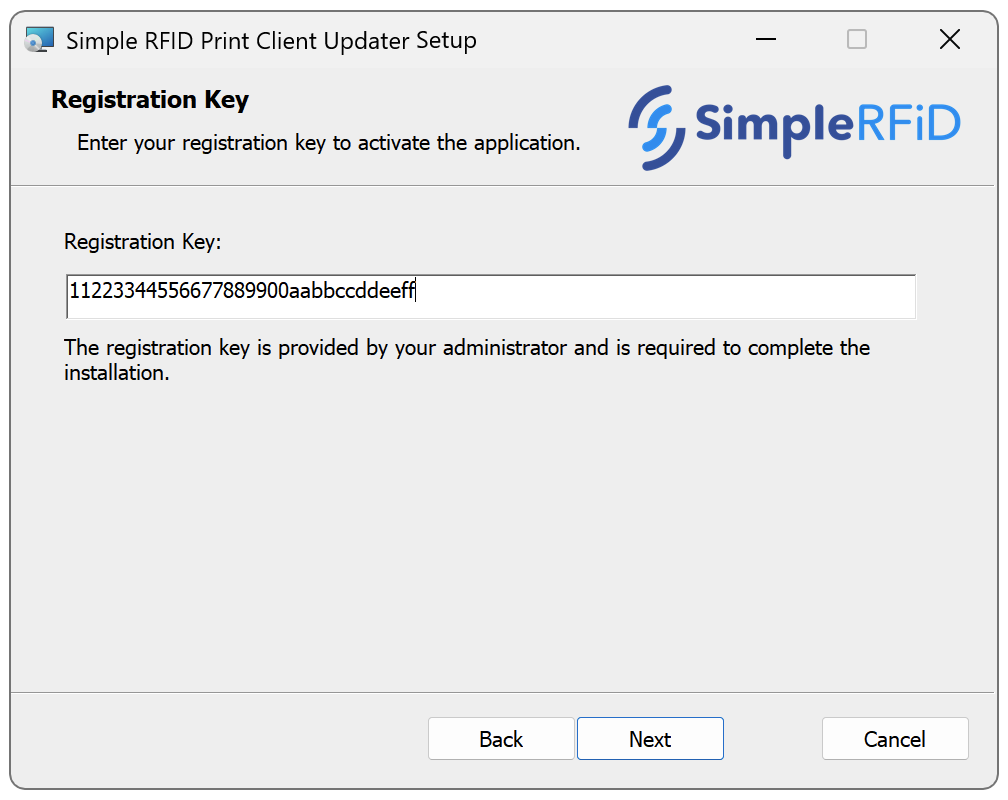](https://kb.simplerfid.com/uploads/images/gallery/2026-02/fYzimage.png) 4. When the installation is completed successfully, you can ****close**** the installer. --- ### ****Step 3. Assign Location****Please ask your manager to assign the location.
Here are the steps for manager: 1. ****Go to**** User Menu (click on the name on the top right) 2. ****Select**** Printers 3. ****Find**** the new Print Station (often on top, will have "**Not assigned**" under the location column) 4. ****Click**** the gear icon ([](https://kb.simplerfid.com/uploads/images/gallery/2026-03/BO8image.png)) on the right from the Print Station[)](https://kb.simplerfid.com/uploads/images/gallery/2026-03/zoZimage.png) 5. In the Location dropdown, ****set**** the desired location 6. ****Click**** ApplyOnce the printer is connected, it will appear on the Printers page, and in the Available Printers menu.
# Calibrate from the web portalMake sure the printer is unpaused before calibrating: [Unpause your printer](https://kb.simplerfid.com/books/hardware-readers-printers/page/printronix-unpause-your-printer)
Calibrate your printer each time after media/ribbon changed and, as a best practice, in the beginning of the day.
You can calibrate your printer from the web portal. This can be done from three places: ### Option 1: From the Menu Bar {{@125}} --- ### Option 2: From the printer's Printer Profile page {{@128}} --- ### Option 3: From the Printer Station Settings {{@104}} # Calibrate your printer ## Calibrate from the web portal {{@126}} ## Calibrate from the printer {{@127}} # Ability to trim product prefixes from labels when printing If you have information in one of your Product fields that you wish to have trimmed when printing, follow these steps to trim these properties.This feature requires Manager level permissions
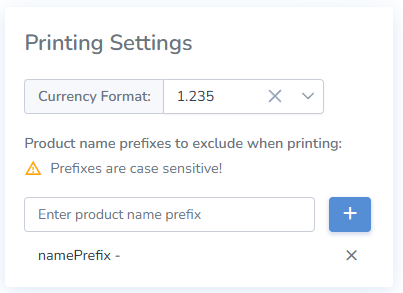- Using a manager’s account, access the ****Customer Profile**** from the ****Admin menu**** in the top right of the web portal - Then ****enter any prefixes that you wish to be trimmed**** from products named when printing - Finally, click ****save****. # Locking the Tag's MemoryLocking your tags prevents the tags from being edited. This is a requirement for all GS1 tags being submitted to ALEC for approval.
****Locking the Tag's Memory**** - Navigate to the Print Jobs menu in the left menu - Before starting the print job, click the "EPC Lock" check-box [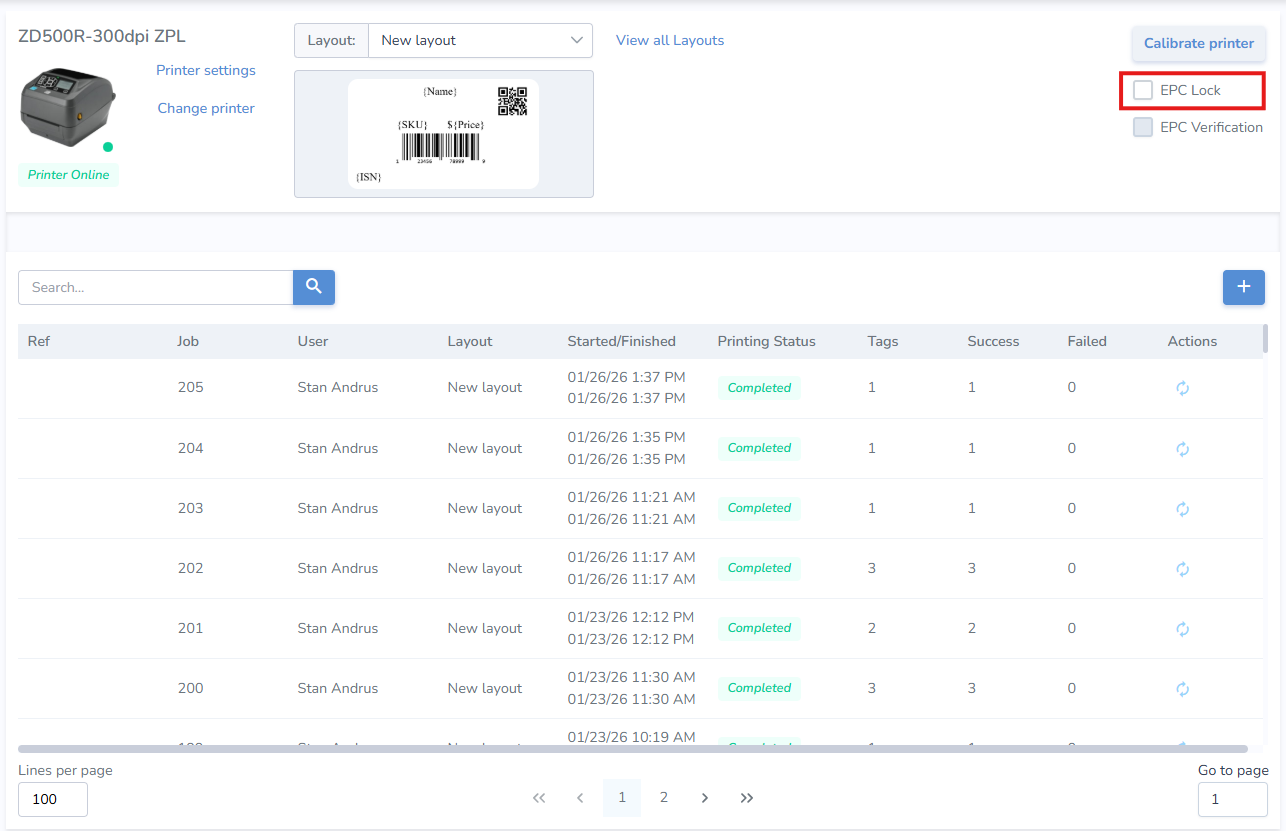](https://kb.simplerfid.com/uploads/images/gallery/2026-01/e1Limage.png) - This will permanently lock the tag and prevent it from being re-encoded # Navigation Menu: Products Create, View, Edit, & Manage Products in all statuses # Product: Page Controls [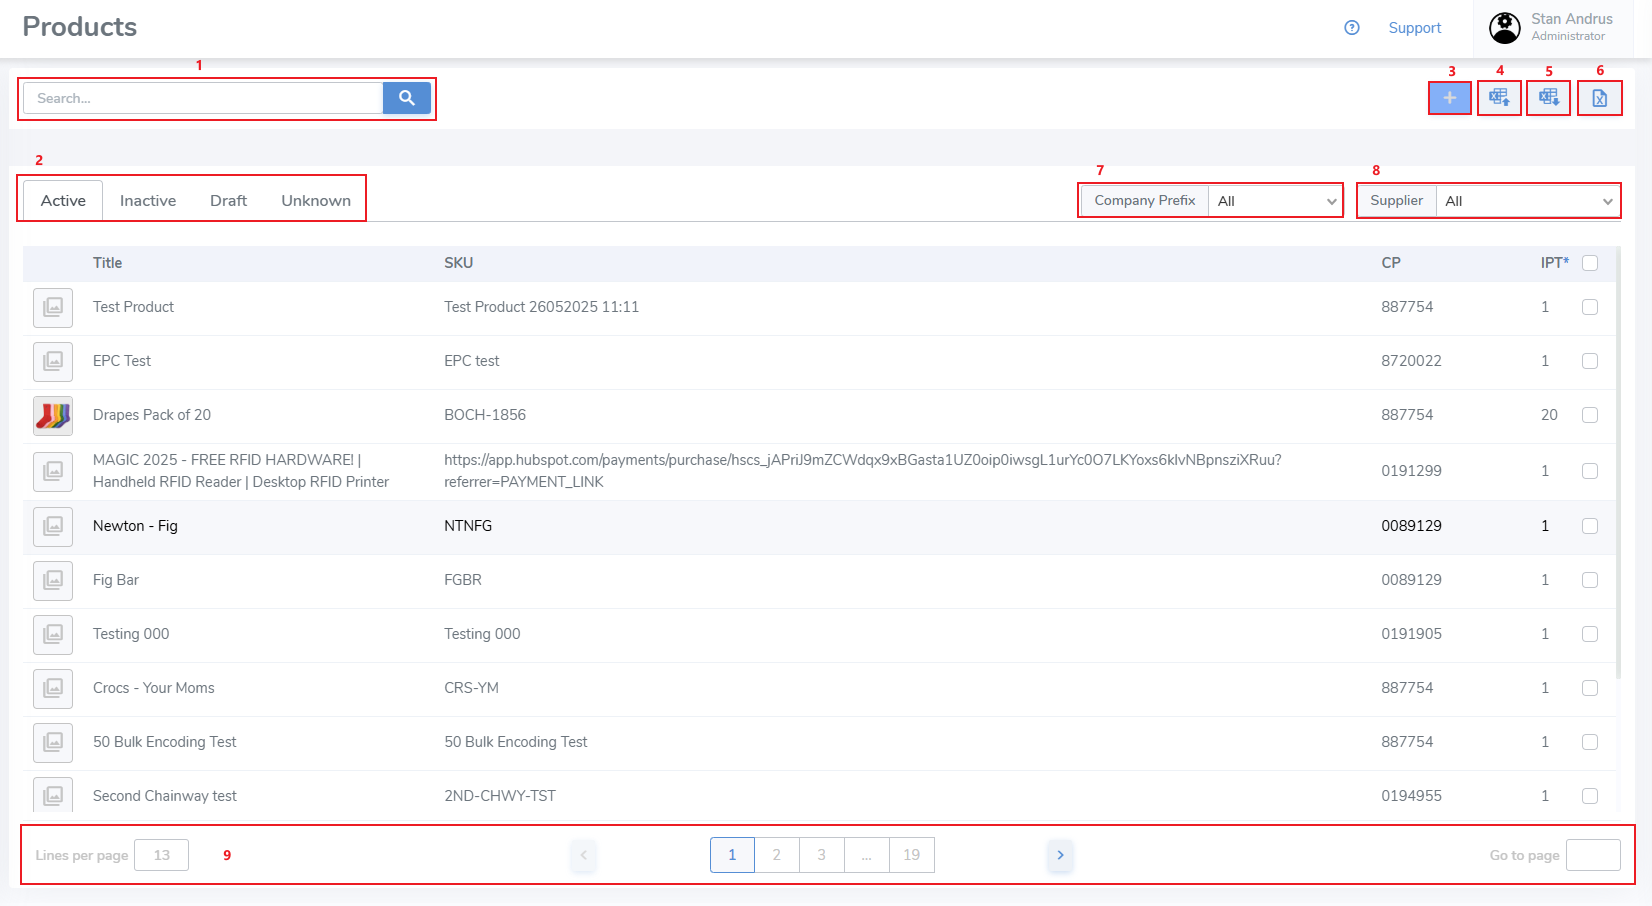](https://kb.simplerfid.com/uploads/images/gallery/2025-05/ztSimage.png) # Products: Active ##### ****Create Product**** To create a new product you must first select the Company Prefix you wish to use to create the itemThis allows you to choose a GS1 company prefix to create an official GTIN / SGTIN, or choose a non-official GTIN or the Closed Loop prefix
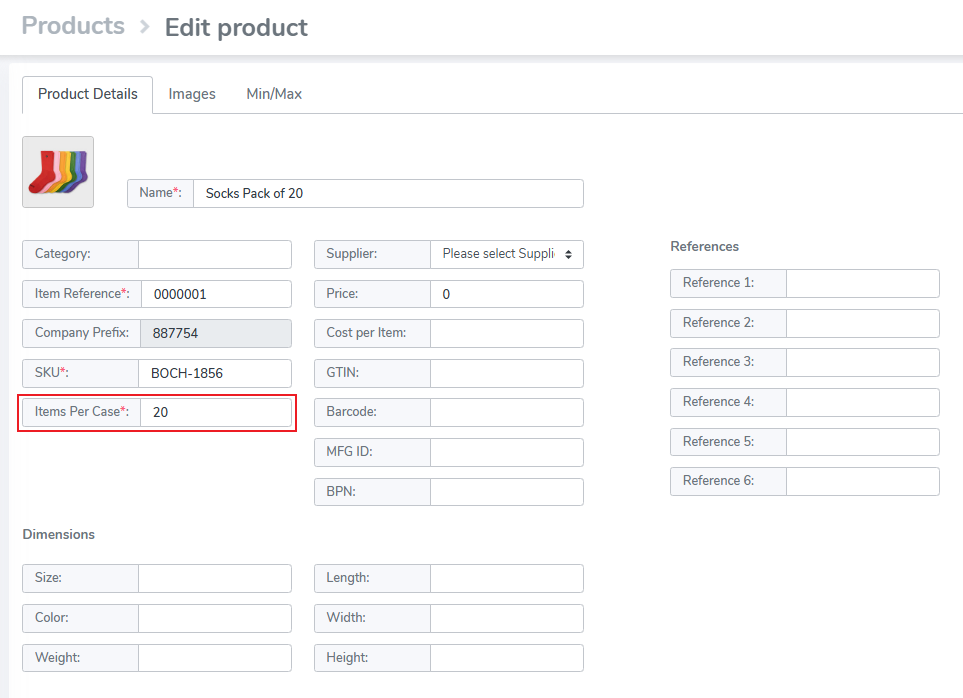
- Choose the desired Company Prefix - Click the "+" button ##### ****Create GTIN / SGTIN**** To create a product using the GS1 format GTIN / SGTIN do the following: - Enter the item's Name - Enter the Item Reference - Enter the SKU - Enter the GTIN & Barcode (these can be the same value) [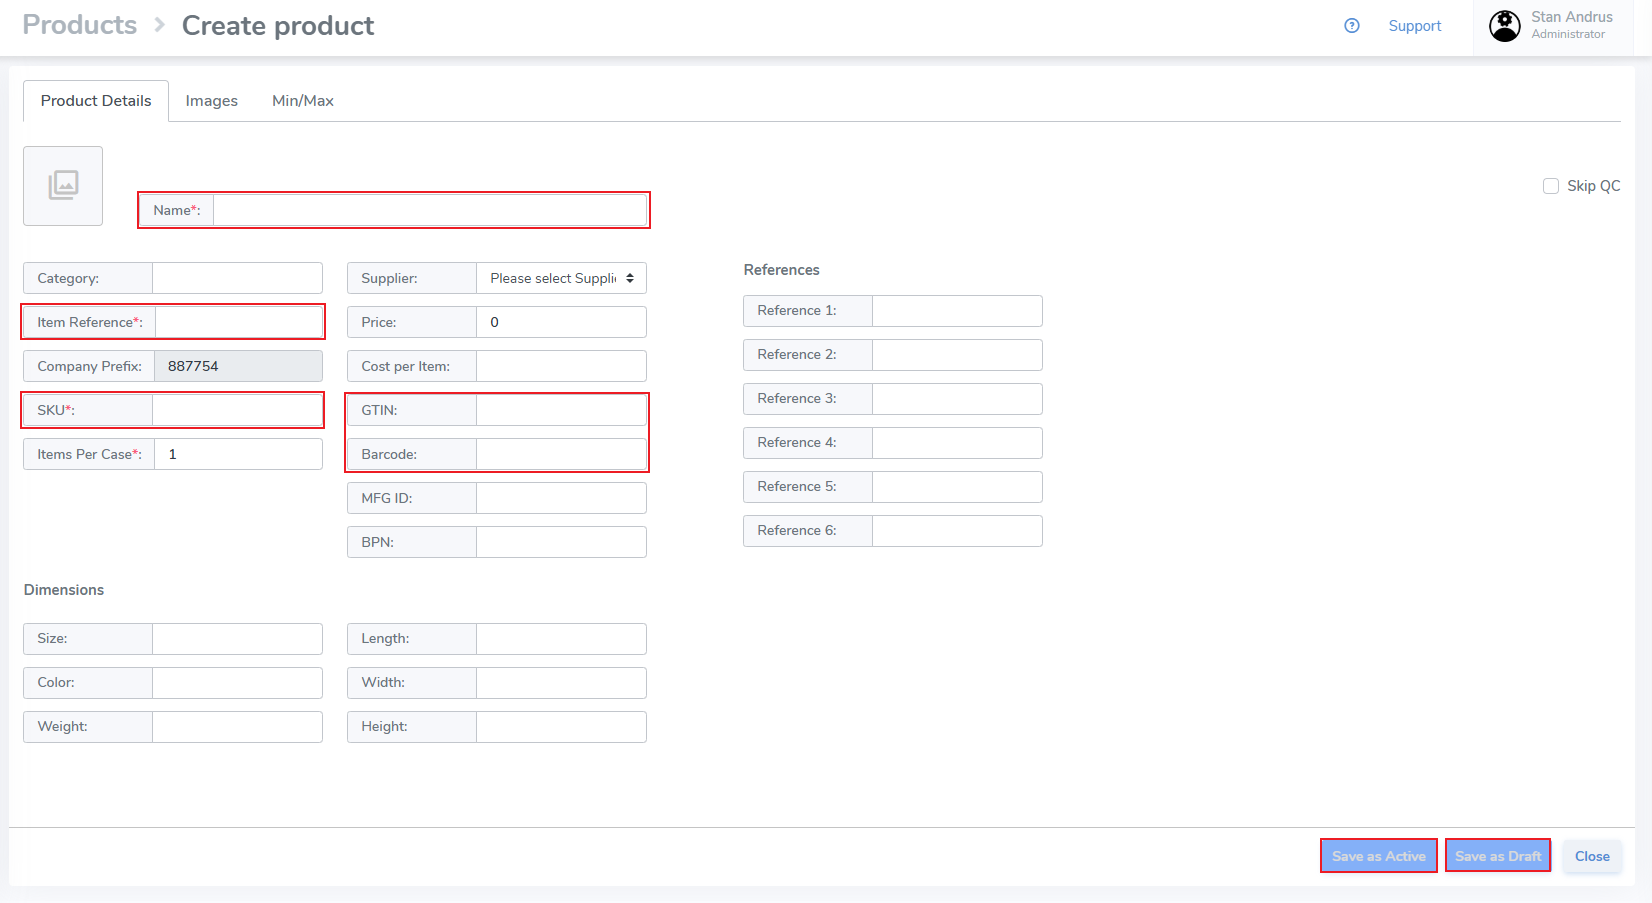](https://kb.simplerfid.com/uploads/images/gallery/2025-05/8FOimage.png) - Click Save as Active to create as an Active product - Click Save as Draft to create a Draft product - Click Close to exit without saving ##### ****Create Closed Loop**** [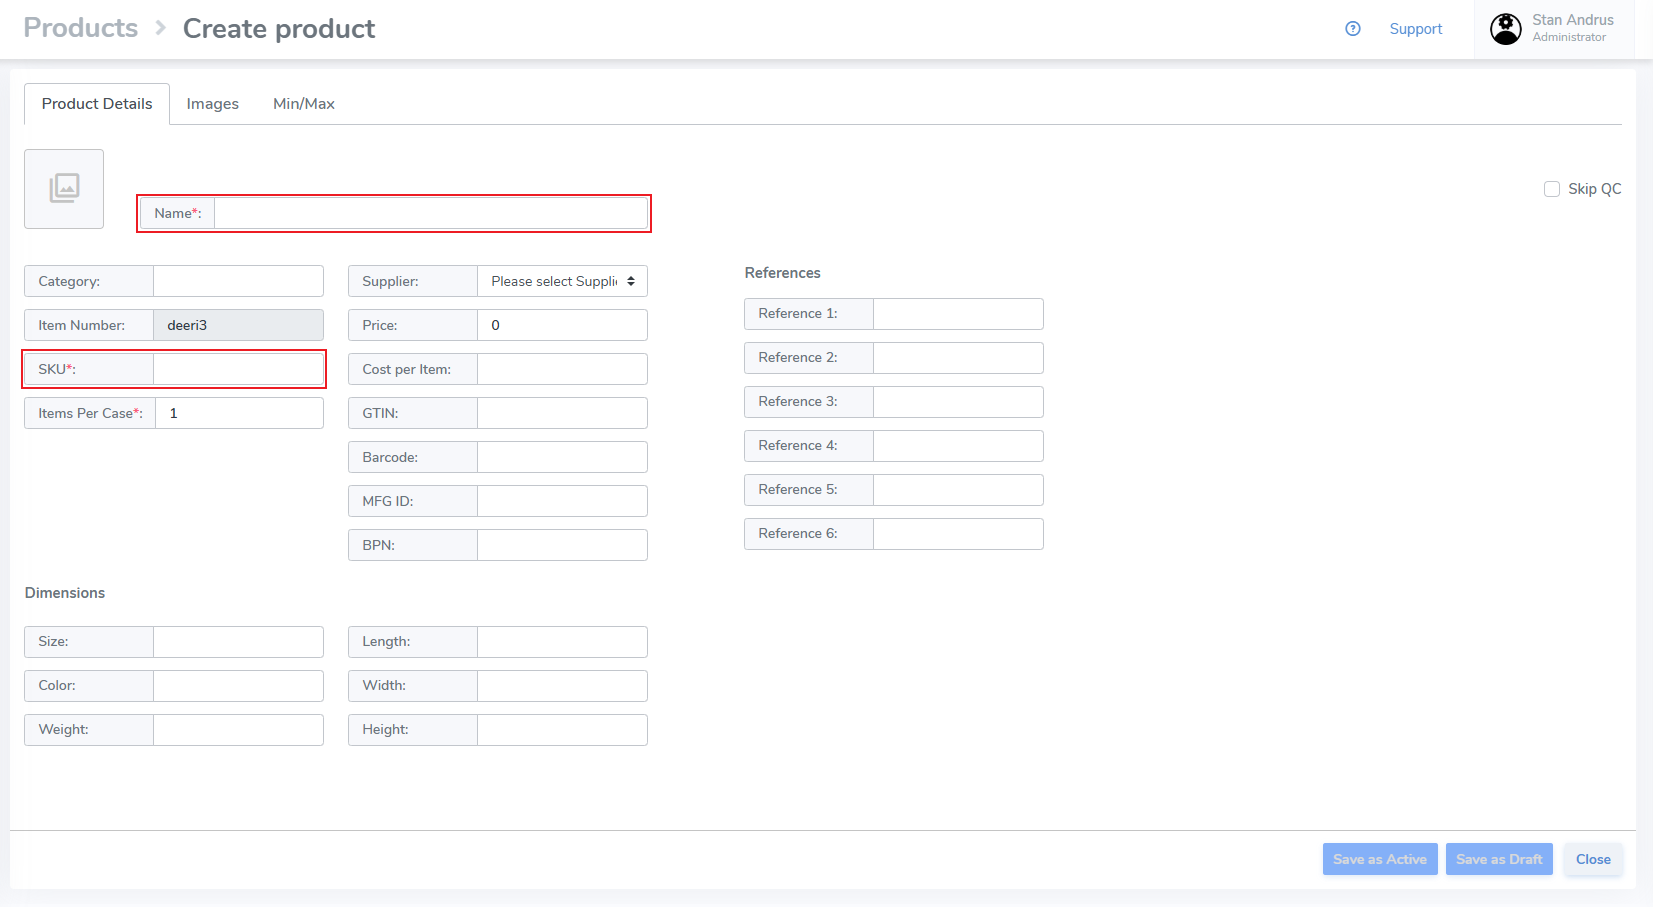](https://kb.simplerfid.com/uploads/images/gallery/2025-05/nZfimage.png) # Products: Inactive # Products: Draft Instructions for creating and updating Draft Products. Draft Products can be created manually, by integration, or via the Brand Magic feature. [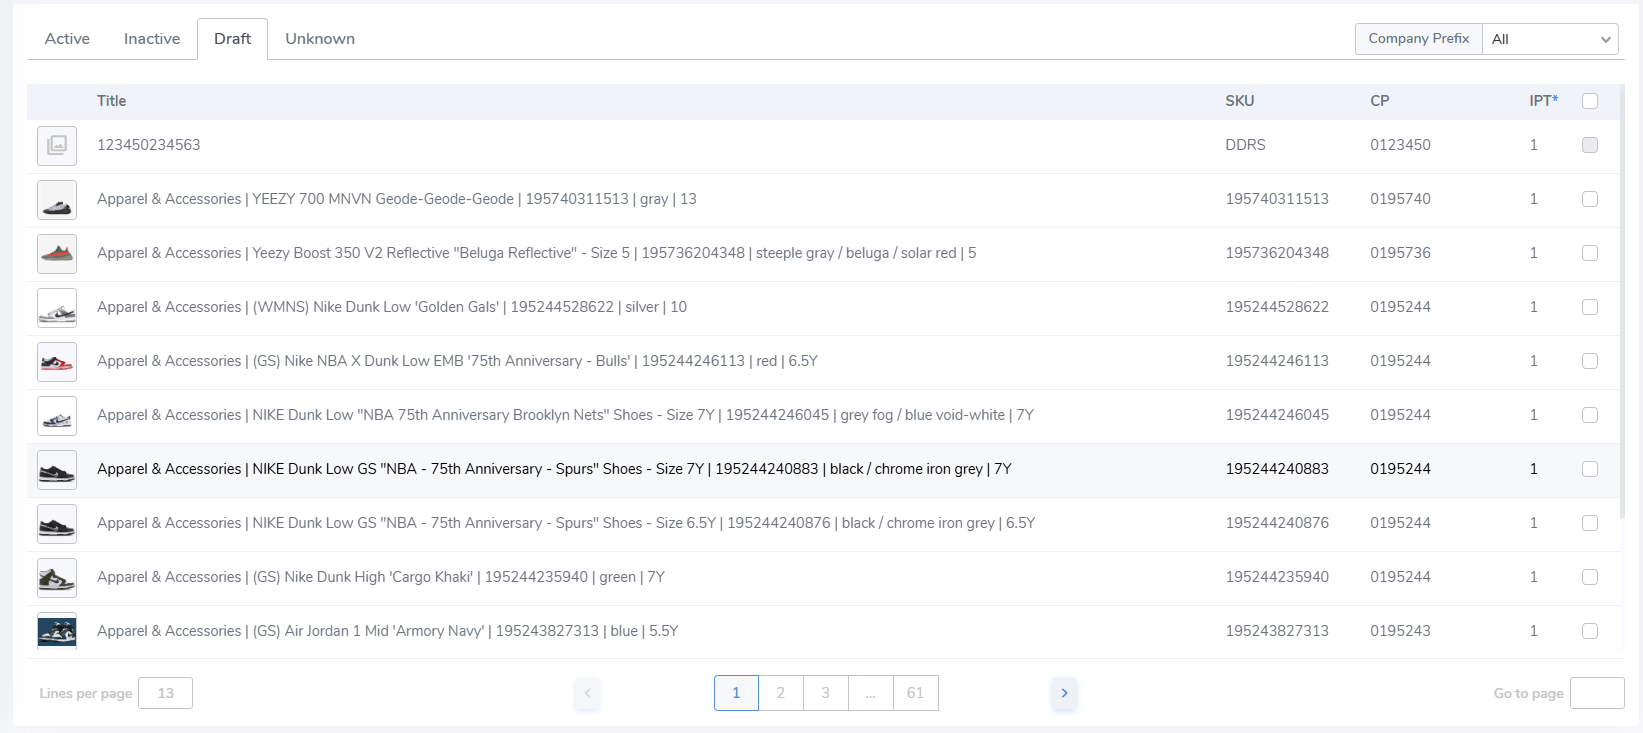](https://kb.simplerfid.com/uploads/images/gallery/2025-06/C8Simage.png) ##### ****Update Draft Products**** To update a Draft Product to Active / Inactive status, the product must have data in all required fields. If the product is missing a required value it cannot be imported until added. ****Move to Active or Inactive In Bulk**** - Update multiple Products in one action by clicking on the checkbox on the far right side. - Then, click the Activate / Deactivate button which appears above. [](https://kb.simplerfid.com/uploads/images/gallery/2025-06/2a6image.png) - Click "Yes" on the pop-up [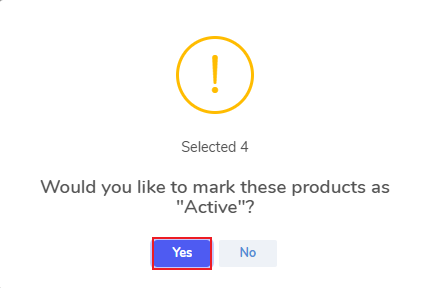](https://kb.simplerfid.com/uploads/images/gallery/2025-06/6isimage.png) - This moves the Draft Products to Active / Inactive status. ##### ****Move to Active / Save Draft Individually**** - Click an individual Product from the Draft page - This opens the Edit Product tab - Ensure that all required fields are completed - Click Save as Active to move to Active status - Click Save as Draft to update the Draft product [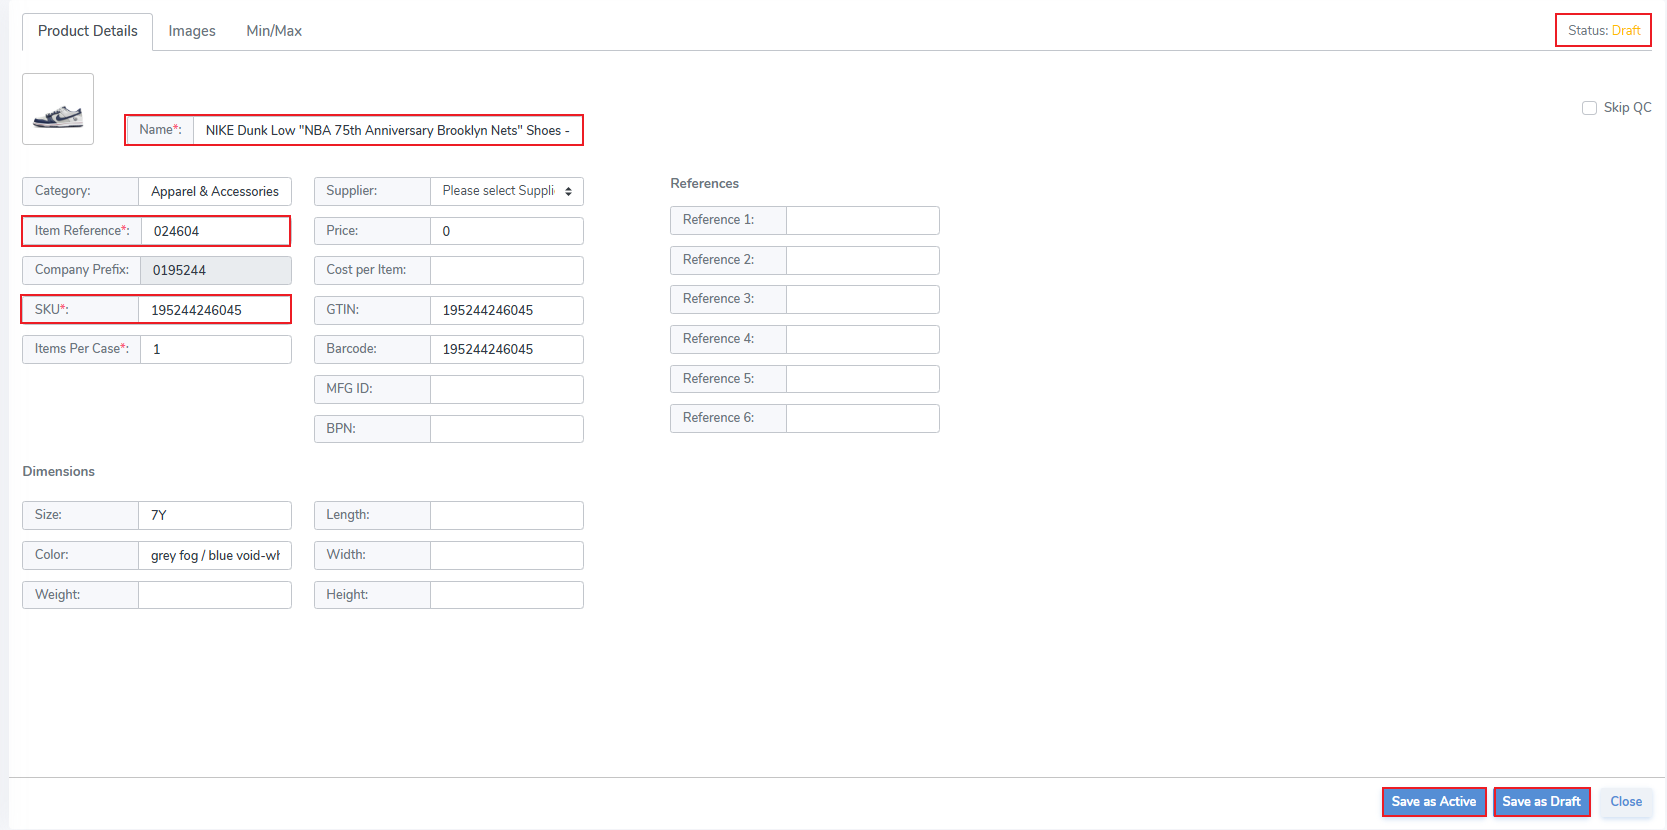](https://kb.simplerfid.com/uploads/images/gallery/2025-06/68mimage.png) # Products: Unknown # Create Product with Case Quantities Products can be created which represent more than 1 item. This can represent a case pack, or any packaging with multiple items. To create a case pack simply create the SKU from the Products tab Edit the "Items Per Case" quantity from the default of "1." In the below example the quantity is 20, so each time the tag is scanned it will generate a quantity of 20.Once you have printed tags for these items, edit these case quantity values from a specific serialized tag ([ISN](https://kb.simplerfid.com/books/support-troubleshooting/page/what-is-the-isn-and-what-is-the-benefit-of-printing-it-on-my-tags)) from the [Inventory Tag level view](https://kb.simplerfid.com/books/software-web-portal/page/inventory-tag-level-properties)
[](https://kb.simplerfid.com/uploads/images/gallery/2025-06/2PAimage.png) # Create a Product This article provides instructions to create Products, both Closed Loop & GS1. ##### ****Create Product**** - Navigate to the Products tab by clicking on Products from the left menu - Choose ****Company Prefix****, either ****Default**** or ****GS1**** ##### ****Create a Closed Loop "Default" Product**** ****Default**** does not require the user enter a format to program tags. - Click ****Default**** - Click the ****\[+\]**** button [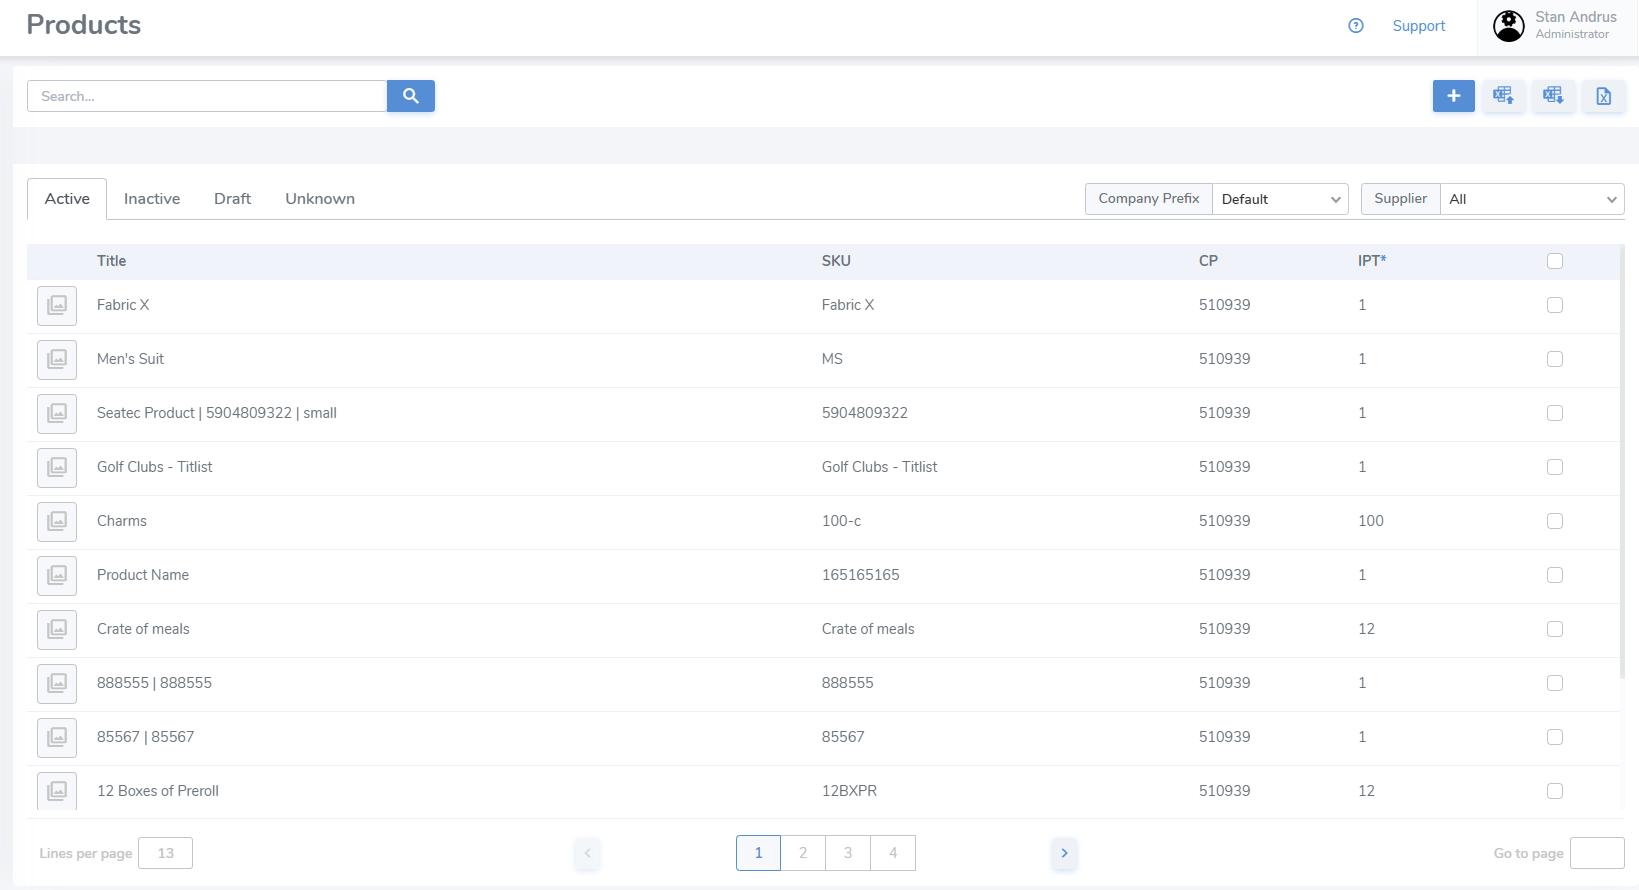](https://kb.simplerfid.com/uploads/images/gallery/2026-04/Y97image.png) - Enter Name - Enter SKU - Company Prefix and Item Reference are automatically generated - Items Per Case default is set to "1" - Input data for any other fields you wish - Click Save as Active if you wish to immediately use the Product OR - Click Save as Draft is you wish to continue editing the Product - Click Cancel to exit the page without saving [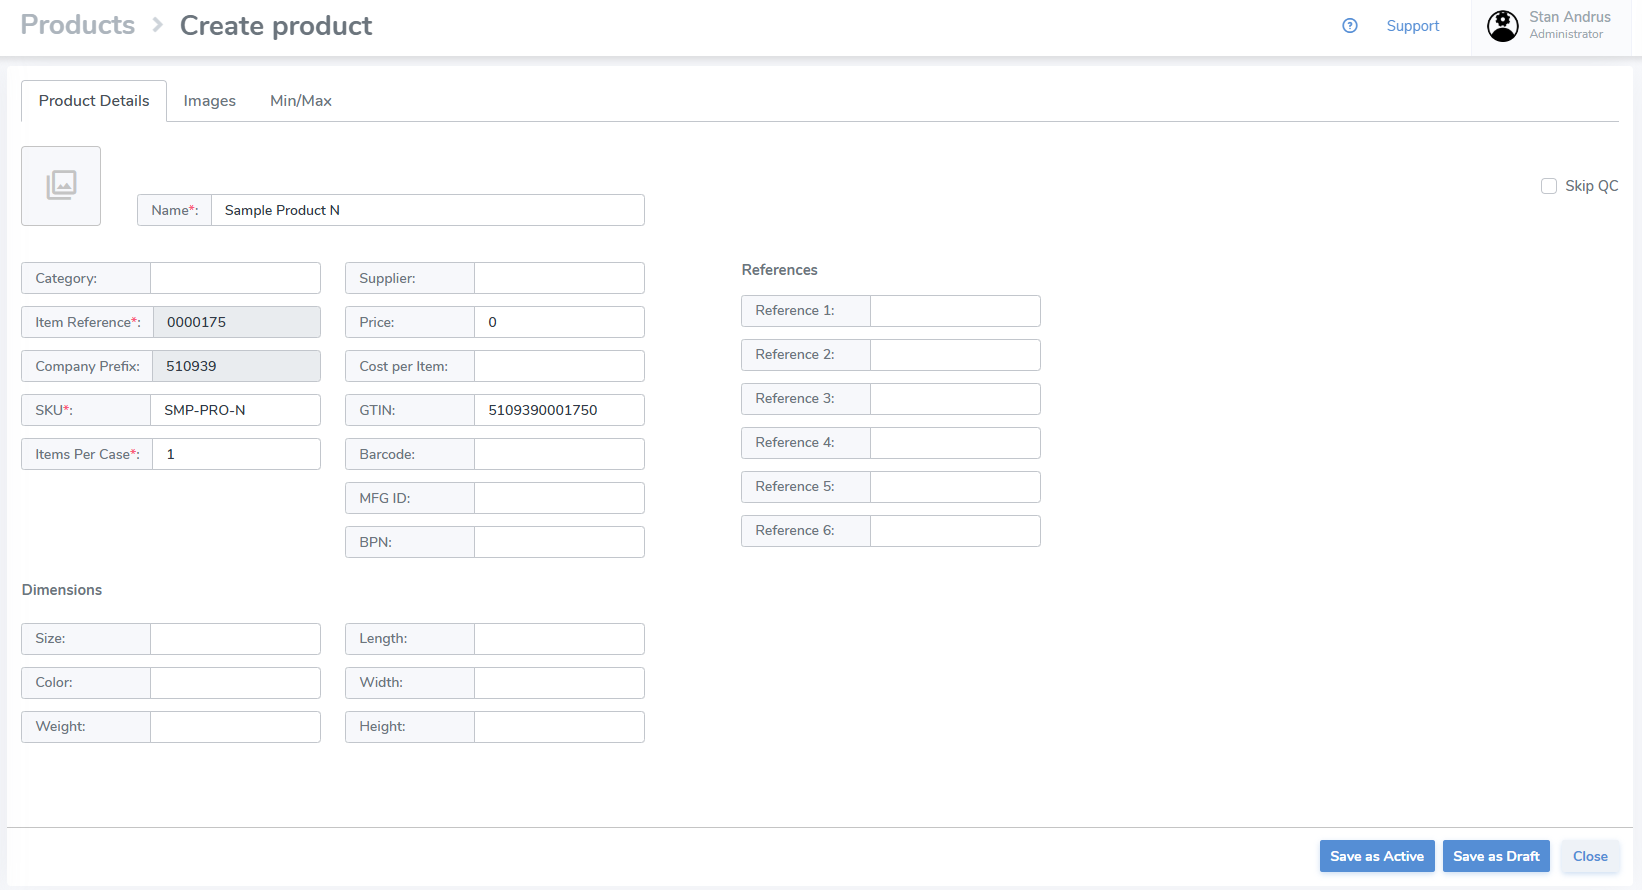](https://kb.simplerfid.com/uploads/images/gallery/2026-04/zreimage.png) ##### ****Create Product as GS1 SGTIN-96**** ****GS1**** - Generates tags in the SGTIN-96 format.Requires a Company Prefix, & User must enter Item References for products.
- Enter Name - Enter SKU - Item Reference must be manually entered and must be unique - Items Per Case default is set to "1" - Input data for any other fields you wish - Click Save as Active if you wish to immediately use the Product OR - Click Save as Draft is you wish to continue editing the Product - Click Cancel to exit the page without saving [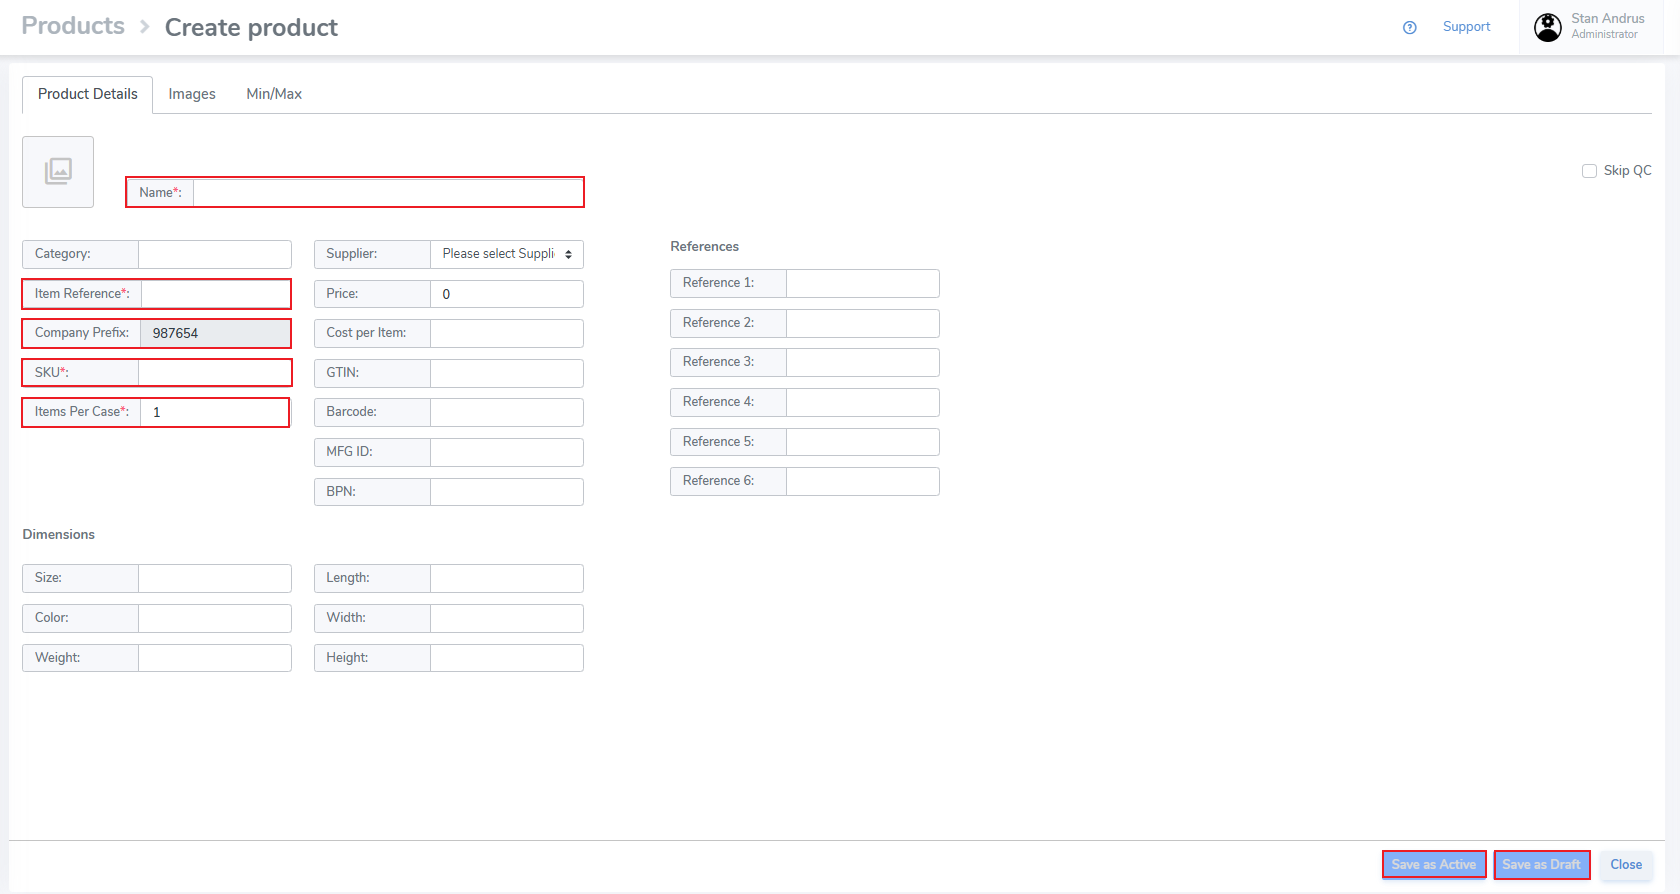](https://kb.simplerfid.com/uploads/images/gallery/2025-06/2sSimage.png) # Creating Products via SpreadsheetIf you are using Shopify please import your products from the Simple RFID app in Shopify
### 1 - Download SpreadsheetSpreadsheet will need to have the correct columns named Sku and Name. (The rest of the columns can be used but are not required).
Spreadsheet template is not required to use, the only columns required would be the Sku and Name. You can just add those two columns to your spreadsheet. If you would prefer to upload the spreadsheet with the template you can find that on the Products page as well in the top right "*****Get Template*****" button. [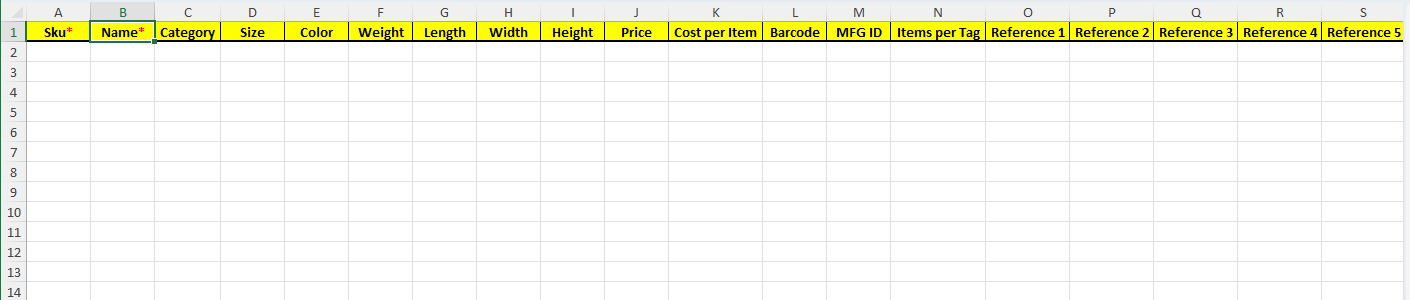](https://kb.simplerfid.com/uploads/images/gallery/2026-03/oM8image.png) --- ### 2 - Upload into the Web Portal Now that you have the spreadsheet with the correct columns, the next thing we need to do is sign into our Simple RFID Web Portal. After signing in we will go to the "Products" tab located on the left hand side. At the top right of this page we will see the "Upload XLSX" button. (*****Circled in yellow)***** [](https://kb.simplerfid.com/uploads/images/gallery/2026-03/screenshot-2026-03-27-131305.png) After selecting Upload it will now allow you to choose a file from your computer. Select the XLSX file with your products and hit "OK" [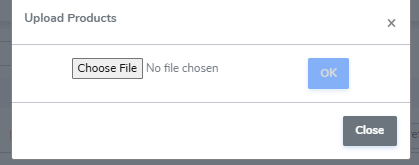](https://kb.simplerfid.com/uploads/images/gallery/2026-03/8a0image.png) --- ### Step 3 - Check for errors Once you have uploaded it should have all your products in the Simple RFID Web Portal. However sometimes if there is an issue with the spreadsheet it can show an error and the reason. If you encounter an issue like this you can try to fix the issue or you can reach out to our support team to assist using the "Support" button on the Web Portal.Most issues come from the SKU column, duplicate SKU's will not allow the upload. Make sure all of your products have unique SKU's tied to them.
[](https://kb.simplerfid.com/uploads/images/gallery/2026-03/3gQimage.png) ---If the printer continues to VOID labels, repeat the process. If the issue persists, perform a calibration directly from the printer itself.
# Menu Bar: Available Printers: Printer Profile From the Menu Bar # Menu Bar: Knowledge Base # Coming Soon... Link to Compare Tool Link to Onboarding Portal Support Bot # User / Manager Menu Top right navigation menu provides hardware views, settings, label designer, User menu, Locations menu, and more. # Change Customer If you have more than one account in Simple RFID you will see a "Change Customer" button Currently the system operates on two frameworks, so some pages are on the URL "web.simplerfid.com" and other pages are on "portal.simplerfid.com" This article shows how to change the vendor from both. ##### Portal.SimpleRFID.com To change customer from Portal: - Click the admin menu, then click Change Customer [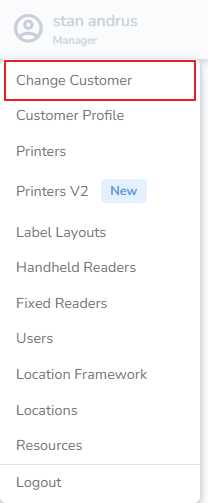](https://kb.simplerfid.com/uploads/images/gallery/2025-05/GsUimage.png) - A pop-up will appear allowing you to select the vendor [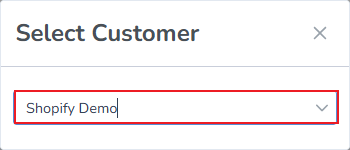](https://kb.simplerfid.com/uploads/images/gallery/2025-05/hdlimage.png) ##### Web.SimpleRFID.com To change customer from Web: - From the Web you will see the selector is on the far left [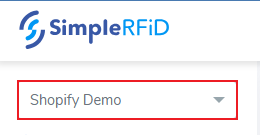](https://kb.simplerfid.com/uploads/images/gallery/2025-05/1Kaimage.png) - From the drop-down select the desired vendor [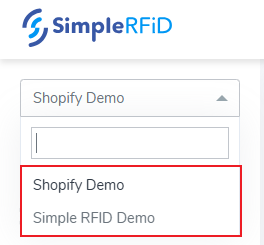](https://kb.simplerfid.com/uploads/images/gallery/2025-05/UIUimage.png) # Account Settings This page provides an overview of the account including: 1. Account Name 2. Abbreviation - This must be a two letter abbreviation. Example 'DM' 3. Email address where you wish to have general notifications sent 4. 'Package' indicates the your plan such as "Trial" or "Standard" 5. Brand Magic - Automatically resolve unknown GS1 products. Scanned unknown tags are converted it into a Draft products 6. Company Prefixes - Enter a company prefix to print and scan tags using the SGTIN schema 7. RFID Layouts - These are the label sizes which are available in your [Label Designer](https://kb.simplerfid.com/books/software-web-portal/page/label-layouts-label-designer) 8. Order Pick Sheet - These are controls for the order pick sheet to add or hide elements 9. Apparel Magic 10. Tokens 11. Shopify Settings 12. Webhooks - 13. Save - saves changes 14. Cancel - cancels operation and navigates away from the Customer Profile pageIf you don't see your label size available in the RFID Layouts list, please request that it be added via our support
[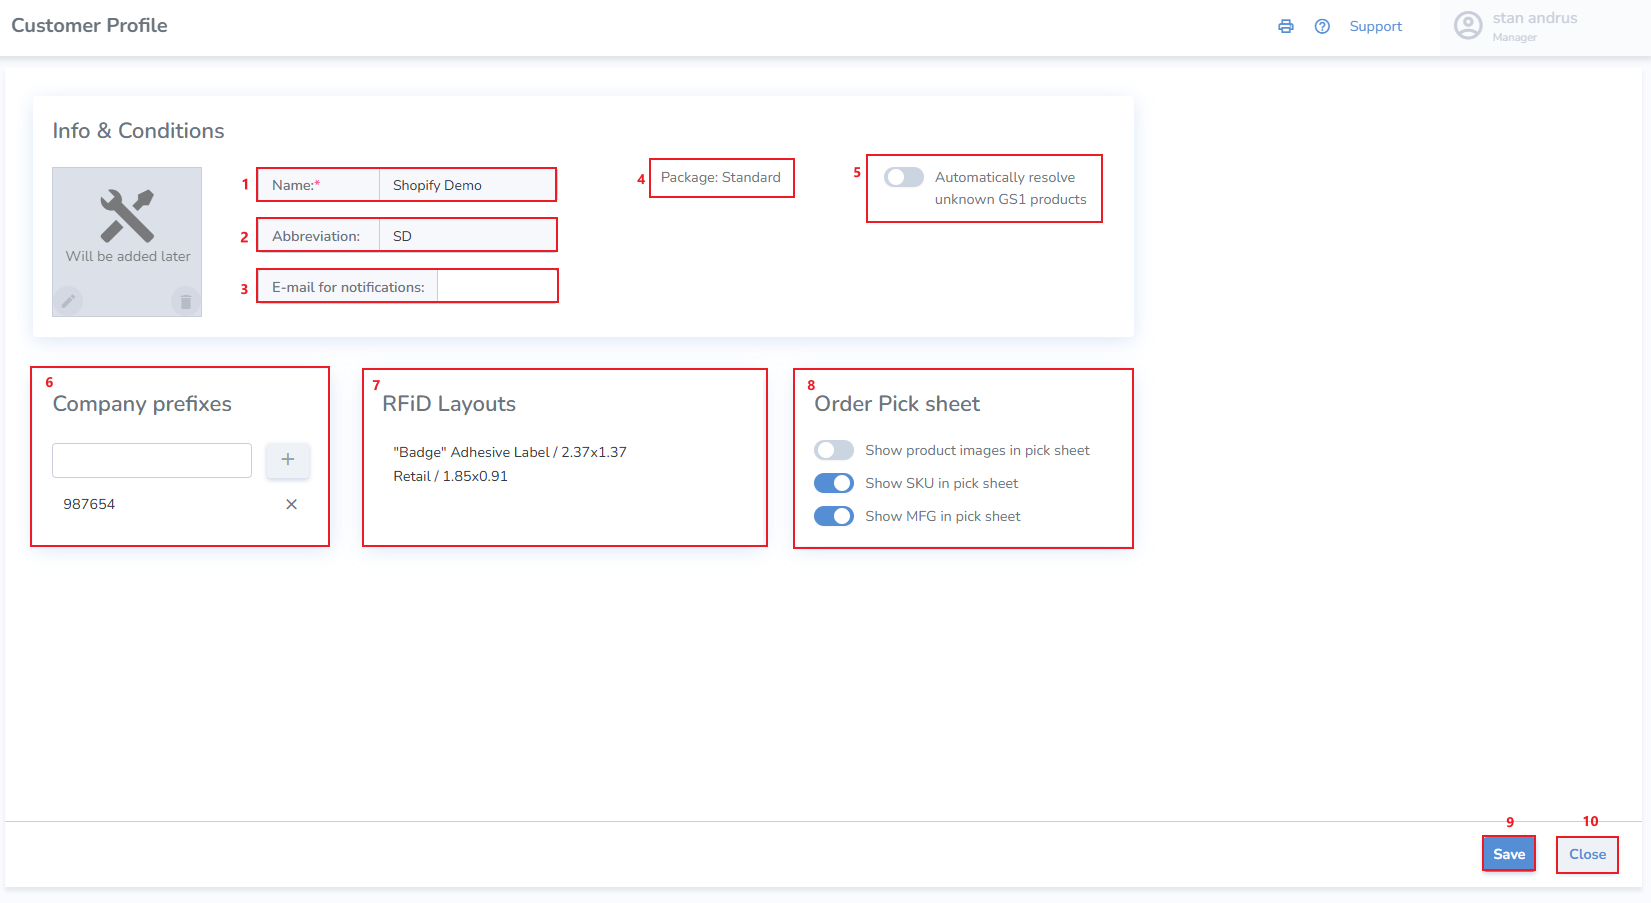](https://kb.simplerfid.com/uploads/images/gallery/2025-05/PVZimage.png) ****GS1 Company Prefixes**** [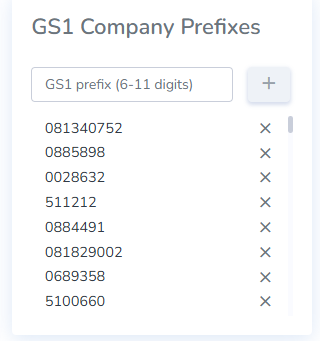](https://kb.simplerfid.com/uploads/images/gallery/2026-10/Agximage.png) #### ****Label Sizes**** ****Add new label sizes to be used by the Label Designer.**** [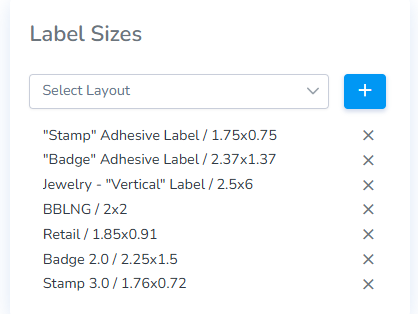](https://kb.simplerfid.com/uploads/images/gallery/2026-10/5MIimage.png) #### ****Printing Settings**** ****Registration key - The printing settings section contains your Registration key. This key is used to connect your printer to your account.**** ****Currency Format - This section provides the ability to set your currency format.**** ****Product name prefixes to exclude when printing - This section allows for eliminating designated products to be hidden from view.**** [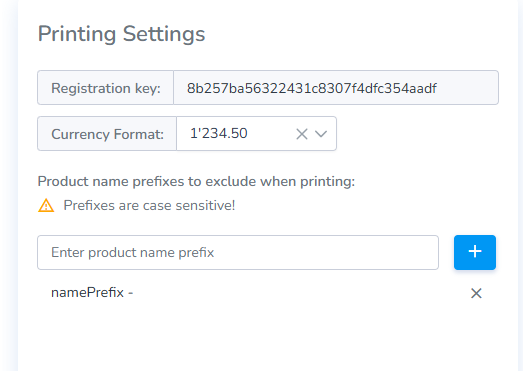](https://kb.simplerfid.com/uploads/images/gallery/2026-10/SMeimage.png) #### ****Audit Freshness Settings**** ****These settings allow users to set the parameters of what constitutes Fresh, Aging, Stale, as well as Archived.**** [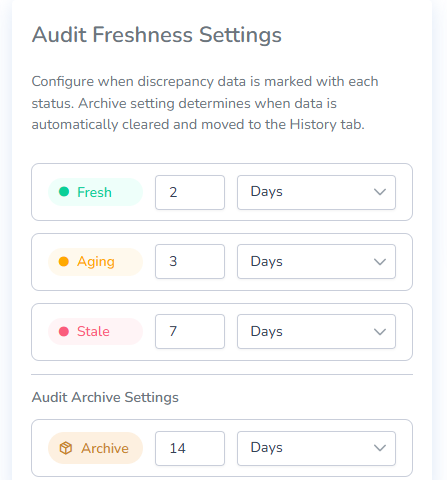](https://kb.simplerfid.com/uploads/images/gallery/2026-10/1c3image.png) --- #### ****API Tokens**** [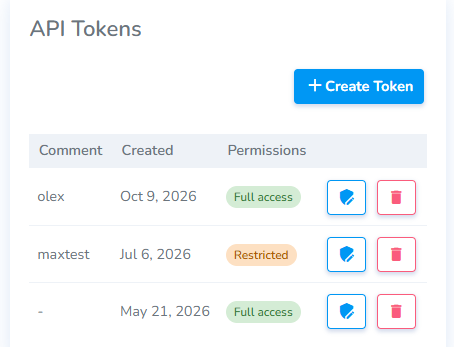](https://kb.simplerfid.com/uploads/images/gallery/2026-10/C4simage.png) --- #### ****Shopify Settings**** [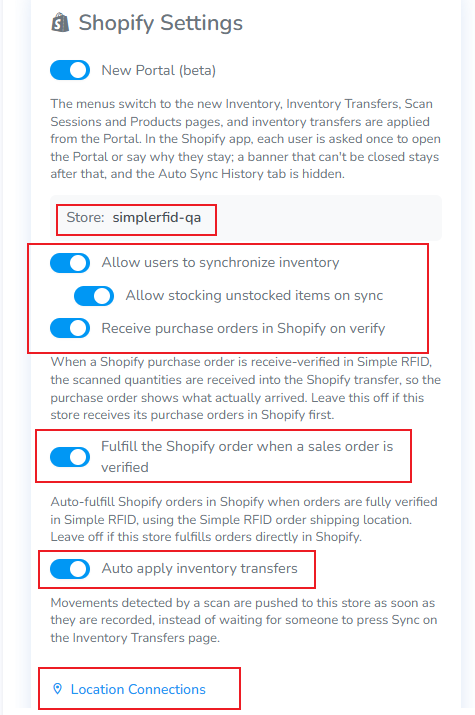](https://kb.simplerfid.com/uploads/images/gallery/2026-10/zVGimage.png) --- ##### ****Webhooks**** [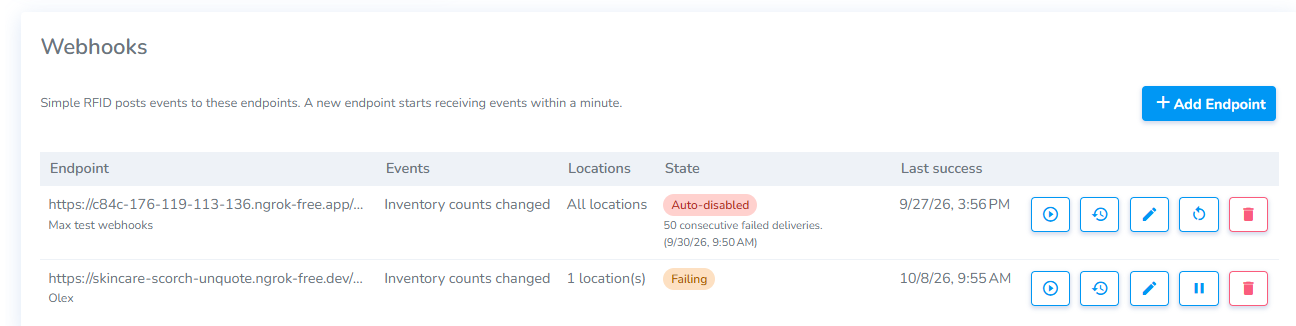](https://kb.simplerfid.com/uploads/images/gallery/2026-10/ceUimage.png) # Account Settings: Switching our of Legacy Audit modeThe system offers two modes for auditing: Legacy Audit, which is a basic flow, and Advanced Mode, which allows for more granular auditing and discrepancy resolving. These modes can be enabled or disabled from the customer profile menu using the switch button at all times.
You will need to be a ****Manager**** on the Simple RFID Web Portal to access this page
#### ****Access Account Settings**** ##### On the [SimpleRFID](https://portal.simplerfid.com/) web portal, click your account name in the top right corner of the screen, then select ****Account Settings**** [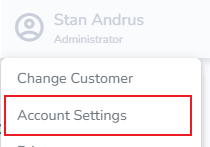](https://kb.simplerfid.com/uploads/images/gallery/2026-10/1PAimage.png) #### ****Account Settings Page**** ##### On the Account Settings page, disable the Audit Legacy mode switch. [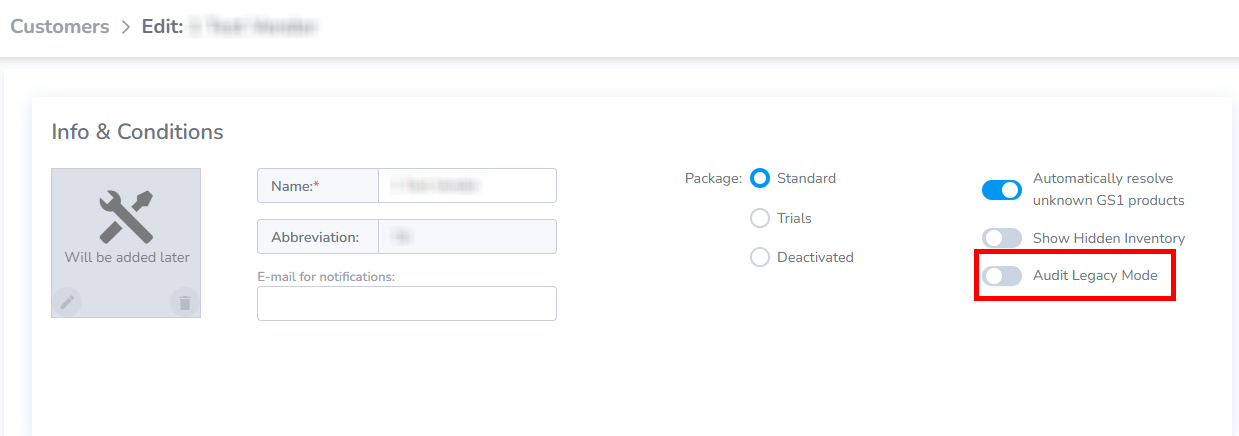](https://kb.simplerfid.com/uploads/images/gallery/2026-05/lQeimage.png) The page will automatically save the results.Switching out of Legacy mode will change the Audit process! Both modes have their own set of actions required for a successful Audit. ****All active Audits will be canceled.****
The instructions for the Legacy Audit Mode can be found here: [Audit and Compare](https://kb.simplerfid.com/books/processes-audit-your-inventory/page/basic-audit-flow-audit-compare-being-deprecated-dec-31-2026/) and [Audit & Compare Shopify](https://kb.simplerfid.com/books/software-integrations/page/shopify-auditing).
The instructions for the New Audit flow can be found here: [Audit - Shopify](https://kb.simplerfid.com/books/processes-audit-your-inventory/page/audit-using-an-integrated-data-source-shopify-apparel-magic-etc)
# Printers List Provides a view of all print stations and connected printers. It includes: \- Printer Station Location it is connected to Printers list Print Client Version Settings Icon # Printers > Station Settings This page allows for the assignment and view of all printers including settings. [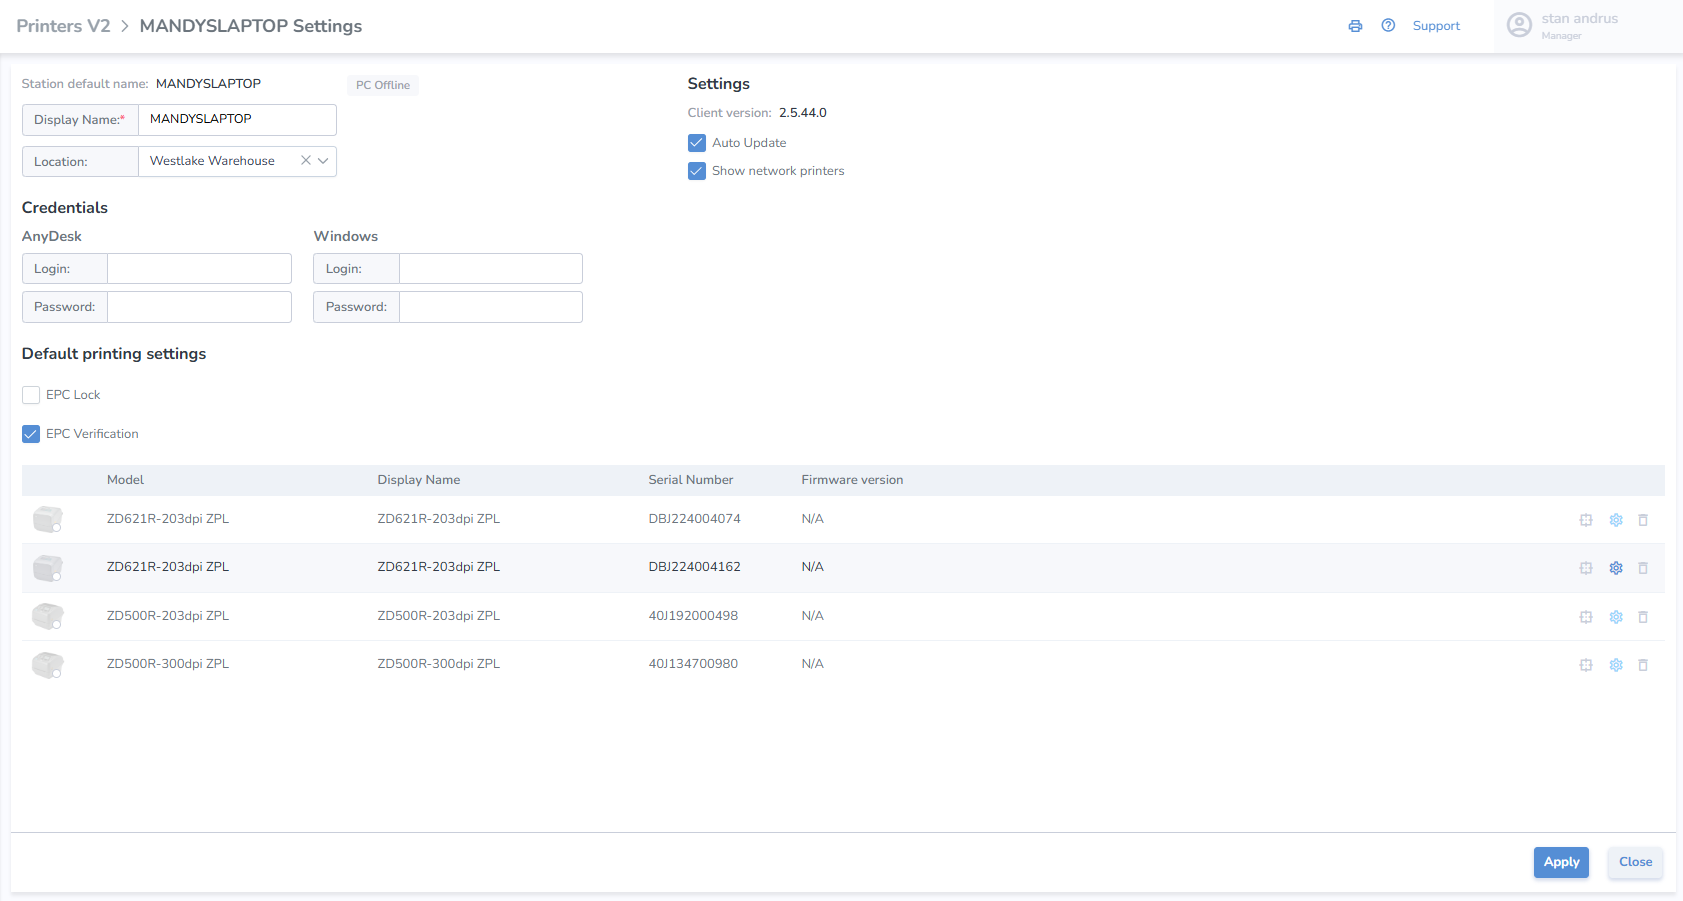](https://kb.simplerfid.com/uploads/images/gallery/2025-05/6kCimage.png) # Label Layouts > All Layouts Label layouts are the label designs which have been created and saved. From this page a user may also create new label designs. 1\. Search window provides ability to search saved designs 2\. Card for each saved design and includes Name, Label size, DPI, Saved date and time, and a preview of the design 3\. "+" button located in the upper right corner of the screen to navigate to the Label Designer to create a new label design 4\. Ability to import an existing design from another label editor [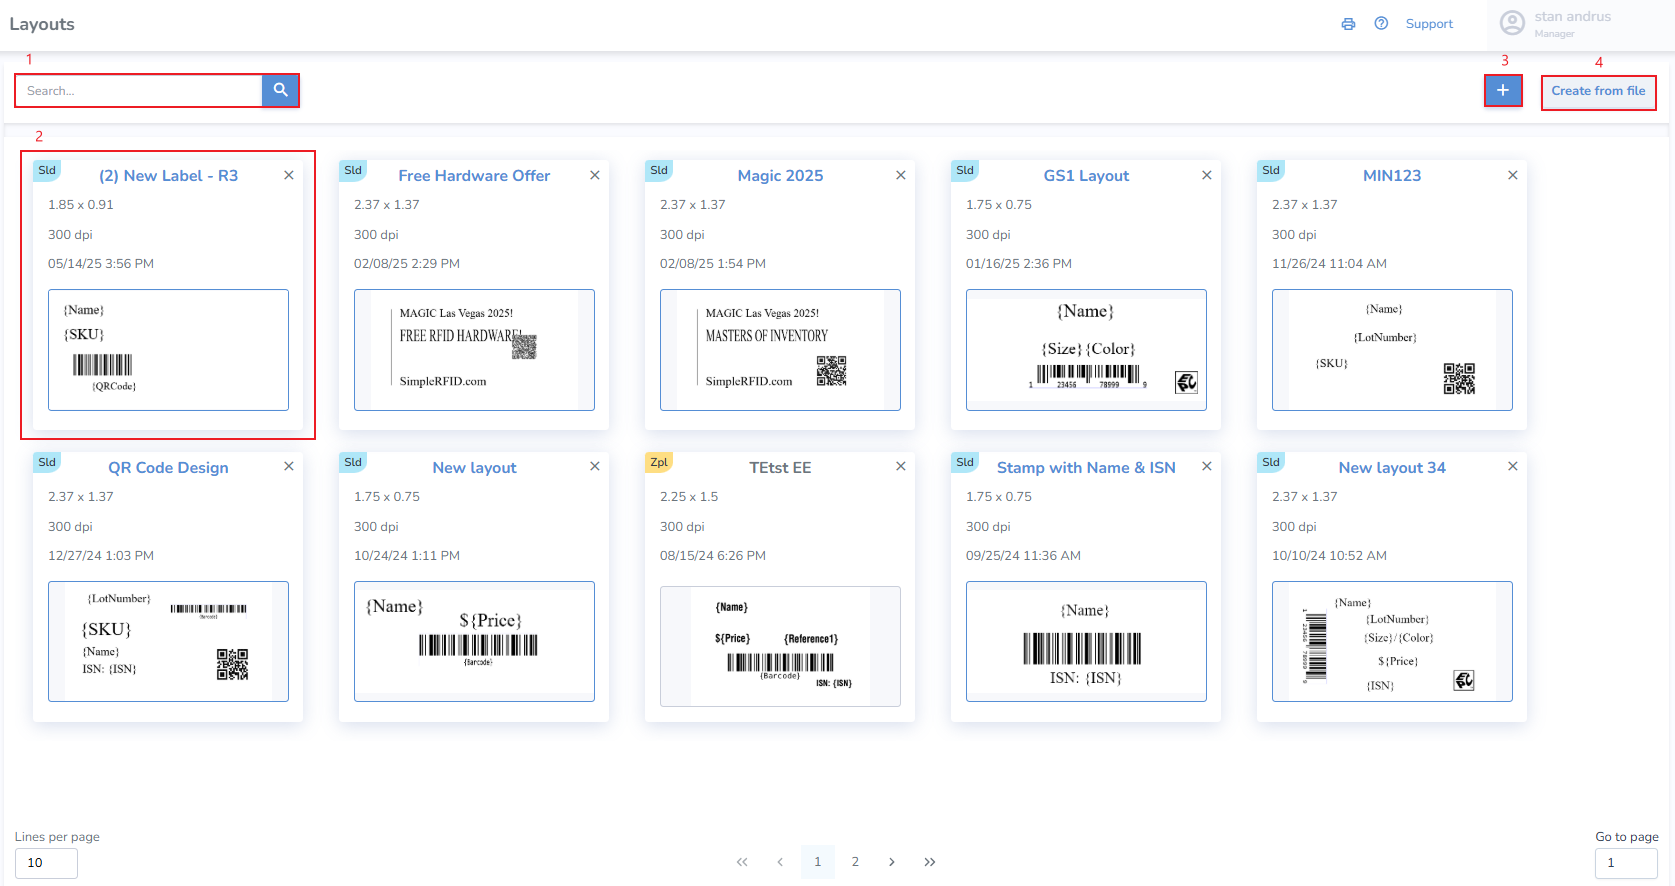](https://kb.simplerfid.com/uploads/images/gallery/2025-05/gJKimage.png) # Label layouts > Label Designer The design editor allows a user to quickly design a label with any properties which appear for the Product, including description, size, color, price, barcode & QR code, image and more. ##### ****Adding Fields to Label Layout**** Add any property from the Edit Product screen to your label by placing the name of the property in curly brackets as a text element in the Label Designer.Is your printed label missing properties? Search the product you are printing and check the fields to confirm that the product contains the field.
E.g. In the example below: to print "Size: 7'" on the label, you would add a text element with {Reference1}
[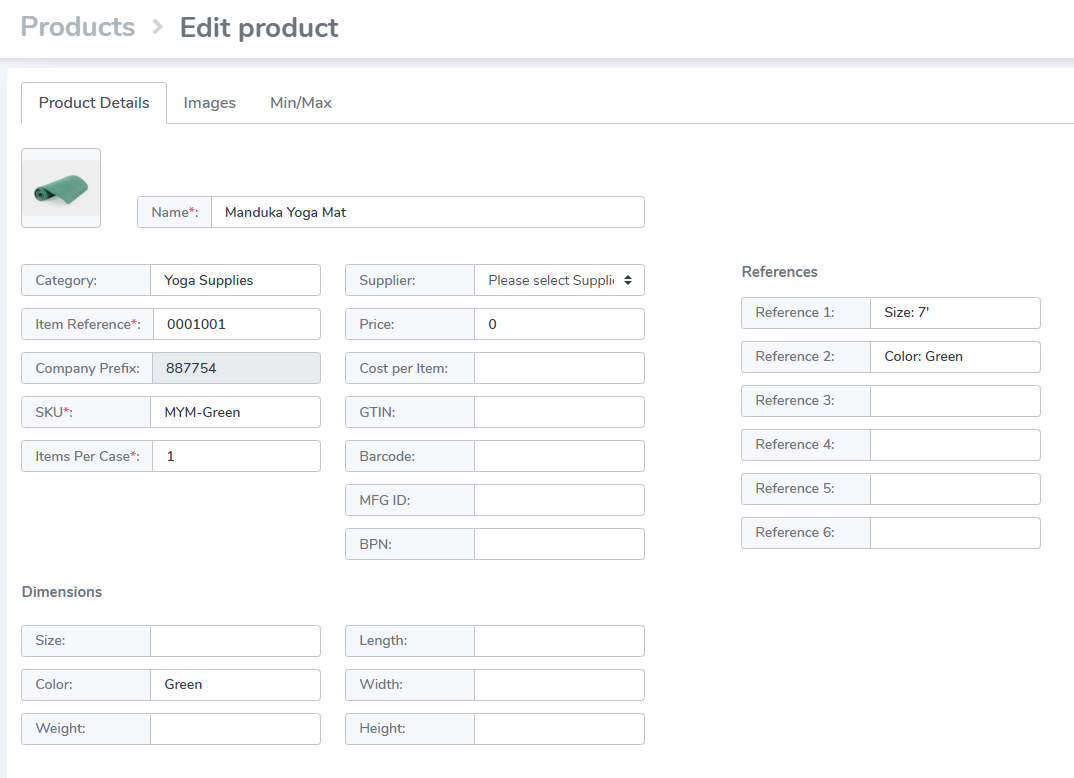](https://kb.simplerfid.com/uploads/images/gallery/2025-06/203image.png) ##### ****Overview of Label Designer**** 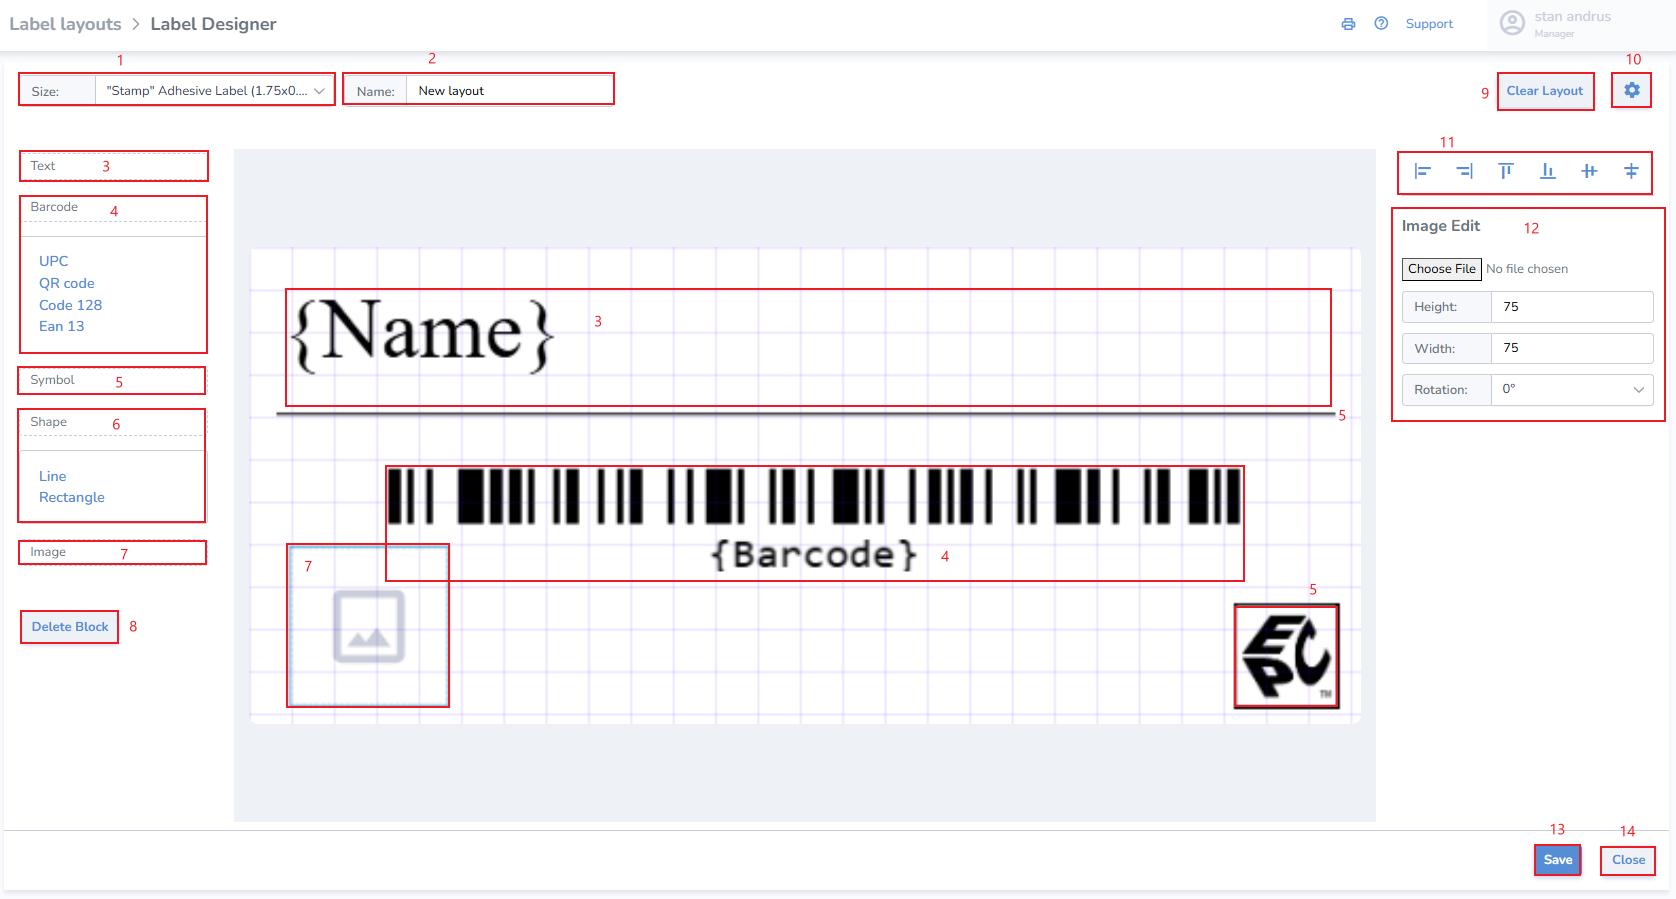****Template**** 1\. Choose label size - Don't see your label size available in the Size dropdown? Email support@simplerfid.com and notify us. 2\. Name Label ****Add Block: Text, Barcode, Symbol, Shape & Image**** 3. ****Text**** - This is any place where text will appear such as name, description, size, color, style, price, etc. in any font desired 4. ****Barcode**** - This allows you to add a barcode or QR codeUnless you have a specific barcode type, such as UPC or EAN, you'll generally want to use ****Code 128**** by default.
5. ****Symbol**** - add EPC global symbol other popular symbols 6. ****Shape**** - add basic shapes to design including line, box, circle 7. ****Image**** - upload a basic image 8\. Delete Block - remove a single block from the canvas 9\. Clear Layout - remove all blocks and clear the canvas 10\. Grid settings - adjust grid lines 11\. Align options 12\. Editor window for selected block 13\. Save button to save design. Once clicked the user is directed back to the Layouts page 14\. Close button to close the design without saving. Once clicked the user is directed back to the Layouts page ##### ****Edit Block**** Click on the Block you wish to edit ##### ****Text**** Click Text Choose the Data source: Text, Property, Custom Text & EPC Text from the right in the Text Edit section - ****Text****: ID, Name, Category, MFG ID, SKU, Price, Item Number, Barcode, QR Code, BPN, & Items Per Tag - ****Font:**** [Choose existing font or add any font](https://kb.simplerfid.com/books/software-web-portal/page/fonts) - ****Property****: Size, Color, Weight, Length, Width, Height, Full Description - ****Custom Text****: Pulls information from Ref 1-Ref 6 in the Products > Edit Product view - ****EPC Text****: tag level properties which include Items per tag, Cost, Cost per item, Born Date, Expiration Date, Lot Number, Sell by date, EPC, EPC ASCII, ISN, SN, or GTIN [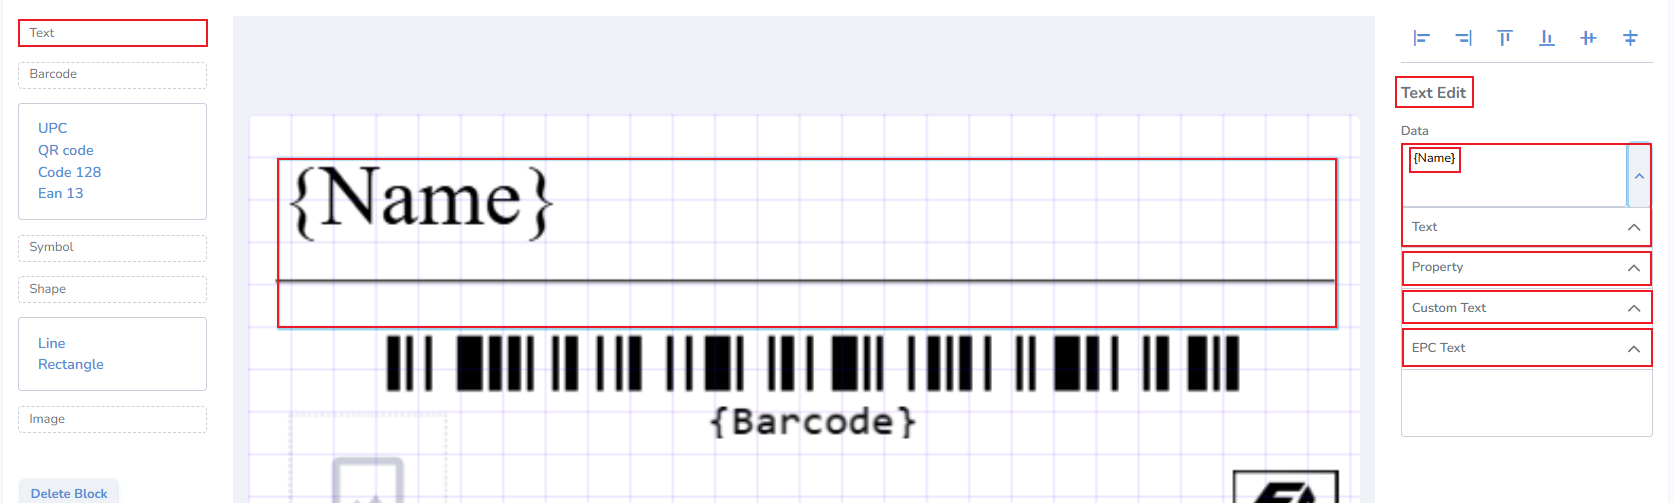](https://kb.simplerfid.com/uploads/images/gallery/2025-05/SiXimage.png) ##### ****Barcode**** Click on the Barcode option on the right to view the Barcode Edit window Choose Data source. This allows you to use any text or number from any field and turn it into a barcode or QR code ##### ****Symbol**** Add a common symbol such as ISO, Trademark, Copyright, or EPC logo [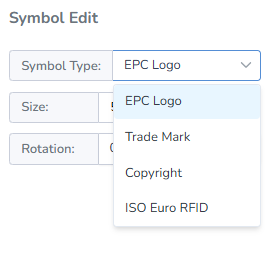](https://kb.simplerfid.com/uploads/images/gallery/2025-05/zQHimage.png) ##### ****Shape**** Add common shape like a box, circle, or line ##### ****Image**** # FontsPlease note that the new font won't appear in the preview, however it will print on the label. Our next improvement will display this new font in the label design template.
# Layouts > Create from file Use an existing design via the Create New Label From File pop-up Click the Create from File button from the Layouts page - Click the "****+****" button and locate your file. Make sure that your file is a valid file type - ****Name**** your Design - Choose the ****label size**** - Choose the ****DPI**** of the original design - Click ****Create**** 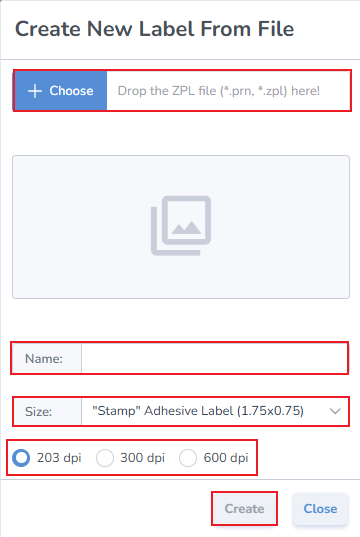 # Handheld Readers This page provides visibility to all of your Handheld RFID readers connected to your account. It provides visibility to all devices, identifies who last used the device, where they were located, and when it was used. It displays the device firmware to help identify the devices which must be updated. - Model Number - Serial Number of all devices - First connected date - Last connected date - Location it was last at - The user who last used the device - Firmware of the device - find the current firmware version here # Fixed Readers # Users ### ****User:**** ##### ****Create a User**** If you are a regular user (not manager), please contact your manager and ask to create an account. ##### ****Reset Password**** ****1. Go to**** [Login Page](https://portal.simplerfid.com) ****2. Click**** *"Forgot password?"** [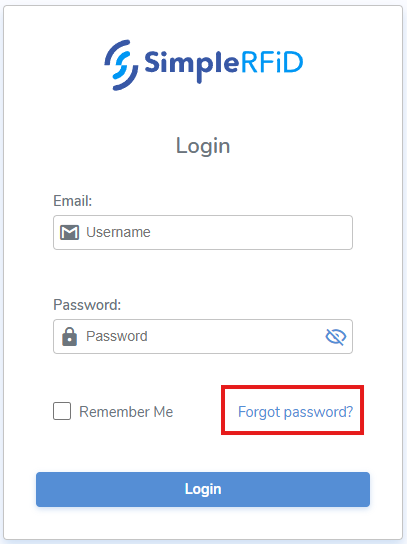](https://kb.simplerfid.com/uploads/images/gallery/2025-06/4skimage.png) ****3. Enter**** **your email** ****4. Click**** **"Send a link to email"** [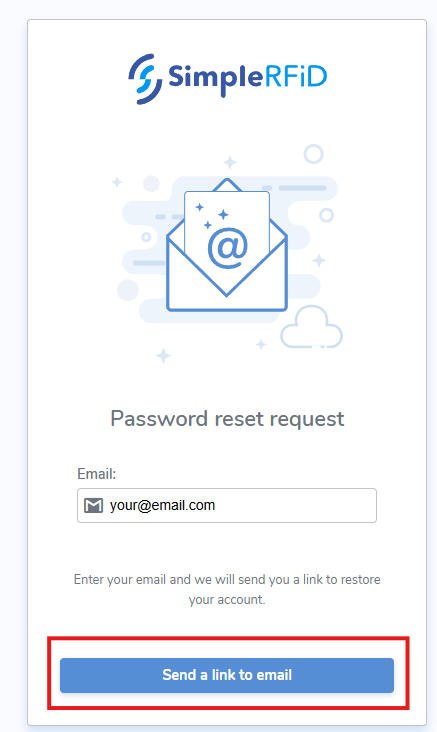](https://kb.simplerfid.com/uploads/images/gallery/2025-06/lHdimage.png) ****5. Open**** **your email inbox** ****6. Open**** **noreply** email ****7. Click**** **"Reset Password"** [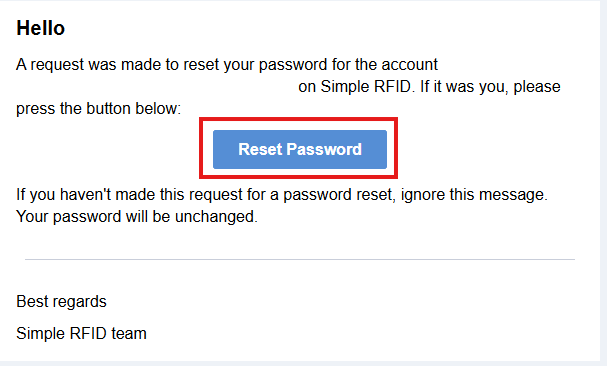](https://kb.simplerfid.com/uploads/images/gallery/2025-06/lnjimage.png) ****8. Enter**** the **new password** twice ****9. Click**** **"Save new password"** ##### ****Deactivate User**** If you are a regular user (not manager), please contact your manager to deactivate your user. ### ****Manager:**** ##### ****Create a User**** 1. ****Go to**** [Users](https://portal.simplerfid.com/manager/users) (logged in as Manager) 2. ****Click**** the “****+****” button to add a new user. 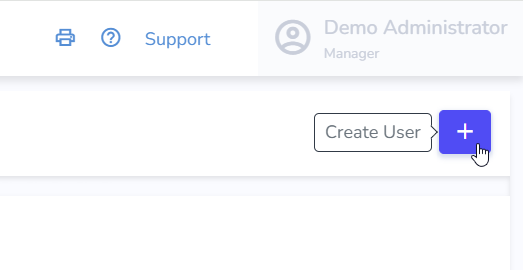 3. ****Enter**** the user’s ****first**** and ****last name****, ****email address****, and optionally a ****phone number****. 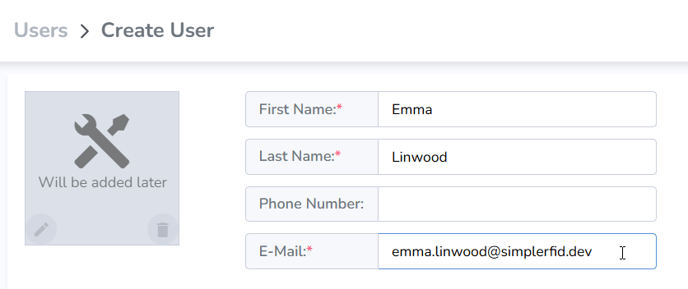 4. ****Select**** the ****locations**** this user will have access to. 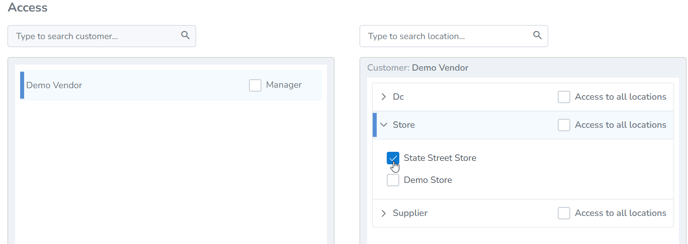 ****OR**** 4. Give them ****Manager**** access for full access to ****all locations****. 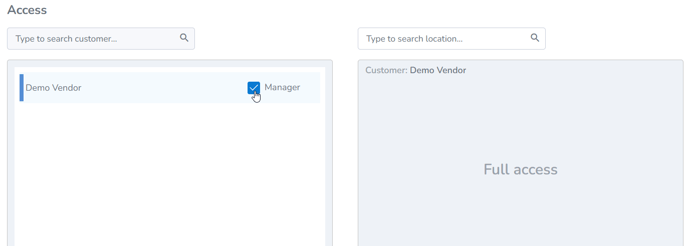 5. Finally, click ****Create****. 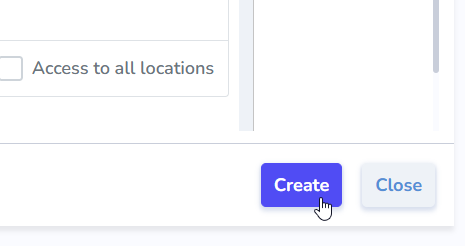The user will then receive an email to set their password and log in.
##### ****Resetting User Password**** Same as User. ****OR**** 1. ****Go to**** [Users list](https://portal.simplerfid.com/manager/users) 2. ****Click on**** the desired User to open it 3. ****Click**** **"Reset Password" > "Reset"**A "Reset Password" email should is sent to the user. User will need to Reset the password as above in user's "Reset Password" after step 5.
##### ****Deactivating a User**** 1. ****Go to**** [Users list](https://portal.simplerfid.com/manager/users) 2. ****Click on**** the desired User to open it 3. ****Click**** **"Deactivate User" > "Deactivate"** # Location Framework The Location Framework provides the ability to create properties that can be assigned to tags via a drop-down menu. Although this is called "Location" Framework, these properties can include anything you wish to associate with your items such as: - Sublocations - Create rows, bins, isles, etc. - Flags - Set items to status such as alterations, embroidery, layaway, etc. - Process - Assembly, Packaging, QA, etc. ##### ****List tab**** The Location Frameworks list tab displays all created frameworks. [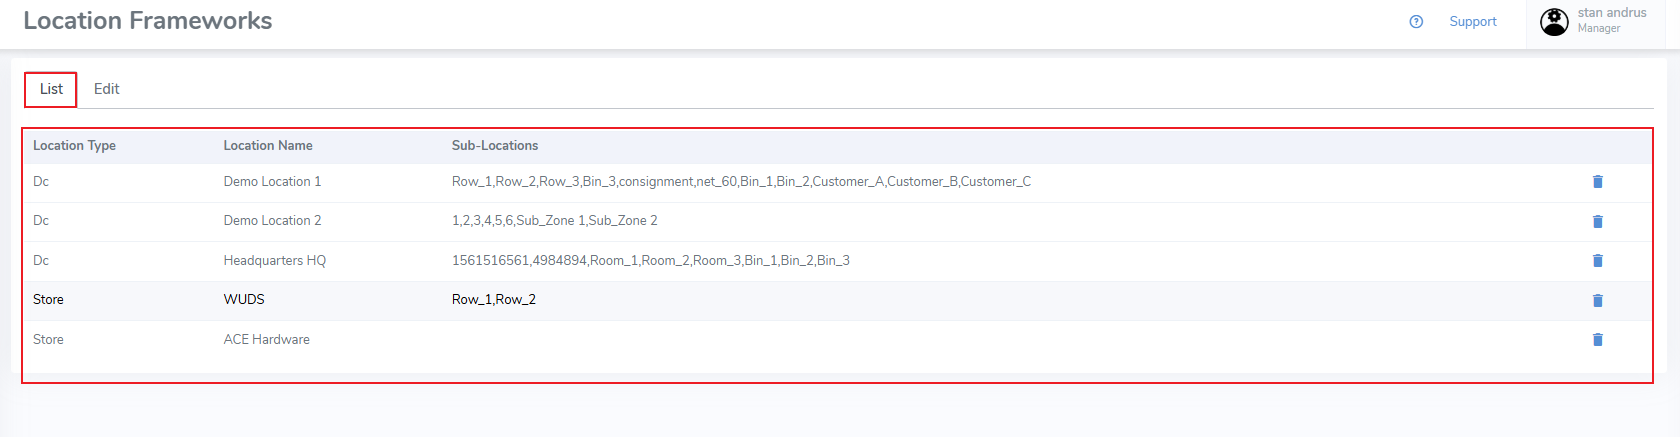](https://kb.simplerfid.com/uploads/images/gallery/2025-05/ECTimage.png) ##### ****Edit tab**** The Edit tab allows for creation of new frameworks and editing of existing frameworks [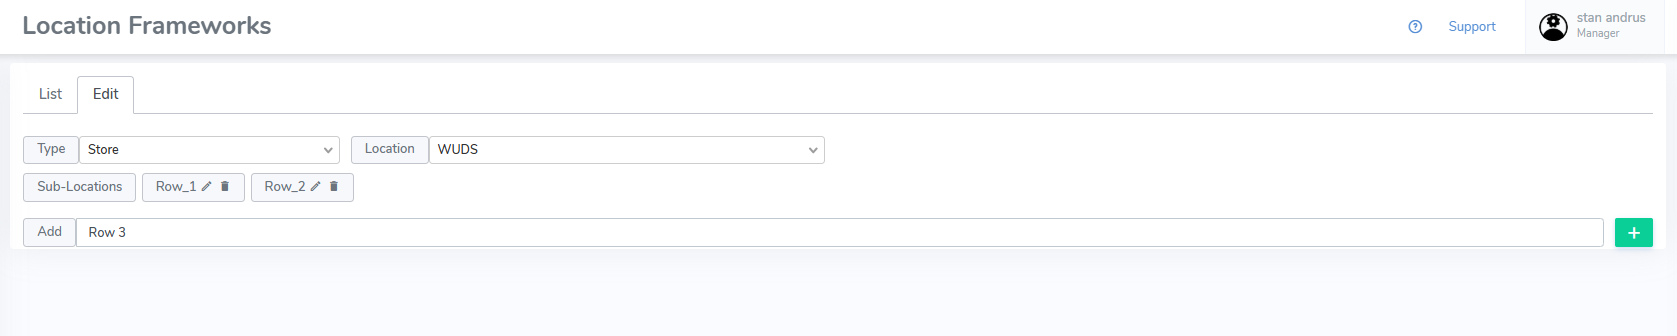](https://kb.simplerfid.com/uploads/images/gallery/2025-05/pRkimage.png) ##### ****Create a Framework**** From the Edit tab: - Type & Location - Select the type & location you wish to apply the framework to - Add - From the add section, enter the values separated by a comma - Click the "+" button to add them ##### ****Edit a Framework**** From the List tab: - Select the desired framework From the Edit tab: - Click the pencil icon to edit an existing value - Click the Trash Can icon to delete the value - Or use the Add row to add a new property These frameworks appear on the web portal Inventory tab [Tag level](https://kb.simplerfid.com/books/software-web-portal/page/inventory-tag-level-properties) views, and can be edited there. These frameworks can be set from the mobile device [Write Tags](https://kb.simplerfid.com/books/software-mobile-app/page/mobile-app-write-tags) page when using Single Tag Encoding # Locations This article covers the different types of locations that can be created, and how to create them. Navigate to the Create Locations menu by clicking the User Settings from the top right menu, then selecting Locations. ##### ****Location Types**** There are three types of locations which can be created in Simple RFID. - 'DC' or Distribution Center (Warehouse) - Store (Retail Space) - Supplier (any external vendor) ##### ****Create a Location**** - Set the location type to the entity you wish to create - Click the "+" button located in the upper right corner [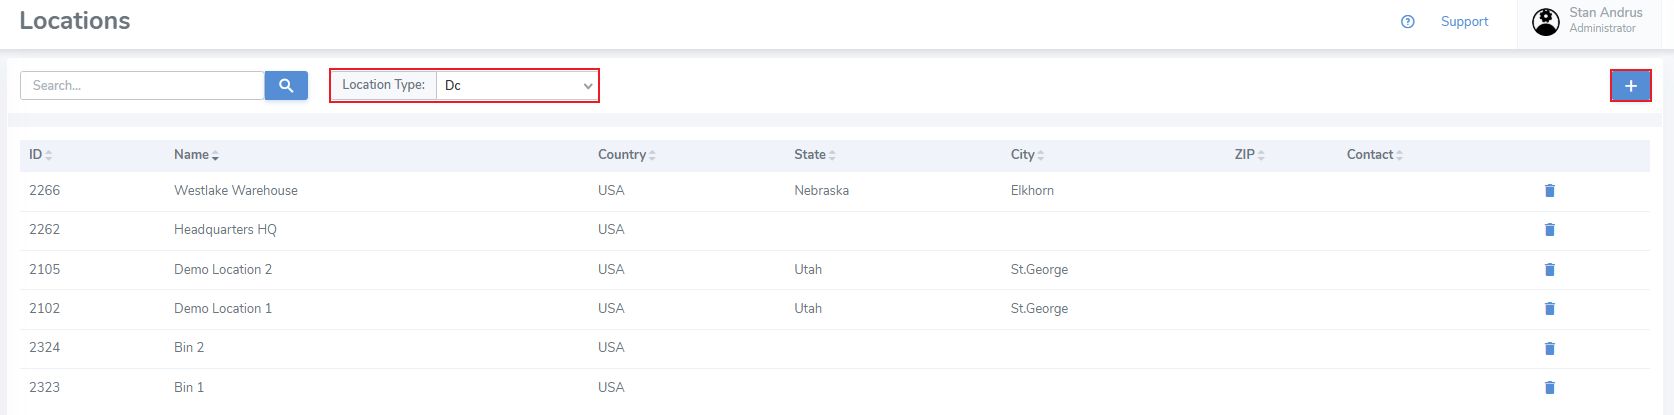](https://kb.simplerfid.com/uploads/images/gallery/2025-06/Q6Uimage.png) Enter information for the location including: - Name - Phone - Email - Contact - Time Zone - Country - Address (including City, State & Zip Code)It's important that your addresses are up-to-date. This address is used to ship supplies.
- Finally click "Save" to save the results [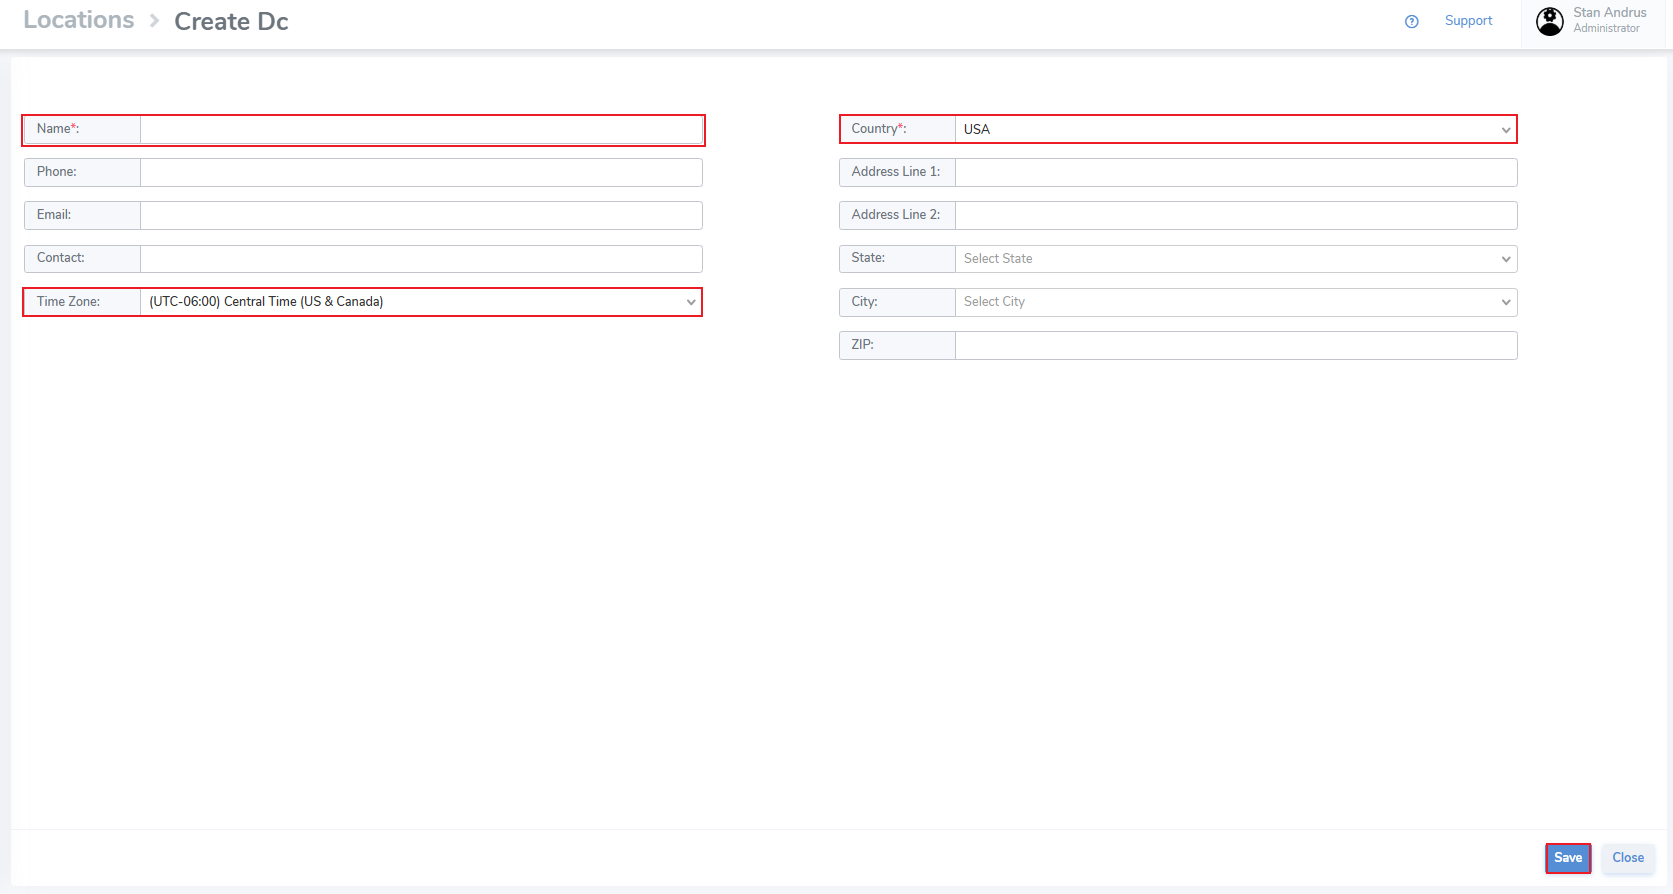](https://kb.simplerfid.com/uploads/images/gallery/2025-05/xH7image.png)A current bug requires that the page be reloaded to display the new location. Switch the filter to a different location type and return back to what you created and it will appear.
# Resources Access the Resources tab by clicking on the Admin menu (top right corner), then select Resources [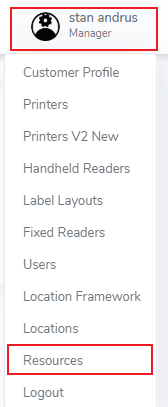](https://kb.simplerfid.com/uploads/images/gallery/2025-05/so5image.png) ##### ****Resources**** The Resources tab provides important links required for setup and maintenance. [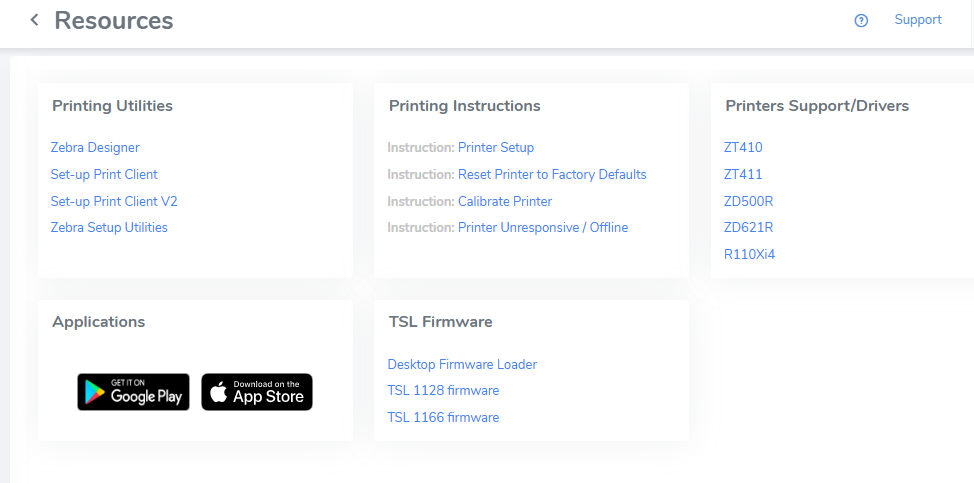](https://kb.simplerfid.com/uploads/images/gallery/2025-05/OFMimage.png) ##### The sections include: ##### ****Printing Utilities**** Download the print client and Zebra tools (Zebra Designer & Setup Utilities) ##### ****Printing Instructions**** Instruction on setup, and common issues ##### ****Printers Support/Drivers**** Drivers for various printer models - MacOS Print Client - ##### ****Applications**** Links to install the mobile app (Play Market & App Store) ##### ****TSL Firmware**** Firmware to update your TSL handheld RFID reader # Logout Instructions of how to log out of the web portal - Click the Admin menu in the top right corner of the screen [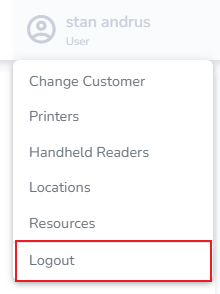](https://kb.simplerfid.com/uploads/images/gallery/2025-05/8jJimage.png) - Click 'Logout' This will forward you to the login screen [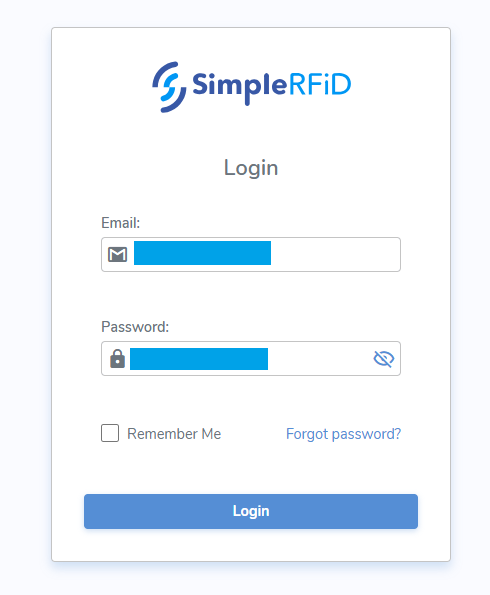](https://kb.simplerfid.com/uploads/images/gallery/2025-05/akTimage.png) # Printer Profile: Calibrate Printer from web The printer profile page contains ****details**** for each connected printer. Users can navigate to this page from the [Available Printers](https://kb.simplerfid.com/books/software-web-portal/page/menu-bar-available-printers-calibrate-printer-from-web) pop-out menu, or the [Station Settings](https://kb.simplerfid.com/books/software-web-portal/page/printers-station-settings) ##### ****Printer Profile Details**** - Location the printer is connected to - 'Station' (Host PC) the printer is connected to - Serial Number of the Printer - Firmware Version of the Printer - Date the printer was setup - Printer DPI: 203, 300, or 600 - Connection Method: USB or Ethernet - Print Station connectivity indicator - Printer connectivity indicator - Notes section - Calibrate Printer button - Save button to save changes - Close button to exit the page [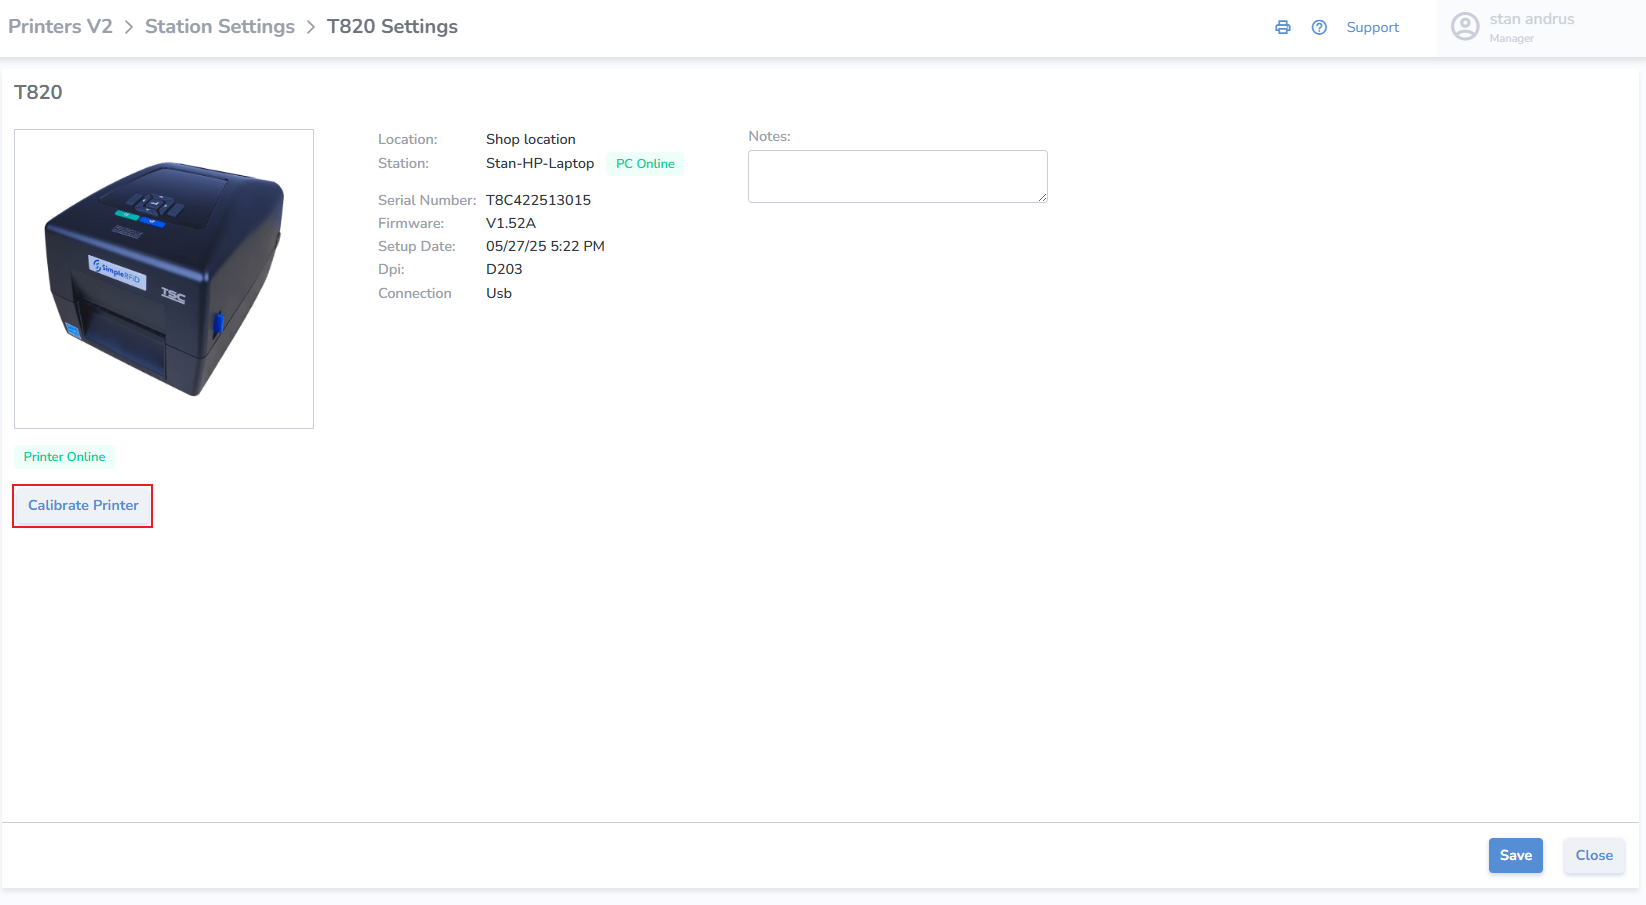](https://kb.simplerfid.com/uploads/images/gallery/2025-05/FLZimage.png) ##### ****Calibrate Printer from Printer Profile**** - Calibrate click the button - Click 'Calibrate' on pop-up [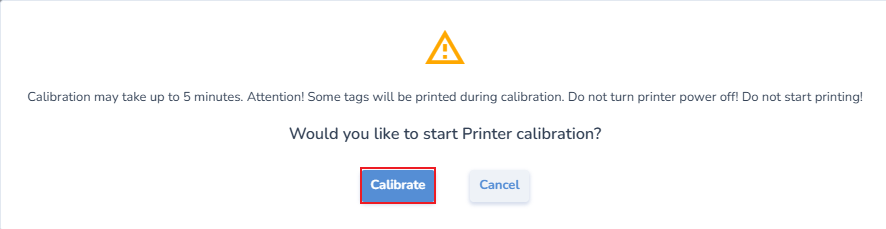](https://kb.simplerfid.com/uploads/images/gallery/2025-05/1Ebimage.png) - Accepting this prompt will then send both the media and ribbon and RFID calibrations to the printer, which will proceed automatically with the following steps: - Media and Ribbon. - Then a pause for roughly 10 seconds. - And then the RF calibration, which will take longer; the labels will periodically inch out of the printer for approximately one minute. At the end of the process it will feed out 2 or 3 labels before stopping completely. - After the calibration has completed: - Open the printer and roll back the labels so the blank tags may be used—precision is not necessary - Un-pause the printer - Now you are ready to print.If the printer continues to VOID labels, repeat the process. If the issue persists, perform a calibration directly from the printer itself.
# Deactivating User To deactivate an account, go to the SimpleRFID web portal and click ****Users****. [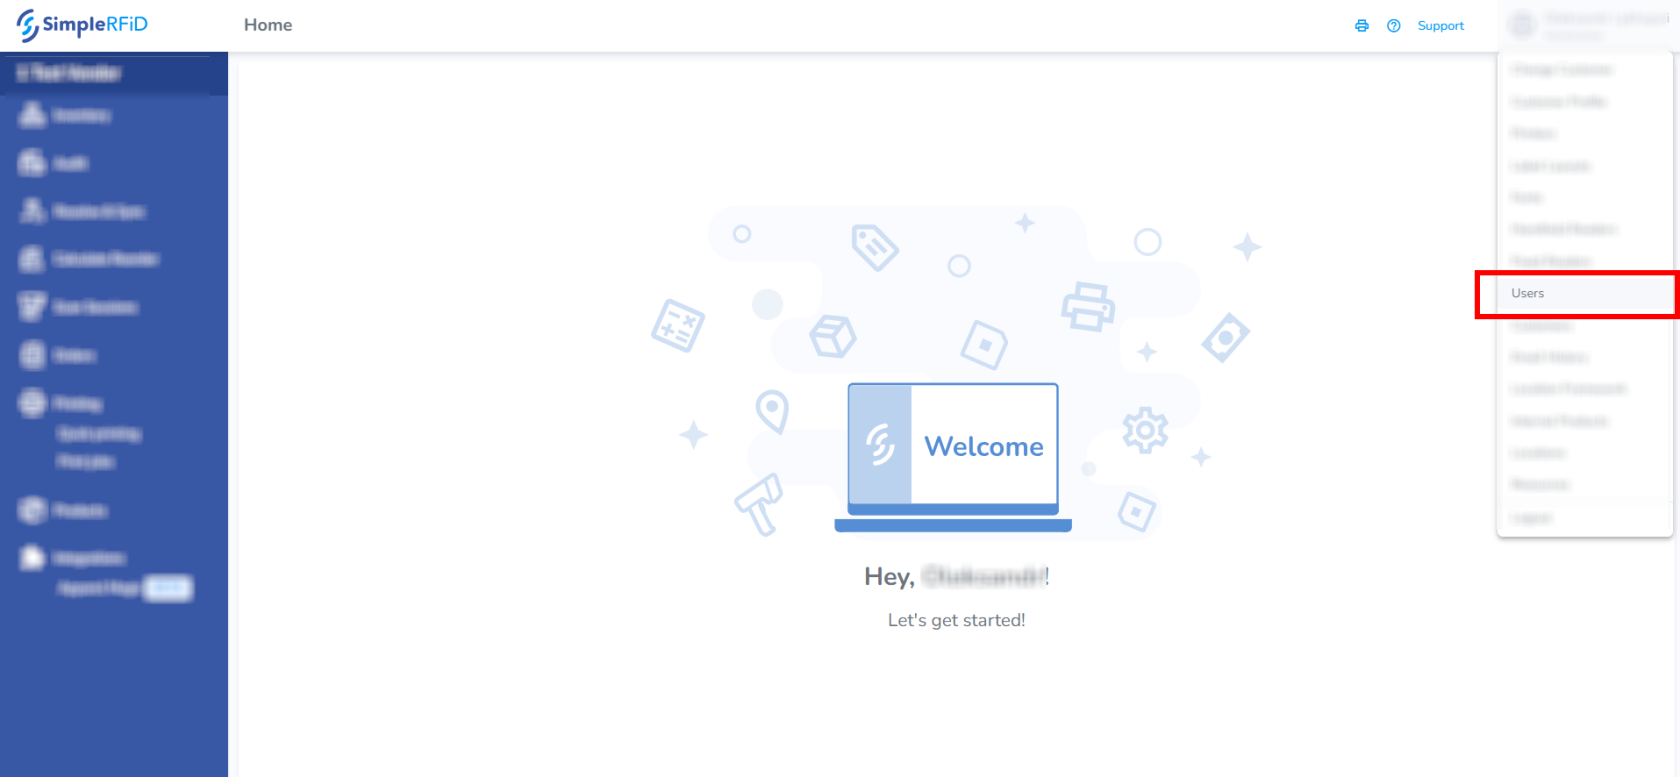](https://kb.simplerfid.com/uploads/images/gallery/2026-05/Agqimage.png)You need to have the ****Manager**** role in the SimpleRFID web portal.
Find the account by typing the name in the search box. Click on the account that appears in the search results. [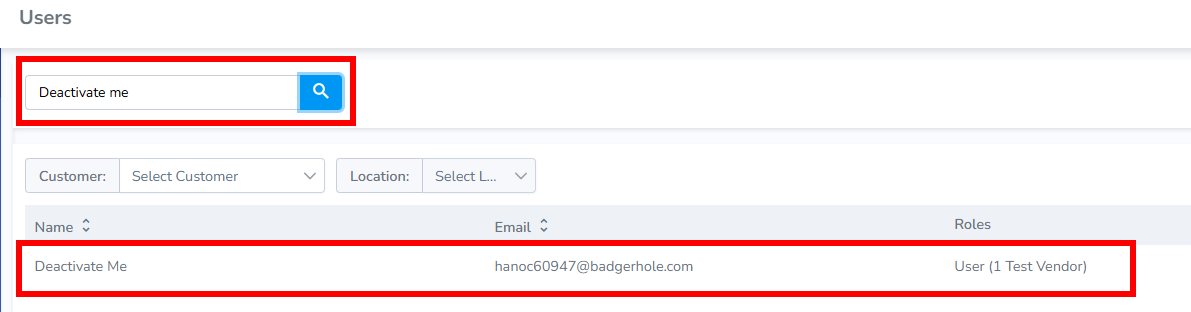](https://kb.simplerfid.com/uploads/images/gallery/2026-05/9oOimage.png) Click ****Deactivate user****. [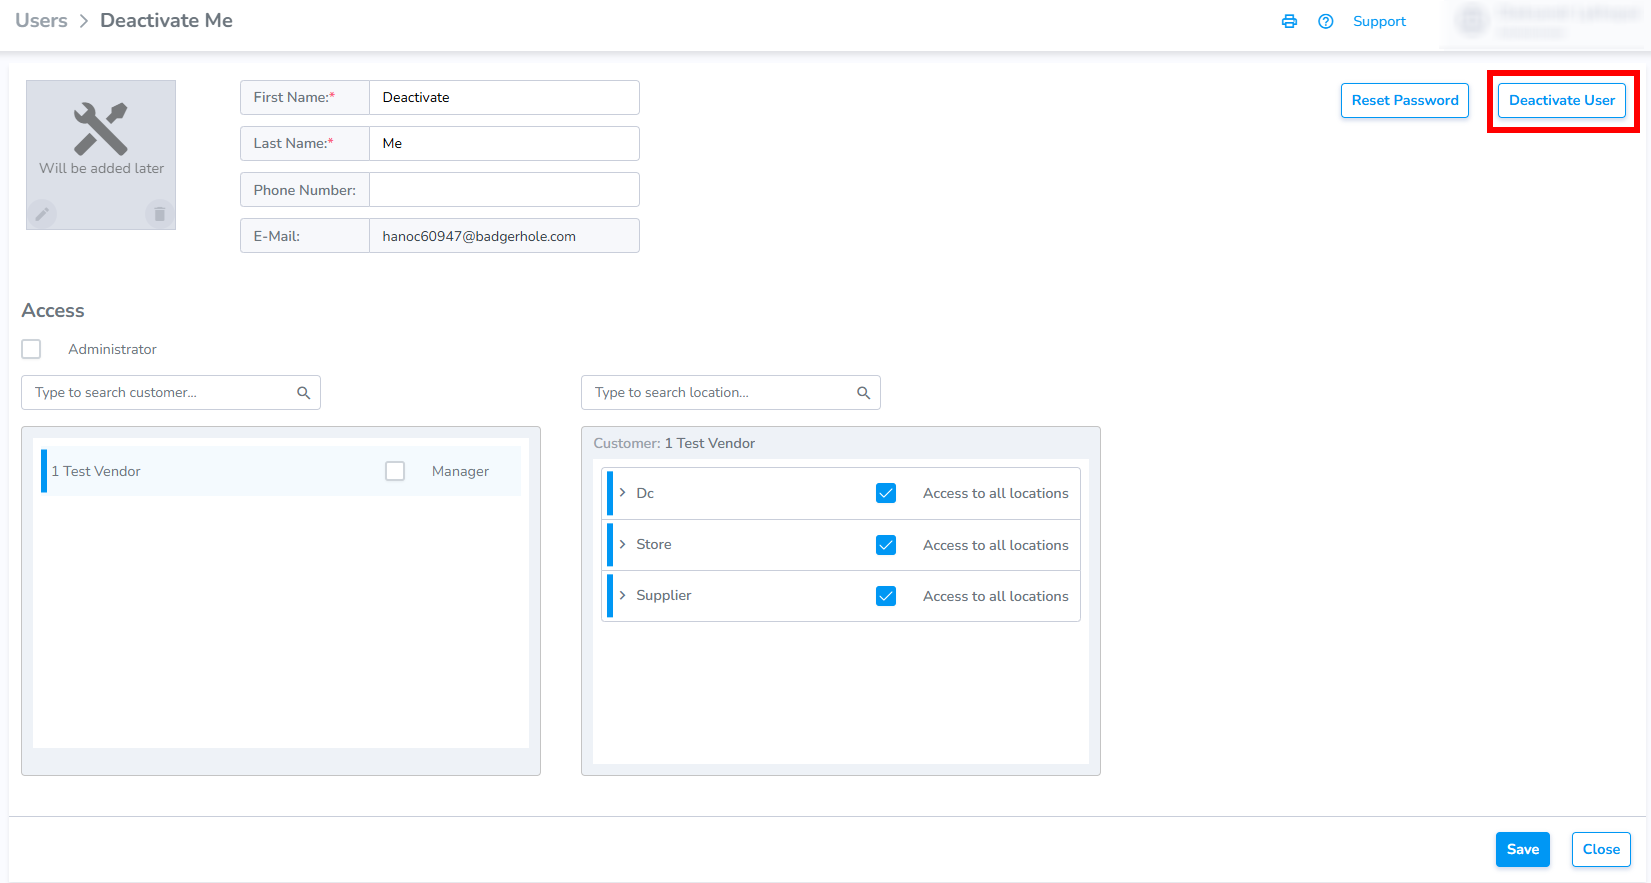](https://kb.simplerfid.com/uploads/images/gallery/2026-05/baGimage.png) Now, we can see that the account is deactivated. [](https://kb.simplerfid.com/uploads/images/gallery/2026-05/f8aimage.png)