Navigation Menu: Resolve & Sync
- Web Portal: Resolution Center: Review & Resolve Mismatches
- Web Portal: Resolution Center: Complete RFID tasks
- Web Portal: Resolution Center: Review and Resolve Mismatches
- Web Portal: Resolve & Sync: Update Partner Counts Manually
Web Portal: Resolution Center: Review & Resolve Mismatches
This article describes the process of reviewing mismatches generated from an inventory audit, determining truth, then performing necessary RFID tasks and inventory adjustments to align the two numbers.
The tab contains 4 tabs: Mismatches,
Mismatches
The Mismatches tab contains a list of the items to review from your audit. The user must review and choose who to trust:
Trust RFID Count - If you trust your RFID it means:
- If the RFID count is greater than the Partner Count = increase Partner Count to match the RFID.
- If the RFID count is less than the Partner Count = decrease Partner Count to match the RFID.
Trust Partner Count - If you trust your Partner Count it means:
- If the RFID is greater than the Partner Count = Perform an "Archive" scan on tags to reduce RFID count to match Partner.
- If the RFID is less than the Partner Count = Print and/or scan tags to increase RFID count to match Partner.
Manual Count - If you trust neither the RFID or Manual Count it means:
- The physical count may differ from both the RFID and the Partner Counts, therefore you must perform a manual count, then enter this count.
- If this count differs from both the RFID and Partner Counts tasks will be generated to adjust both RFID and Partner.
When should you choose each Source of Truth?
RFID Count
Choose the RFID Count if you trust that every item has been tagged with RFID and that all tagged items were successfully scanned.
This option is often preferred when:
- If the Partner Count is more than the RFID Count: You want to avoid overselling by ensuring inventory is not overstated.
- If the RFID Count is more than the Partner Count: The partner system quantity is too low and want to increase it to match the verified RFID scan.
- You have confidence in your RFID tagging and scanning process.
When RFID Count is selected as the source of truth, all generated tasks will be Adjustments to the partner system to match the RFID inventory.
Partner Count
Choose the Partner Count if you trust that the inventory quantity in your partner software is accurate.
This option is commonly used when:
- You are first implementing RFID and have not yet established confidence in your RFID data.
- You believe the partner system reflects the correct inventory (because you recently counted)
- You wish to align your RFID inventory with your existing records.
When Partner Count is selected as the source of truth the result will be RFID tasks, such as printing missing RFID labels or performing Add or Archive scans to match the partner inventory.
Trust Neither / Manual Count
Perhaps you don't trust either your RFID or Partner counts. In this instance you must physically count the items to determine the truth.
If the manual count differs from both, both RFID and Partner tasks will be created.
Assigning a Reason
Users have the option of assigning a reason for each action to help in categorizing issues.
Accessing the Resolution Center
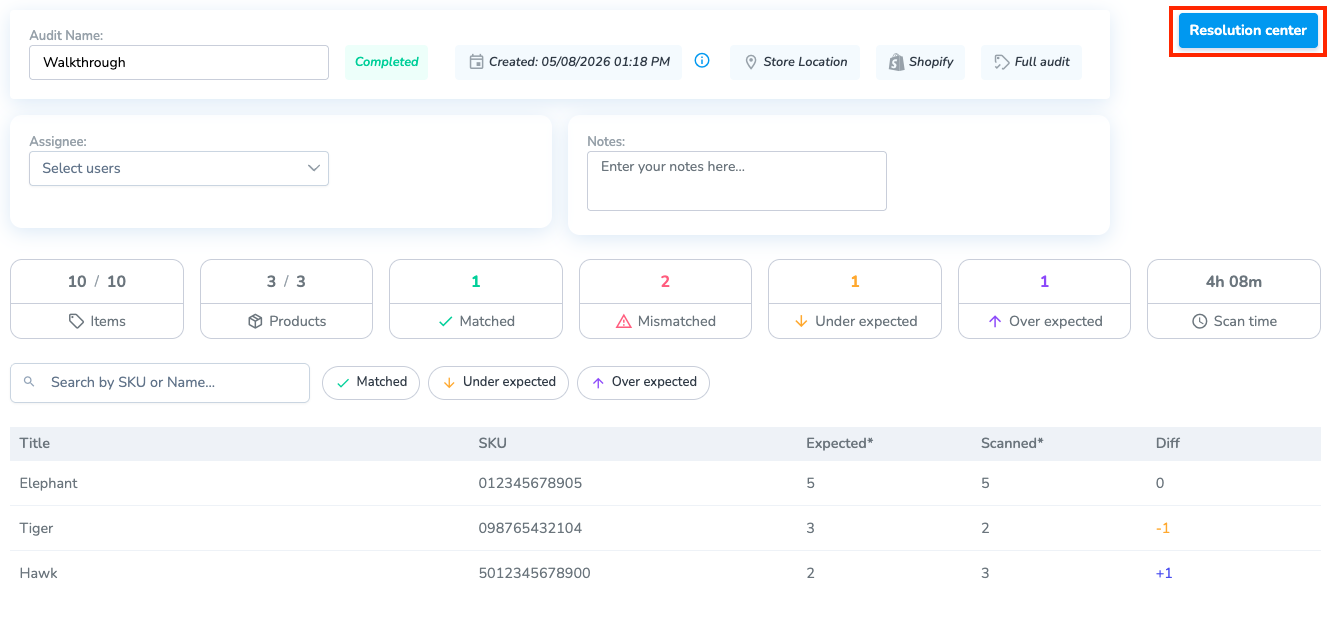
Once an audit is completed, all mismatched products are moved to the Resolution Center. From there, users can access mismatches either:
- Directly from the audit by selecting Resolution Center, or
- From the left navigation menu by selecting Resolve & Sync
Steps
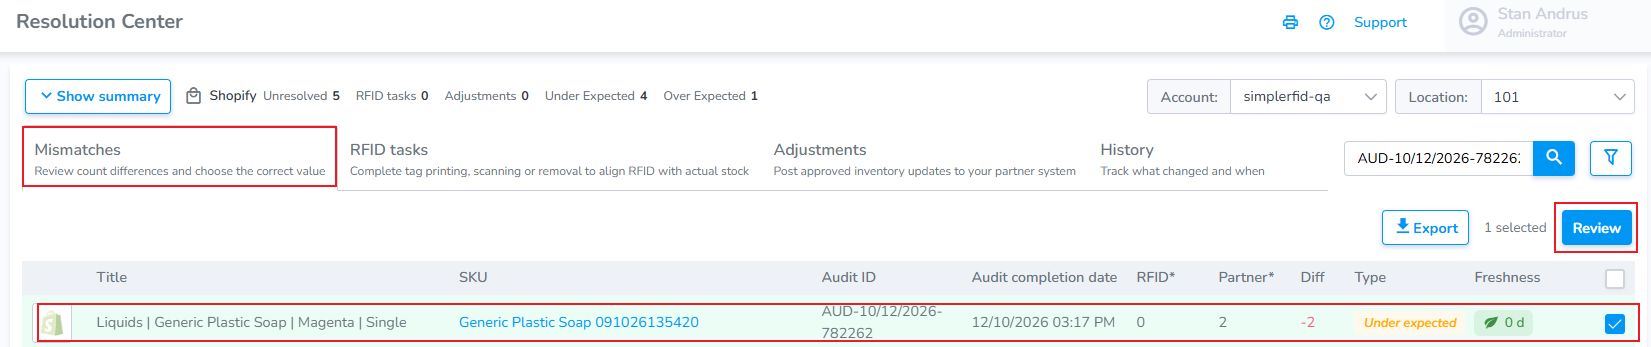
1. Review Mismatches
- Choose the product(s) you wish to review by clicking the checkbox(es) on the far right.
- Next, click "Review" to manage the products.
2. Determine what to Trust
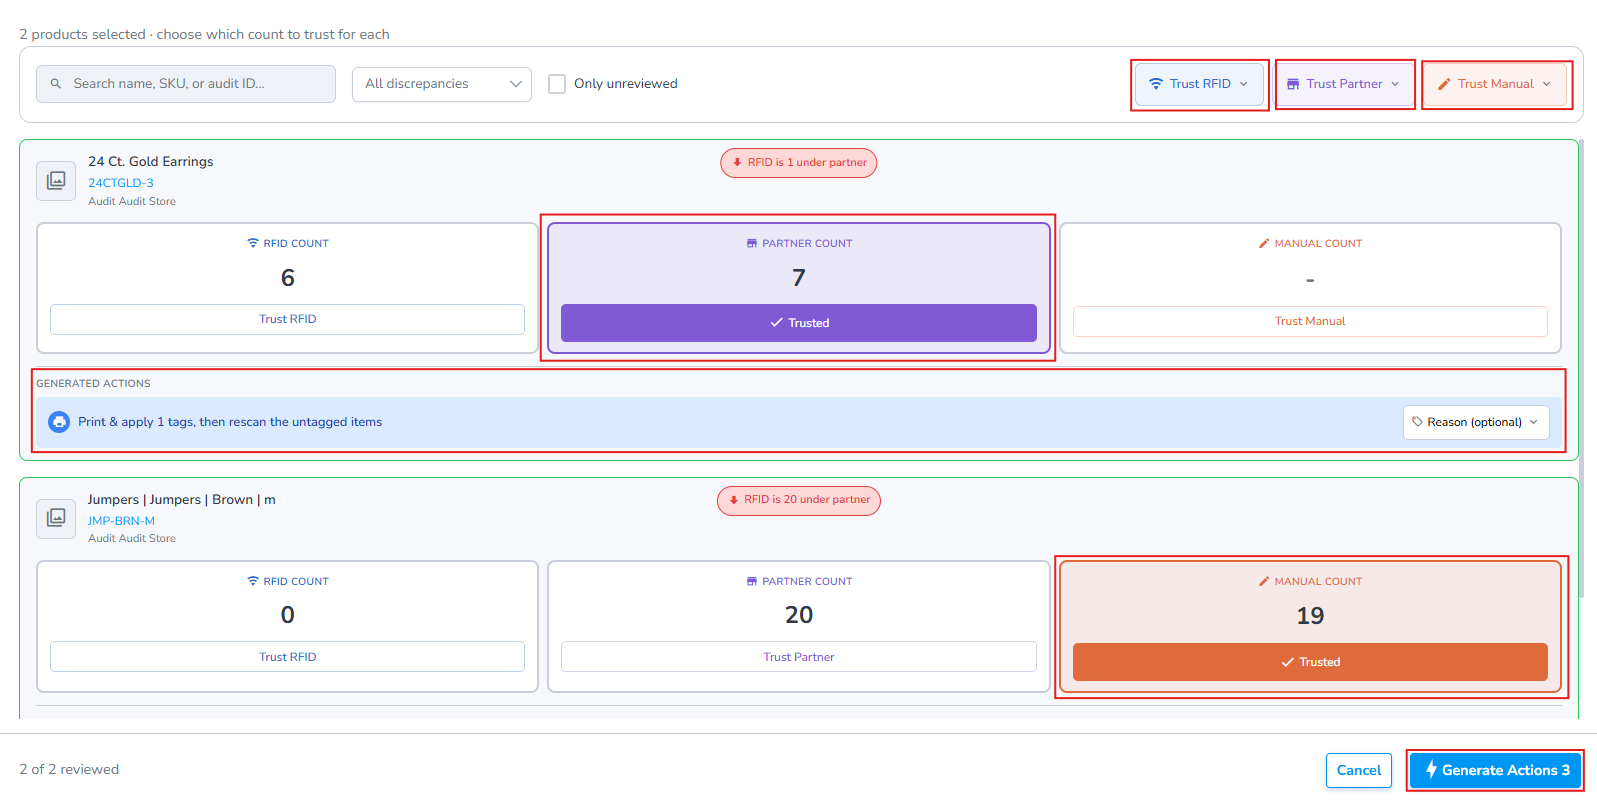
1. Choose either RFID Count, Partner Count, or Manual Count
- If Manual Count is selected you must enter the count
2. After selecting the option, below each product card is displayed the "Generated Actions" which indicates what required actions will be.
3. Finally, click the "Generate Actions" button at the bottom right.
3. Generate Actions
Complete Required RFID tasks & Partner Adjustments
Once the "Generate Actions" button is clicked, RFID tasks and partner adjustments are created (If you are auditing against a spreadsheet you'll use the spreadsheet export and perform adjustments Uploading corrections).
Web Portal: Resolution Center: Complete RFID tasks
After Mismatches have been reviewed in the Resolution Center, actions are required to align the RFID and Partner Count: These RFID tasks include Printing RFID tags, performing an Add, or Remove (Archive) Scans to align the RFID with the partner count.
RFID tasks
Click on the RFID tasks tab

Print Missing Tags
- Click on the records you wish to print
- Click the Print button
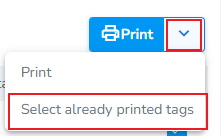
Associate Already Printed Tags
- Click on the records you wish to associate
- Click the chevron, then click Select already printed tags
Perform Add or Remove (Archive) scans
Finally, you will perfor
Note: To update RFID inventory, use the mobile app to perform Add scans (to increase the RFID count) or Archive scans (to decrease the RFID count). Printing actions must be completed from the RFID tasks tab or by the associated print job generated for the action.
Coming Soon: The next version of the mobile app introduces a dedicated Pending Actions tab that consolidates all required RFID actions into one place. Instead of switching between multiple screens, users will be able to view and complete Add, Archive, and print actions from a single workflow. Here's a preview.
Web Portal: Resolution Center: Review and Resolve Mismatches
Make Adjustments to Partner Inventory
If you are auditing data from a spreadsheet or non-integrated source, follow these instructions to complete inventory adjustments.
Apply Adjustments
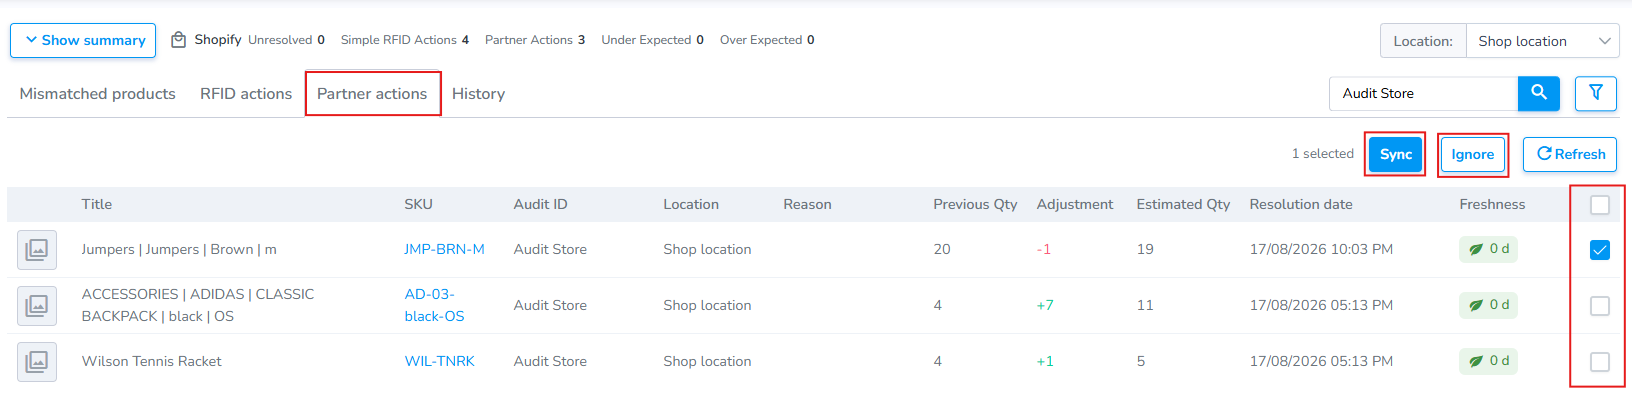
1. Check the boxes on the right
2. Click the Sync button to updated counts
Ignore
Use the Ignore button to clear items from the Adjustments list without making changes to the partner quantity.
Web Portal: Resolve & Sync: Update Partner Counts Manually
If you are using a 3rd party source to audit, this article walks through the final step in the process--updating the partner system via spreadsheet import.
Partner Corrections
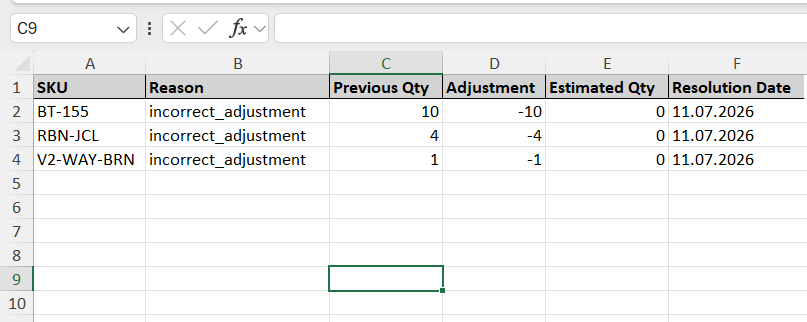
Now that you have reviewed your mismatched products, generated RFID tasks, and identified products which require an inventory correction you can export a spreadsheet with the corrections for upload into your third party source.
Including Corrections in Exported Sheet
Generate a spreadsheet containing corrections in two ways:
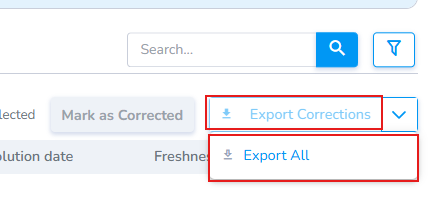
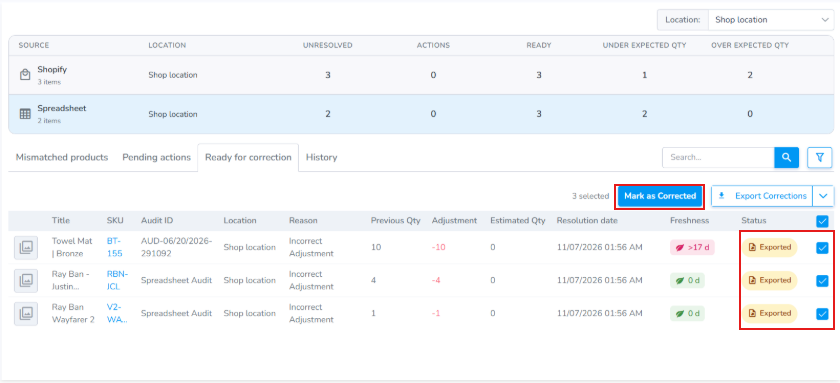
- Click on the checkboxes on the right, then click Export Corrections to include specific records
- Click the drop-down arrow, then click "Export all" to include all records in the export
- Inventory corrections are generated as a spreadsheet.
- Sheet is exported,, then upload into partner system.
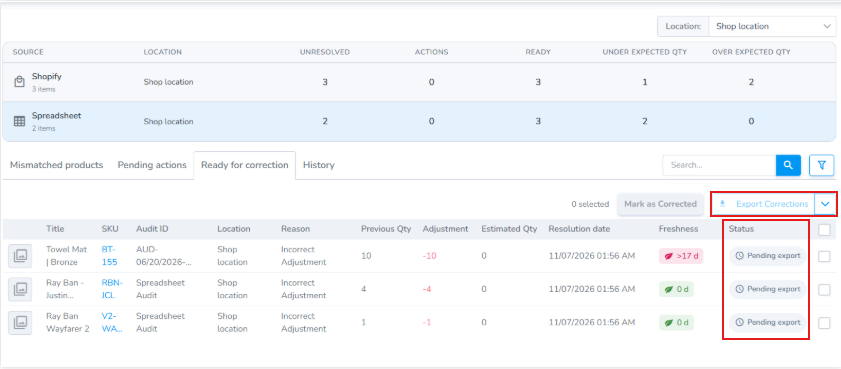
Product Correction Export
- Take the correction sheet and upload it into your partner system
Mark as Corrected
Once partner system has been updated the user "Mark(s) as Corrected" to indicate that the partner system has been updated.
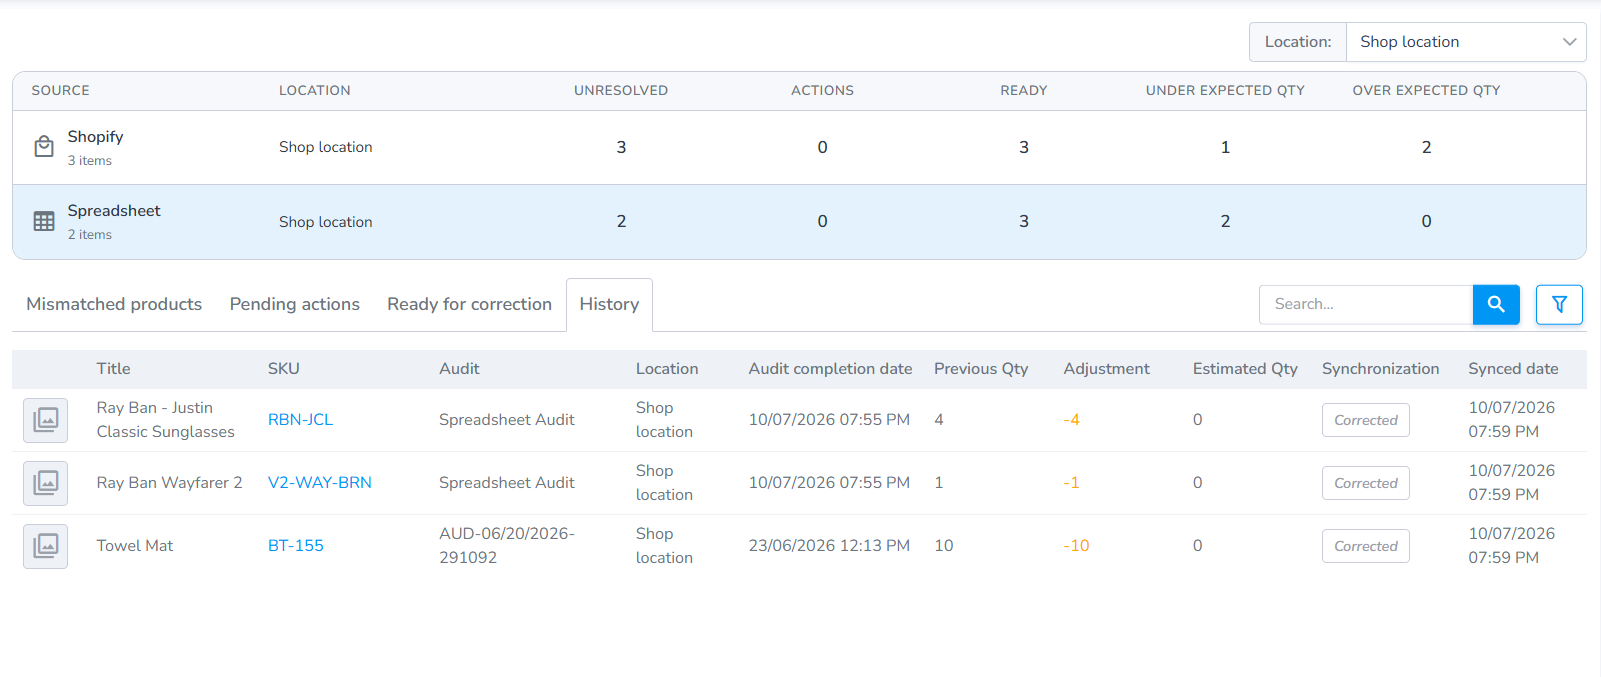
History tab
Click on the History tab to view the products which have been updated. They will be marked as "Corrected."