Software: Mobile App
Android & iOS
- Mobile App: Downloading & Installing
- Mobile App: Log In & Log Out
- Mobile App: Select Location
- Mobile App: Pair Bluetooth
- Mobile App: Connected Reader
- Mobile App: Reader Settings
- Mobile App: Compare Scan
- Mobile App: Scan
- Mobile App: Scan Settings
- Mobile App: Scan Summary & Statuses
- Mobile App: Save Scans
- Mobile App: Archive
- Mobile App: Inventory
- Mobile App: Audit
- Mobile App: Audit: Create and Start an Audit
- Mobile App: Audit: Scan Items in Audit
- Mobile App: Complete Audit
- Mobile App: Ship Menu (Sales Orders & Transfers)
- Mobile App: Verify Accuracy of Sales Orders
- Mobile App: Display Receiving Statuses in Ship menu
- Mobile App: Ship & Receive Transfers
- Mobile App: Create Transfer by Scanning from the Mobile
- Mobile App: Receive Menu (Purchase Orders & Transfers)
- Mobile App: Verify Receipt of Purchase Orders
- Mobile App: Write Tags
- Mobile App: EPC Read
- Mobile App: Search Tags
- Mobile App: Application Settings
- Mobile App: Manual Reader Control
- Mobile App: Increase Max Reader Power & Set Reader Sensitivity to Far
- Mobile App: Scan to Print Feature
- Mobile App: Restoring Archived Tags
- Mobile App: Review & Resolve
Mobile App: Downloading & Installing
How to locate and download the mobile app
The mobile app is available for both Android and iOS platforms
Users can install the Android app here
Users can install the iOS app here
To login to the mobile app you will first need credentials to the Simple RFID portal. The same username and password to login to the web portal will be used to access the mobile app
Mobile App: Log In & Log Out
How to log in and log out
Launch the app on your Android or iOS device

Log in
This opens the login screen. Enter your username & password.
Note: This will be the same username & password you use to log into the web portal
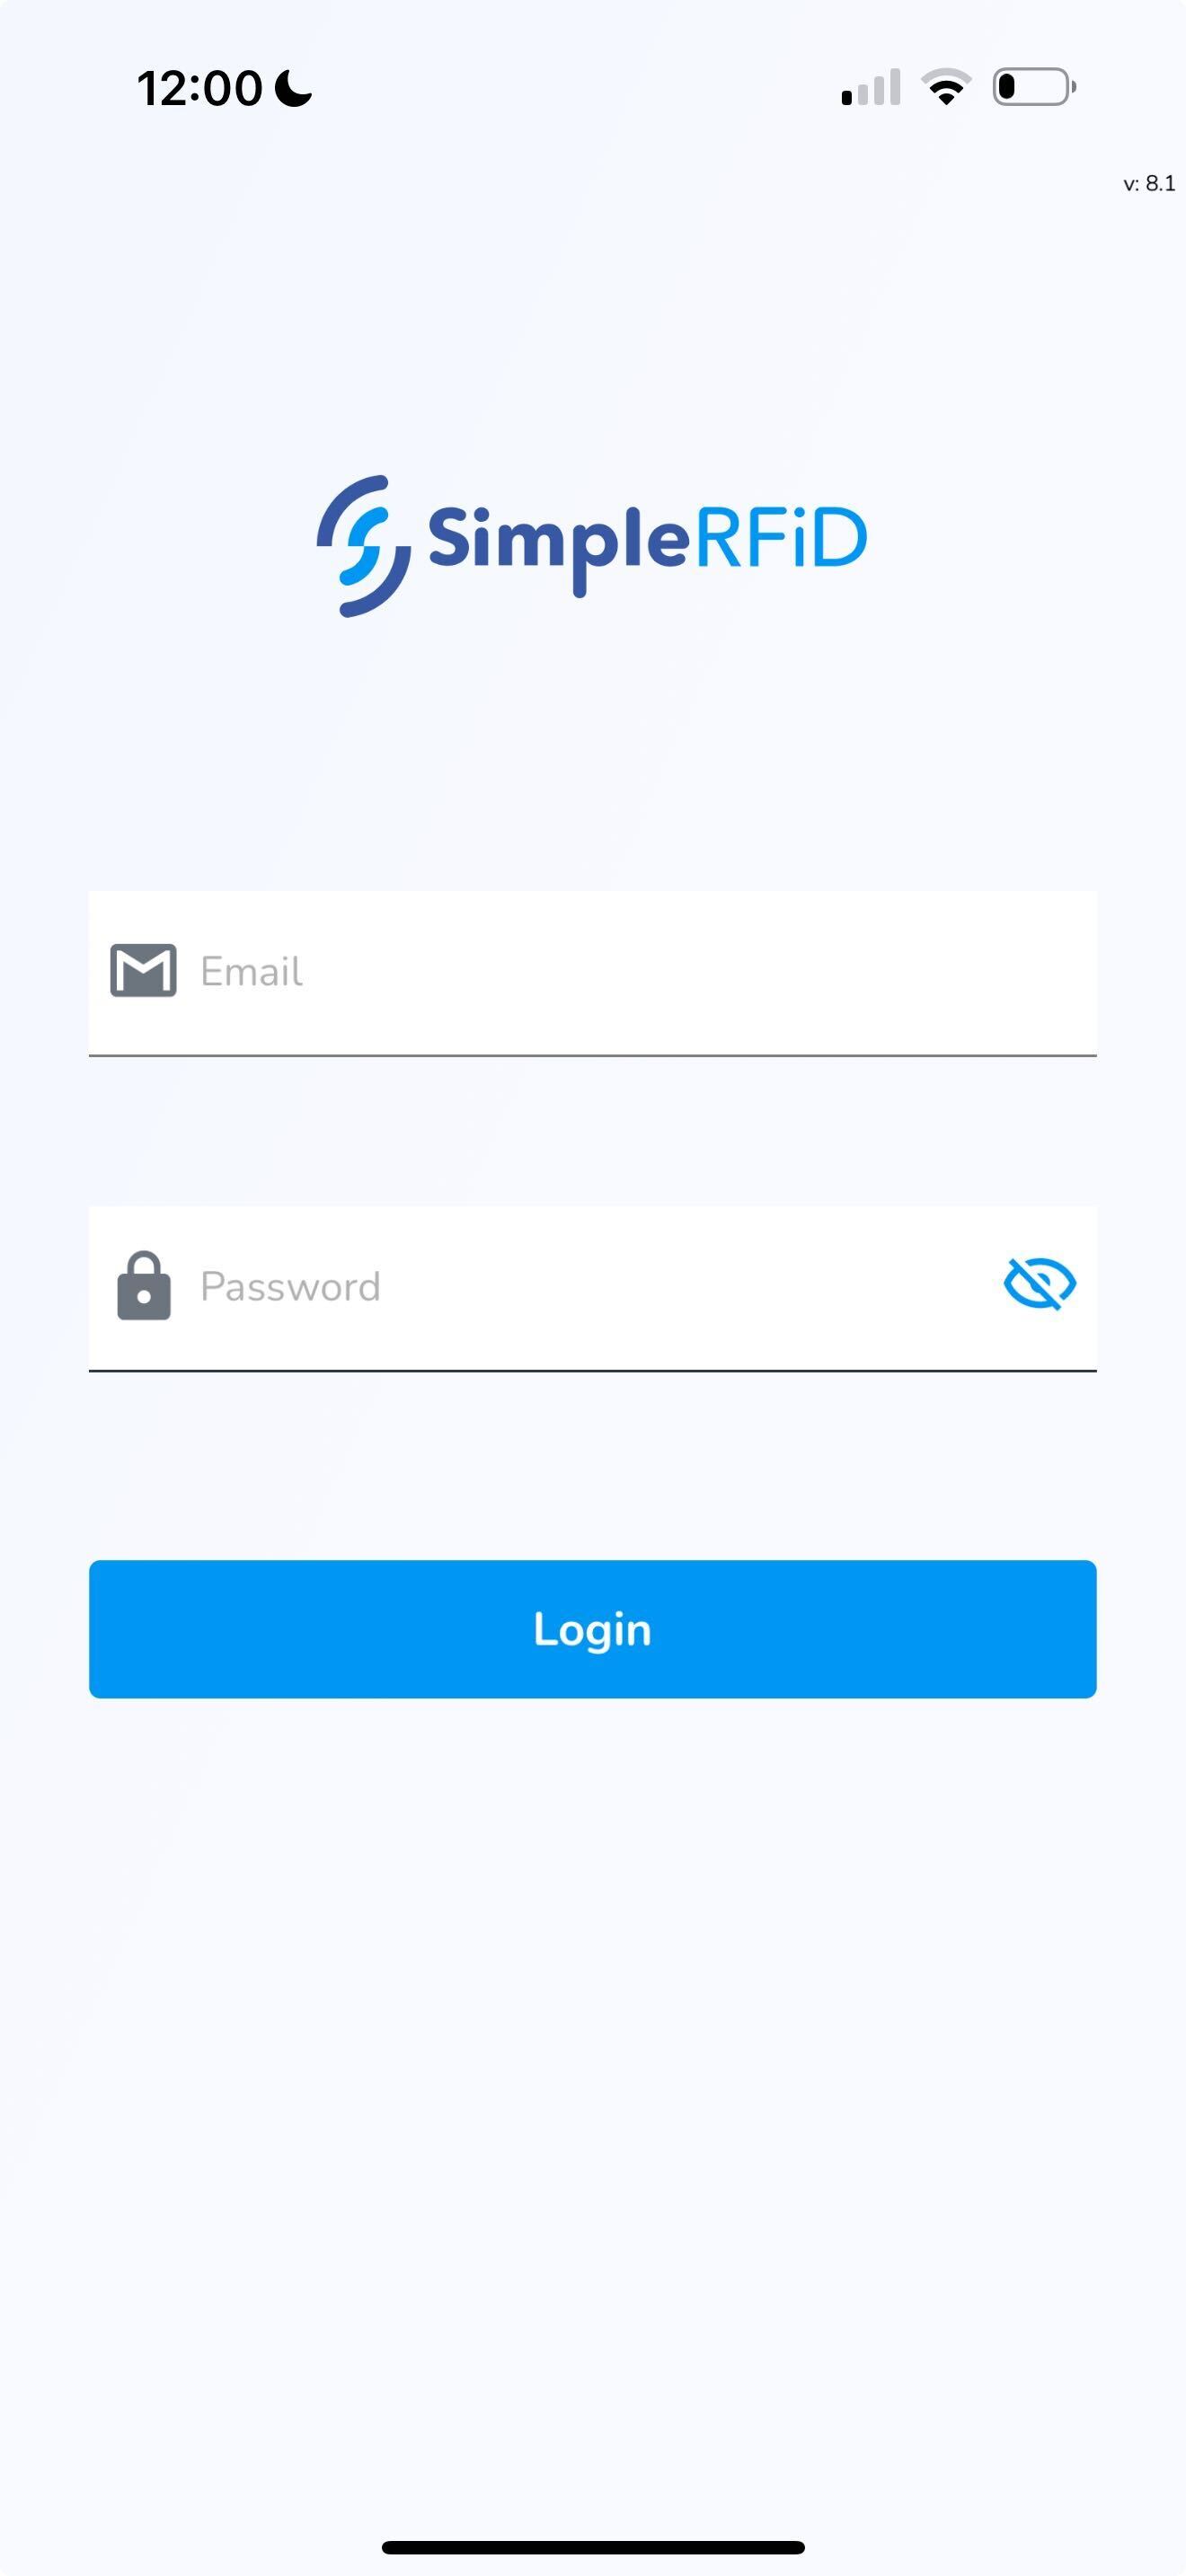
Click Login
This will open the Home screen
Log out
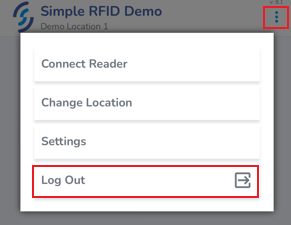
To log out click on the ellipsis in the top right corner of the screen
Click Log Out
Mobile App: Select Location
How to select a location
Note: A user may be granted access to a specific location(s), or have access to all locations
Select Location
Upon first logging in, you will be prompted to select a location
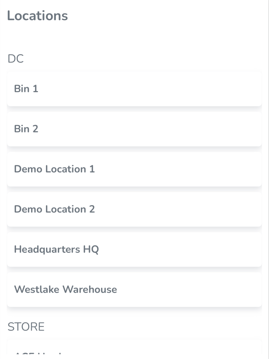
Once the location is selected it will appear at the top of the screen

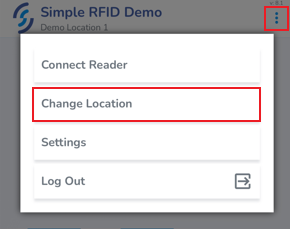
To change location, click on the ellipsis in the top right corner of the screen, then click Change location
If you don't see the Change Location option, it may not be available from the screen you're viewing. Press the Back button (or Simple RFID logo) to go back to the dashboard, then try again.
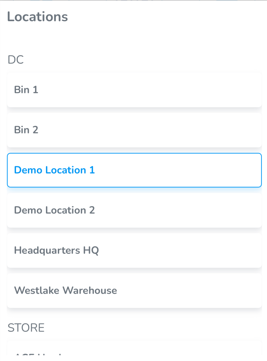
The currently selected location will be highlighted. Tap another location to switch.
Mobile App: Pair Bluetooth
These steps must be followed for any device which connects via Bluetooth to the mobile app. If you are using an "ALL-IN-ONE" device please disregard this article.
Steps to connect the handheld RFID reader to the mobile app
iOS
1. Tap the ellipsis, which are three dots in the top right corner of the app

2. Tap Connect Reader
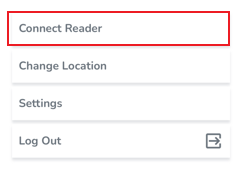
3. Tap the Add new Reader button

4. Press the reader trigger button.
When the trigger is pulled a blue light will begin flashing on the side of the device indicating that the reader is in Bluetooth discovery.
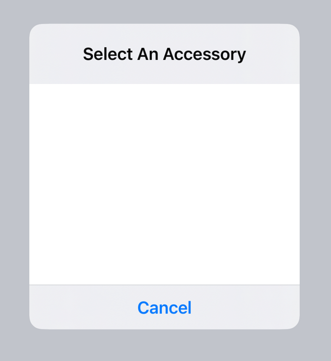
5. From the Select an Accessory window select the reader Bluetooth option which matches the serial number of your device.
A sticker containing the serial number of the device has been applied to the device.
Once the reader is paired it will be displayed as a Connected Reader, the blue flashing light on the side of the reader will appear solid.
To simplify the pairing process, and automatically pair the reader by pulling the trigger, enable Auto-Reconnect from the Reader Settings tab
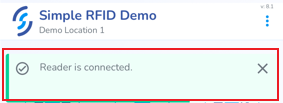
A toast pop-up will appear at the top of the screen indicating that the reader is connected.
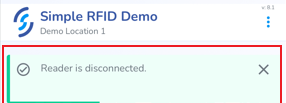
Another toast pop-up will appear when the Bluetooth is disconnected.
Android
Steps might differ between different devices
1. Swipe down the notification pane
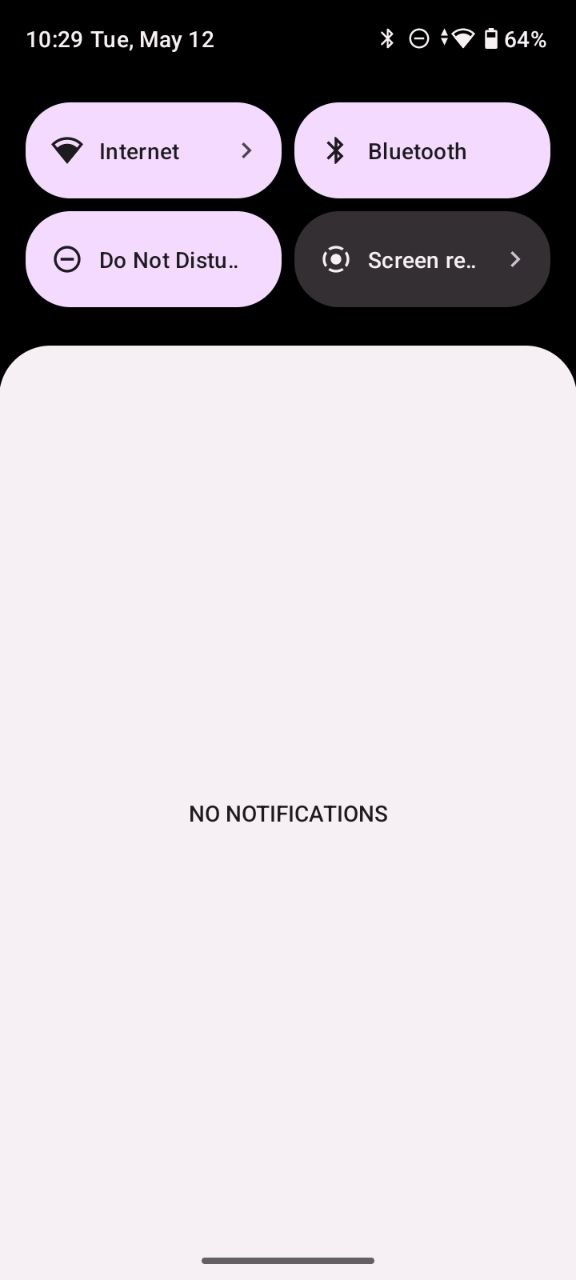
2. Tap Bluetooth to enable bluetooth
3. Tap&Hold "Bluetooth" until Bluetooth settings opened (or open Bluetooth settings from the device Settings)
4. Tap + Pair new device
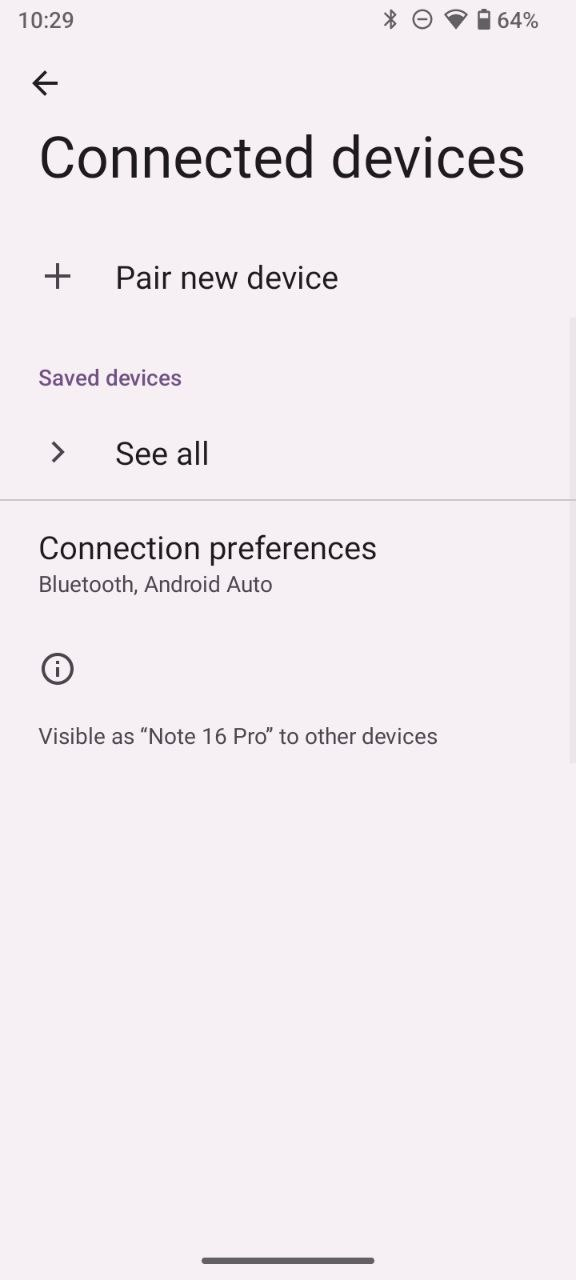
5. Enable your reader (e.g. press the trigger button)
6. Select the reader from the devices list (e.g. 1128 is dispalyed as "xxxxxx-US-1128")
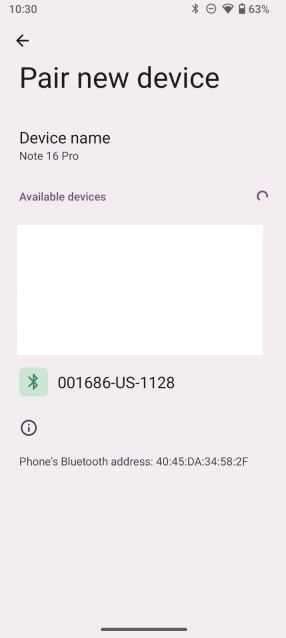
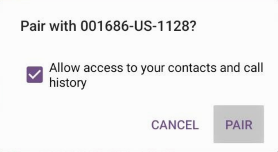
7. Tap Pair.
Device should appear in "Saved devices" section
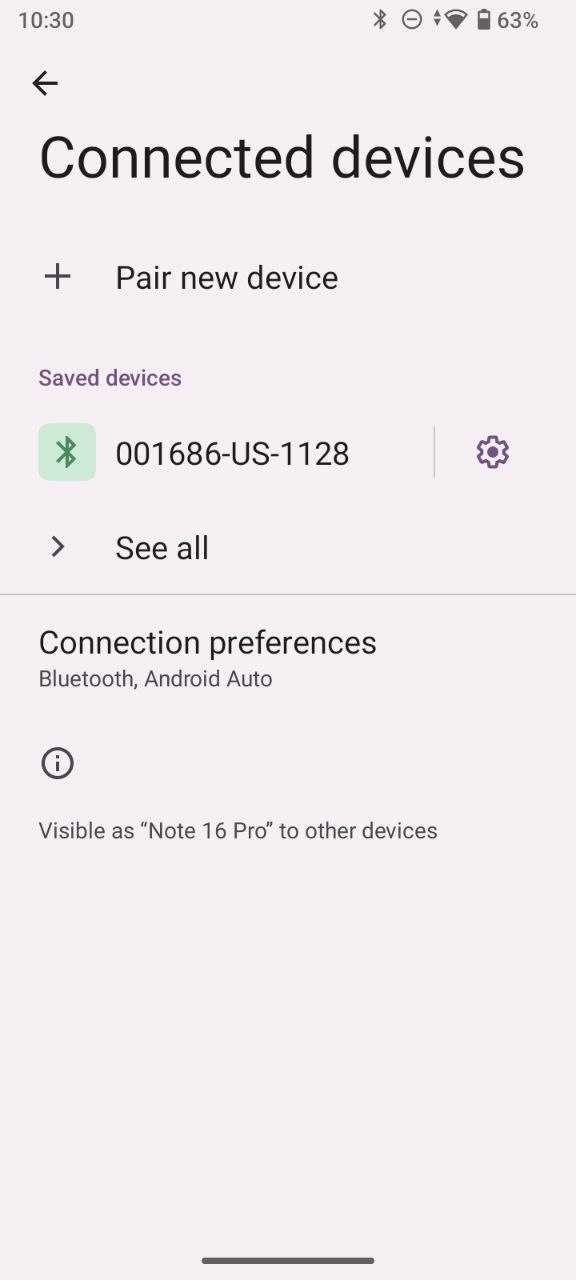
8. Open Simple RFID mobile app
9. Login&go to the main menu (dashboard)
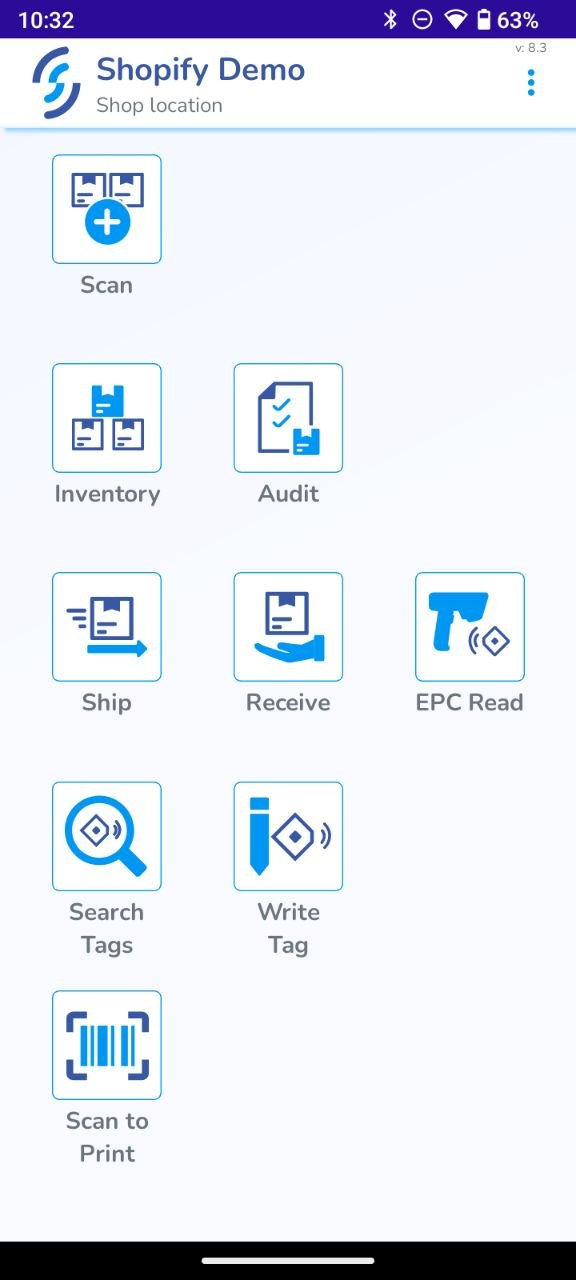
10. Tap three dots on the top-right
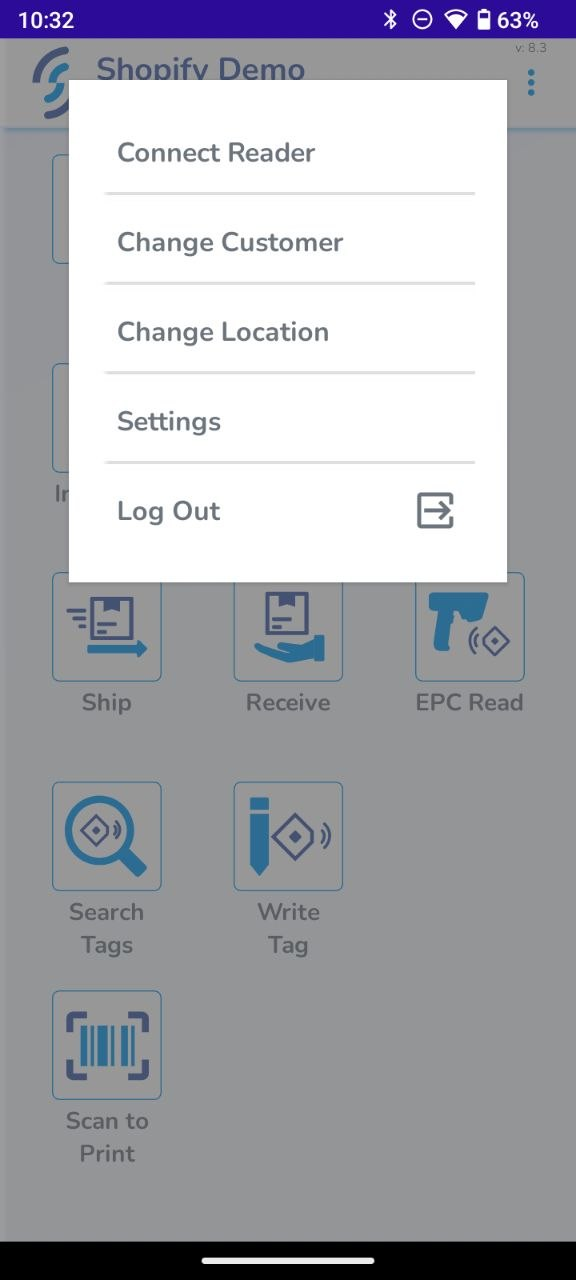
11. Tap "Connect reader"
12. Tap the triangle near the appeared reader
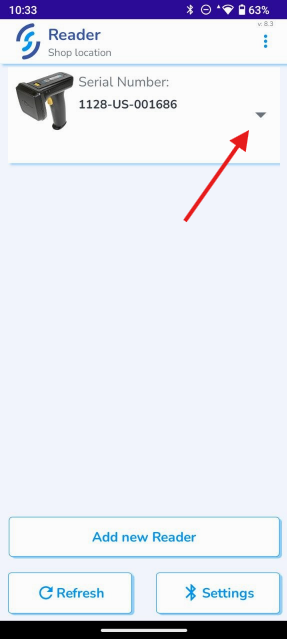
13. Tap Connect
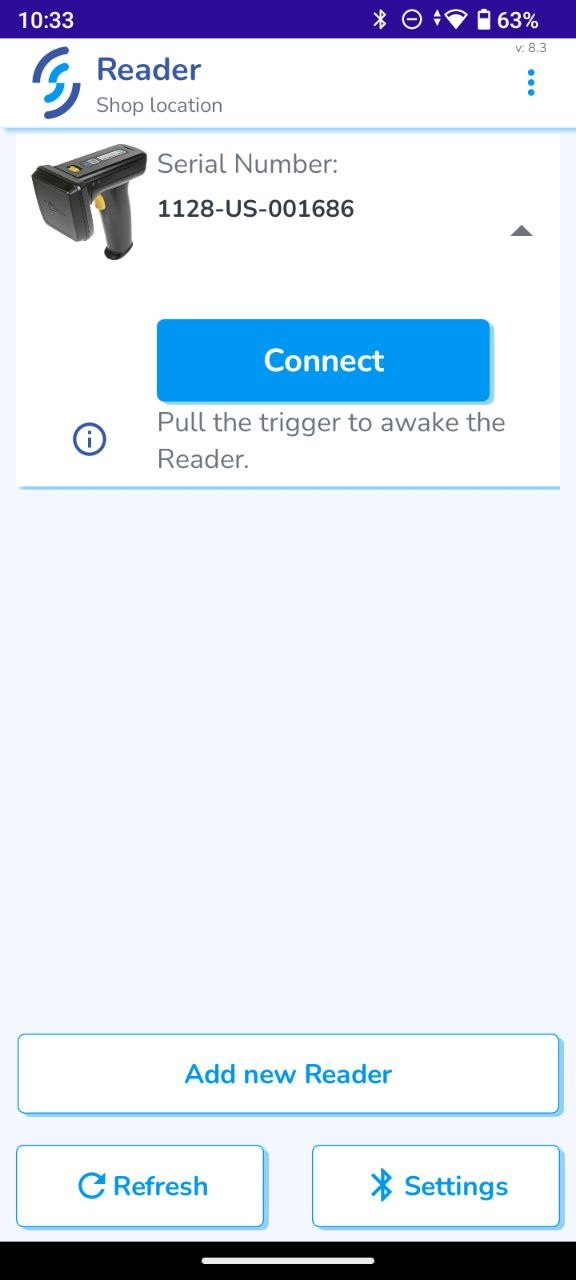
You should see the battery percentage and the toast message "Reader is connected".
This means that the reader was connected successfully.
To simplify the pairing process, and automatically pair the reader by pulling the trigger, enable Auto-Reconnect from the Reader Settings tab (tap the gear once connected)
If you have any questions, feel free to email support@simplerfid.com!
Mobile App: Connected Reader
View of connected reader
Once paired, the device appears as a Connected Reader, and displays the reader's Serial Number, Firmware Version, & battery power level.
Tapping the Find Reader button executes a sound from the reader to assist the operator in locating the device.
Clicking the Disconnect button terminates the connection to the device.

At the bottom of this screen are tools to connect a new device including: Add new Reader to Pair Bluetooth, Refresh to refresh the available Bluetooth connections, and Settings which navigates to the device's settings menu to enable the Bluetooth.
Mobile App: Reader Settings
Access and manage settings for reader
After clicking the settings icon from the Connected Devices tab you will be navigated to the Reader Settings

This page provides settings to manage the following:
Battery power percentage & icon, device Serial Number & Firmware Version
The Auto-Reconnect setting streamlines the Bluetooth pairing process by automatically pairing to the device when the trigger is pulled.
If Auto-Reconnect has been enabled for multiple devices, the reader may pair with any of them making it difficult to determine which device the reader is paired with. This can lead to confusion when attempting to pair as the Bluetooth option never appears. To determine if the reader is already paired, check to see if the blue light on the side of the reader is solid
The Buzzer switch enables or disables the device's audio feature
The Vibrate switch enables or disables the device vibrate feature
The Reading sensitivity settings allows to set the default power settings for Near, Middle & Far presets
Mobile App: Compare Scan
This article describes the process of scanning inventory with a live comparison of your current inventory
For information on the different settings on the scan page, please read here
Starting a Compare Scan
There are multiple places where you can perform a Compare Scan. These include:
It's important to note that the Compare Scan has the same function in both places you perform it: You want to compare an inventory is matched with your current physical inventory in real time.
On the Scan page, there are two values for each product that you will want to keep track of
- Scanned: The number of tags that have been scanned this session
- Expected: The inventory count currently in the inventory
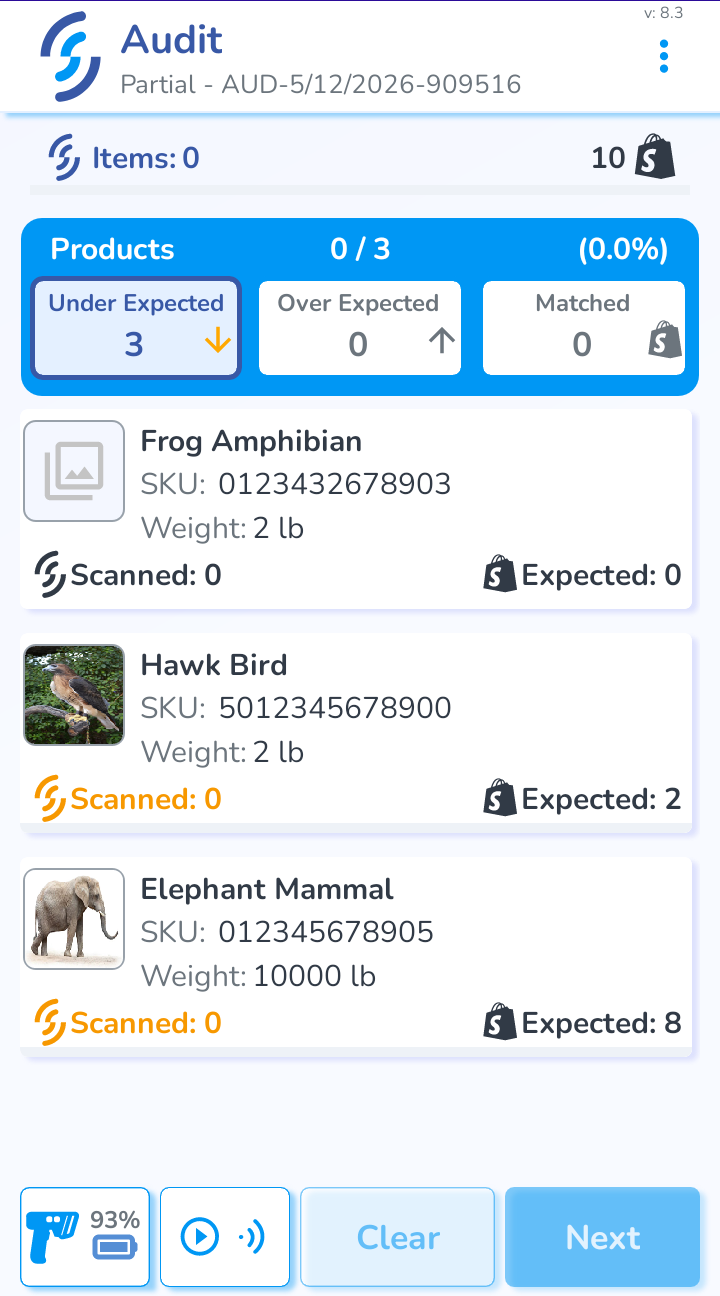
There are three possible states that a product can have:
- Under Expected: The Scanned amount is less than the Expected amount
- Over Expected: The Scanned about is more than the Expected amount
- Matched: The Scanned amount is equal to the Expected amount
Every product will be in the Under Expected section, because the Scanned amount starts at 0
Scanning Process
As you scan products, they will be put into the three sections explained previously. You can click on a section to view all of the products in that section.
While the scanner is active, there will be a loading screen in the product area. To view the counts for your products, stop scanning.

Once you feel confident that you have picked up everything, press Next. This will take you to the Summary Page.
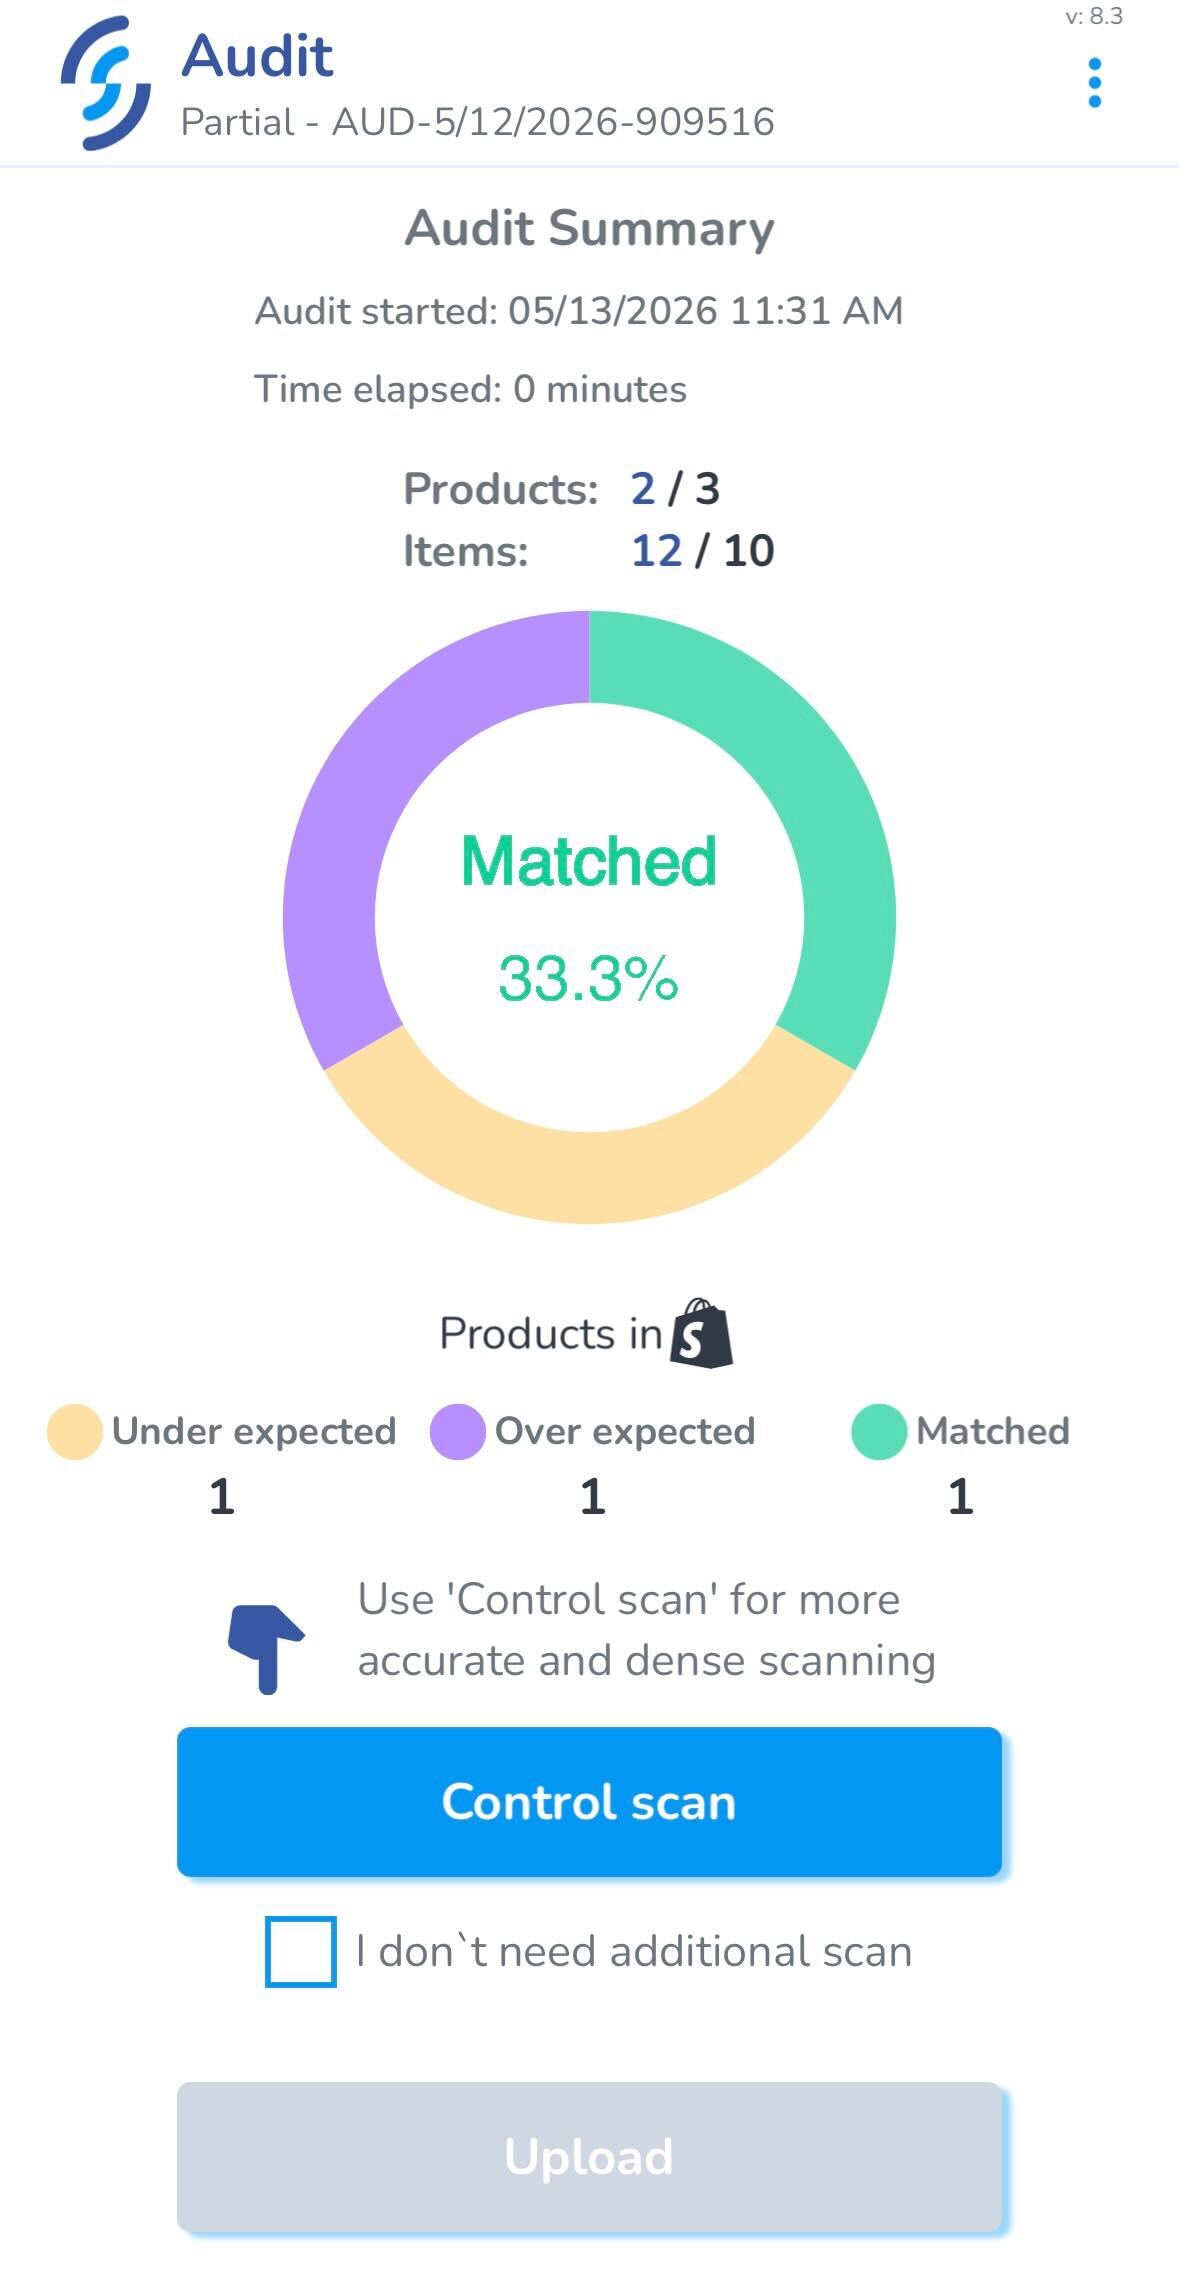
From here, you can see how many products are in each section, and how many items you picked up.
There are two options on this page:
- Control Scan: Perform another scan on Density mode to pick up any tags you may have missed
- Upload: Upload the scan to an Audit, or inventory
A Control Scan is recommended for greater accuracy, but you can click the checkbox below to go straight to an Upload
Viewing Compare Scan History
You can view all of the Scans you have performed in the Scan Sessions page on the Web Portal. The Scan Type for the Scan will be a Reset.

Mobile App: Scan
ATTN: Before beginning this article make sure you have enabled Advanced Tag Counting mode on the mobile in the Application Settings.
Steps to Scan and Add items to inventory
- From the Home screen click Scan

- Tap the Start new scan session option
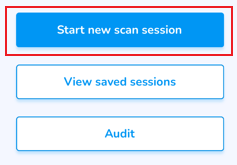
Poor internet preventing your scan from uploading? Save Scans and upload later
Need to verify inventory accuracy? Audit
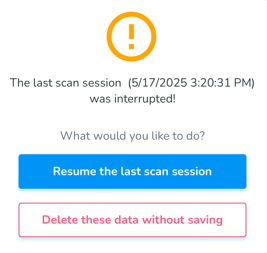
- If the scan was stopped during the process a pop-up message will appear at this point asking if you wish to Resume the last scan session, or Delete the data without saving
Start Scan
- To initiate the Scan:
- Pull the trigger on the reader OR
- Press the auto scan button

The total number of tags will appear in the Scan Summary screen, and below the items and their totals.
Understand the Scan Summary & Statuses, and how each affects your inventory
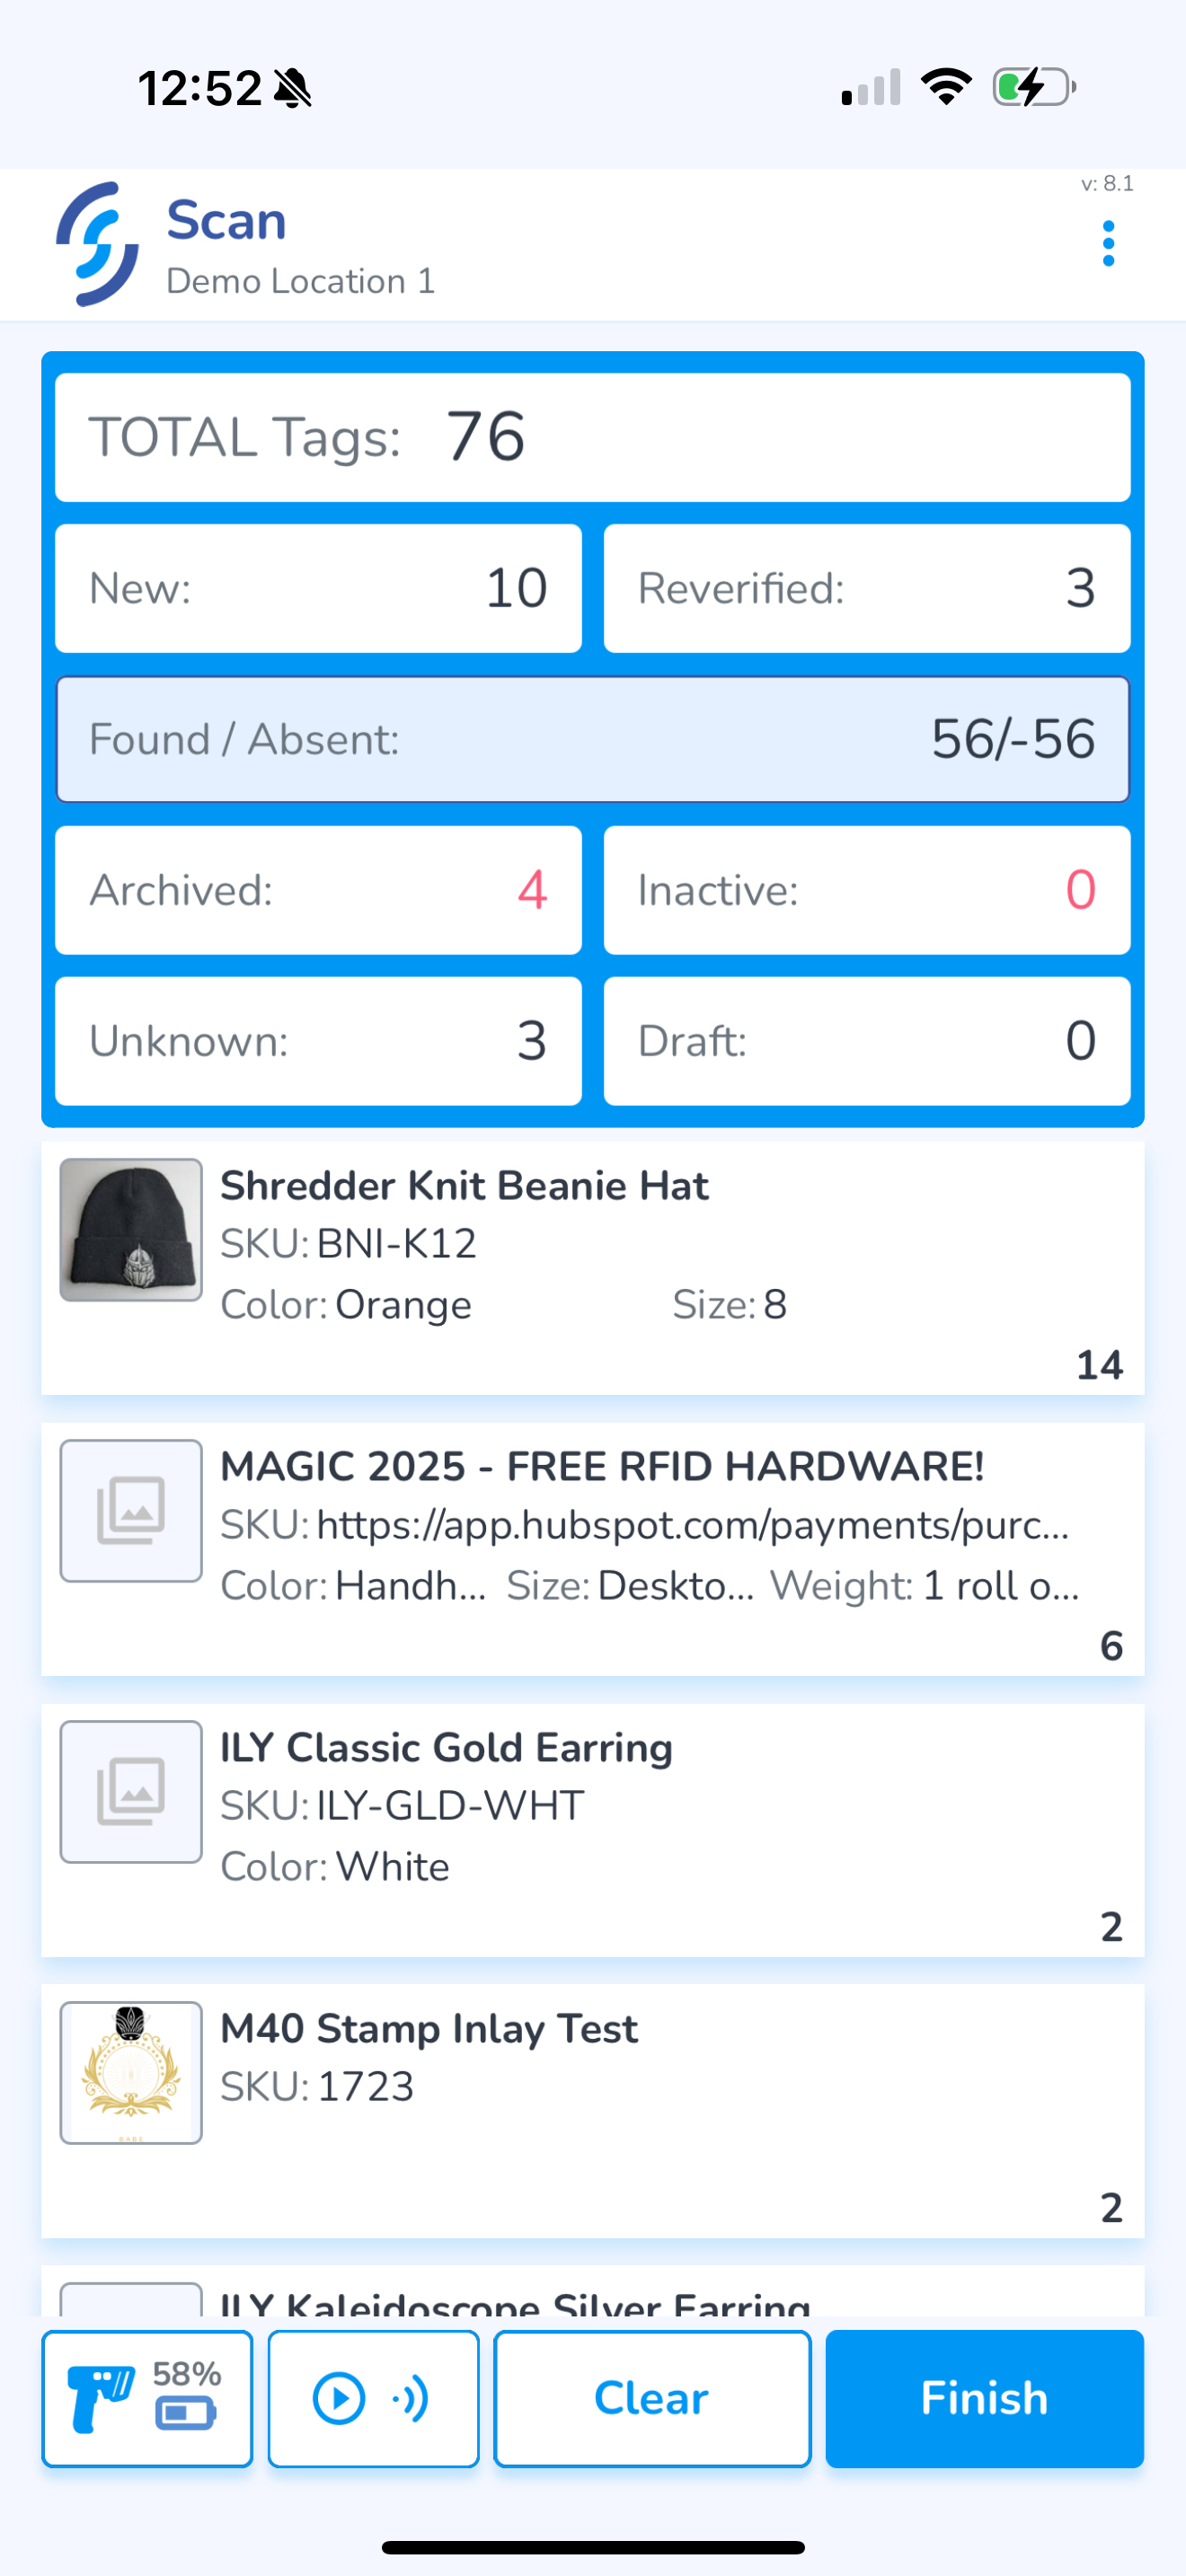
To complete the scan and move to the upload screen, click Finish
Choose the Statuses you wish to include in the upload
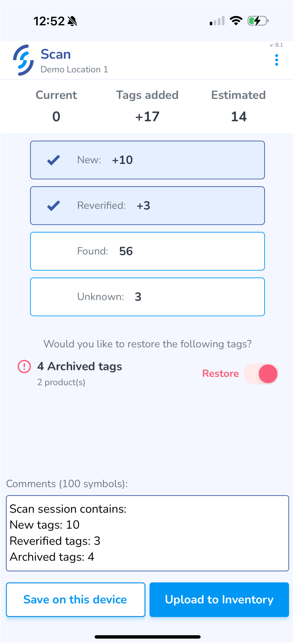
If you wish to add a note to the upload, click into the Comments window and type it in
Finally, click Upload to Inventory
Animation indicates the scan is being uploaded, followed by a green check mark for success
If you are unable to upload due to poor internet connectivity, you can Save Scans on this device for later upload
Mobile App: Scan Settings
View and manage scan settings including power, speed & density
We have simplified the standard RFID settings to provide better more intuitive controls. If you wish to use the standard RFID reader controls you can enable Manual Reader Controls (Pro) from the Application Settings
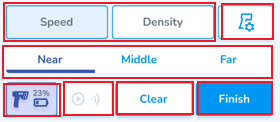
Click the reader & battery power icon in the bottom left corner of the screen to pop-up the Scan Settings
The Speed & Density settings are designed to optimize scanning for different environments. It is recommended to use Speed to capture product quickly. When tags are difficult to capture, use Density
To the right of the Speed & Density settings is the Connected Reader
Near, Middle & Far presets allow to quickly adjust the reader power. Use the Near option to scan items up close and avoid capturing unintended tags. Use Middle for defined tasks such as verifying orders, and use Far whenever Auditing and scanning for accuracy. These presets can be modified from the Reader Settings
To the right of the Scan Settings button is the Auto-Scan button which allows the scanner to capture tags without holding the trigger
Clear allows the scan results to be erased
Finish terminates the session
Mobile App: Scan Summary & Statuses
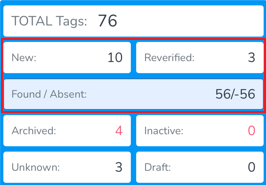
The grid identifies what items the scanner captures & groups the totals by status
There are two views to scan items: Basic, & Advanced. Enable Advanced tag counting mode in the Application Settings
Summary Screen
Active Statuses
Inactive Statuses
- Archived - This displays all Archived items scanned.
- Inactive - Products which are moved to Inactive on the Products tab of the web portal
- Unknown - Tags which do not correspond with any Products
- Draft - Items in Draft status. *Unknown items are automatically created as Draft Products if "Brand Magic" is enabled from the Web Portal
Items can be moved to Archived via Archive Scans, & verifying Sales Orders
Basic
Basic is designed for instances where, due to the volume of inventory, the app performance is negatively impacted
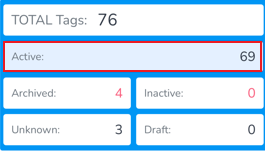
As well when uploading
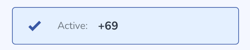
Advanced
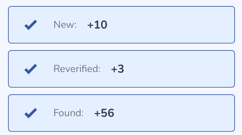
Advanced displays all Active statuses separately, providing more granular visibility into what is being scanned.
Which allows the option for separate uploading
Inactive Statuses & Restoring Archived
Inactive statuses are included in both Basic & Advanced scans, however only if the items are captured in the scan
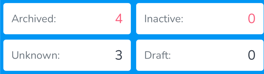
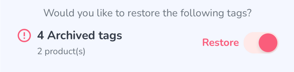
From the Upload screen, Archived tags can be restored by moving the switcher to 'Restore'
Mobile App: Save Scans
Steps to save scans to the mobile device
If you are unable to upload scan data due to poor internet connectivity you can save the results to the device for upload when service is restored
Save Scans
At the end of a scan session is the option to Save on this device

After clicking 'Save on this device' you will see a summary of the scan session and a prompt to Save or Cancel
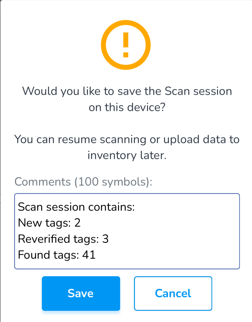
Click Save
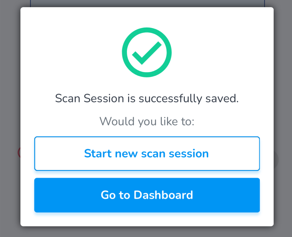
Continue a saved scan session
From the Home screen, click Scan

Click View saved sessions
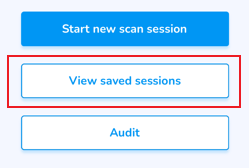
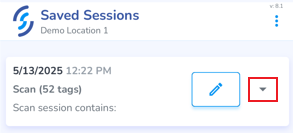
This will display any Saved Sessions
Click on the arrow to open the scan session
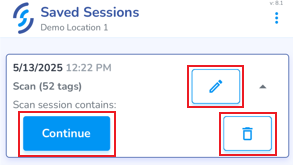
Click Continue to continue or complete the session
Click the Pencil icon to name the scan
Click the Trash Can icon to delete the scan
Mobile App: Archive
Steps to remove (Archive) items from inventory
This feature is hidden by default, however it can be enabled from the Application Settings page. Once enabled, the Archive button will appear on the home screen
Remove items from inventory using the Archive scan. In addition to the Archive scan, Sales Order verification Archives tags. Archived items no longer appear in Active Statuses, however they can be Restored.


- Scan the item(s) you wish to Archive
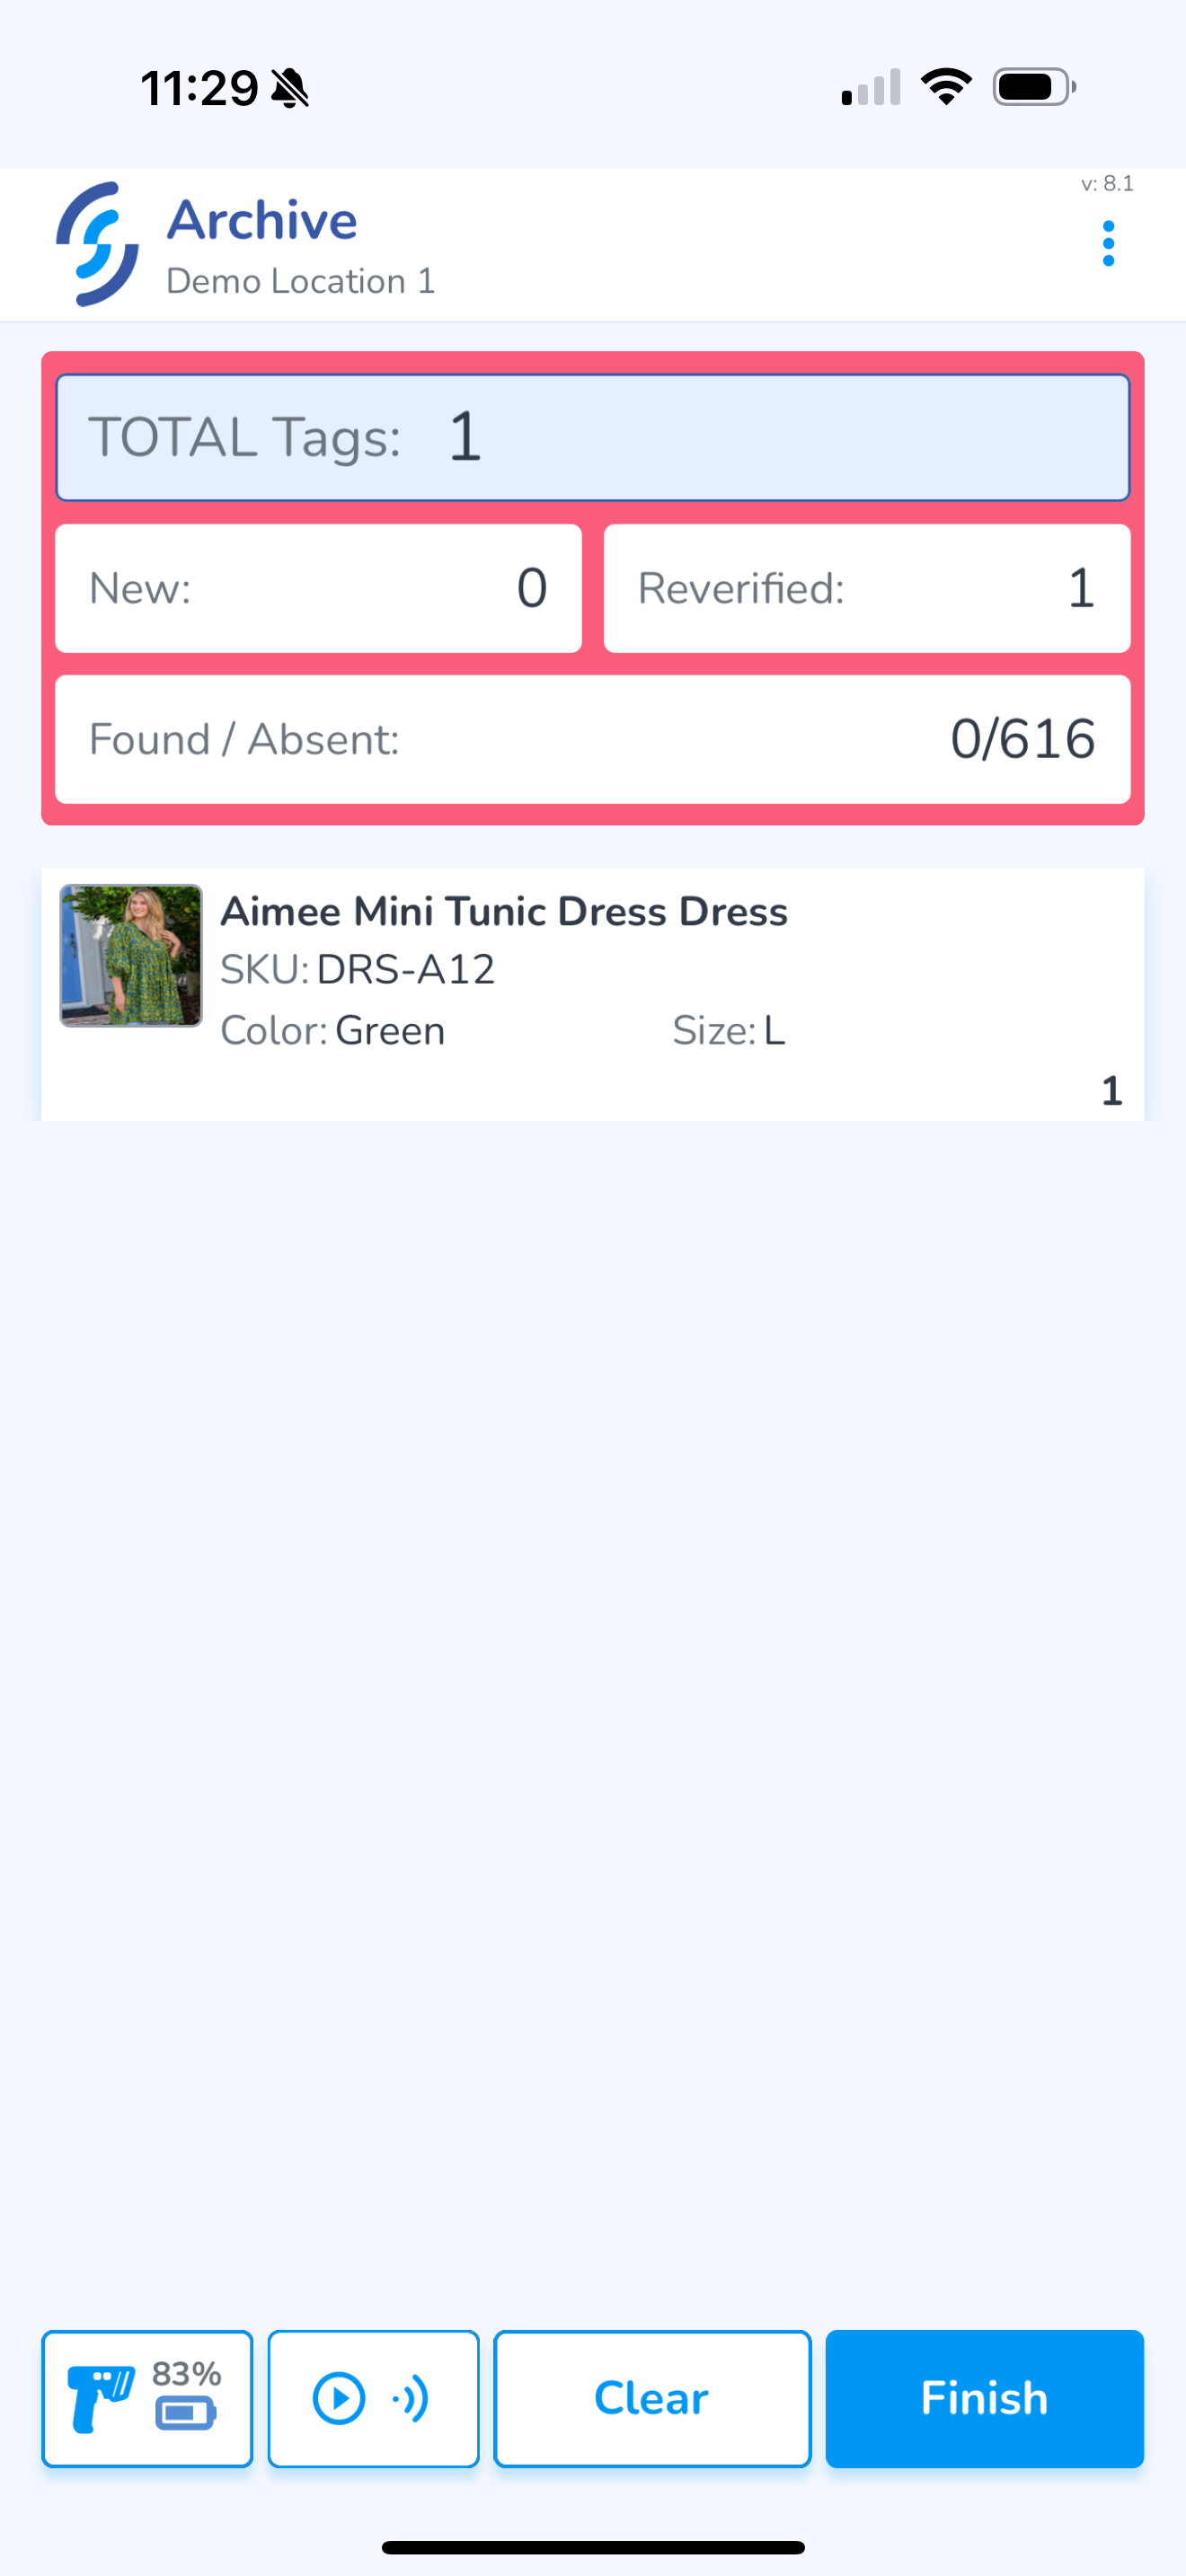
- Click Finish
Review the summary and confirm what is being uploaded
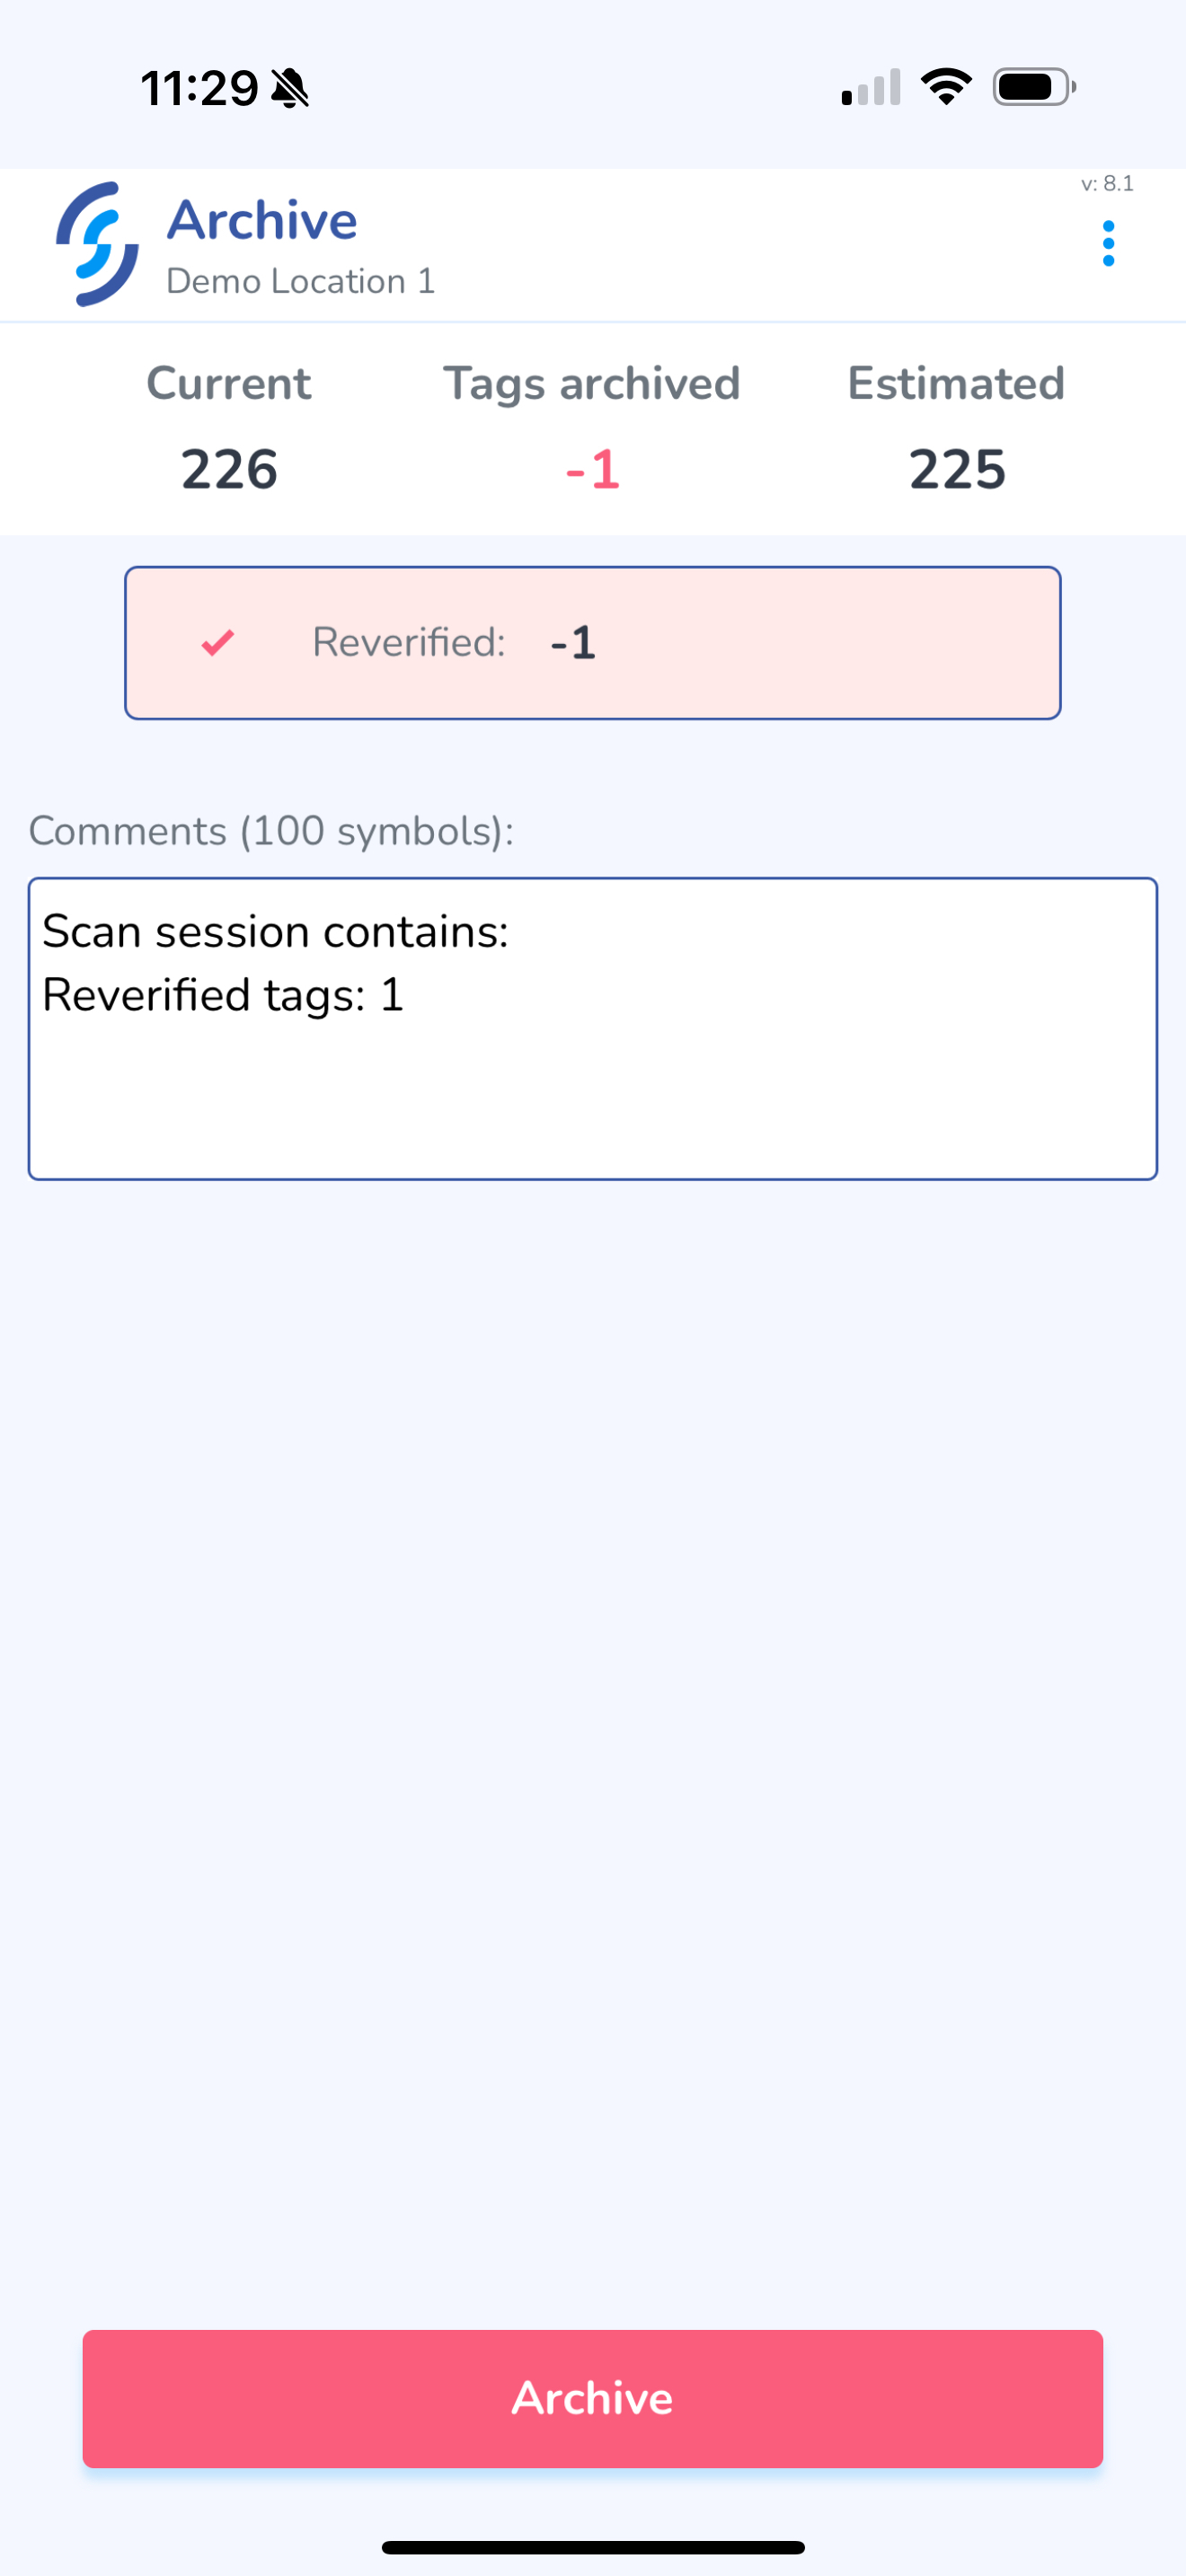
- Click Archive
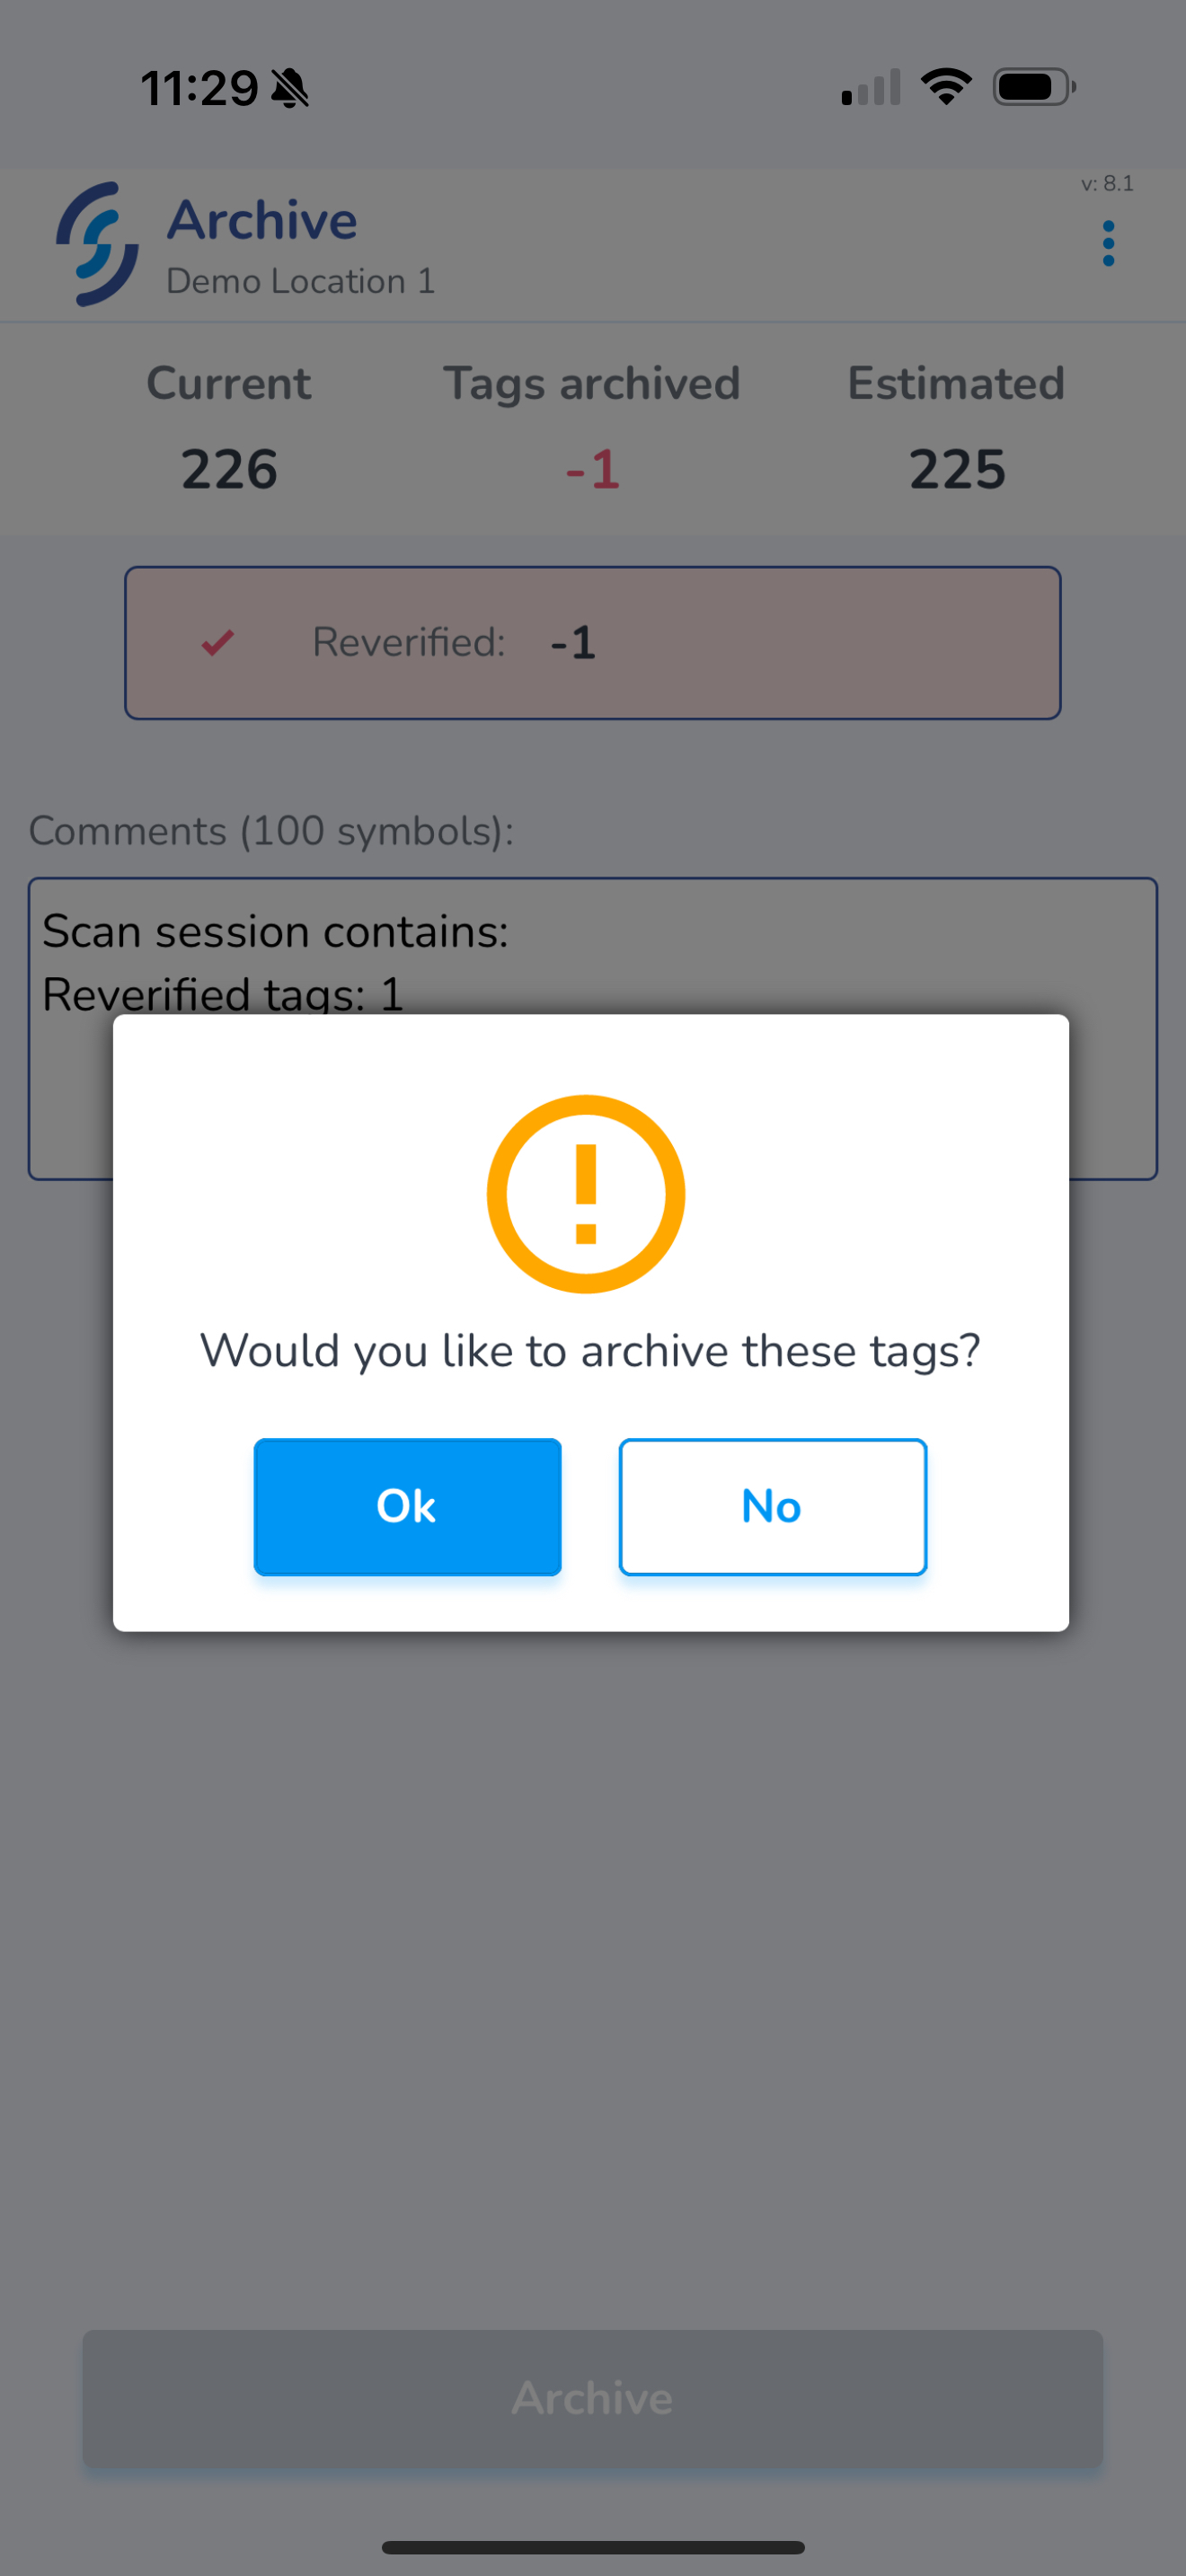
- Click Ok to the prompt
- Start new scan session or
- Go to Dashboard screen

Mobile App: Inventory
View inventory including verified & absent
Click the Inventory tab on the Home screen

Do you have items in your Verified inventory that are no longer present? Perform an Audit to remove these items
Verified status
Default status is Verified. Verified status are items that have been scanned and added into inventory since the last audit.
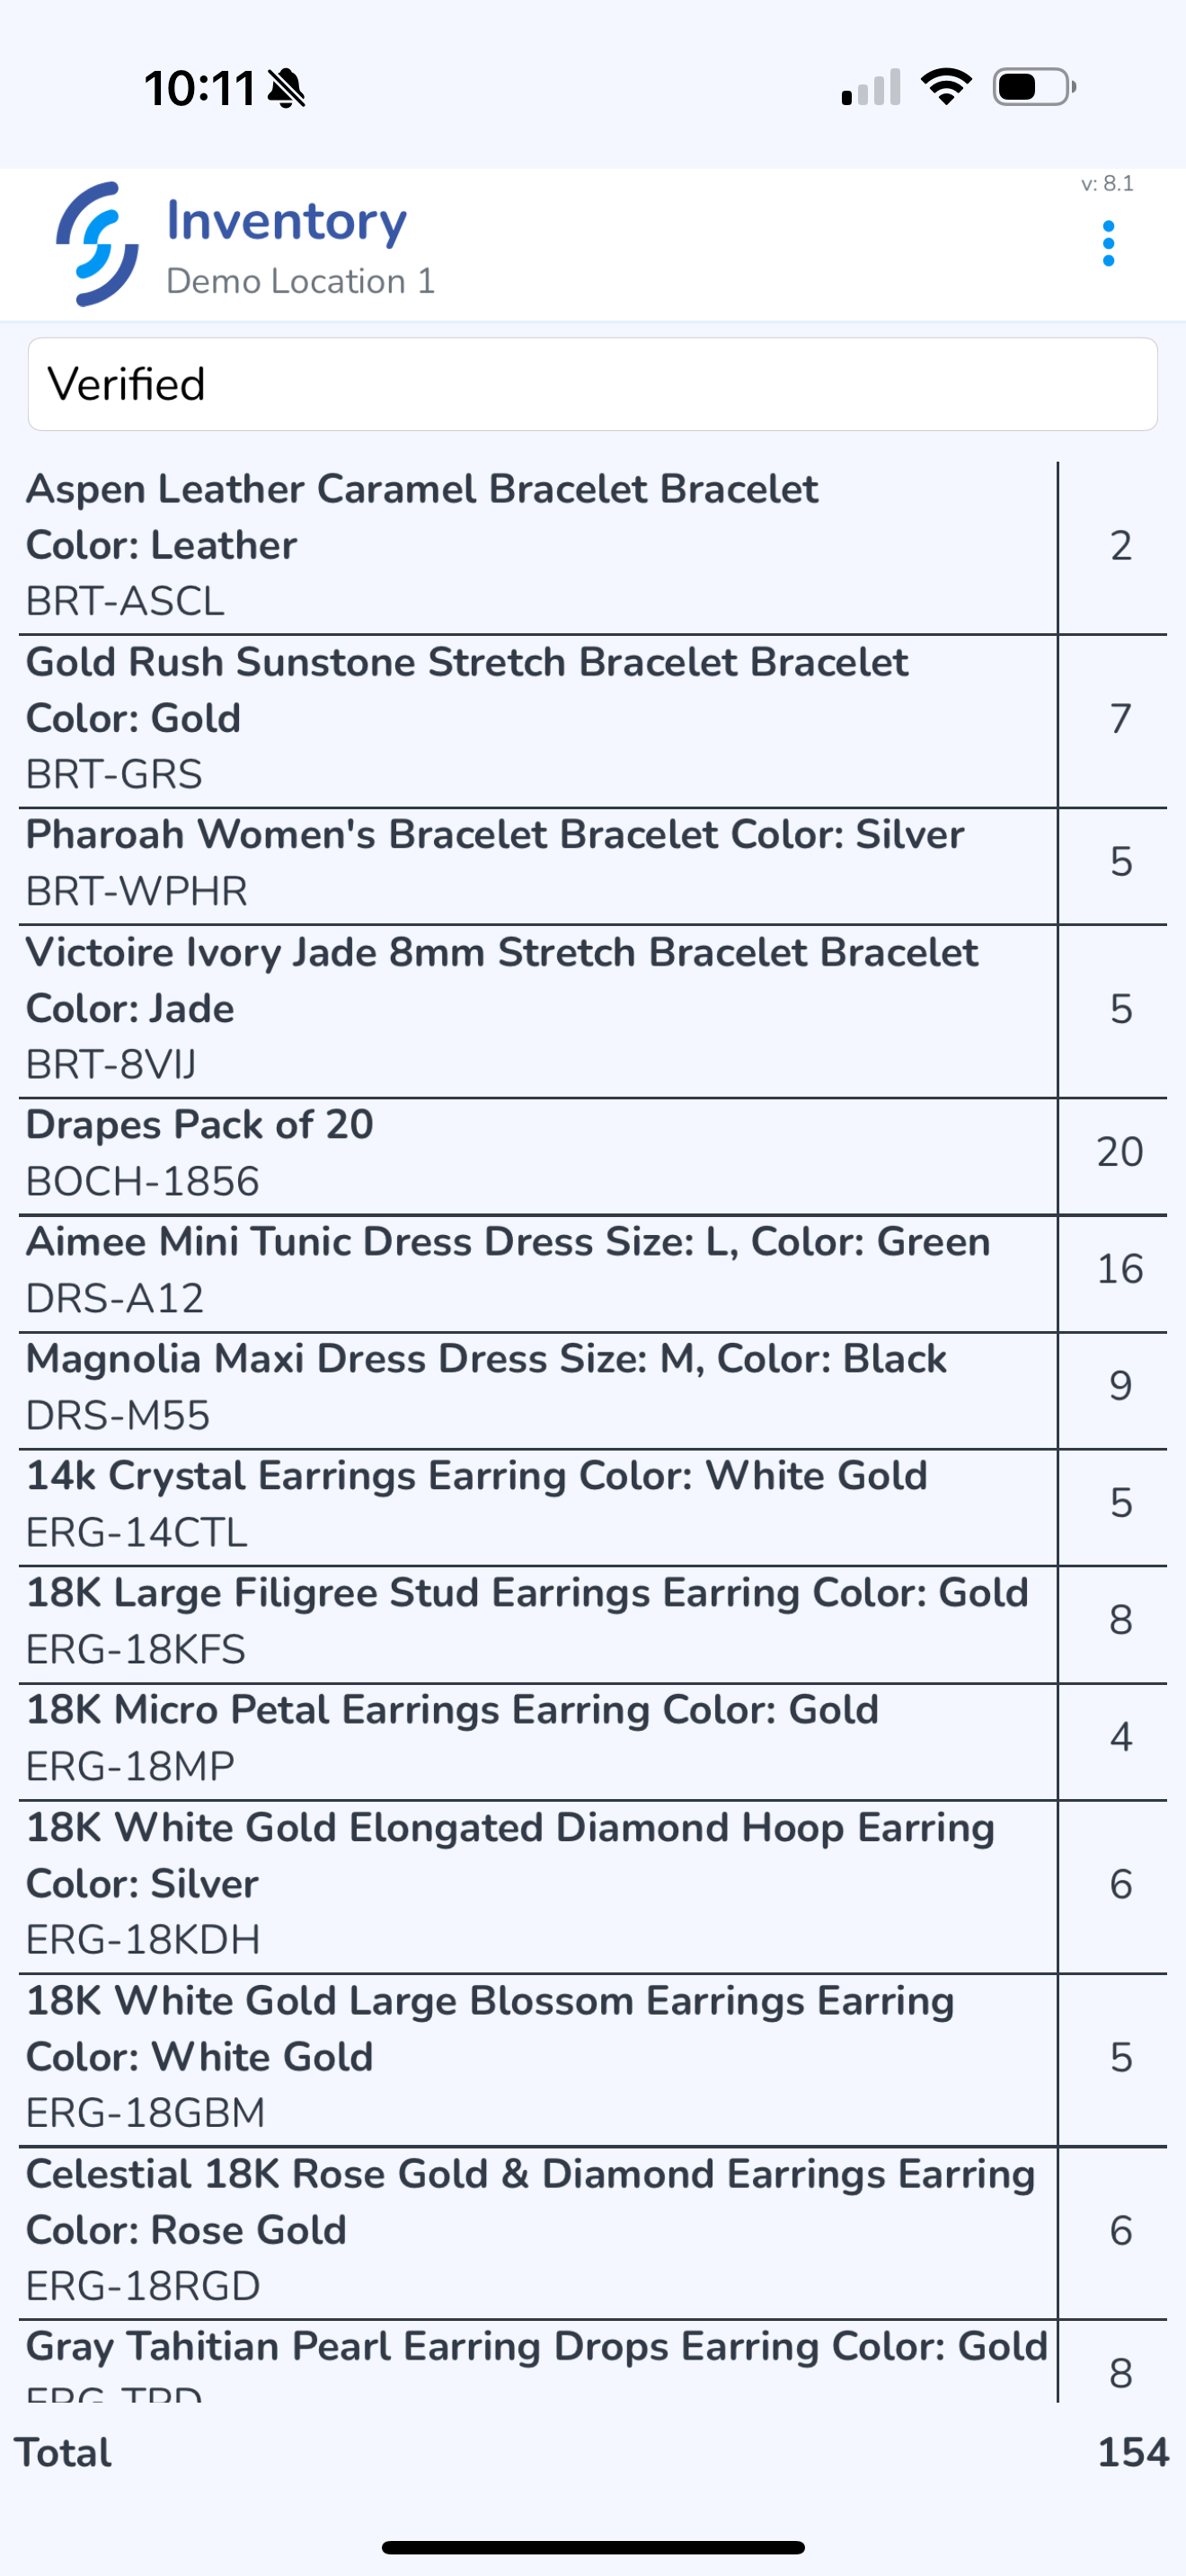
Status selector
Click on the Status to view the selector

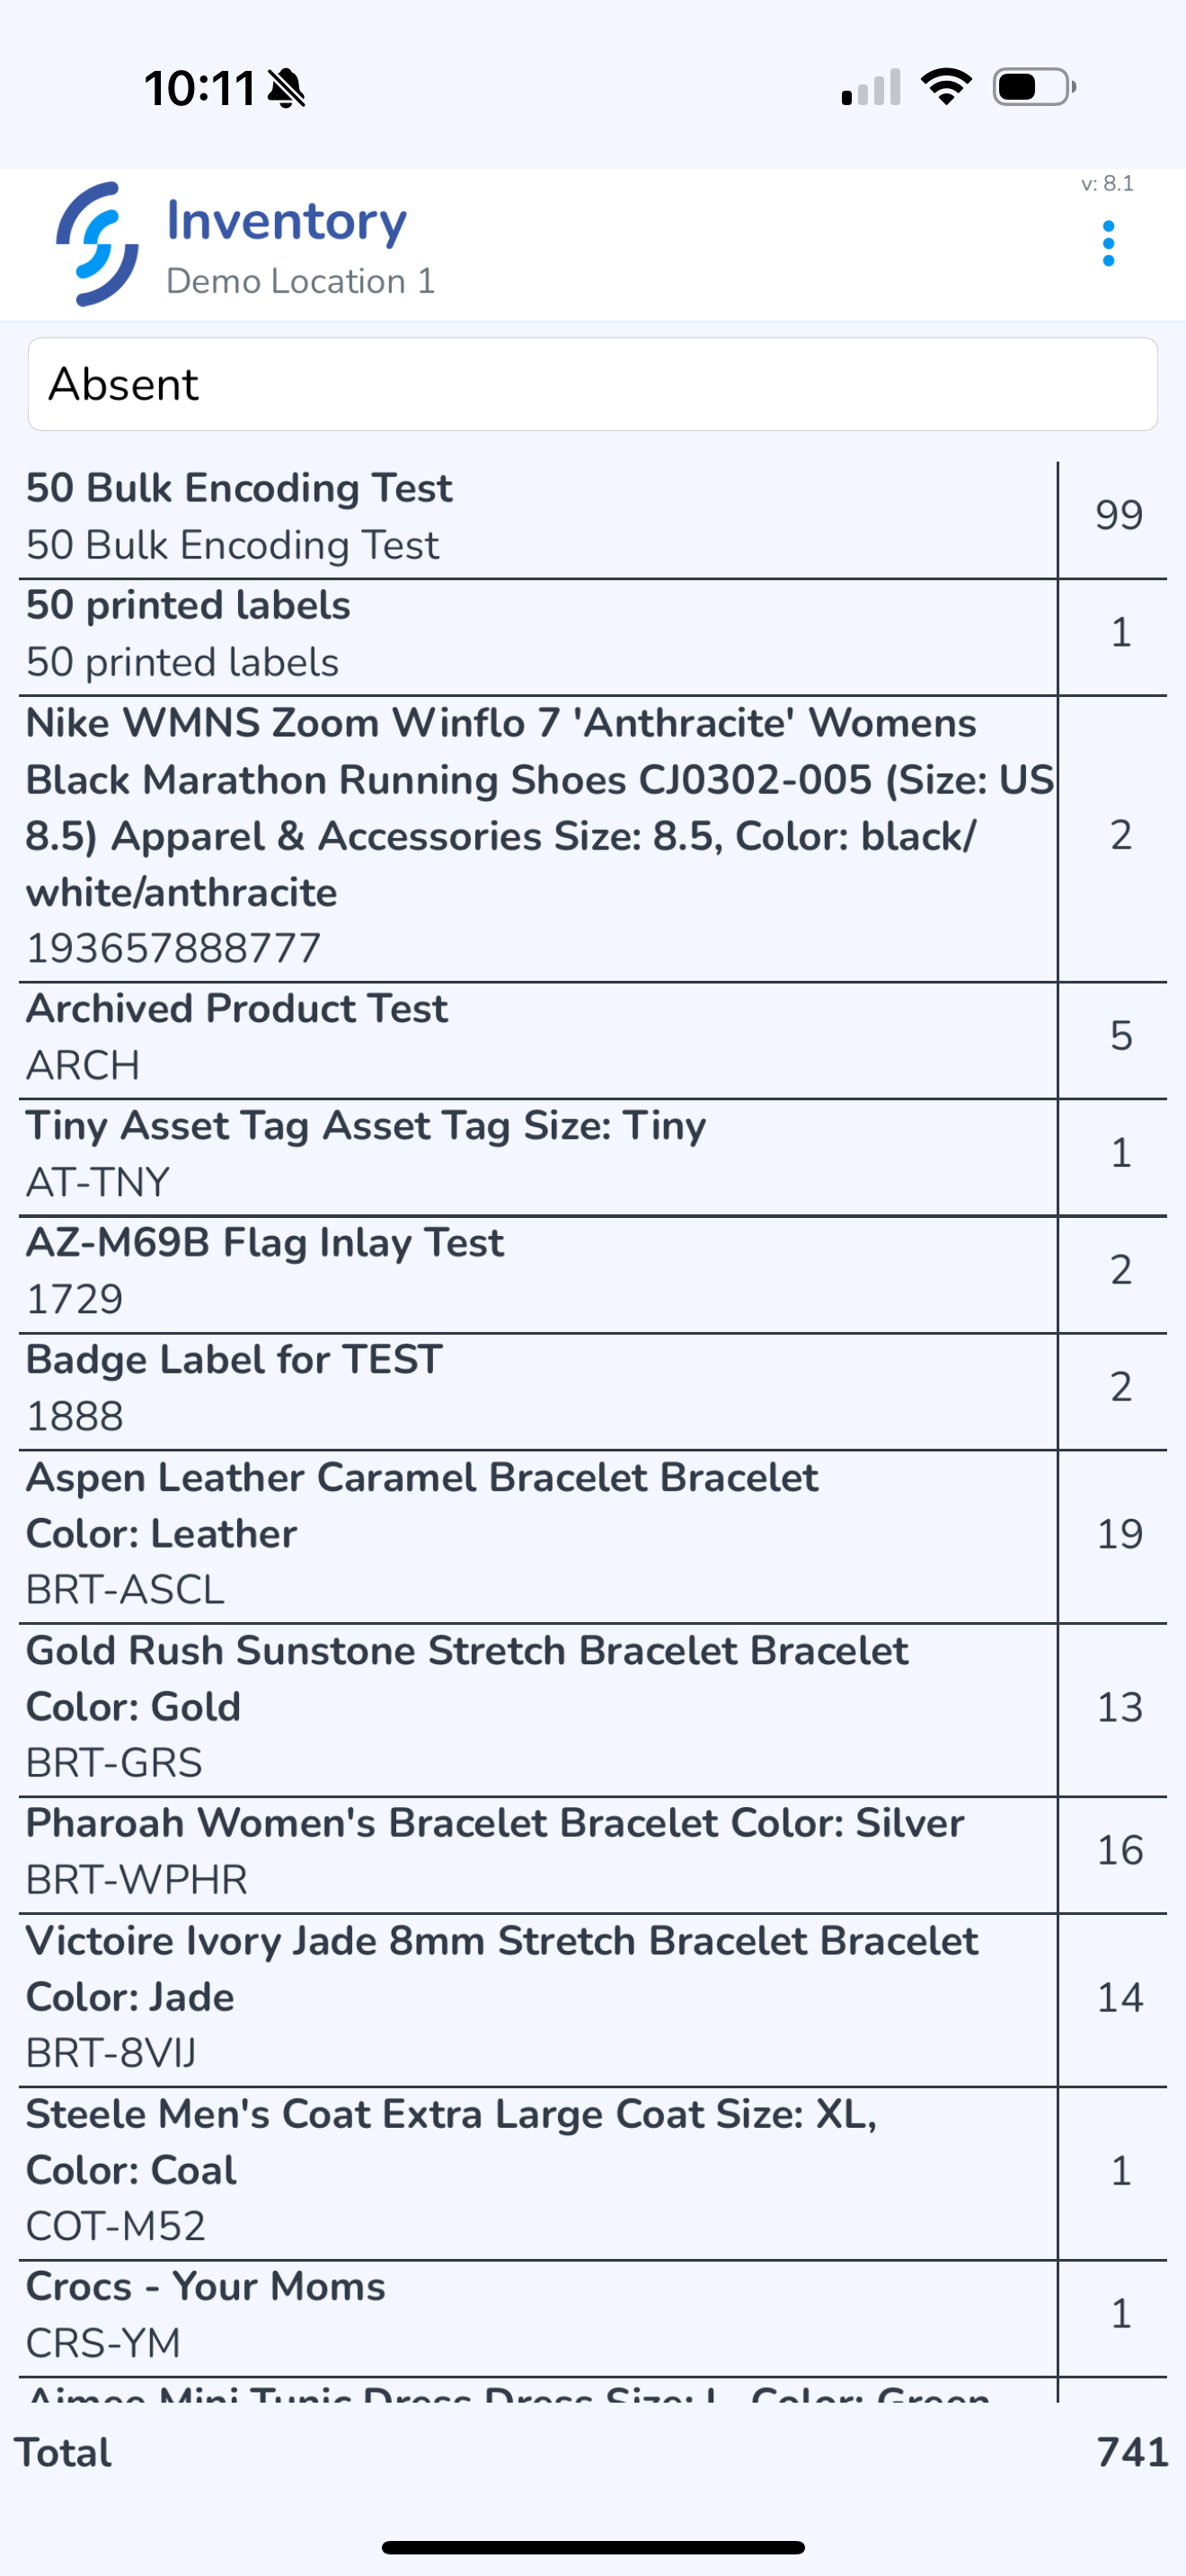
Absent status
Absent items are items which were not scanned since the last audit.
Mobile App: Audit
Mobile App: Audit: Create and Start an Audit
Audit
The following outlines the process of creating, and performing audits for your inventory
- Open the Mobile App
- From the Home screen click the Audit button

Audit List
From the Audit List view the user will see all Draft and Open Audits, and can Create a New Audit.
Draft Audits are audits which have been created but not Started.
Open Audits are all audits which have been Started but not Completed.
Tap the + Create New Audit button on the bottom of the page to Create a new Audit.
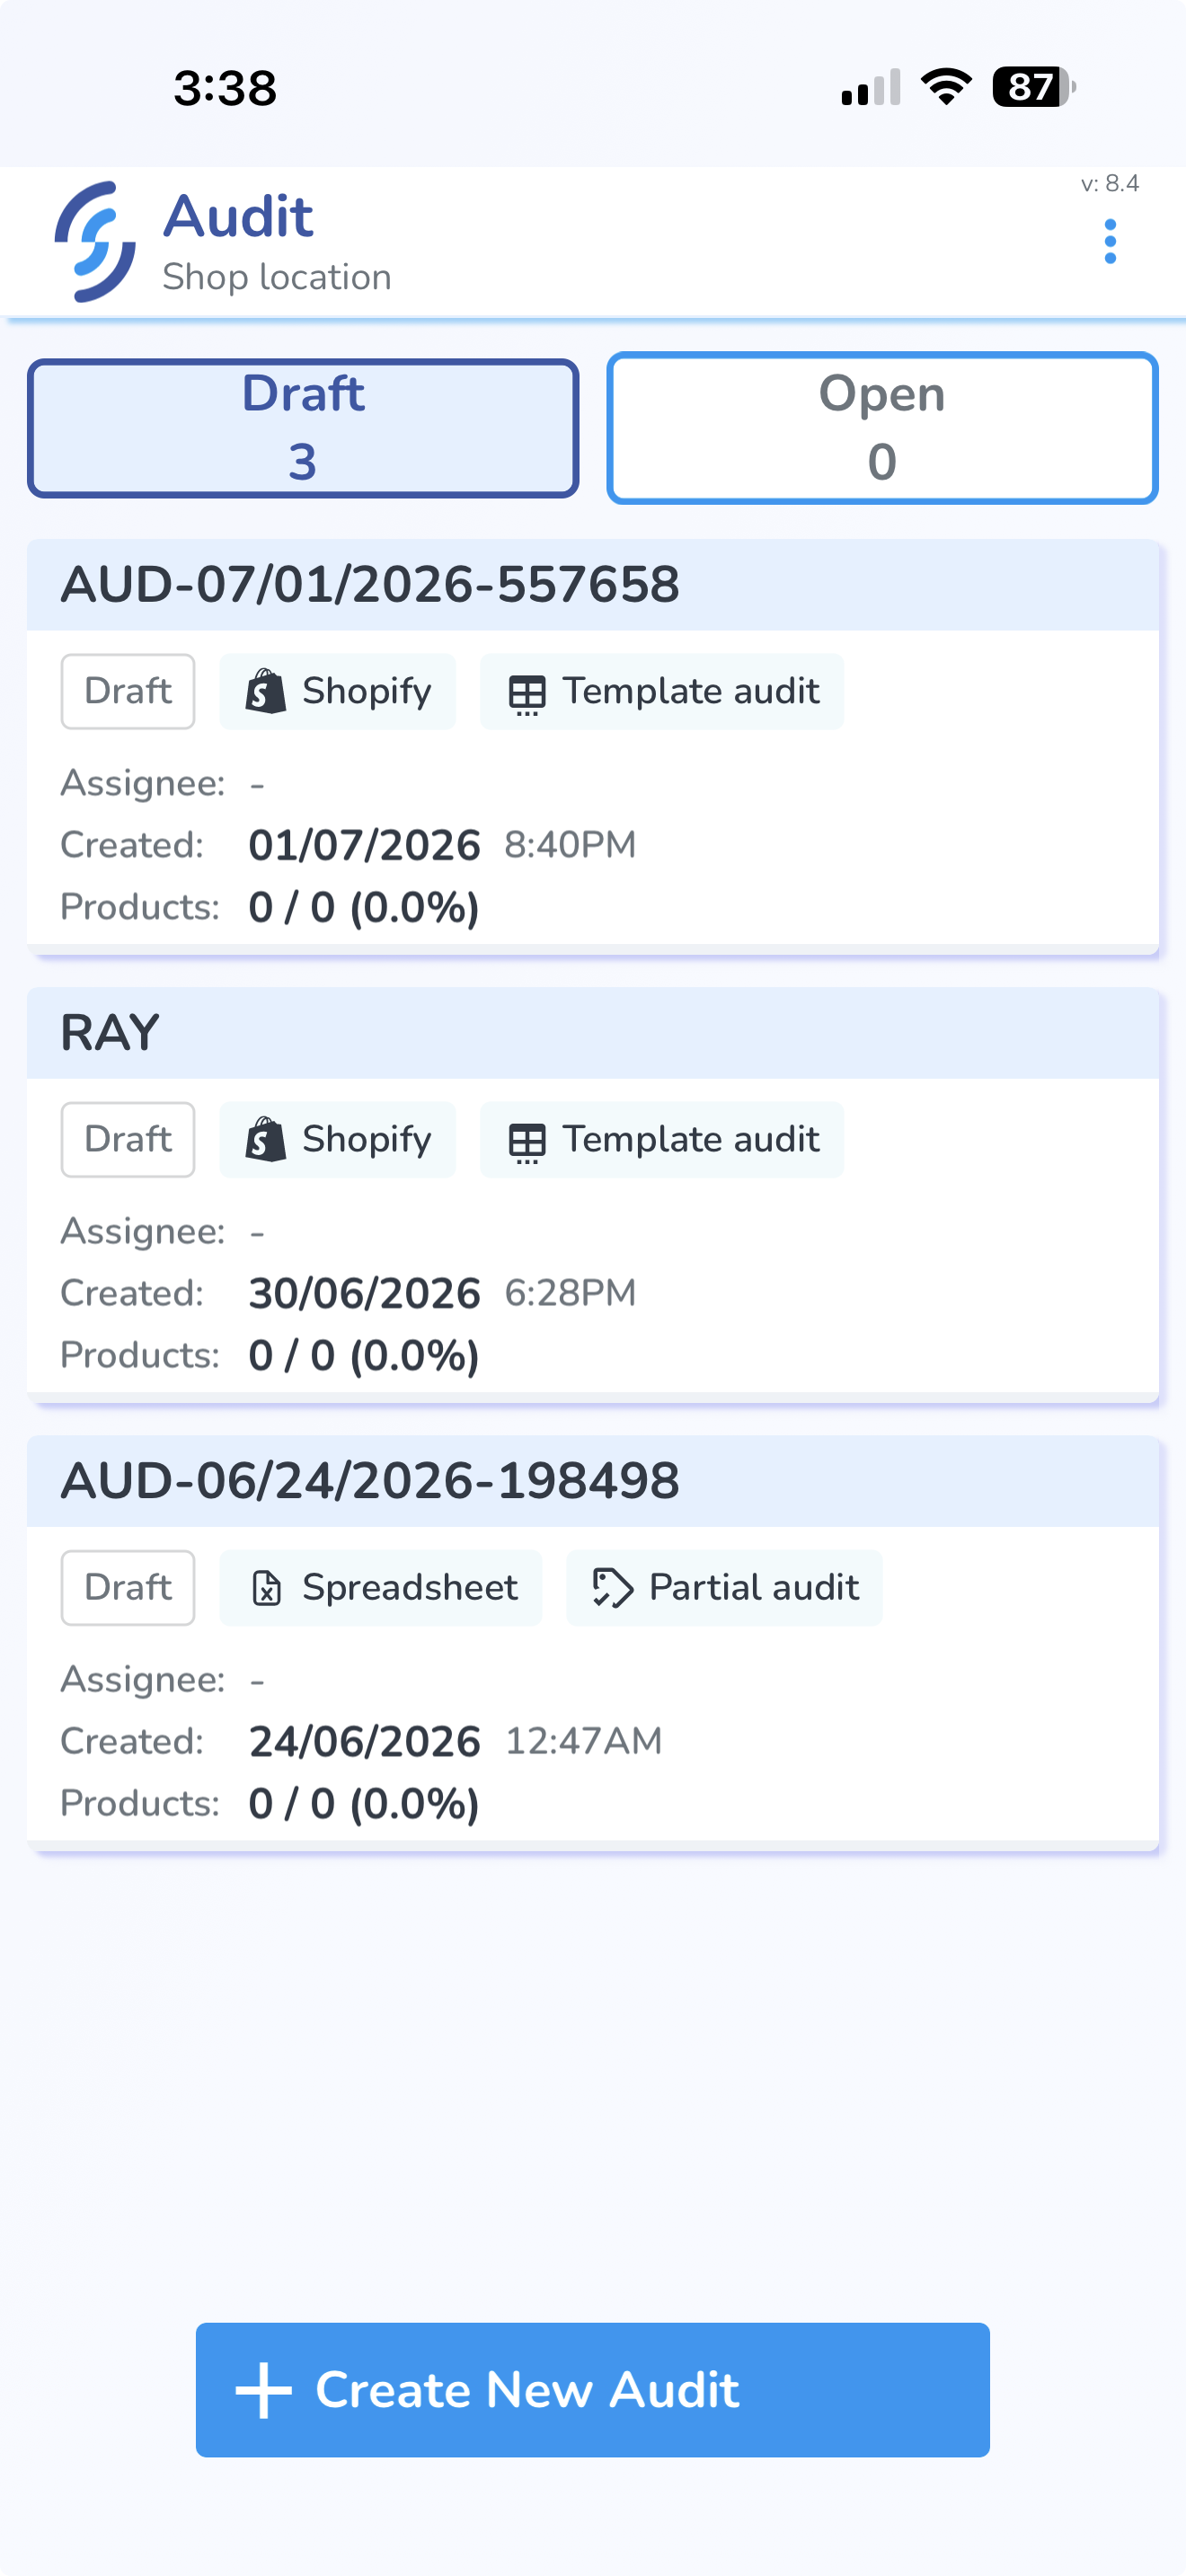
Create New Audit
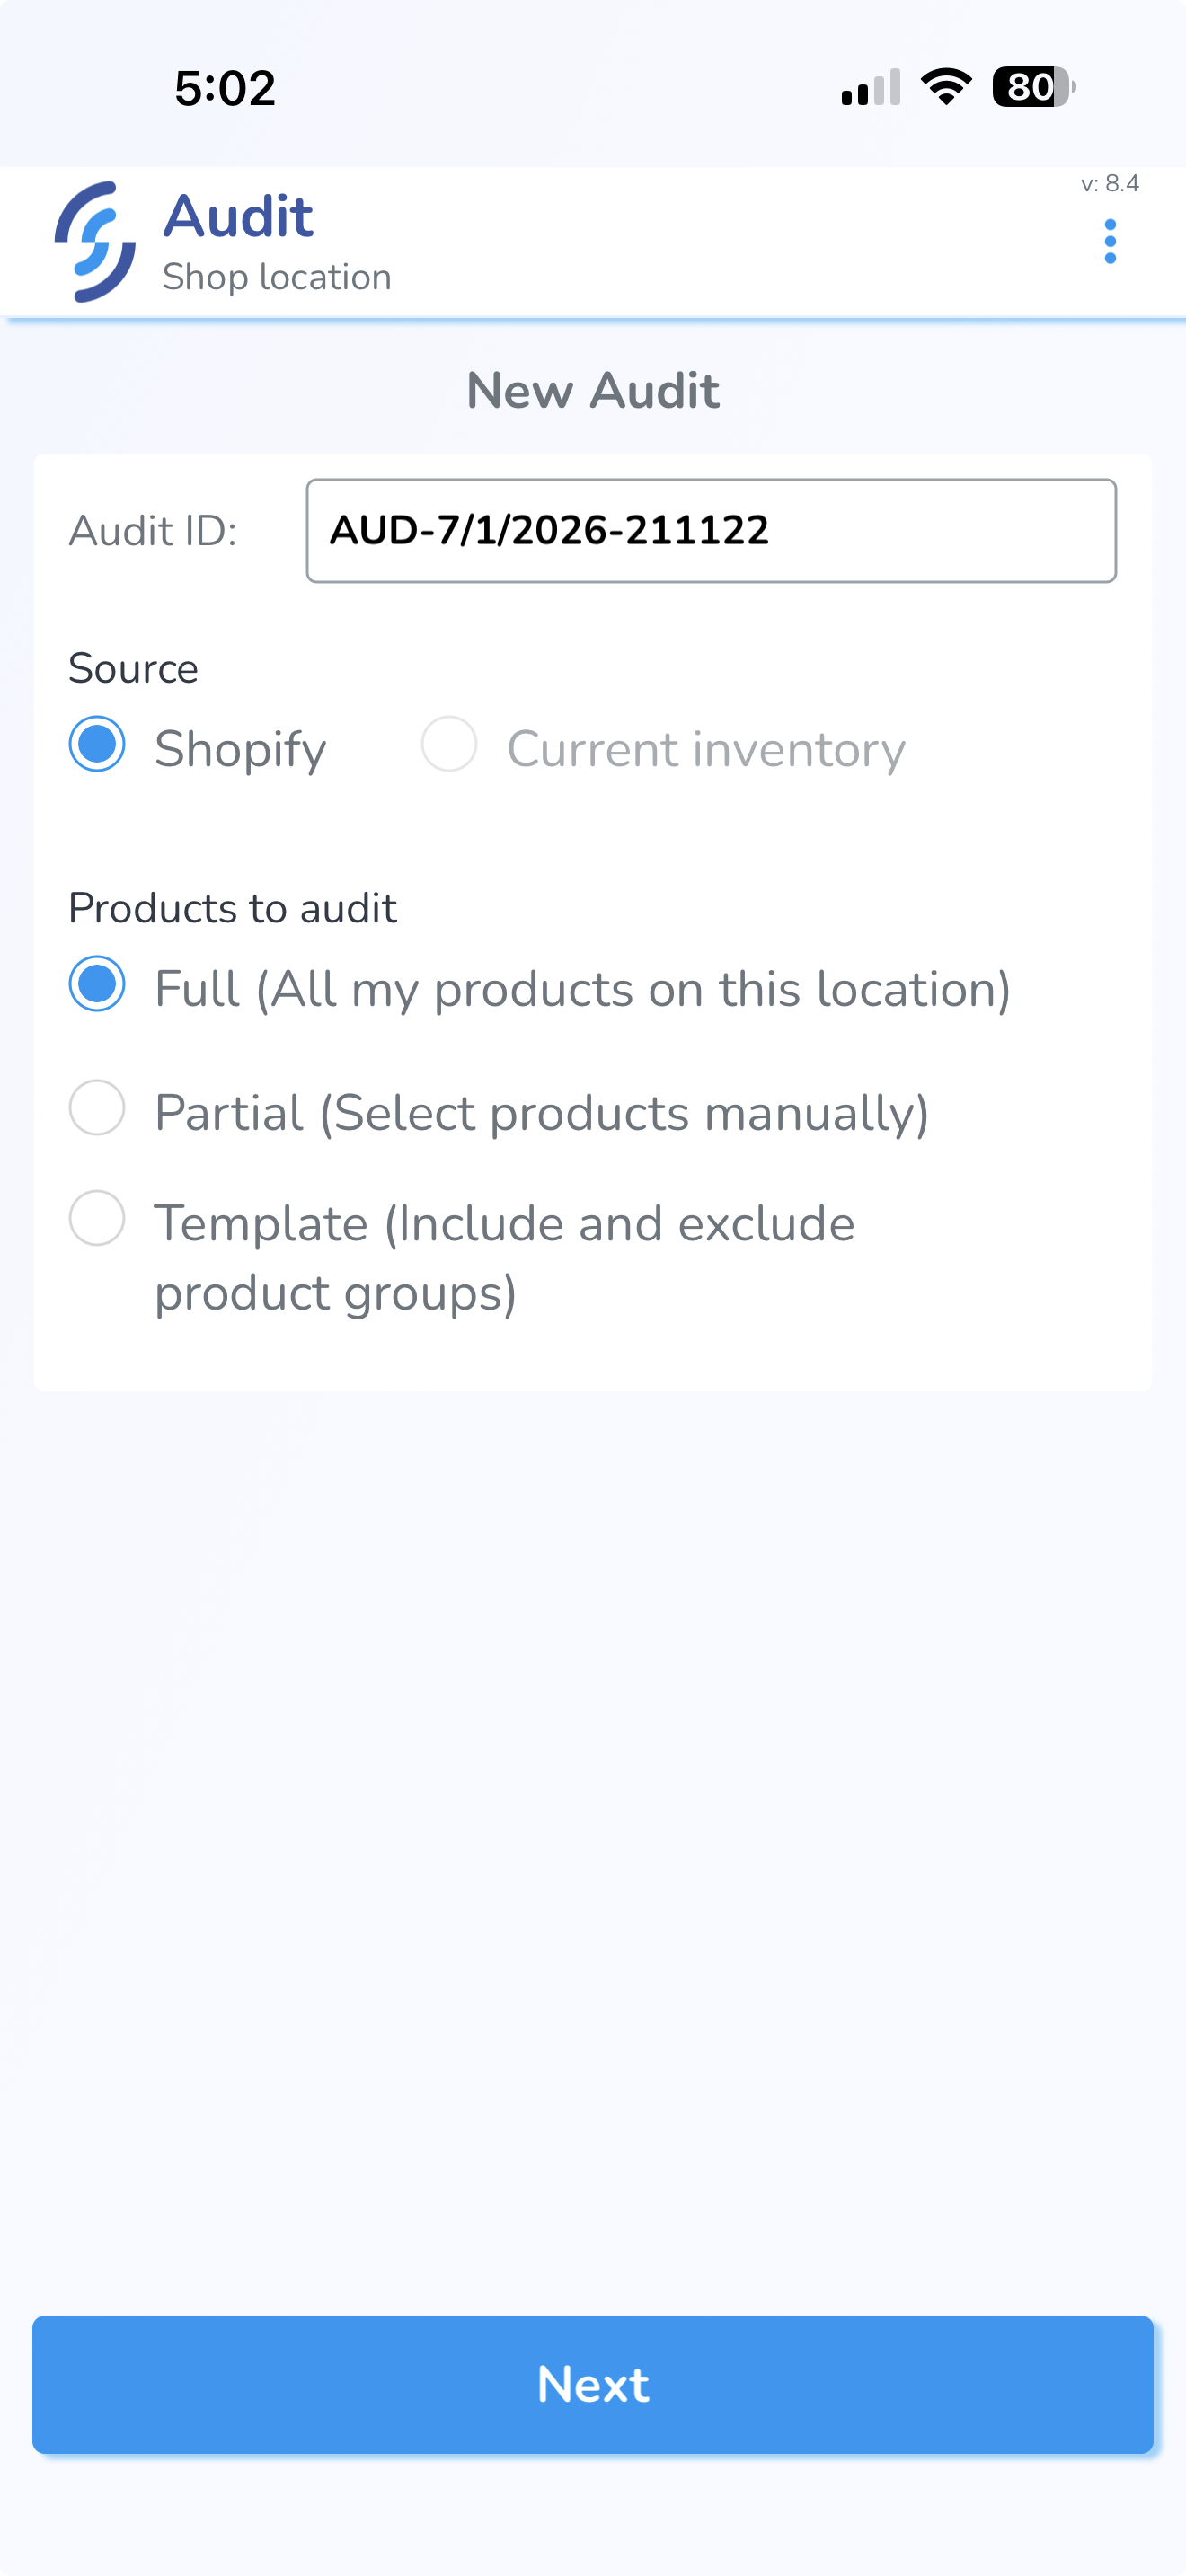
Enter the Name of the Audit, the Source of the comparison, the Location where the audit is being conducted, and the Products being audited
Name:
- This is a free text field to name the audit anything you choose. If you choose to keep this field blank the system will auto-generate an Audit Name for you.
Source:
- Integrated Platform: Shopify, Apparel Magic, etc.
- Manual Input: This allows the user to use their own Custom Source such as a spreadsheet
- Current Inventory: Not yet implemented.
Location:
- Choose the location where the audit is being conducted
Products:
- Full: All of the products in your location
- Partial: Specific products that you define
- Template: Products from a reusable template you define
Click "Create" to create
- The Audit will be created in Draft status.
Add Products to an Audit
Product inventory quantities are not displayed until you click Start Audit.
When you start an Audit, Simple RFID retrieves the latest inventory quantities from the selected Source (such as Shopify or Apparel Magic). These quantities become the baseline for comparing your RFID scan results during the Audit.
Important: Once you click Start Audit, the Audit is locked. You will no longer be able to add or remove products from the Audit.
Full Audit
If you selected Full, you do not need to manually add products.
When you click Start Audit, all active products from the selected Source and Location are automatically loaded into the Audit along with their current inventory quantities.
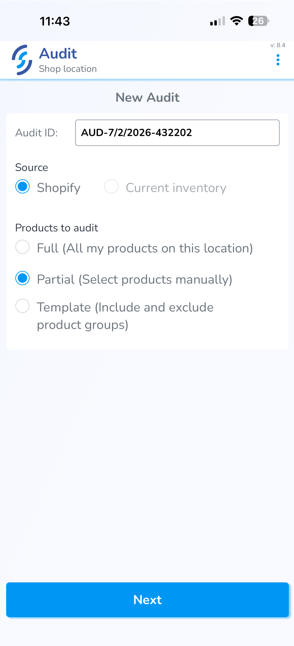
Partial Audit
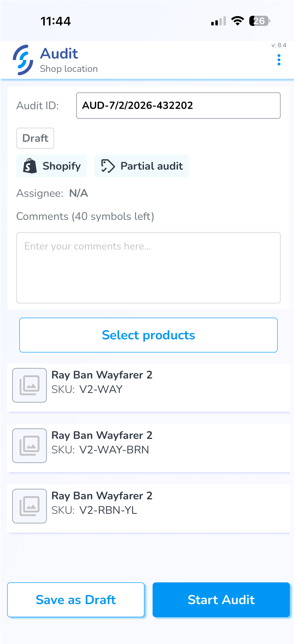
If you wish to manually add items to an Audit, select Partial.
Then, at the bottom of the screen, click "Next".
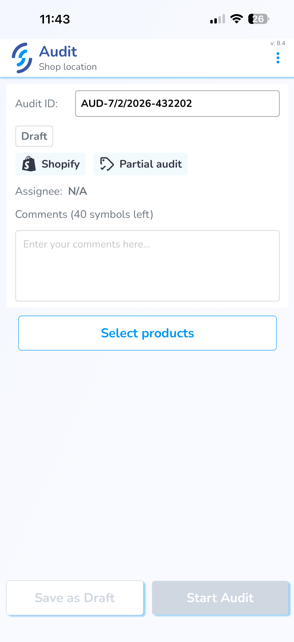
Select Products
Click "Select Products" to manually add items.
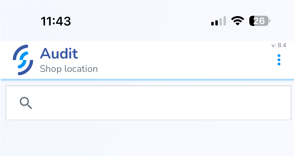
This will open the search window which will allow you to locate the desired items.
Once located, click on the Product to add.
Once all Products have been added, click "Start Audit"
Template Audit
If you selected Template, a window will open displaying your saved Audit Templates.
From this window, you can:
- View existing templates.
- Create a new template.
- Edit an existing template.
- Delete a template.
To create a new template or modify template settings, click the Configuration icon. This opens the Templates side panel, where you can view, create, edit, and manage your reusable Audit Templates.
Mobile App: Audit: Scan Items in Audit
Scanning Items from the Mobile App & Performing Control Scan
From the Mobile App users can scan items included in the Audit to identify any discrepancies between your partner system's inventory (such as Shopify or Apparel Magic) and the inventory detected through RFID scanning.
To begin scanning:
- Open the Audit page in the Simple RFID Mobile App.
- Select the Audit you want to perform.
- Tap Start Audit to begin scanning RFID tags.
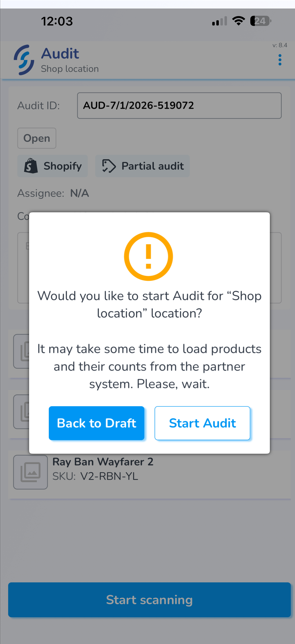
Initially items will load with 0 quantity and display as "Under Expected"

Under Expected, Over Expected, and Matched
As products are scanned, each product is categorized based on the comparison between the Expected and Scanned quantities:
Under Expected – Fewer items were scanned than were expected.

Over Expected – More items were scanned than were expected.
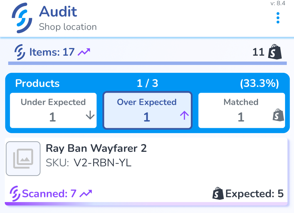
Matched – The scanned quantity matches the expected inventory quantity.

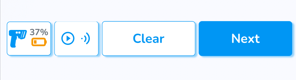
When you are satisfied with the scan results, click Next to proceed to the Upload prompt
Control Scan
From the Audit Summary screen the user will see the totals from their Audit.
Here they can choose to perform a Control Scan
What is a Control Scan? The Control Scan changes the settings in the app, putting the reader in "Density" scan mode which helps locate tags which were missed during the initial pass.
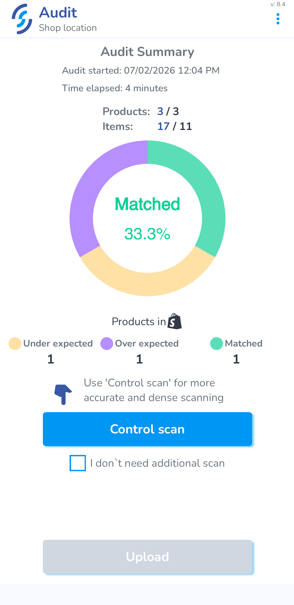
You may choose to bypass this Control scan and upload immediately by clicking the "I don't need additional scan" checkbox, then click "Upload" however we strongly recommend performing the Control Scan as it typically assists users to locate the missing 5-10% of items.
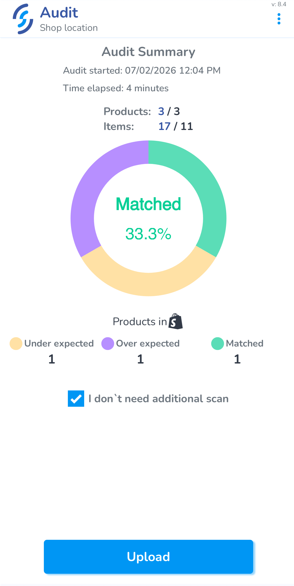
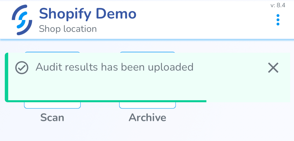
Once uploaded a toast pop-up message will appear indicating that the scans were uploaded successfully.
You may repeat the scan process as many times as necessary while the Audit remains Open. Additional scans are combined with previous scan results, allowing you to continue improving the Audit's accuracy.
Important: Clicking Complete Audit closes the Audit and prevents any additional RFID scans from being uploaded. Before completing the Audit, ensure all scans have been performed and uploaded successfully.
After the Audit has been Completed, navigate to the Resolve & Sync page on the Web Portal to review any inventory discrepancies, resolve outstanding issues, and sync the updated inventory quantities back to partner system.
Mobile App: Complete Audit
Once you have performed as many scans as you wish to ensure accuracy you will need to Complete the audit to close it. Once the Audit is Closed all Mismatched products are moved to the "Review Mismatches" page for review.
Complete an audit to move mismatched products to the Review & Resolve process. To do this the audit must be in Open status.
- Click on the desired audit

- A pop-up will appear. Click "Complete Audit"
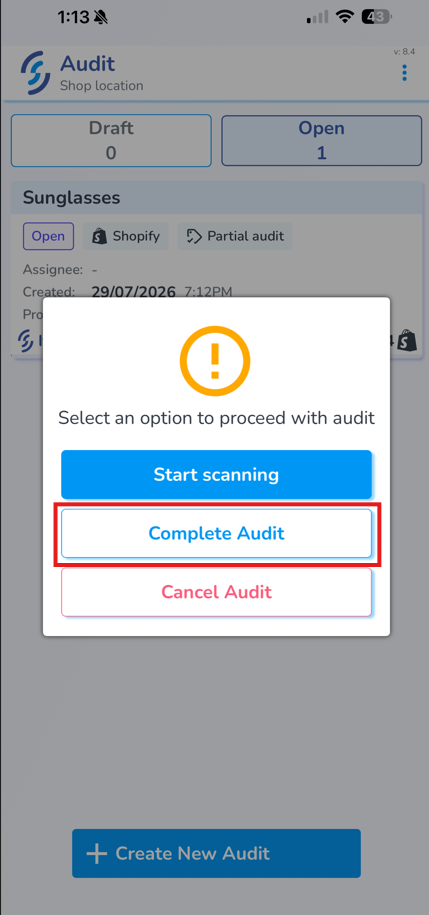
- Accept the confirmation pop-up prompt by clicking "Complete"
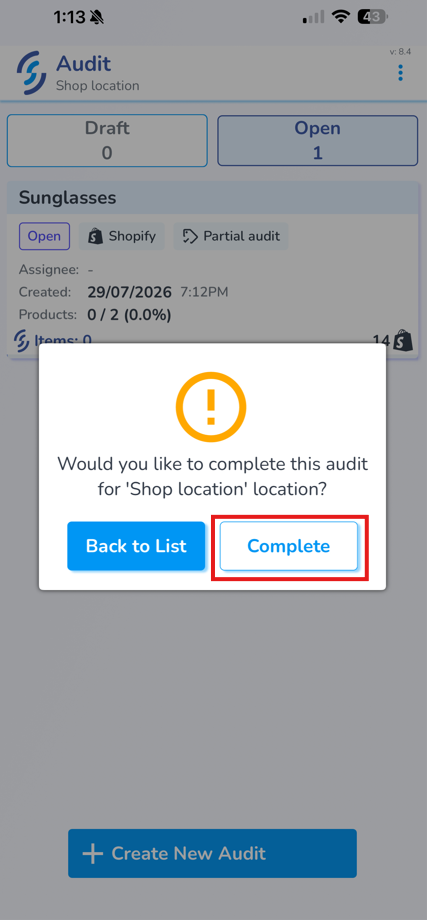
- The Audit will then be removed from the mobile view
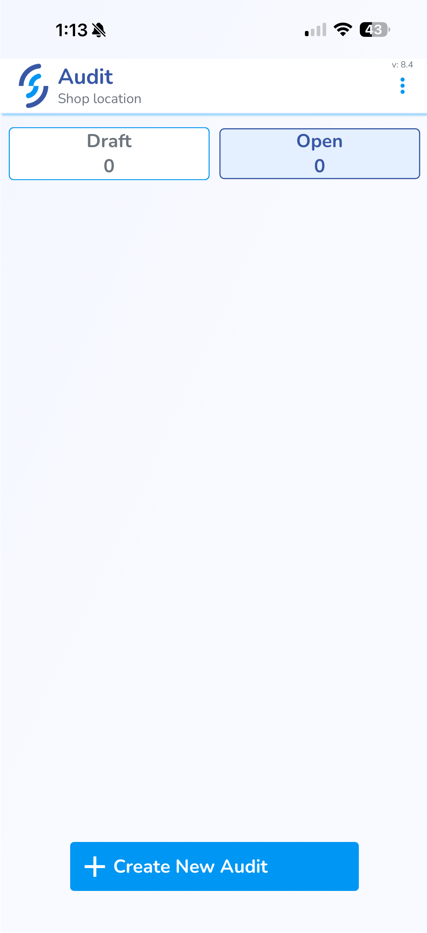
The mismatched items will now appear on the Resolve & Sync Mismatched Products tab for review and resolution.
Mobile App: Ship Menu (Sales Orders & Transfers)
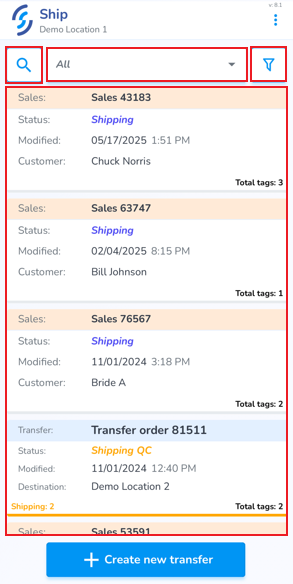
From the Ship screen contains the following tools to help locate your order:
- Search
- Status drop-down
- Filter menu
Below these filters are the orders
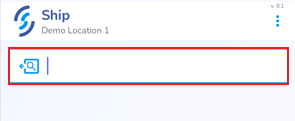
Search
- Click on the search window to lookup a specific order
Status Drop-down
- Use the Status drop-down to choose a specific status
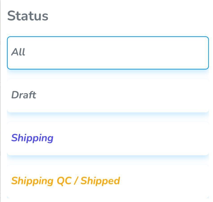
You can expand the statuses to include Receive statuses for orders shipping by enabling Display Receiving Statuses in Ship menu from the Application Settings
Filter Menu
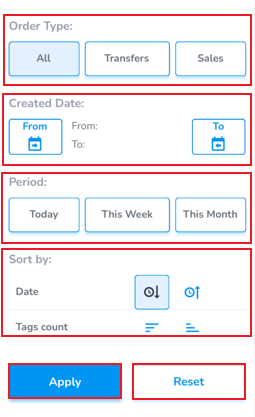
Click on the funnel icon to view the filter menu
- Order Type allows to view all order types, or only view Transfers and/or Sales
- Created Date allows to choose from and to dates to display orders from a specific timeframe
- Period provides quick filters to display today, this week & this month
- Sort by allows to sort oldest to newest, and Tags count from largest to smallest
- Click Apply to save the settings
- Click Reset to remove the saved filter
Mobile App: Verify Accuracy of Sales Orders
Sales Orders can be scanned to verify the physical items match the ordered items. Items verified in Sales Orders are Archived.
Sales Orders must first be created in the web portal, and moved to Shipping status, to appear on the mobile app
To verify a Sales Order click the Ship icon from the Home screen

If you have access to more than one physical location, confirm the Selected Location is correct. It will appear below 'Ship'
Locate & Open Order
From the Ship tab you will see the Sales Orders (which appear peach). Locate the order you are verifying

- Click on it to open it.
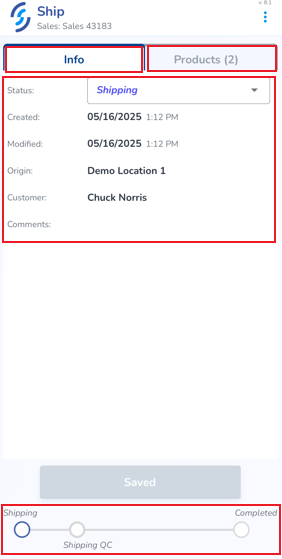
Sales Orders contain two tabs: Info & Products
The Info tab provides order details including status, origin, customer name, created & modified date, and a progress indicator at the bottom of the screen
The second tab, Products displays the ordered item(s)
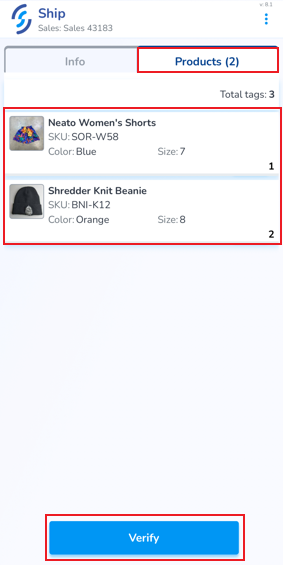
- To begin the verification process, click Verify
- Pair Bluetooth
The ordered items are now ready to be scanned to confirm accuracy
Ignore Non Order Products
If you wish to have the RFID reader only capture tags for products included in the order, you can enable the "Ignore Non-Order Products" setting in the Application Settings menu.
**Please note that if non ordered items are in the package, the scanner will miss them.
This setting however can be beneficial for environments where there are many items nearby which are easily unintentionally captured during the verification process.
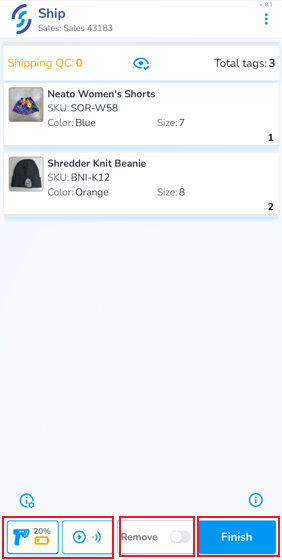
At the bottom of the screen are the Scan Settings and Auto-Scan button
The Remove switch removes scanned items from the order
Finish terminates the session
Removing Incorrect Items
If an incorrect item is scanned, the word 'remove' appears at the top with the quantity to be removed, and the item(s) to be removed appear in red. Incorrect items must be removed before the scan session can be terminated
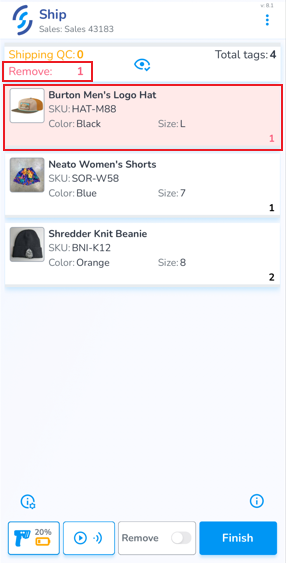
To remove incorrect items you can either:
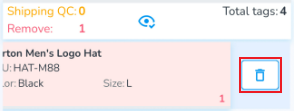
- Slide the incorrect item to the left, then click on the trash can icon
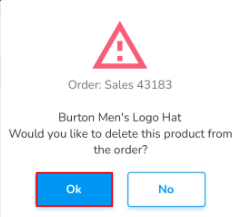
- Click 'Ok' to the pop-up prompt
OR
- Enable the Remove scan option
- Scan the incorrect item(s)

Removing Extra Items
If more items are scanned than are ordered, the 'remove' message appears, and the item with extra items will appear in red, and the number of extra items is displayed on the left
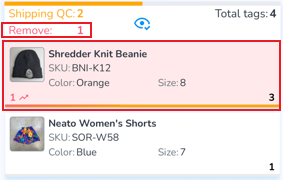
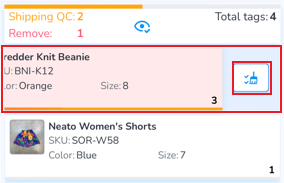
- Slide the item to the left, then tap the broom icon to clear all scans for the item
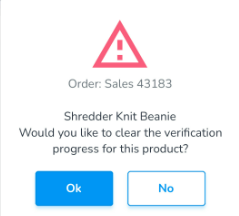
- Click 'Ok' to the pop-up prompt
OR
- Enable the Remove scan option
- Scan only the items being removed
Verify Order
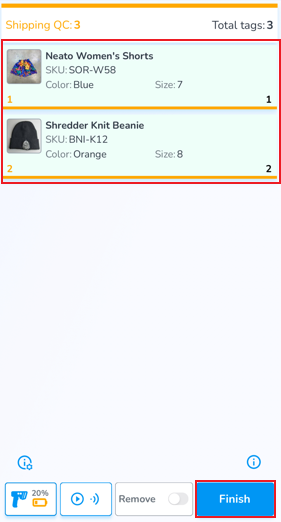
Correctly scanned items appear in green. The quantity scanned appears on the left, and the ordered quantity appears on the right. A yellow progress bar indicates if any items are missing.
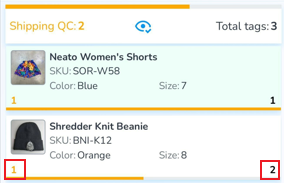
Once all items are scanned correctly & complete, click Finish
- Click 'Ok' to the pop-up prompt
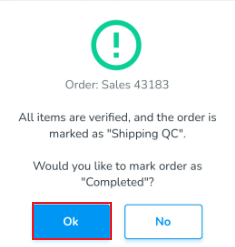
You will be returned back to the Ship orders list, and a toast pop-up will confirm the order is completed

Mobile App: Display Receiving Statuses in Ship menu
This feature is disabled by default. To enable this additional view go to the Application Settings
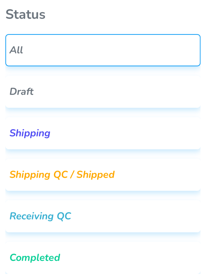
If this is enabled the Status filter menu will include the Receiving statuses in the Ship menu. These additional statuses include:
- Receiving QC
- Completed
Mobile App: Ship & Receive Transfers
Steps to verify transfers at shipping and receiving
To verify Transfer orders at shipping click the Ship icon from the Home screen
Ship Transfer
Click on the Ship icon

Choose an Existing order, or Create new transfer from the mobile. You may also create a transfer by simply scanning items.
Transfer Orders can be created from the web or the mobile app, however creating them from the mobile is disabled by default. To enable, navigate to the Application Settings in the Ship section
Choose Location
If you have access to more than one physical location, confirm the Selected Location is correct. It will appear below 'Ship'
Locate & Open Order
From the Ship tab you will see the Transfer Orders. Locate the order you are verifying
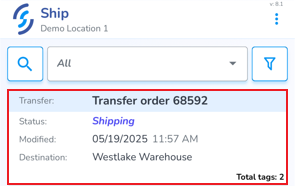
- Click on it to open it.
Transfer Orders contain two tabs: Info & Products
The Info tab provides order details including status, origin, customer name, created & modified date, and a progress indicator at the bottom of the screen
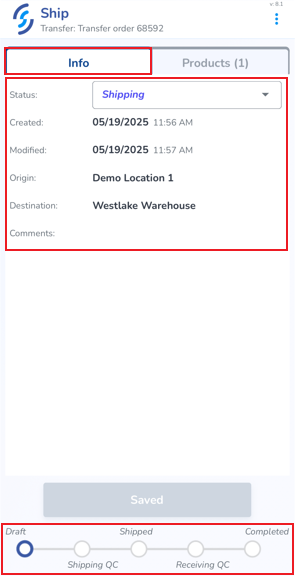
The second tab, Products displays the ordered item(s)
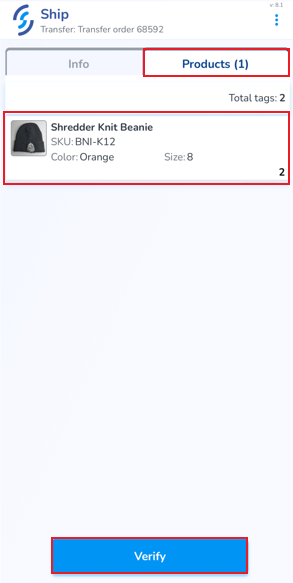
- To begin the verification process, click Verify
- Pair Bluetooth
The ordered items are now ready to be scanned to confirm accuracy.
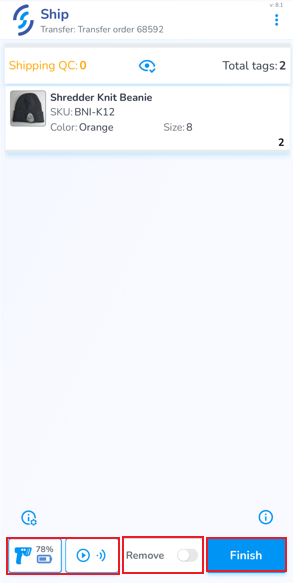
At the bottom of the screen are the Scan Settings and Auto-Scan button
The Remove switch removes scanned items from the order
Finish terminates the session
Scanning Incorrect Items
If an incorrect items is scanned, the word 'remove' appears at the top with the quantity to be removed, and the item(s) to be removed appears in red. Incorrect items must be removed before the scan session can be terminated
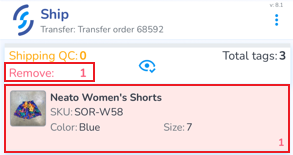
To remove incorrect items you can either:
- Slide the incorrect item to the left, then click on the trash can icon
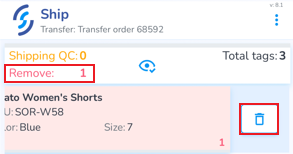
- Click 'Ok' to the pop-up prompt
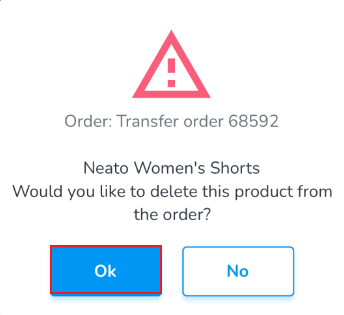
OR
- Enable the Remove scan option
- Scan the incorrect item(s)
Scanning Extra Items
If more items are scanned than are ordered, the 'remove' message appears, and the item with extra items will appear in red, and the number of extra items is displayed on the left
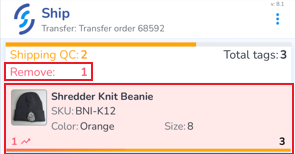
- Slide the item to the left, then tap the broom icon to clear all scans for the item
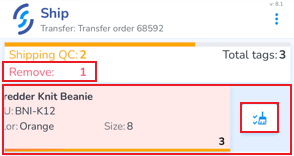
- Click 'Ok' to the pop-up prompt
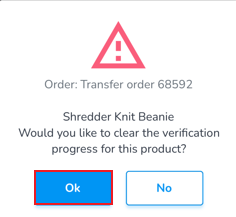
OR
- Enable the Remove scan option
- Scan only the items being removed
Complete Shipping Order
Correctly scanned items appear in green. The quantity scanned appears on the left, and the ordered quantity appears on the right. A yellow progress bar indicates if any items are missing.
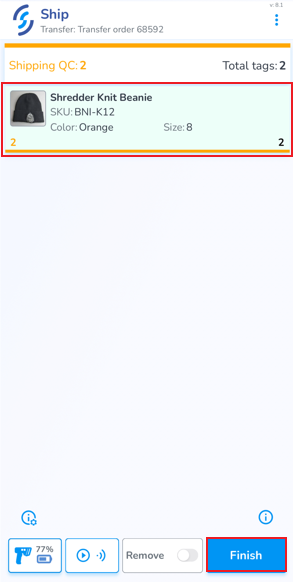
Once all items are scanned correctly & complete, click Finish
- Click 'Ok' to the pop-up prompt
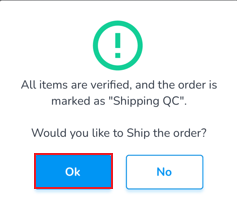
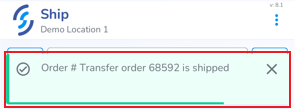
You will be returned back to the Ship orders list, and a toast pop-up will confirm the order is completed
Receive Transfer
Choose Location
If you have access to more than one physical location, confirm the Selected Location is correct. It will appear below 'Receive'
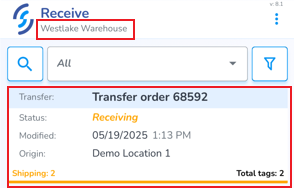
- Click on it to open it
Transfer Orders contain two tabs: Info & Products
The Info tab provides order details including status, origin, customer name, created & modified date, and a progress indicator at the bottom of the screen
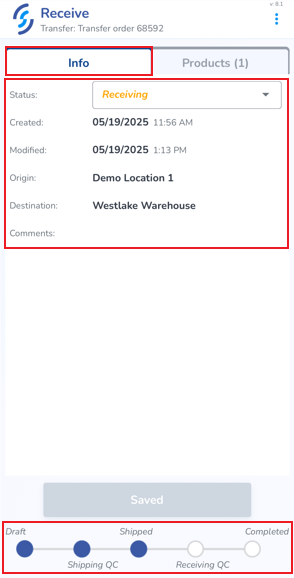
The second tab, Products displays the ordered item(s)
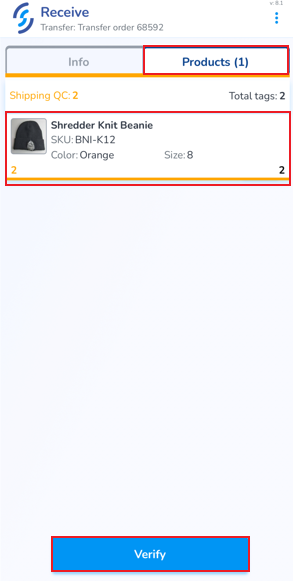
- Pair Bluetooth
- To begin the verification process, click Verify
The ordered items are now ready to be scanned to confirm accuracy. This process associates the serialized tags captured to the order and adds them to the destination inventory
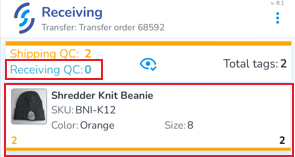
Correctly scanned items appear in green. The quantity scanned appears on the left, and the ordered quantity appears on the right. A blue progress bar indicates if any items are missing.
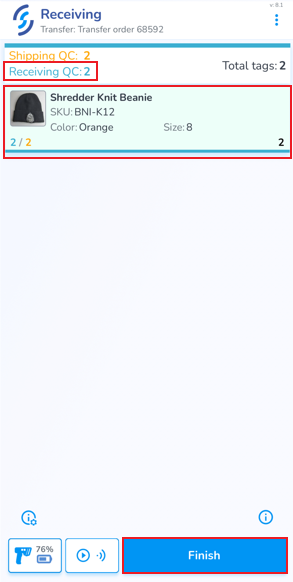
Click Finish to complete the Transfer receiving
- Click OK on the prompt
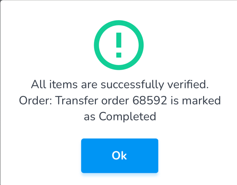
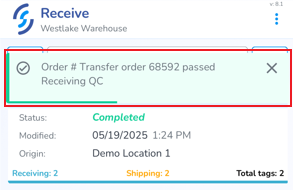
- A toast pop-up message will appear confirming the order has been received complete
Only the tags included in the order can be scanned at Transfer Receiving.
Verifying a partial order
If you want to complete an order that doesn't contain all the items originally intended, you can do so by finishing the verification, then moving the order to the next status manually via the web portal.
First, click Finish in the mobile app. You'll be warned that the order has unverified items. Click Ok to continue:
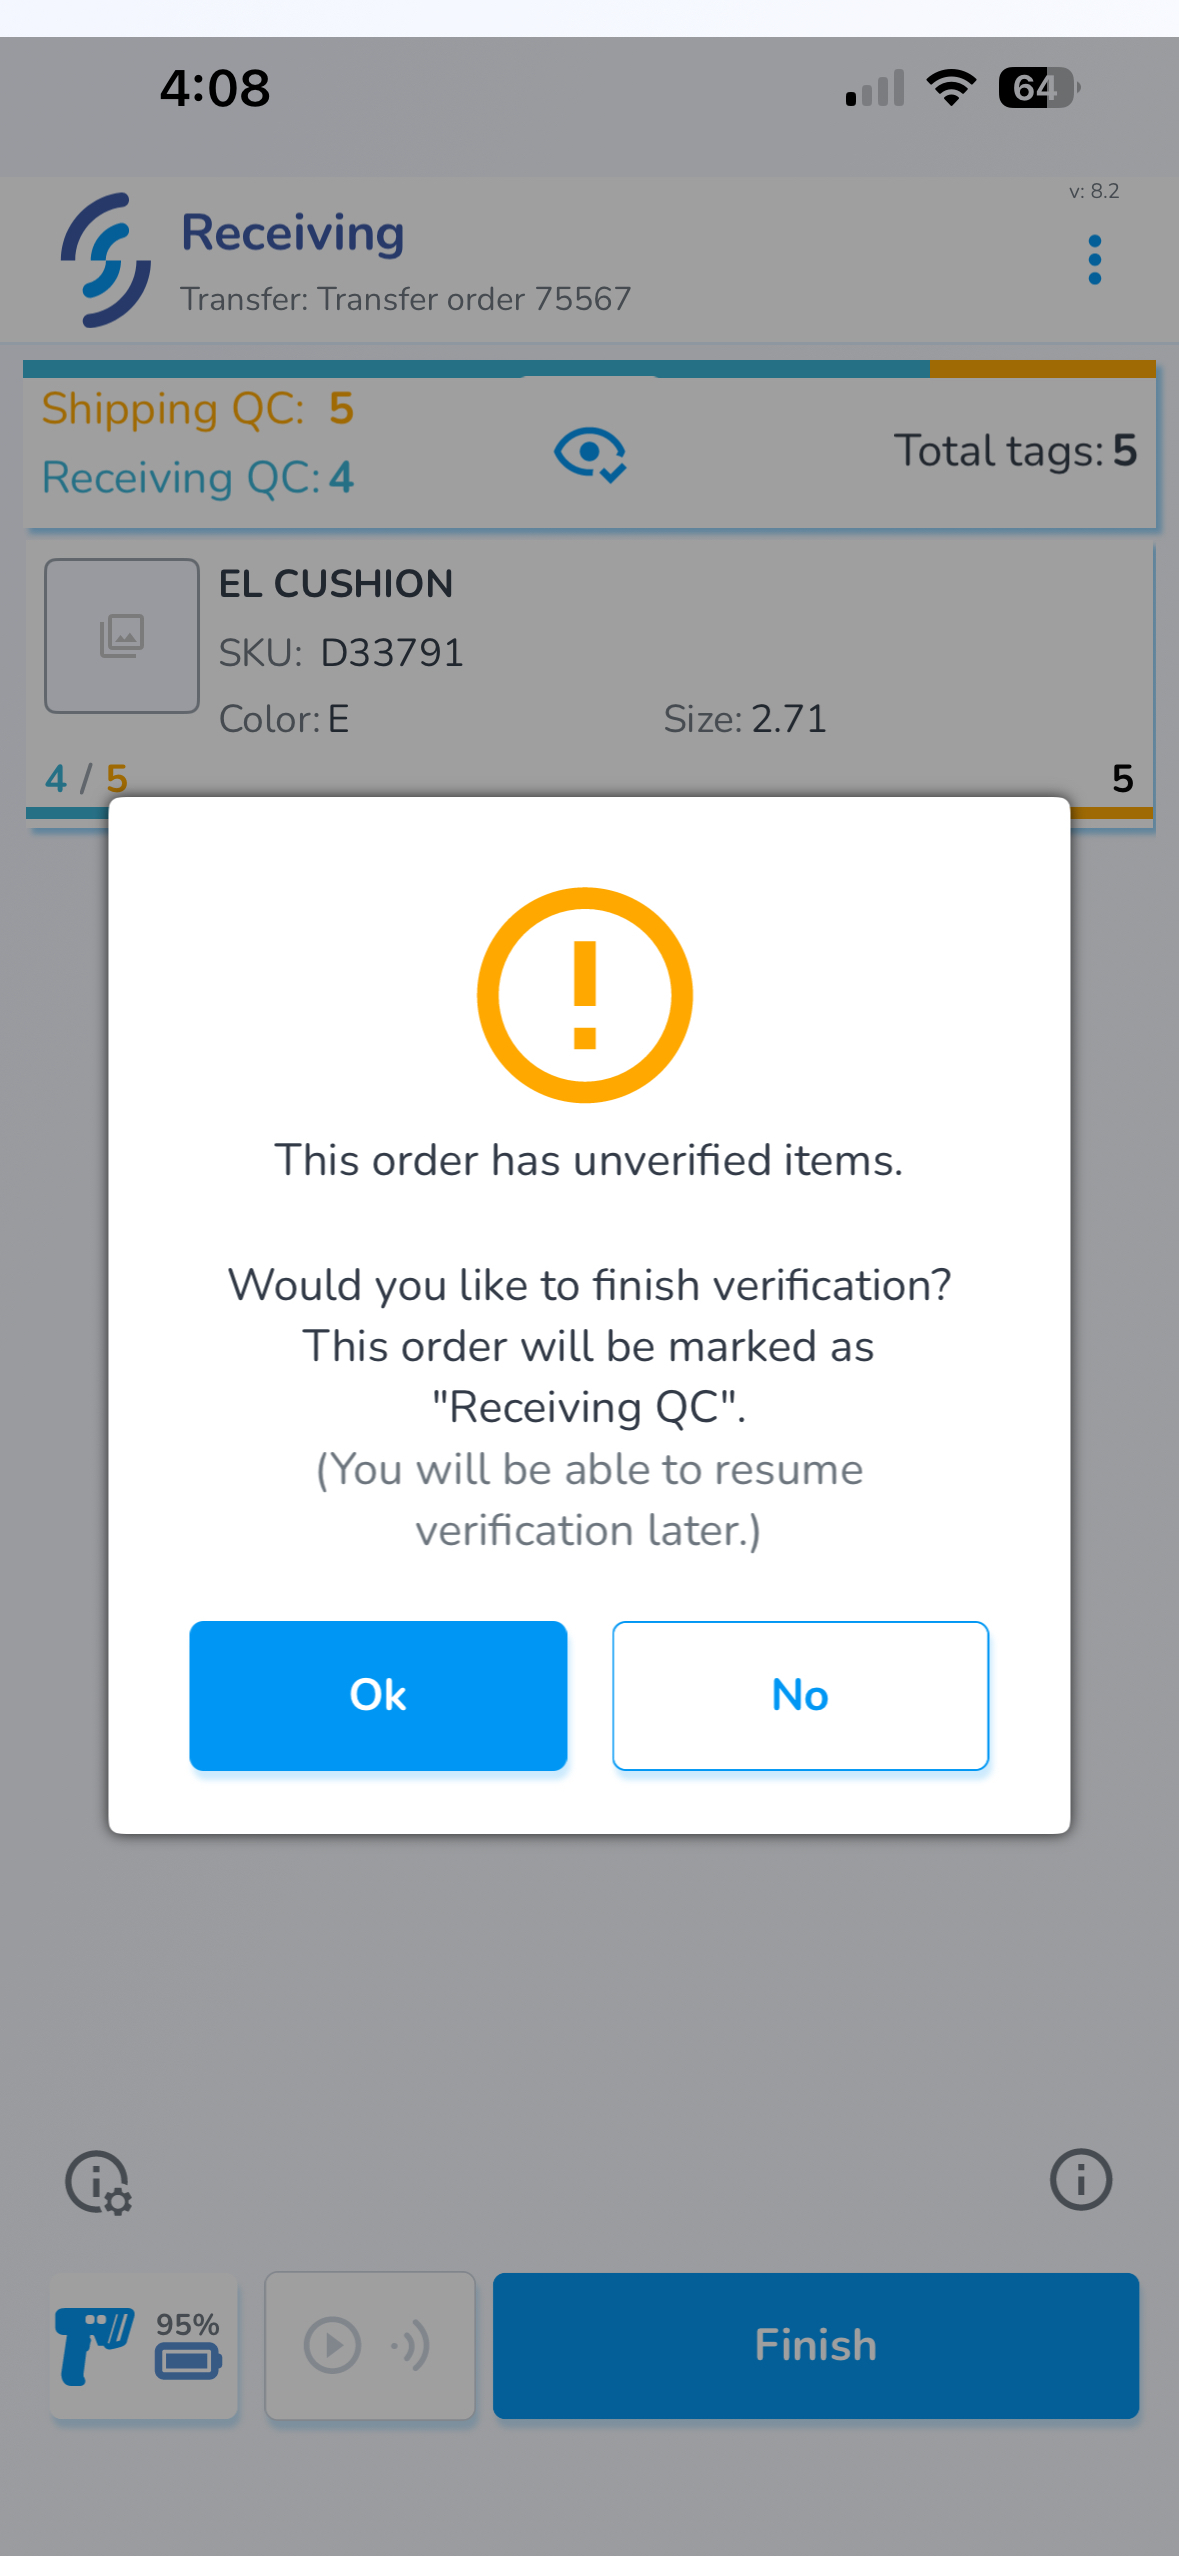
Then, from the web portal, select the order and change the status.
- If the order is outbound, and still needs to be verified at the destination, select Shipped/Receiving.
- If the order is inbound, and you are completing the Receiving verification, select Completed.
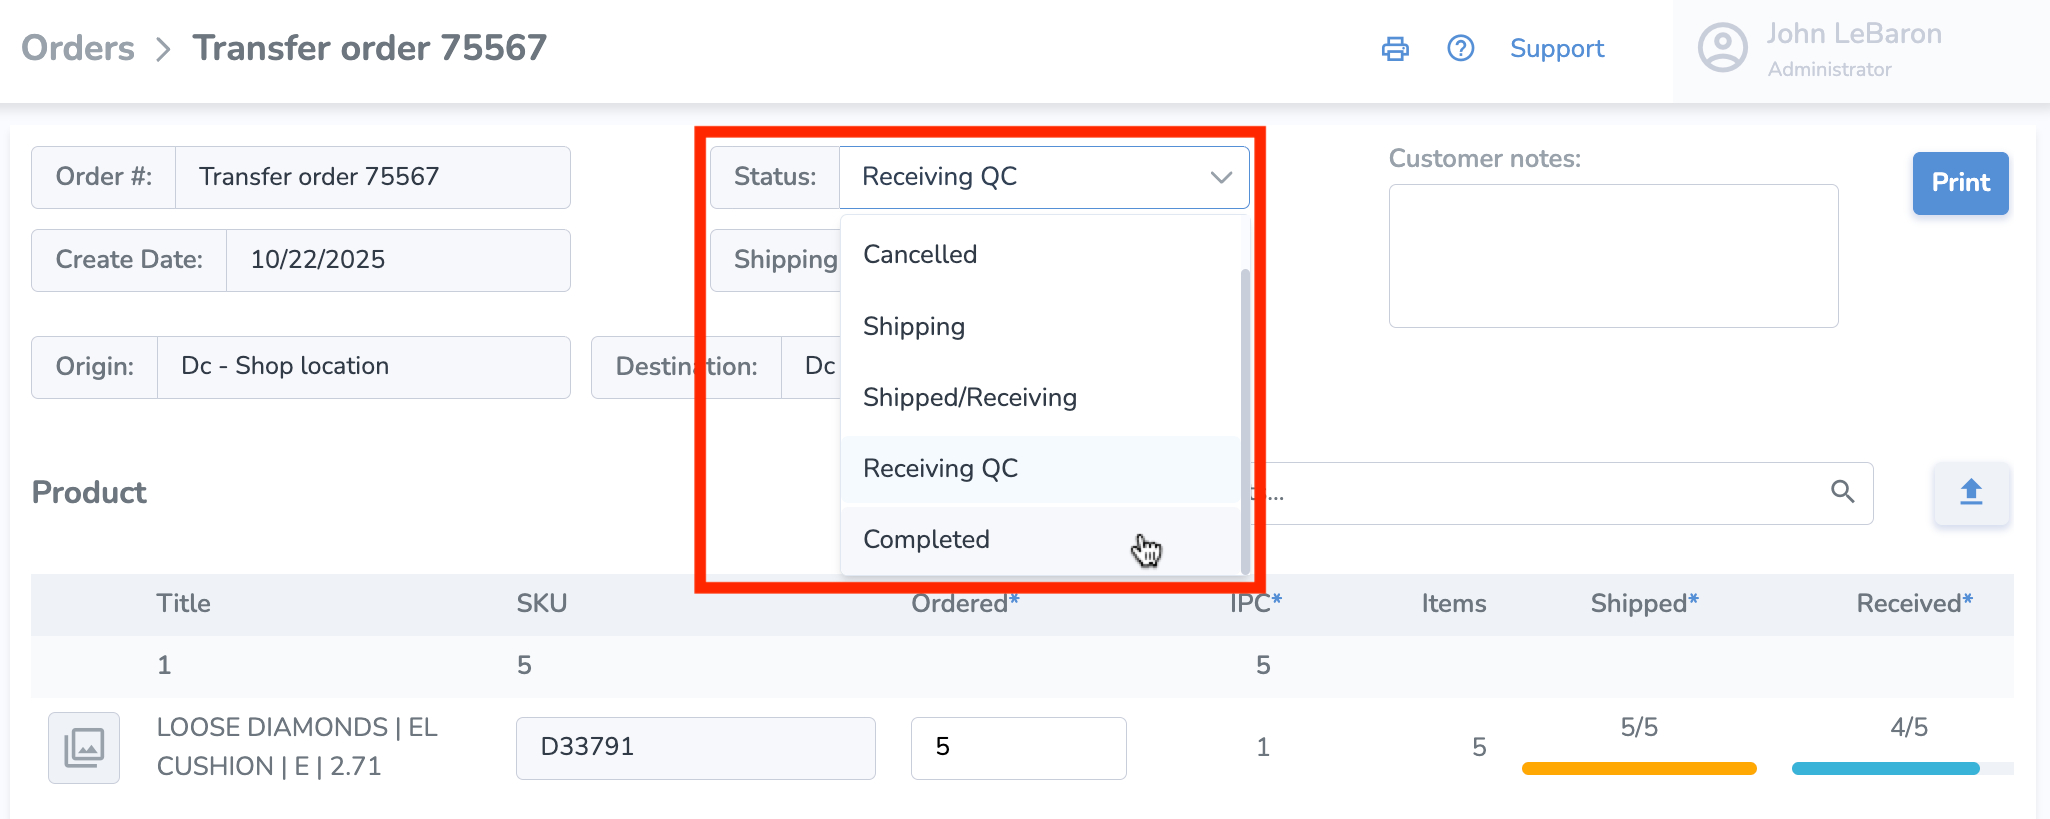
Finally, click Save to finalize your changes.
Mobile App: Create Transfer by Scanning from the Mobile
Create from Mobile
Create a transfer order by scanning items
Transfer Orders can be created from the web or the mobile app, however creating them from the mobile is disabled by default. To enable, navigate to the Application Settings in the Ship section
At the bottom of the Ship menu click the 'Create new transfer' button to create

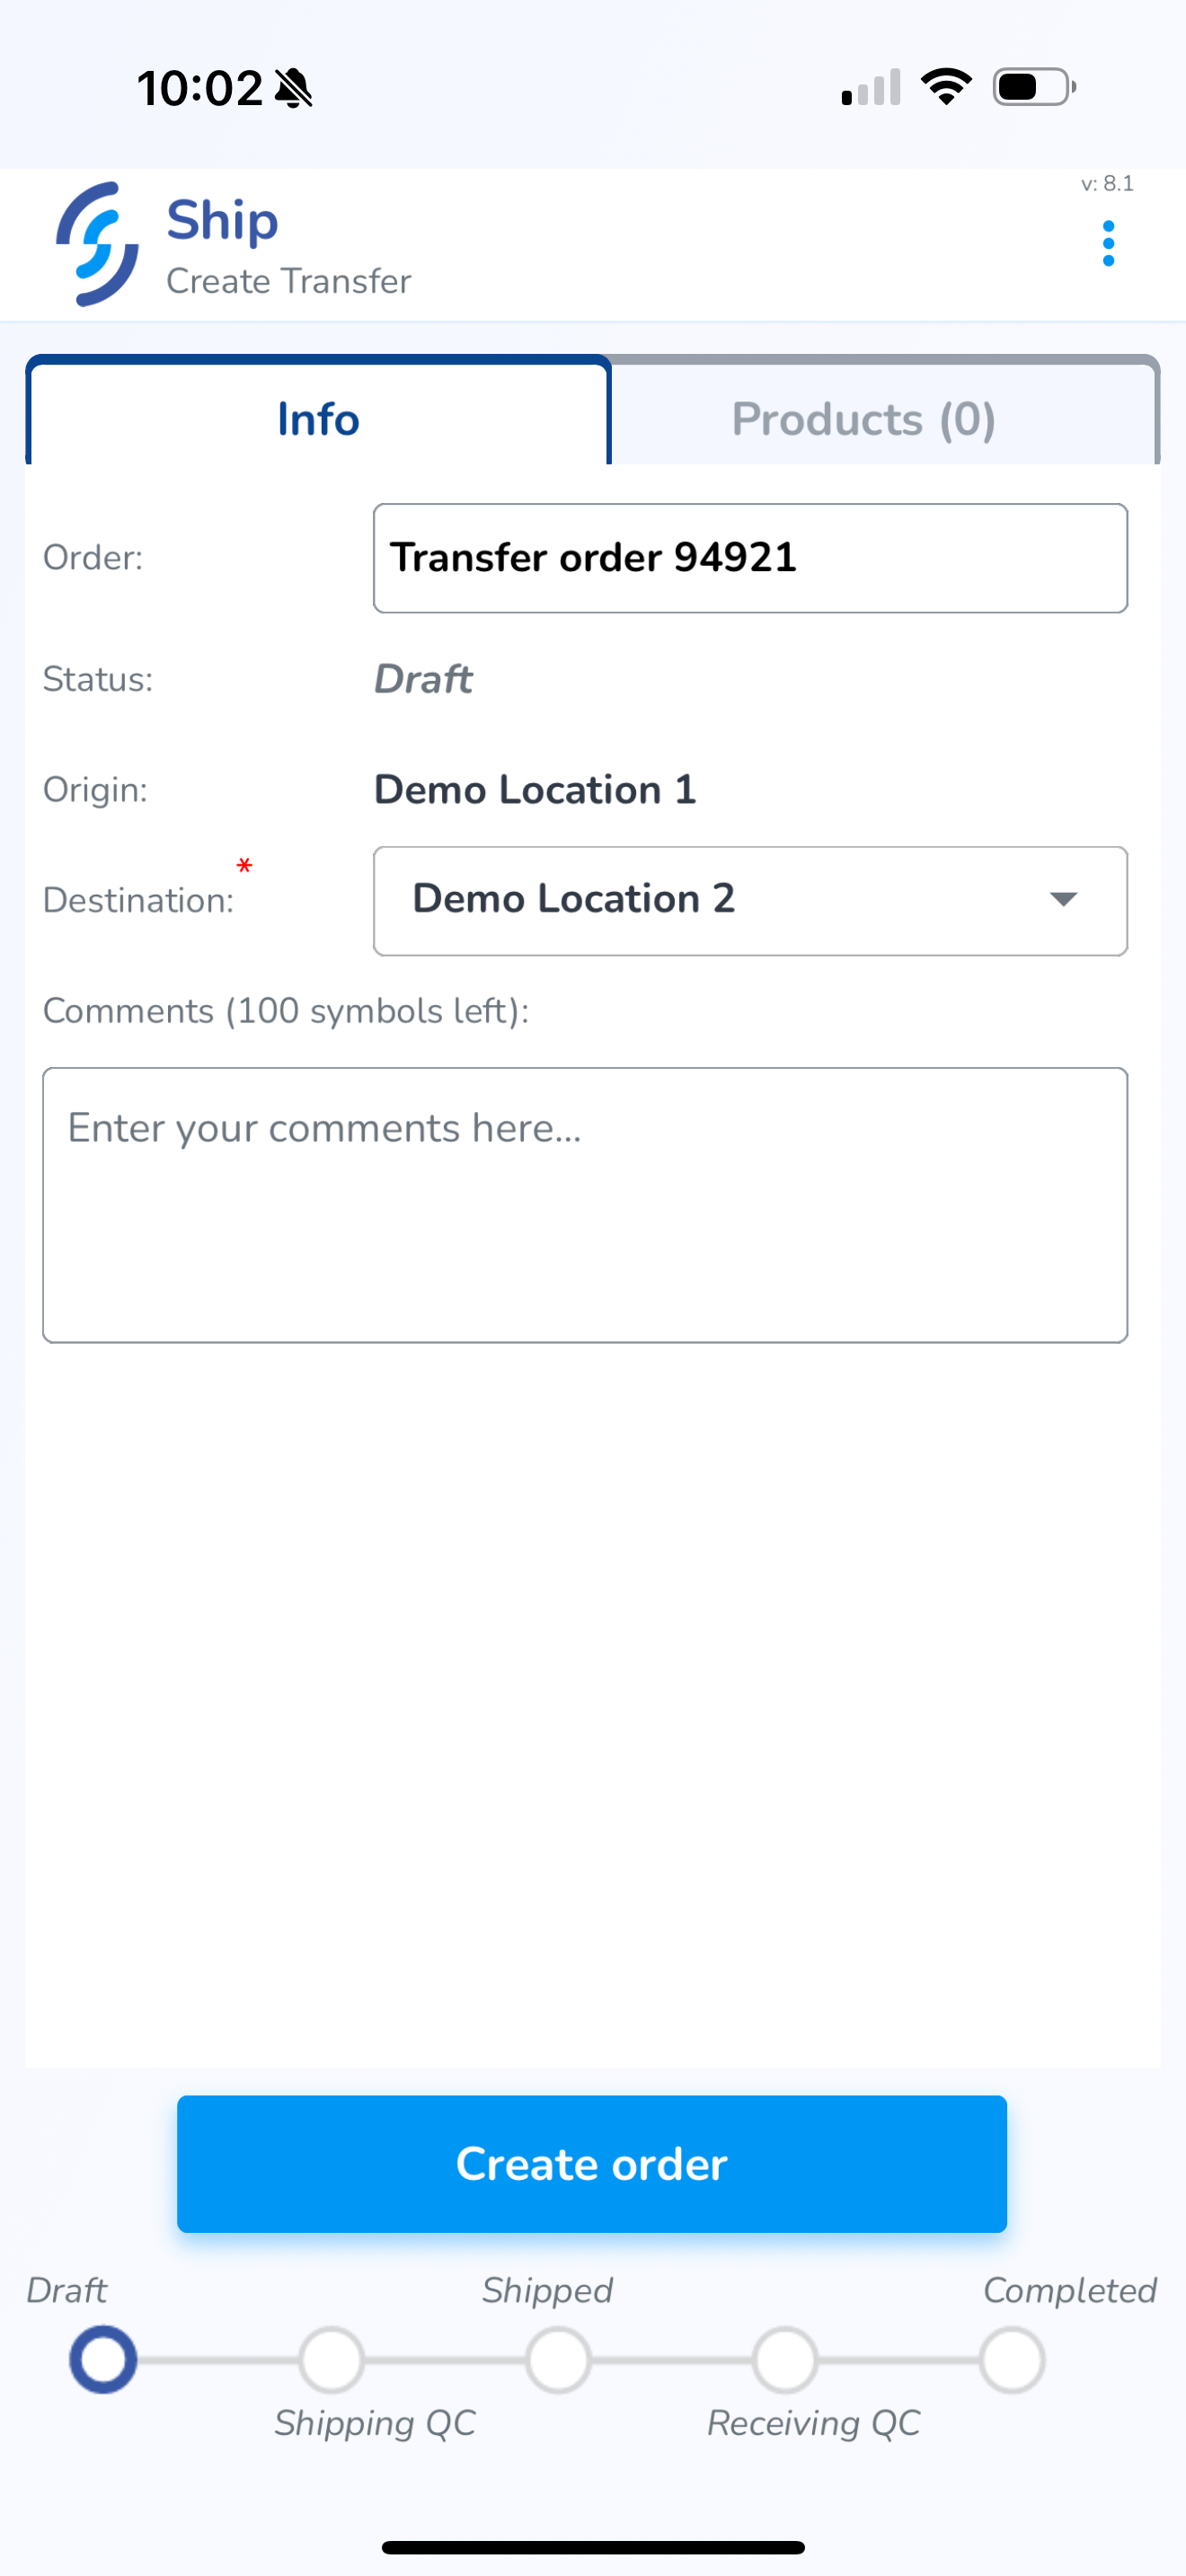
Info
- Choose the location you are sending the transfer
- Enter any notes you wish to include in the Comments section
Products
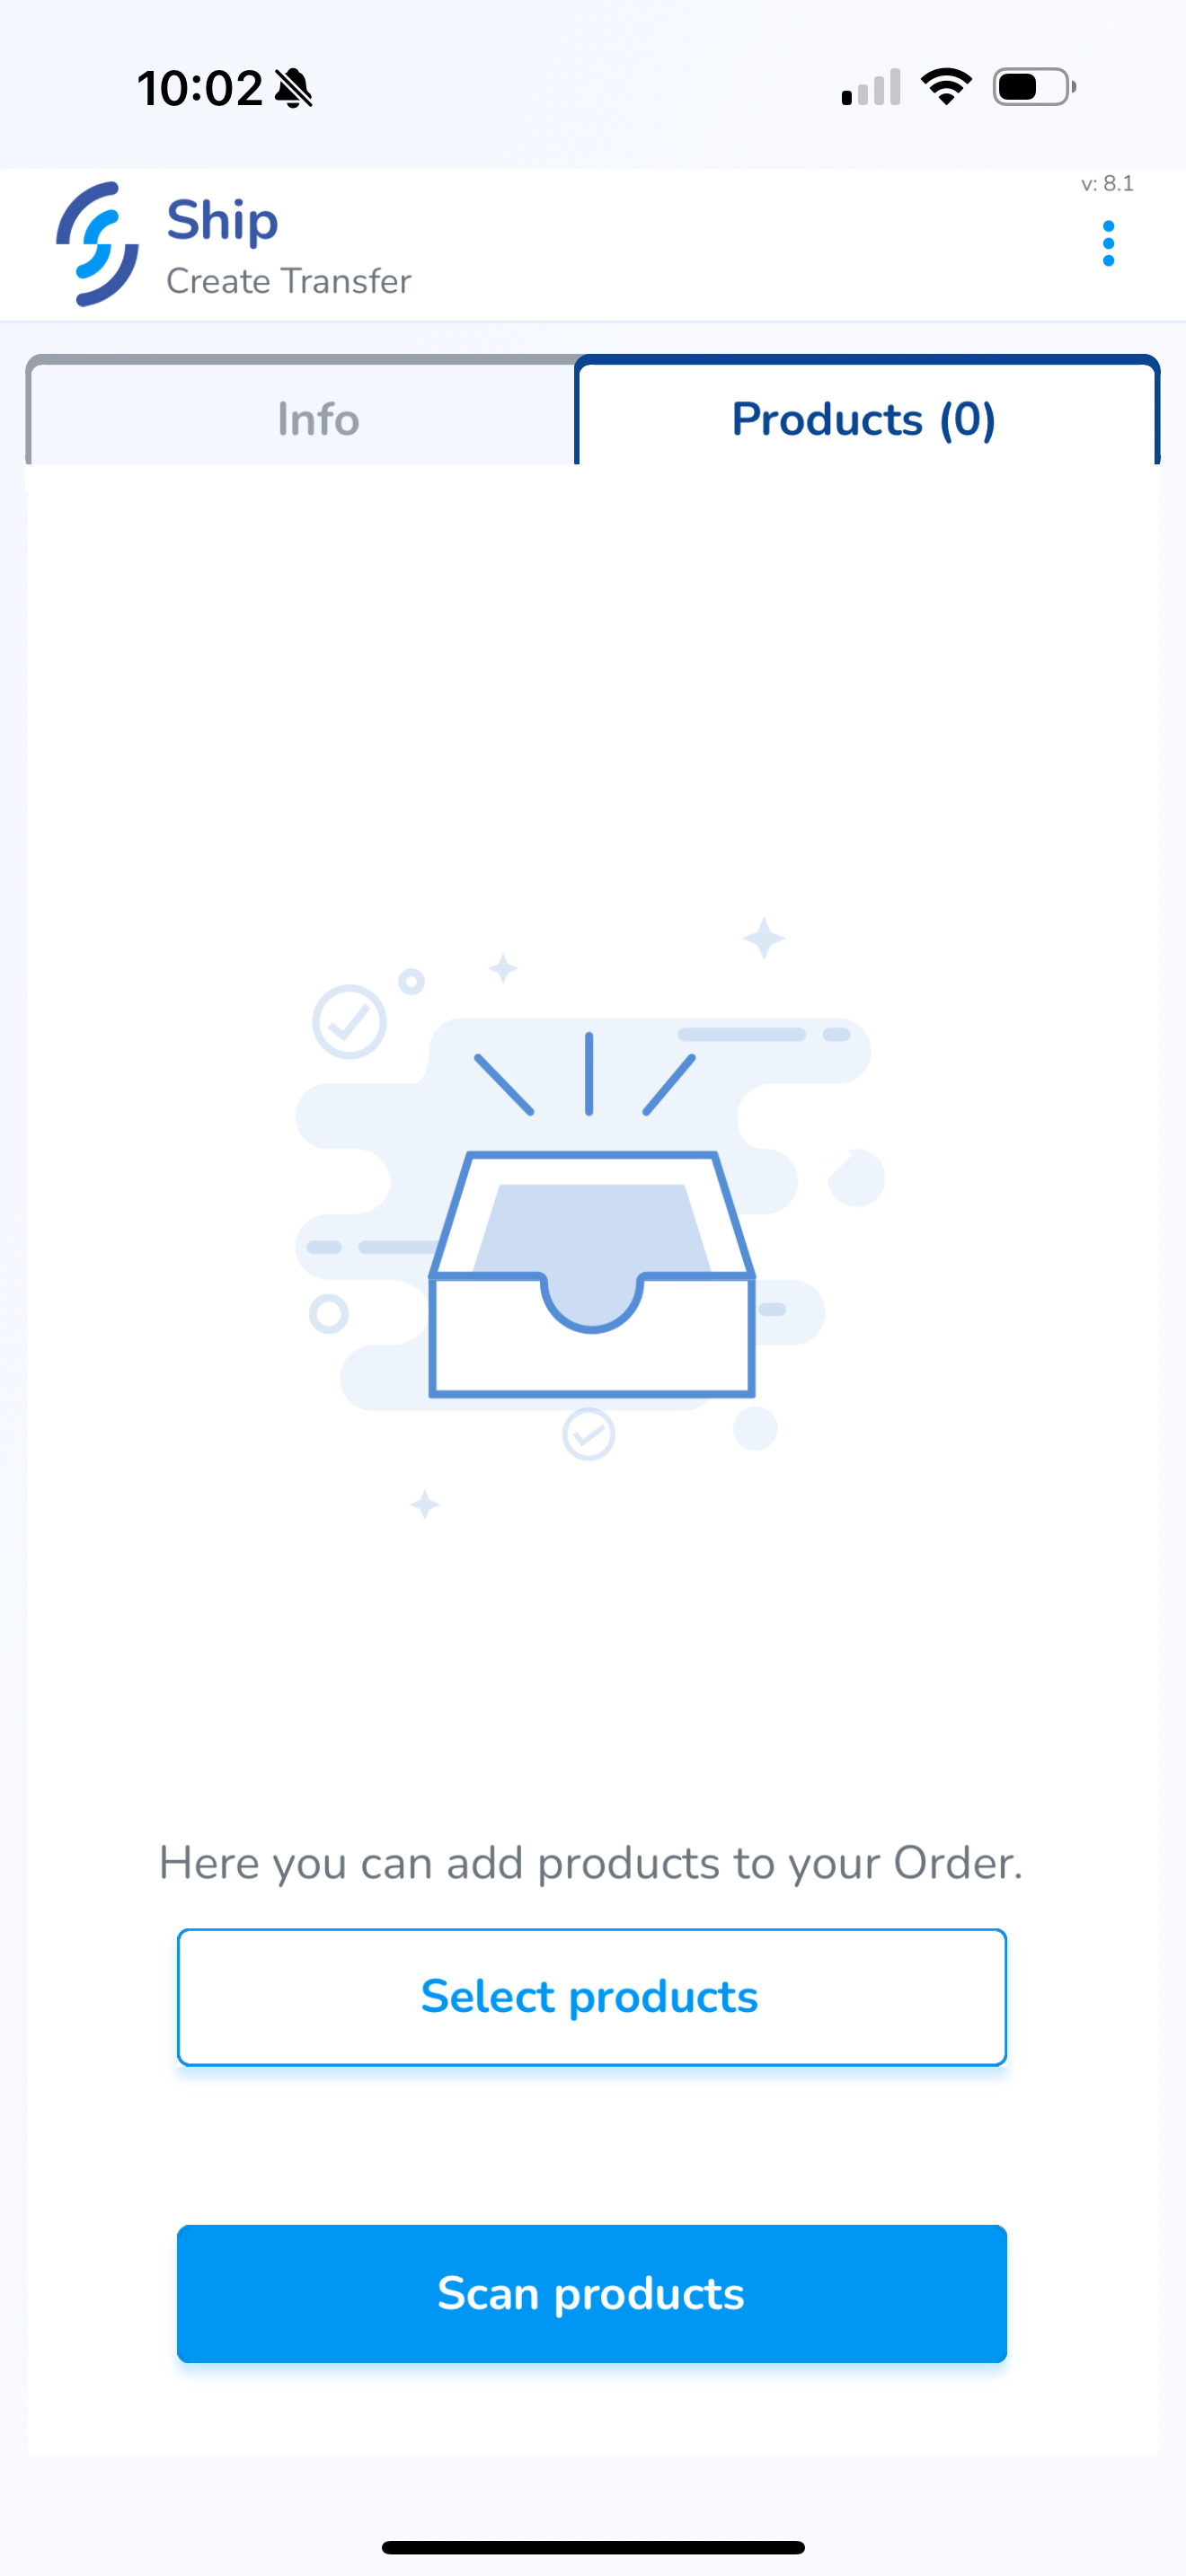
Click on the Products tab
Scan Products
Click Scan Products
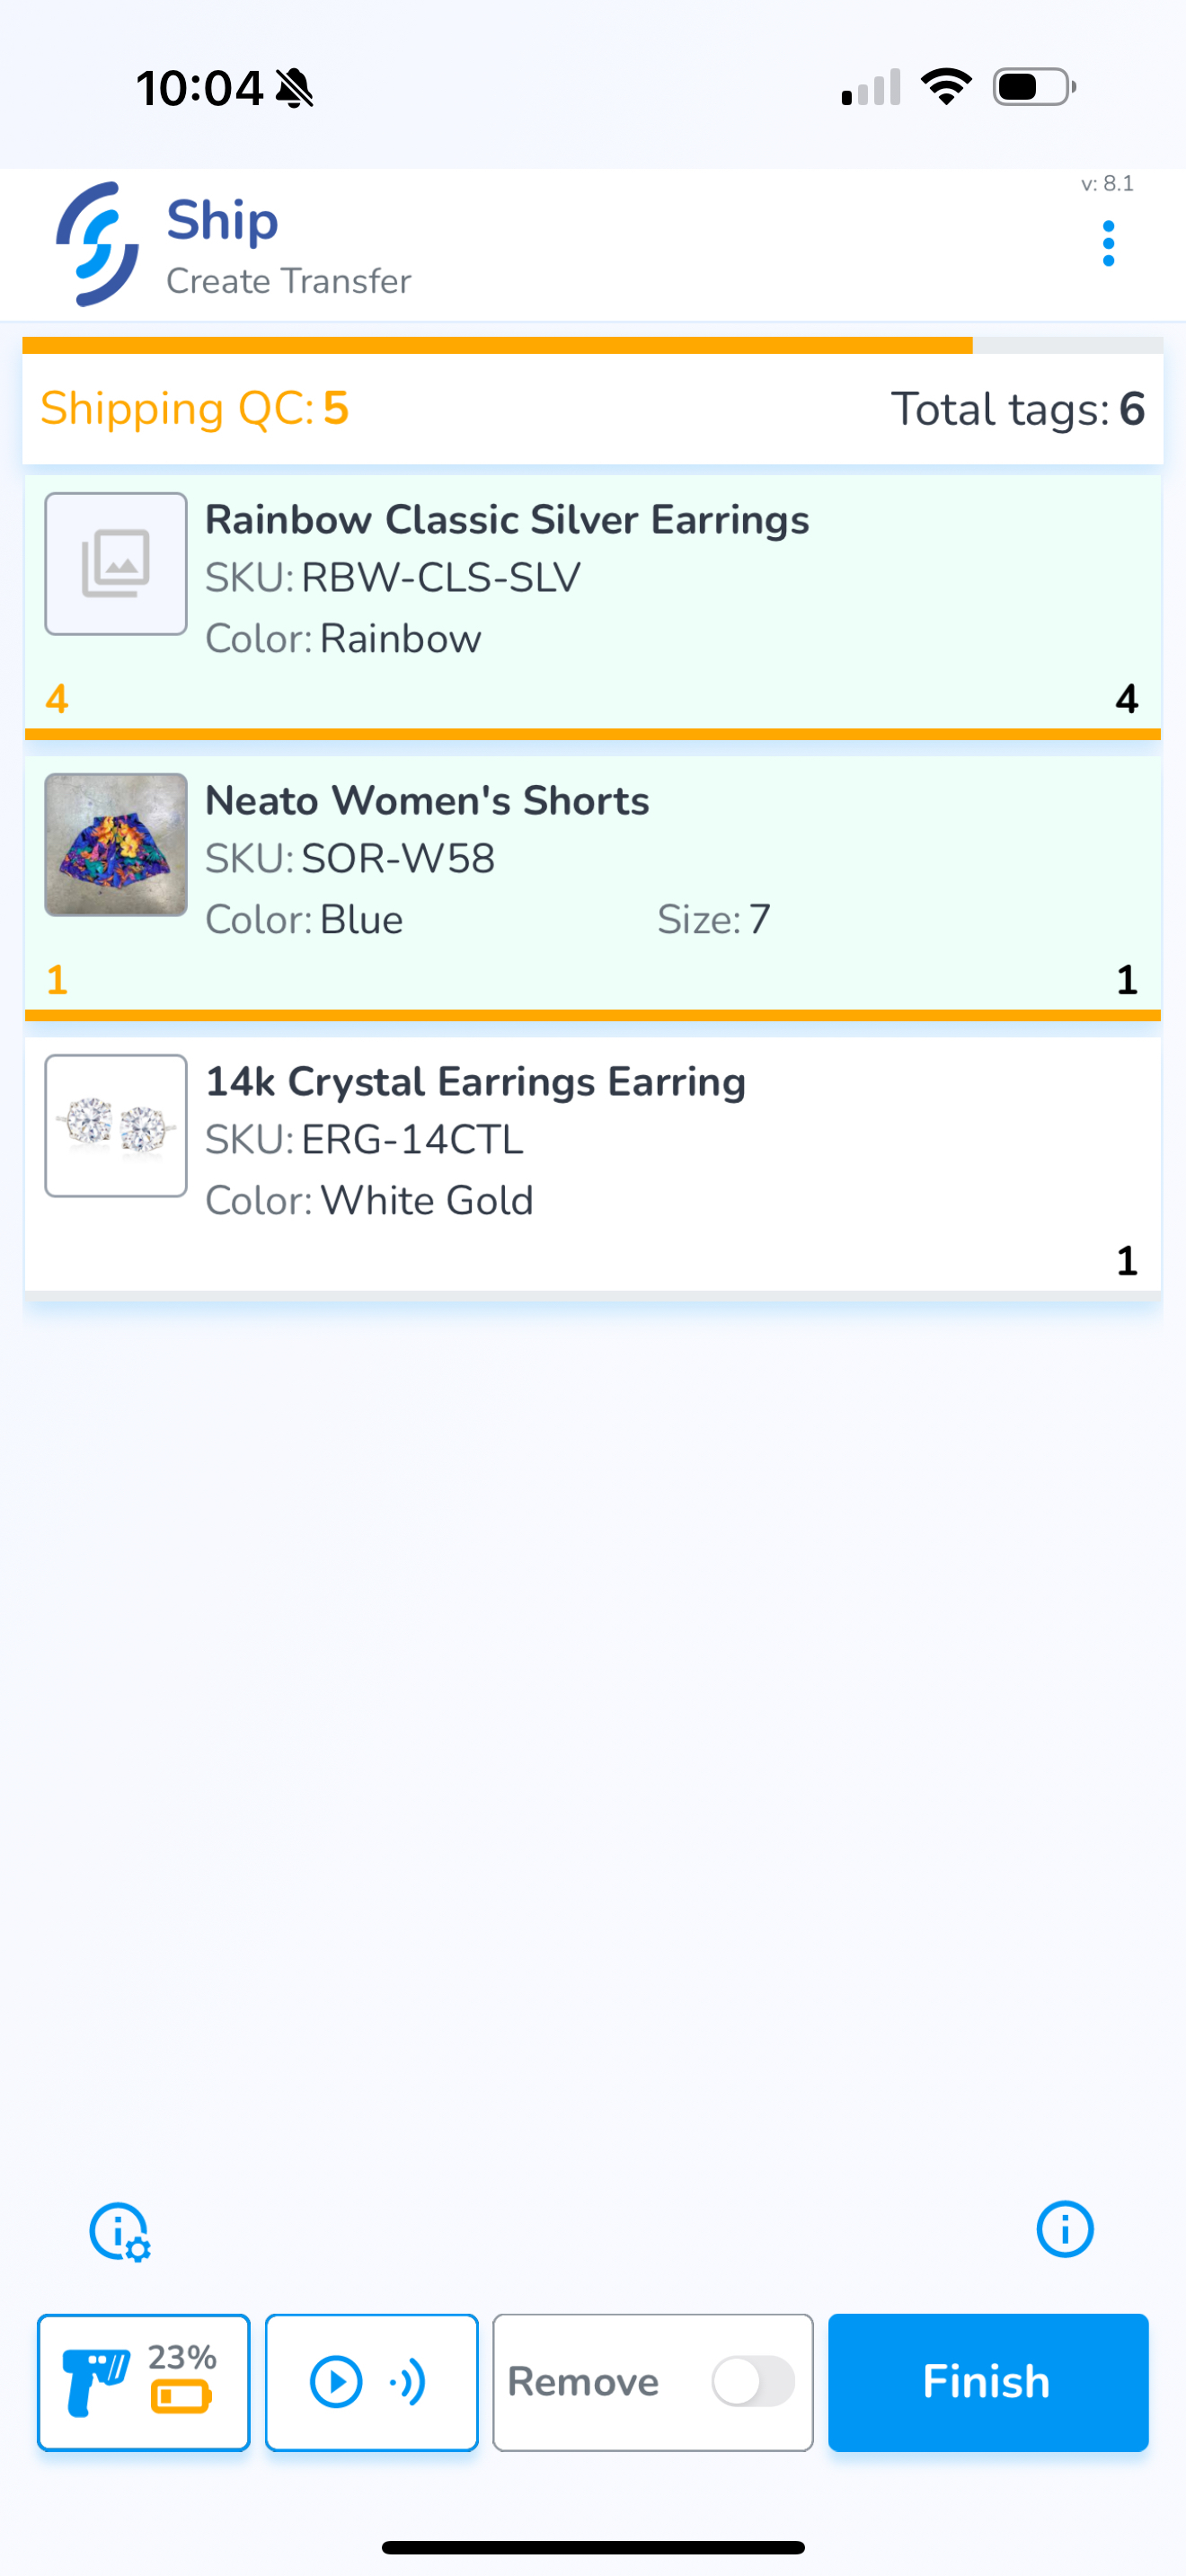
Adding items via the Scan method adds items & quantities scanned to the order
Mobile App: Receive Menu (Purchase Orders & Transfers)
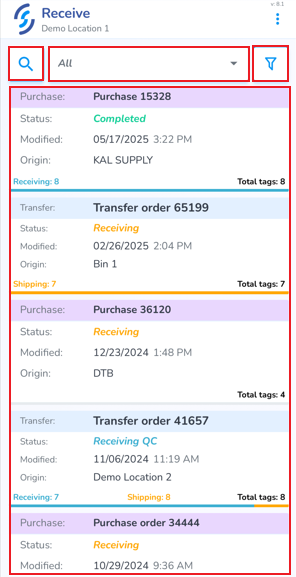
From the Receive screen contains the following tools to help locate your order:
- Search
- Status drop-down
- Filter menu
Below these filters are the orders
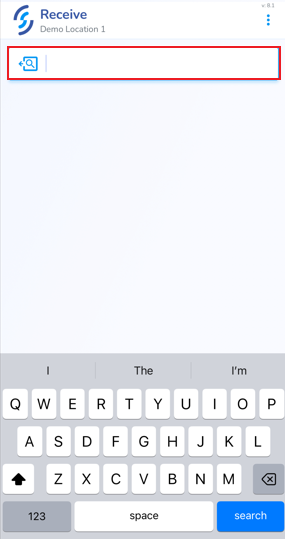
Search
- Click on the search window to lookup a specific order
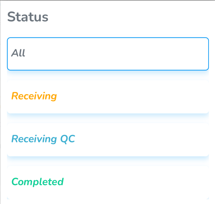
Status Drop-down
- Use the Status drop-down to choose a specific status
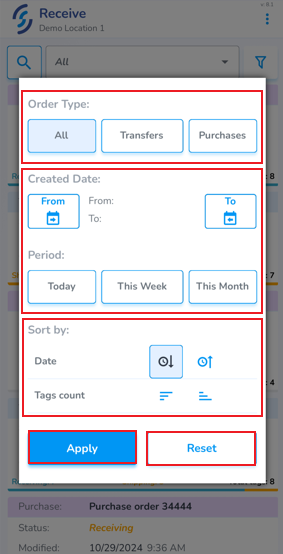
Filter Menu
Click on the funnel icon to view the filter menu
- Order Type allows to view all order types, or only view Transfers and/or Purchases
- Created Date allows to choose from and to dates to display orders from a specific timeframe
- Period provides quick filters to display today, this week & this month
- Sort by allows to sort oldest to newest, and Tags count from largest to smallest
- Click Apply to save the settings
- Click Reset to remove the saved filter
Mobile App: Verify Receipt of Purchase Orders
Purchase Orders can be scanned to verify the physical items match the ordered items. This verification process is called QC or Quality Control
Purchase Orders must first be created in the web portal, and moved to Receiving status, to appear on the mobile app
To verify a Purchase Order click the Receive icon from the Home screen

If you have access to more than one physical location, confirm the Selected Location is correct. It will appear below 'Receive'
Locate & Open Order
From the Receive tab you will see the Purchase Orders. Locate the order you are receiving
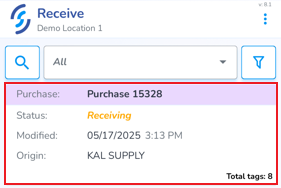
- Click on it to open it
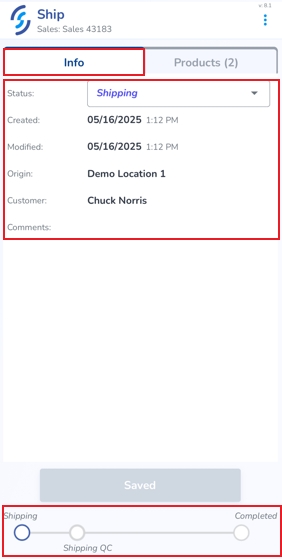
Purchase Orders contain two tabs: Info & Products
The Info tab provides order details including status, origin, customer name, created & modified date, and a progress indicator at the bottom of the screen
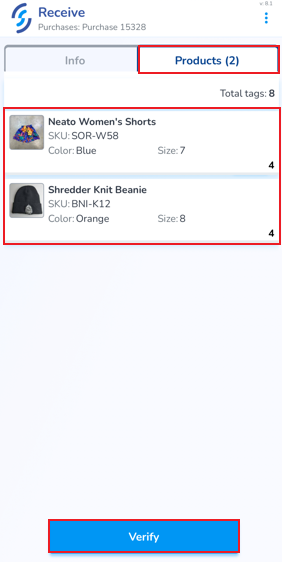
The second tab, Products displays the ordered item(s)
TSL Readers: Pair Bluetooth
- To begin the verification process, click Verify
Scan Labels
Correctly scanned items appear in green. The quantity scanned appears on the left, and the ordered quantity appears on the right. A blue progress bar indicates if any items are missing. Items are filtered for uniqueness by serial number, and therefore items already received cannot be added again.
In the event of a purchase order arriving short, the system will add the received quantities and keep the order open.
To begin scanning either:
- Pull the trigger or press the Auto-scan button reader controls Scan Settings and Auto-Scan at the bottom of the screen .
- If you haven't enabled the setting "Ignore Non Order Products", you may need to Remove items. The switcher allows you to toggle between adding and removing items from the order
- Finish terminates the session
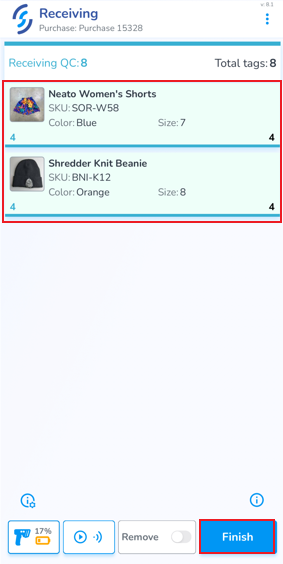
- Once items are scanned click Finish
- Click 'Ok' to the pop-up prompt
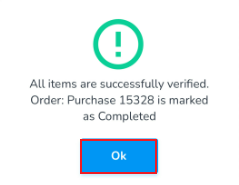
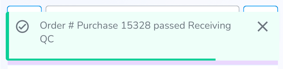
You will be returned back to the Receive orders list, and a toast pop-up will confirm the order as accurate
We recommend enabling the setting "Ignore Non Order Products" located in the Application Settings. Enabling this setting only displays related products with new serial numbers which have not yet been received. If the setting is enabled, the scanner will never capture products which aren't related to the order, and therefor the Remove function becomes less important.
Remove Incorrect Items
If an incorrect item is scanned, the word 'remove' appears at the top with the quantity to be removed, and the item to be removed appear in red. Incorrect items must be removed before the scan session can be completed
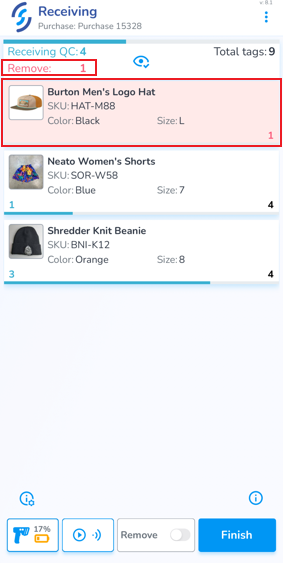
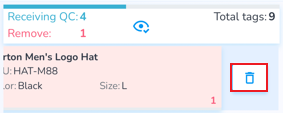
To remove incorrect items you can either:
- Slide the incorrect item to the left, then click on the trash can icon
- Click 'Ok' to the pop-up prompt
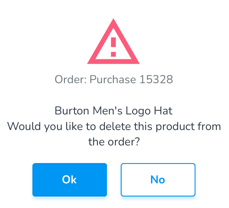
OR
- Enable the Remove scan option
- Scan the incorrect item(s)
Remove Extra Items
If more items are scanned than are ordered, the 'remove' message appears, and the item with extra items will appear in red, and the number of extra items is displayed on the left
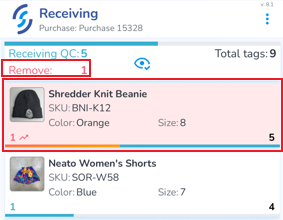
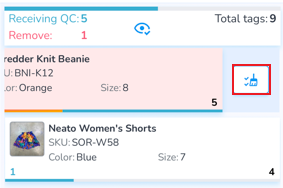
- Slide the item to the left, then tap the broom icon to clear all scans for the item
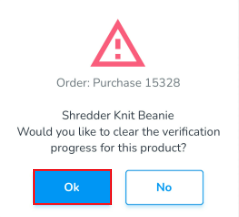
- Click 'Ok' to the pop-up prompt
OR
- Enable the Remove scan option
- Scan only the items being removed
Mobile App: Write Tags
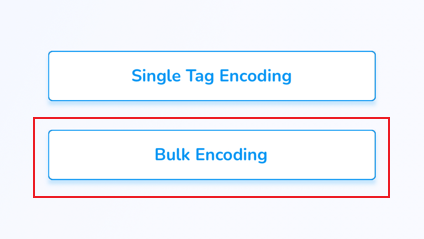
- Single Tag Encoding is designed for programming one tag at a time and is ideal when you only need to encode a small number of tags.
- Bulk Encoding is intended for programming multiple loose RFID tags with the same product information. Use this method when you have a larger quantity of unassigned tags that all need to be encoded for the same product, and the tags are isolated from other tags.
Choose the encoding method that best matches the number of tags you need to program and your workflow.
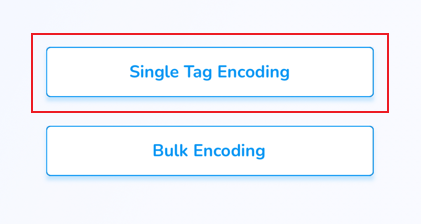
Single Tag Encoding
Use this option when needing to program a small number of tags
Click Single Tag Encoding
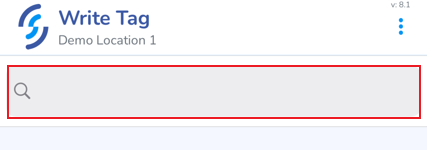
This will open the Search window
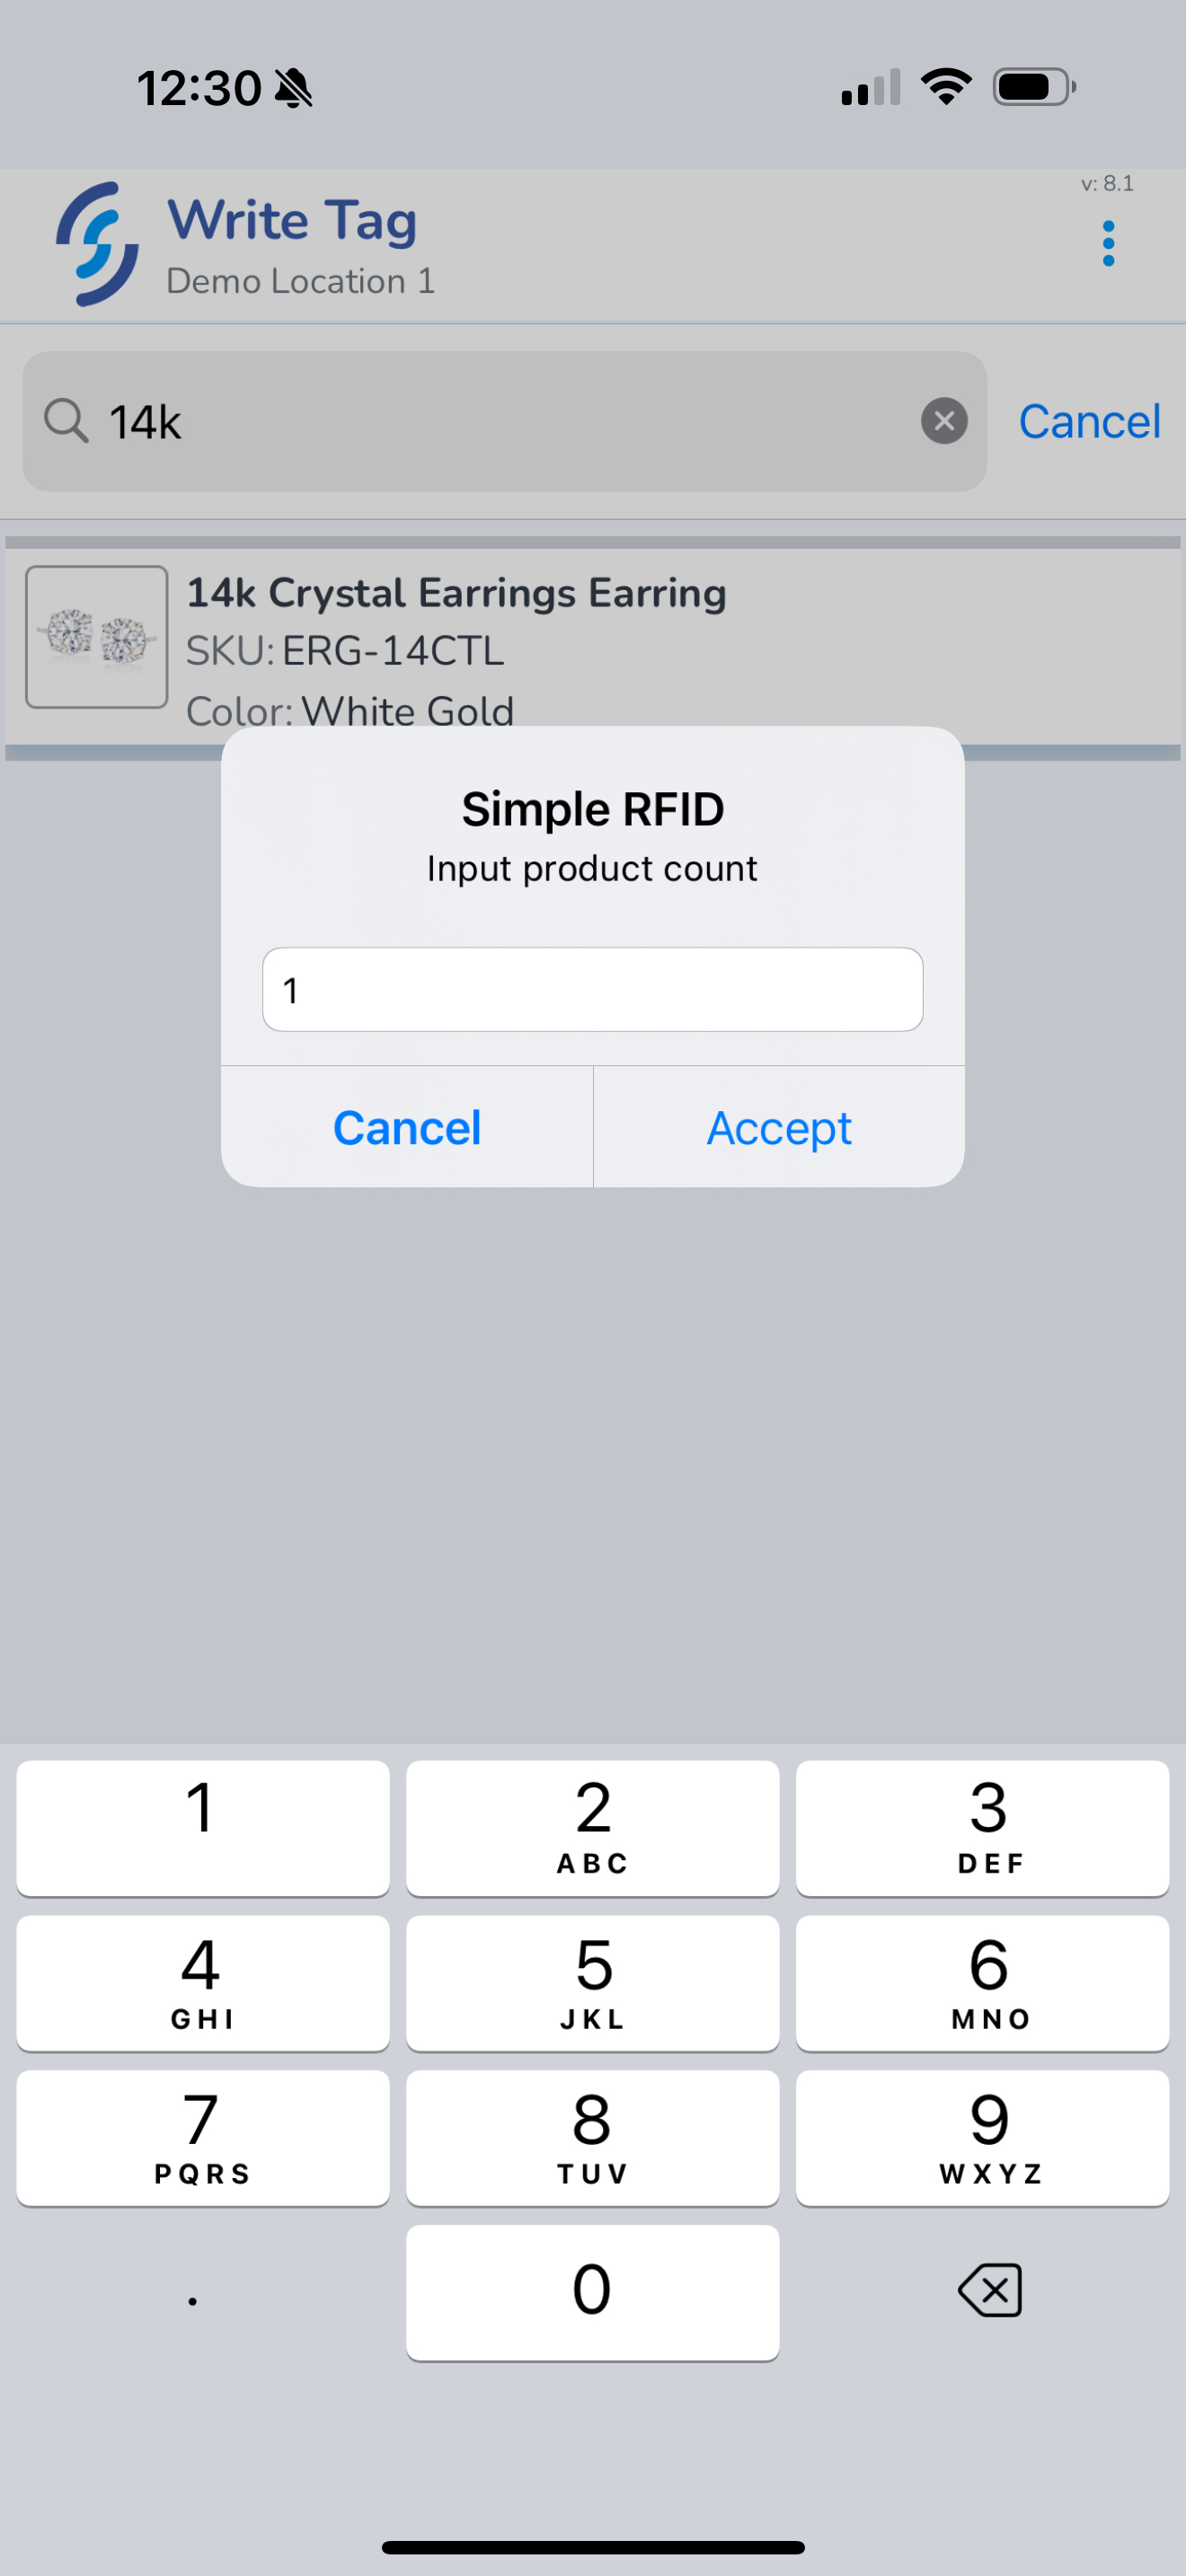
Enter the desired quantity of items you wish to encode
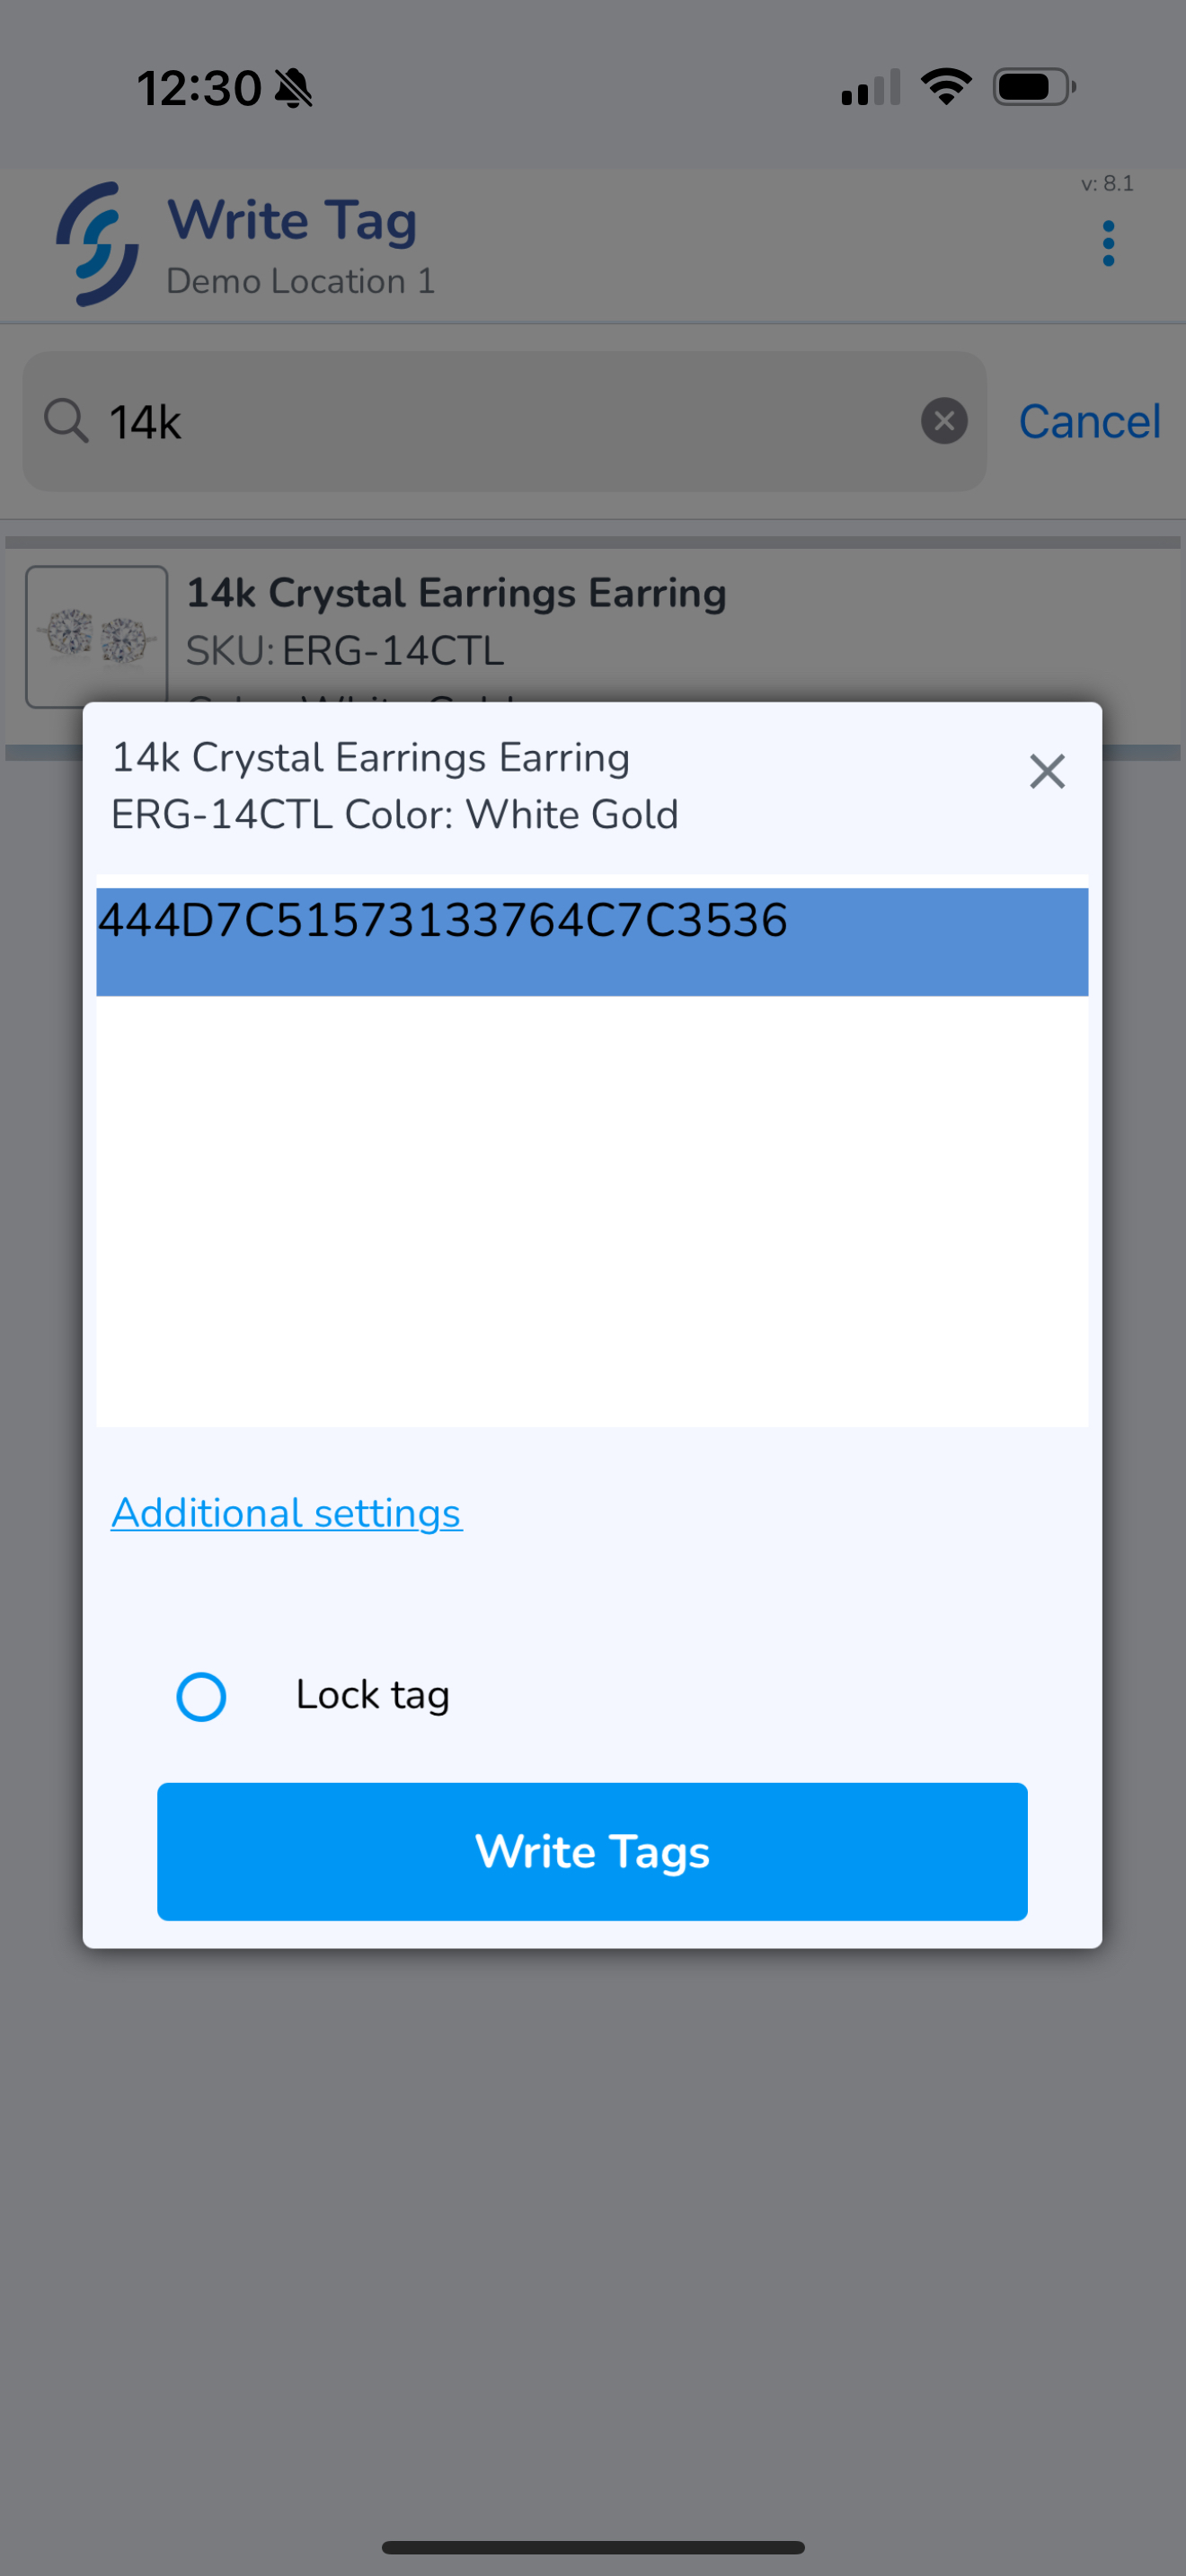
Adding Tag Level Properties
Click the "Additional settings" button to open tag level properties which can then be set including:
- SN (Serial Number)
- Expiration Date
- Lot Number
- Cost
- Sell By
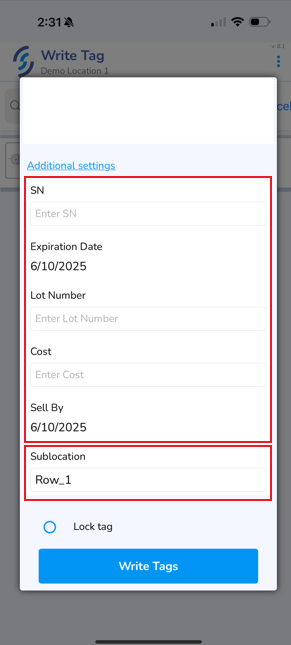
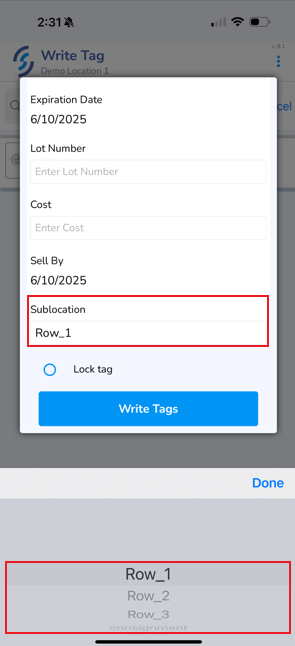
- Sublocation
The Sublocation is a drop-down and the values can be created from the Location Framework section of the web portal.
- Pull the trigger or click the Write Tags button
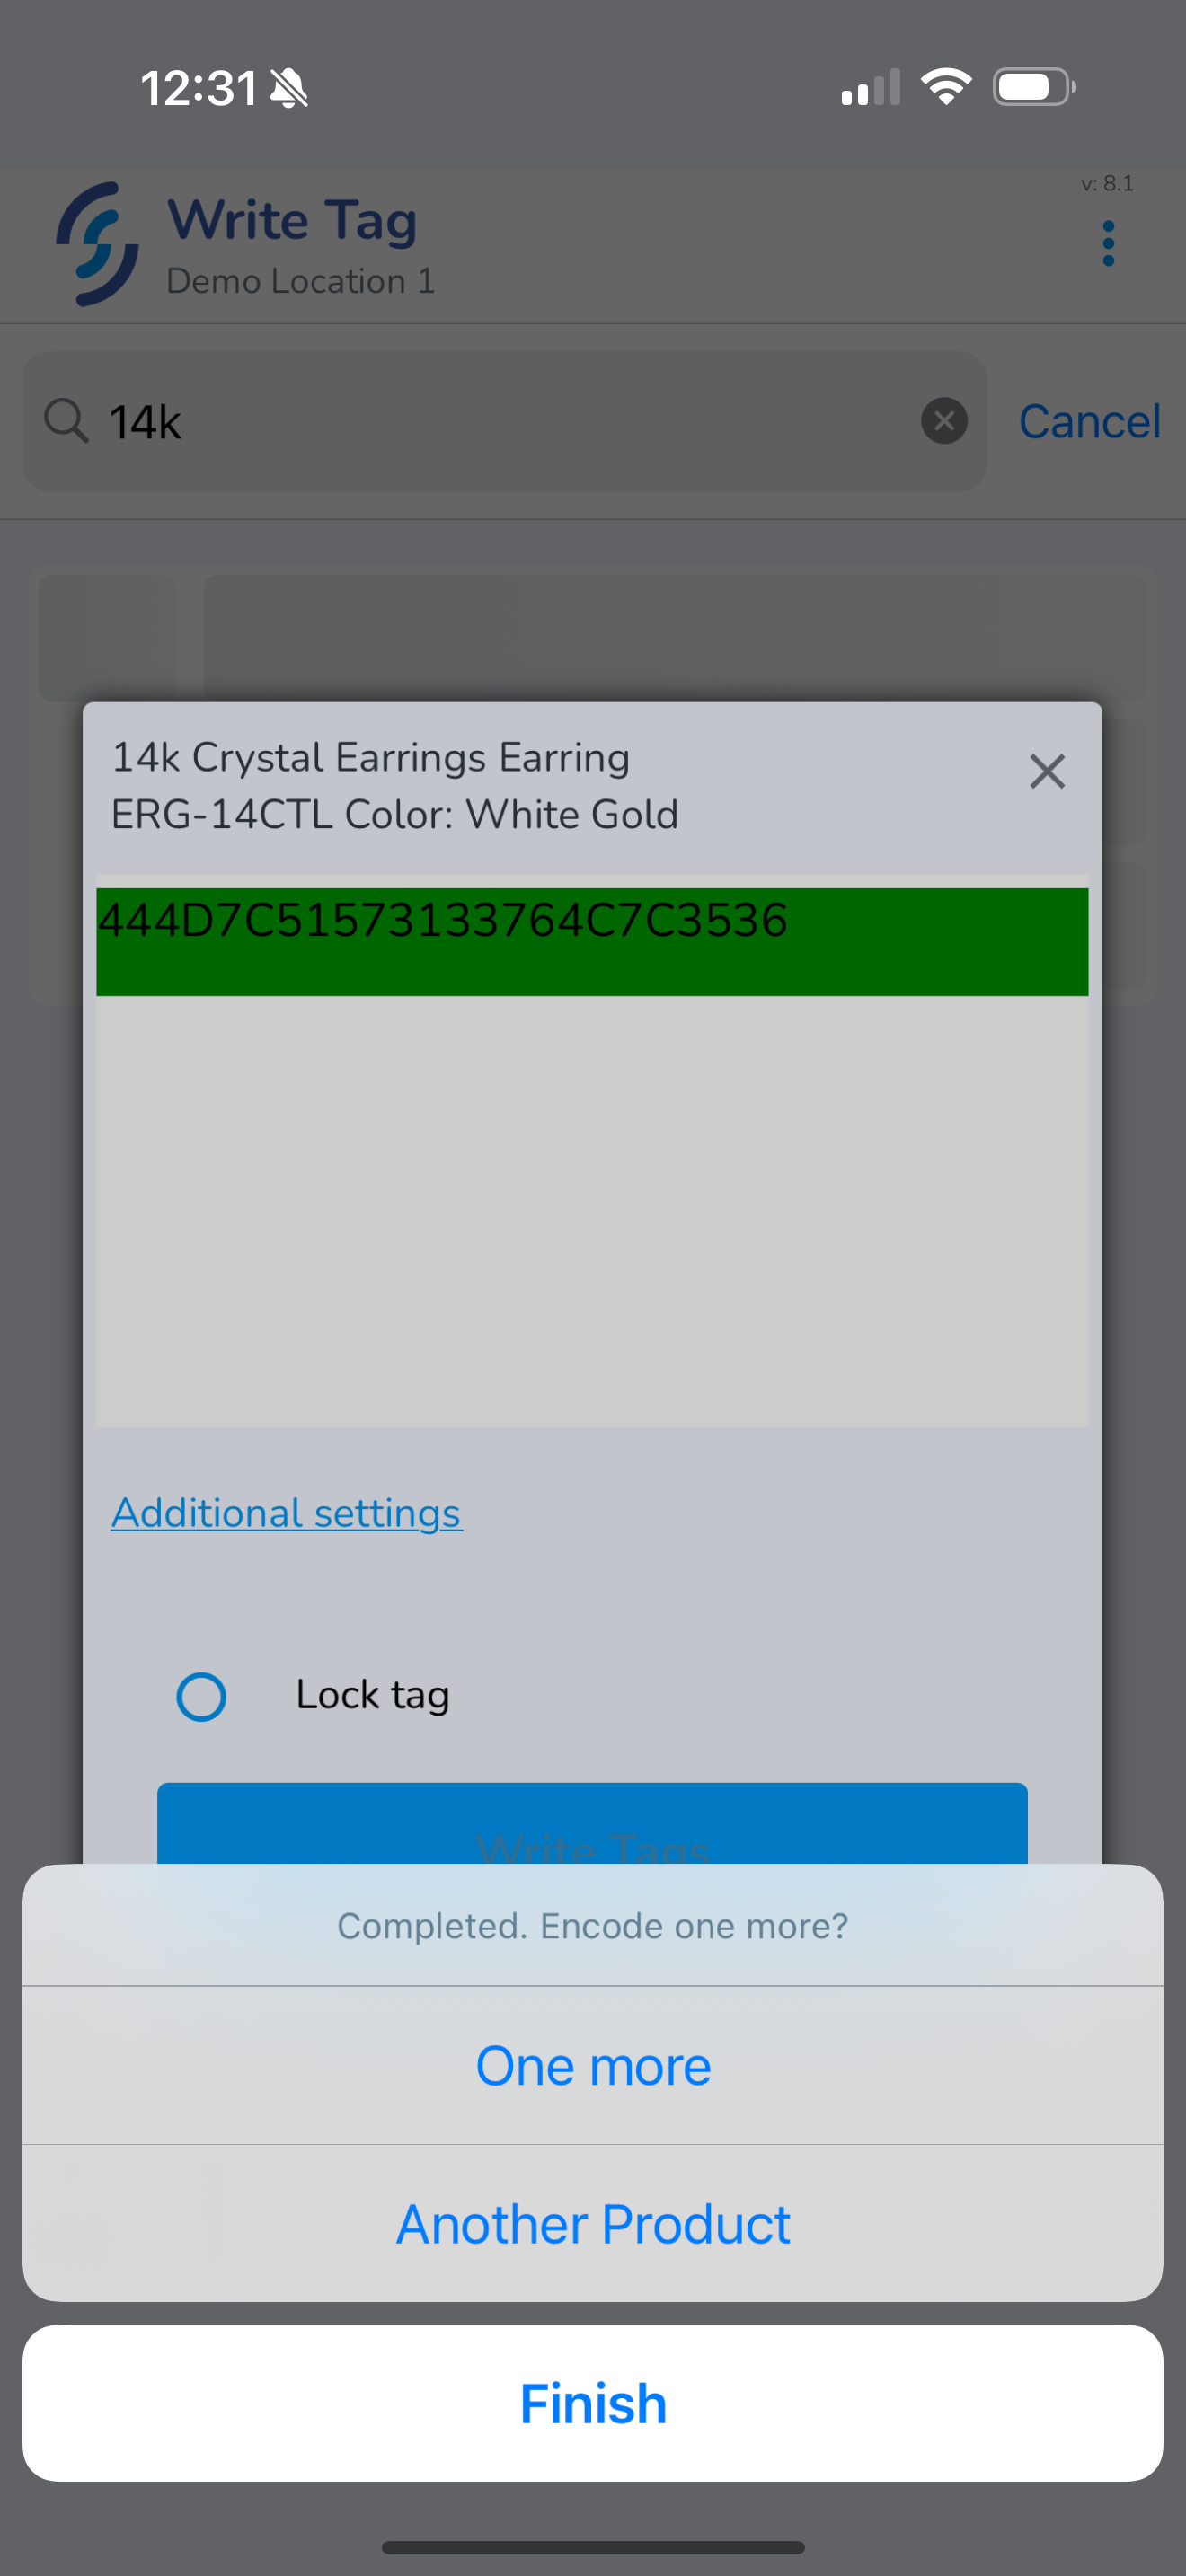
As each tag is programmed successfully it will turn green
- One more - to program more quantity of the same Product
- Another Product - to search for a new Product to program
- Finish to complete the process and return to the Home screen
Bulk Encoding
Use this option when needing to program a large number of tags. This method captures the serial numbers from each tag, then ensures that all captured serial number is encoded with the product's information.
Caution: When using this feature, it is critical that any blank tags are removed from the field of view to avoid unintentionally encoding tags
Select Bulk Encoding
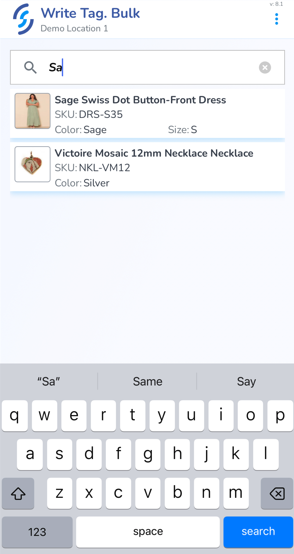
Use the search for the item you wish to encode
Once located, select it
As a safety precaution, only blank tags never before encoded, are eligible to be bulk encoded. This is a feature designed to prevent overwriting existing tags
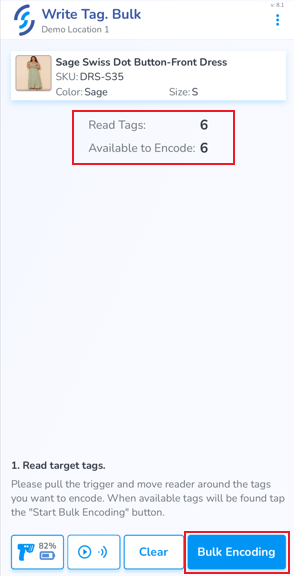
Click Bulk Encoding
Slowly move the reader over the tags
You will see the number of tags Available to Encode decrease.
Once the 'available' total is 0 a finishing prompt will appear
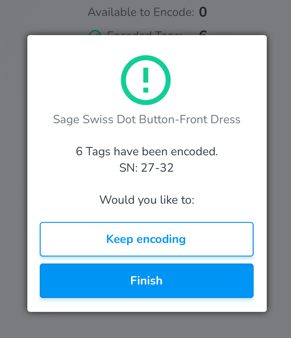
Mobile App: EPC Read
Quickly confirm the information programmed into a tag by using the EPC Read feature.
Requirements:
- A mobile device with the Simple RFID app installed
- A handheld TSL reader paired to the mobile device
Step 1: Select the EPC Read option on the mobile app

Step 2: Adjust the reader power
If you're trying to capture a specific tag, make sure to set the power to Near, otherwise you may pick up other tags in the area, making it difficult to identify the correct tag.

Step 3: Scan the tag(s)
Pull the trigger to scan
Tap on the EPC you wish to copy to the device's clipboard
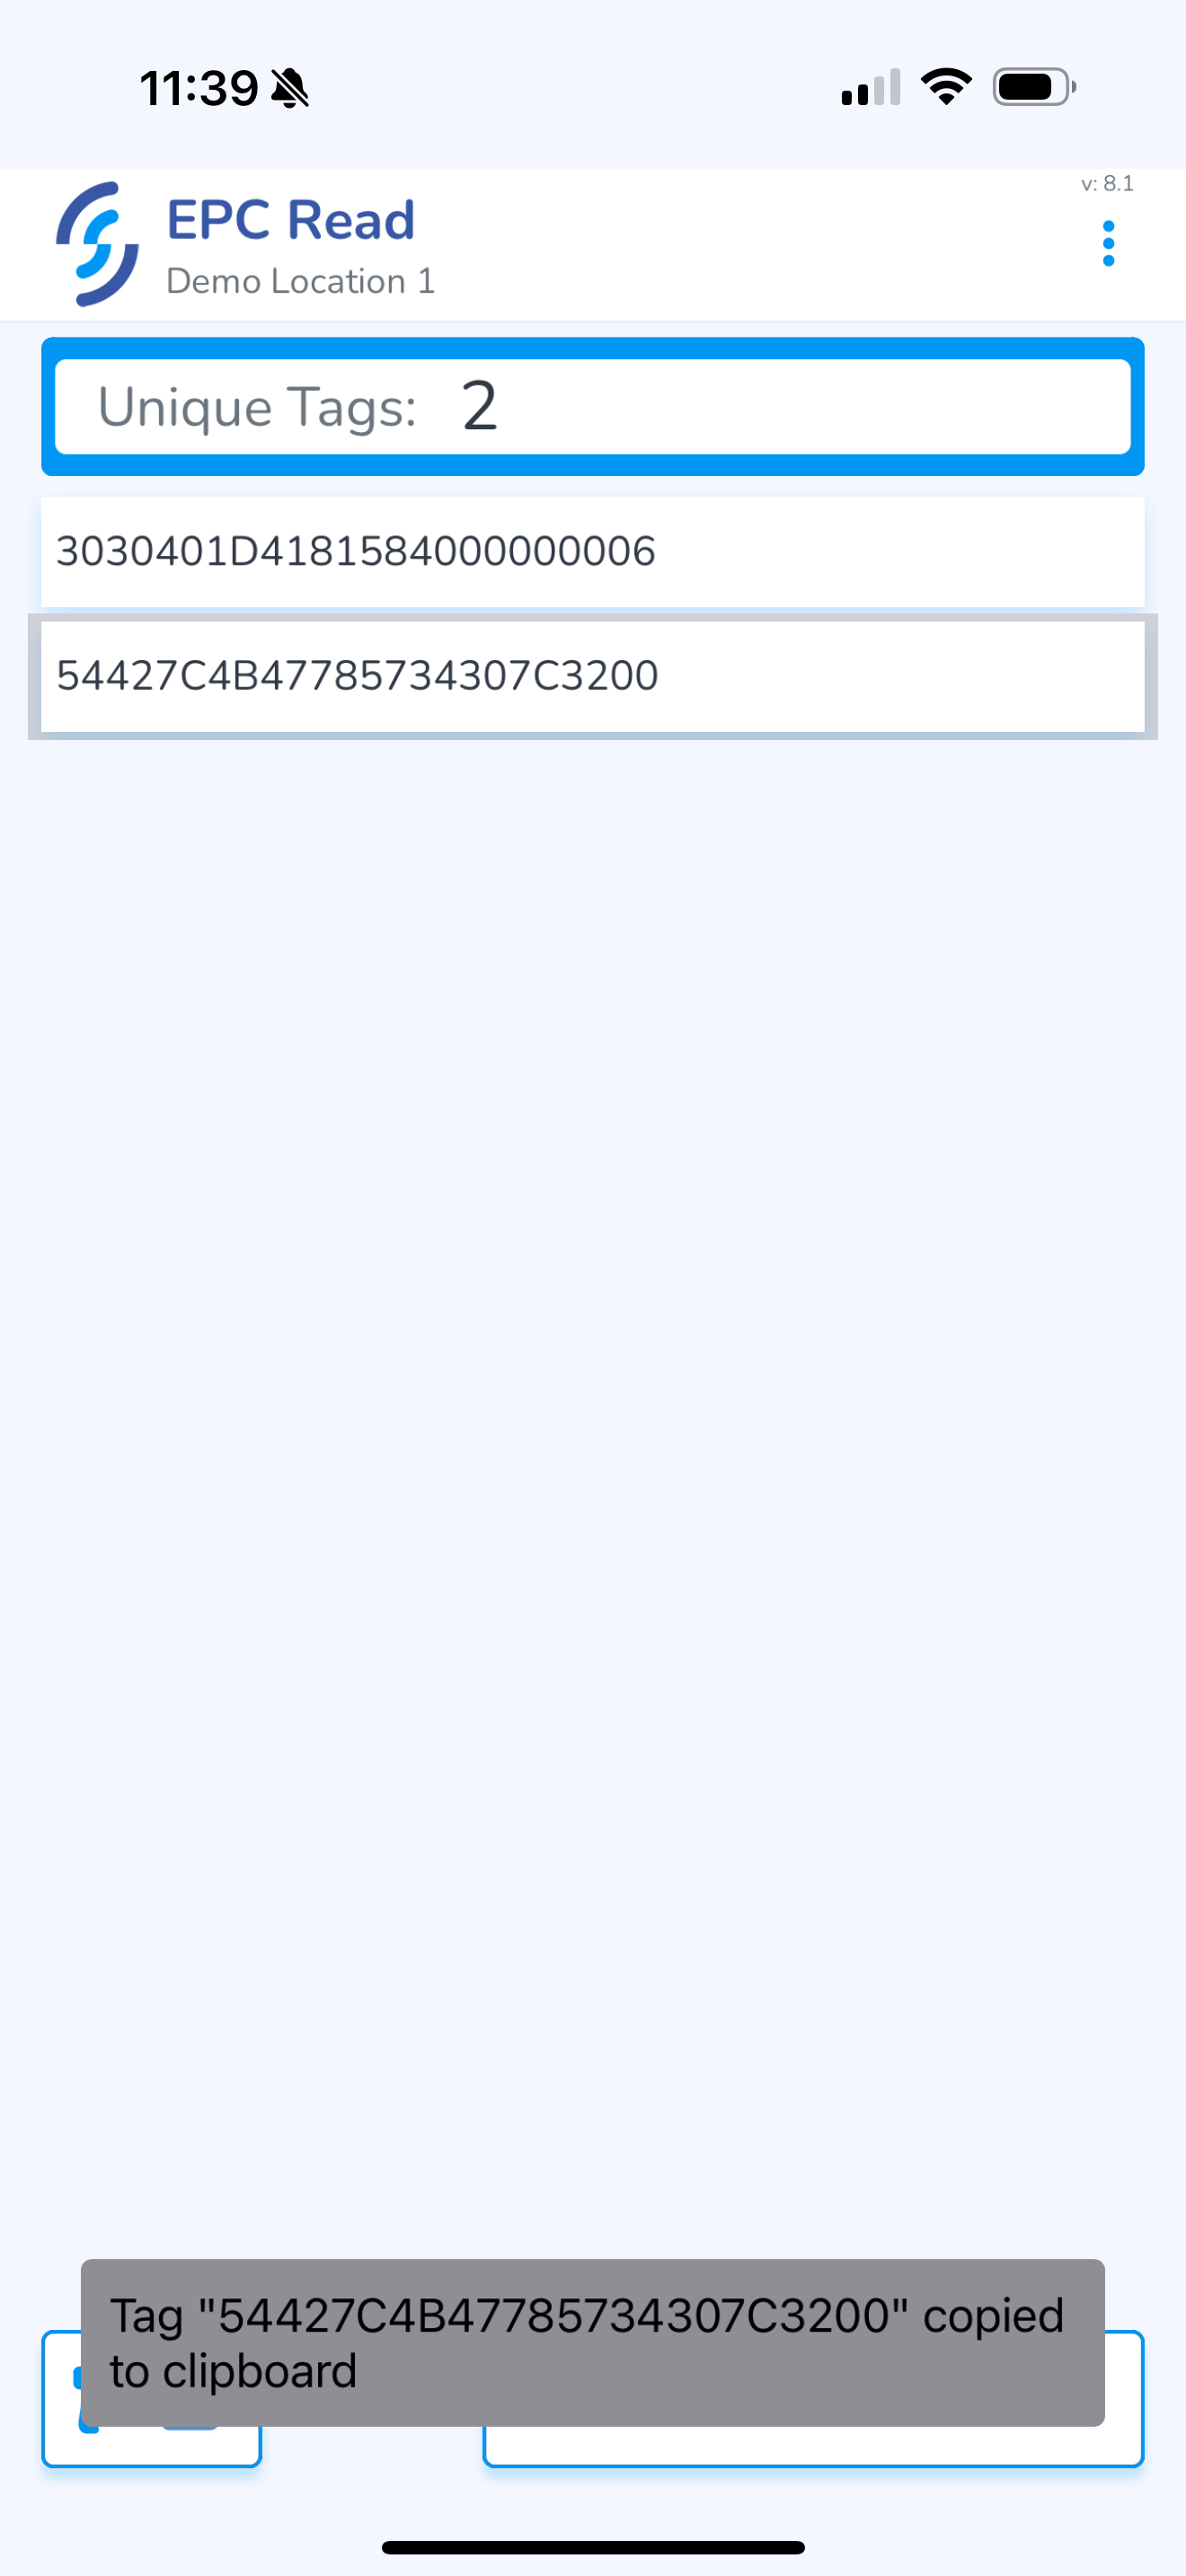
This will allow you to view & share EPC numbers for troubleshooting.
Mobile App: Search Tags
From the home screen click Search Tags
From the input window, enter the item you wish to locate, and select it
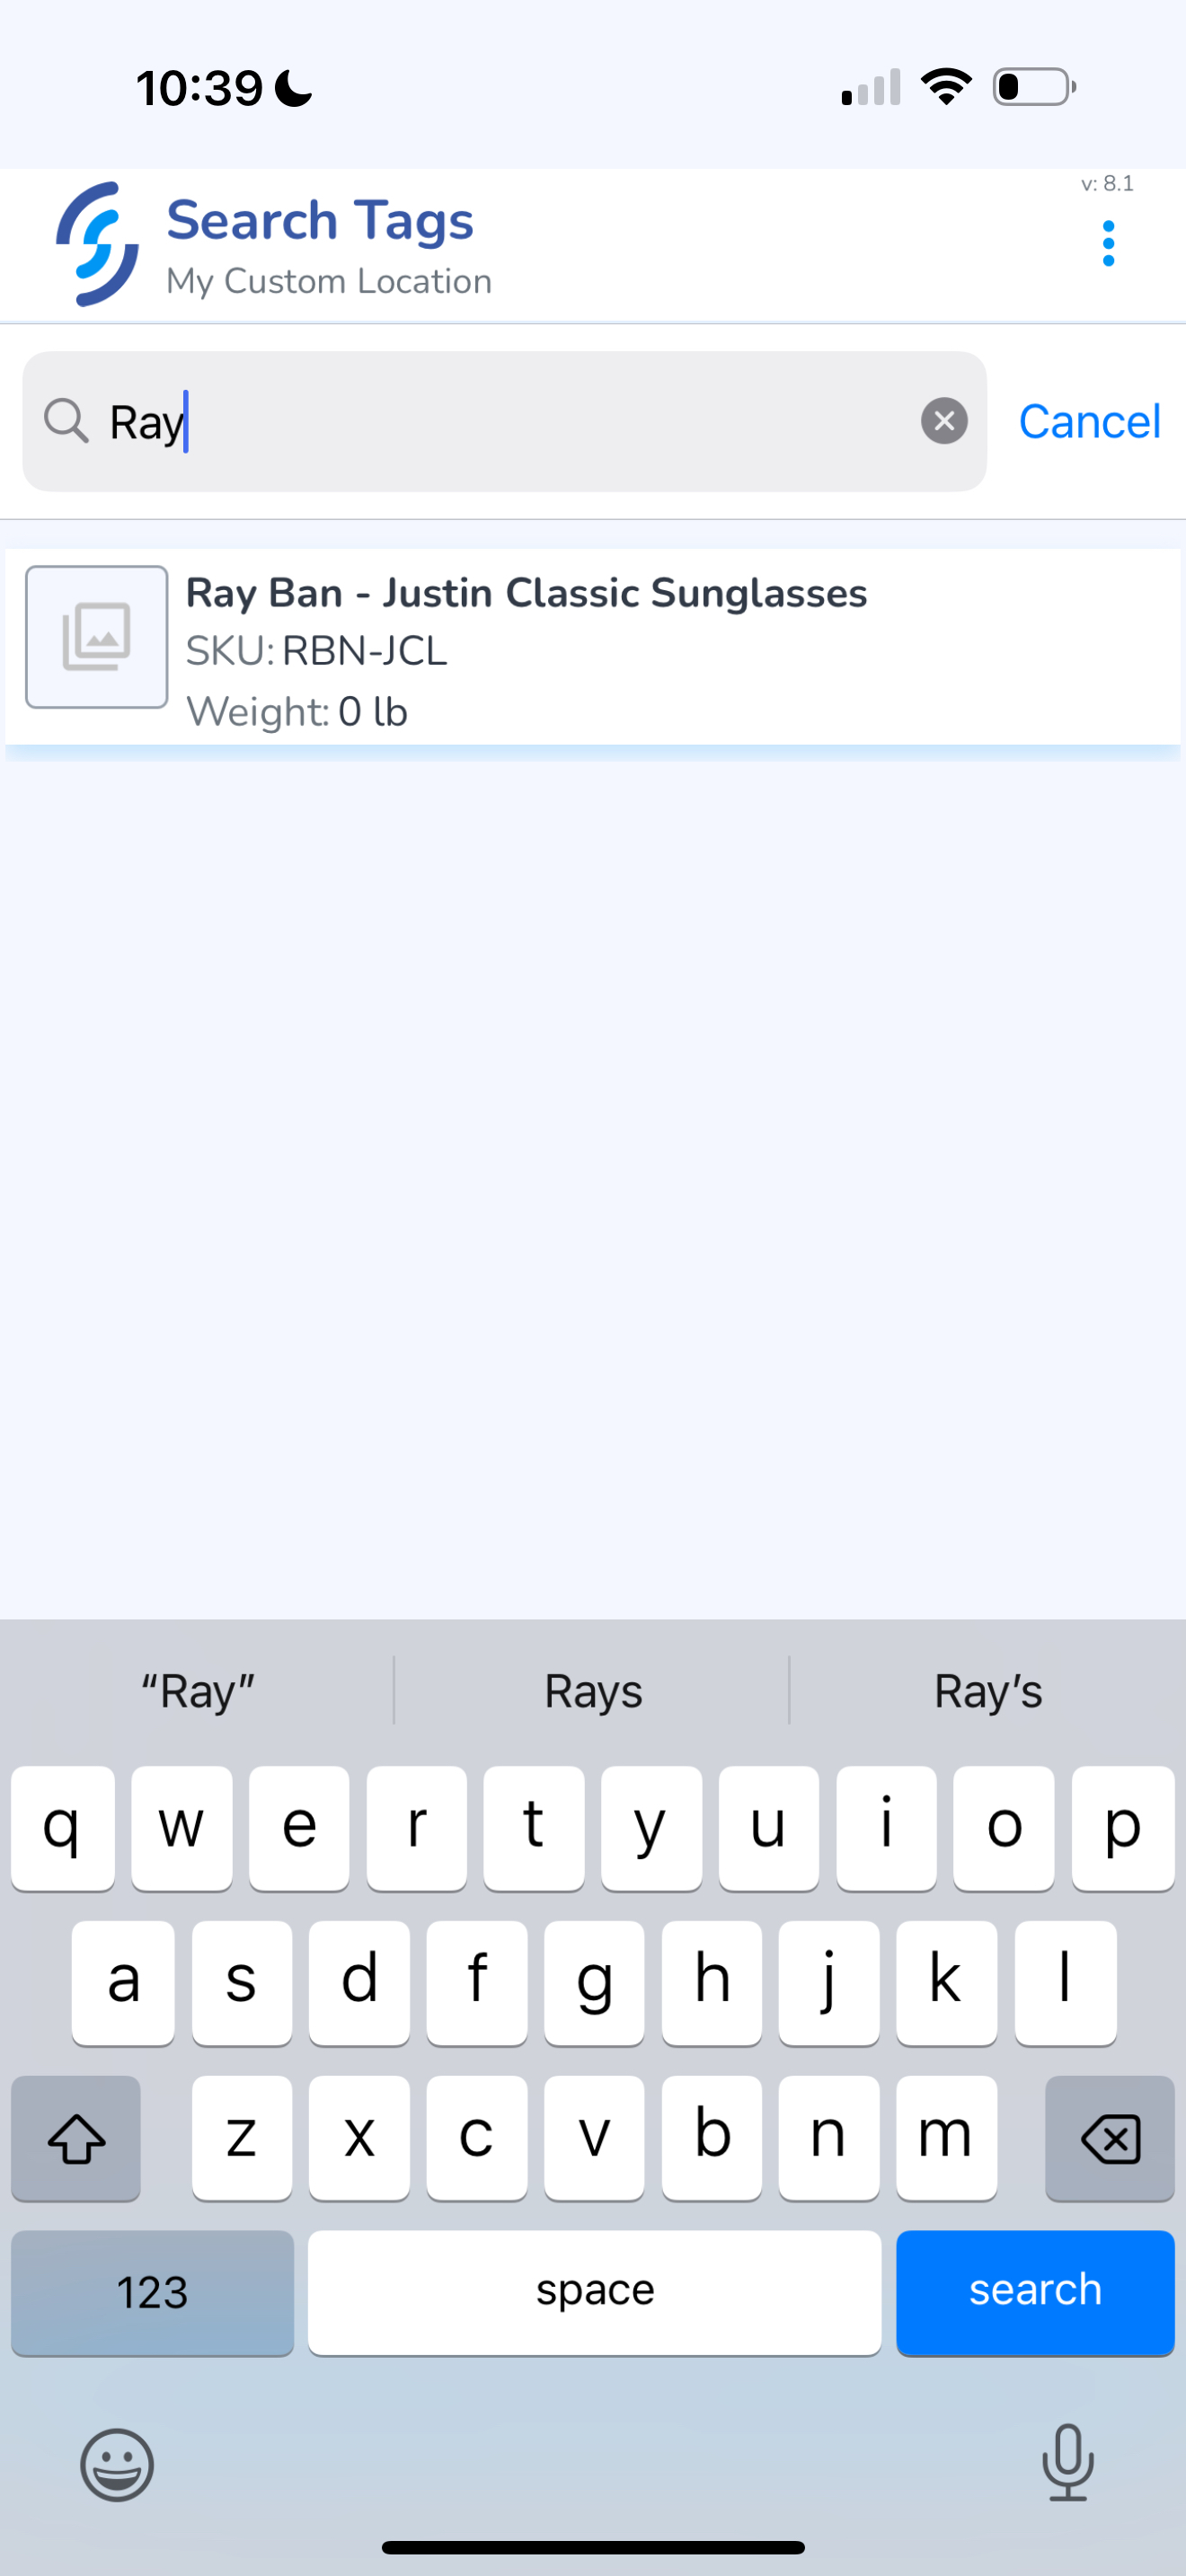
Once it is selected, click the Search/Seek button
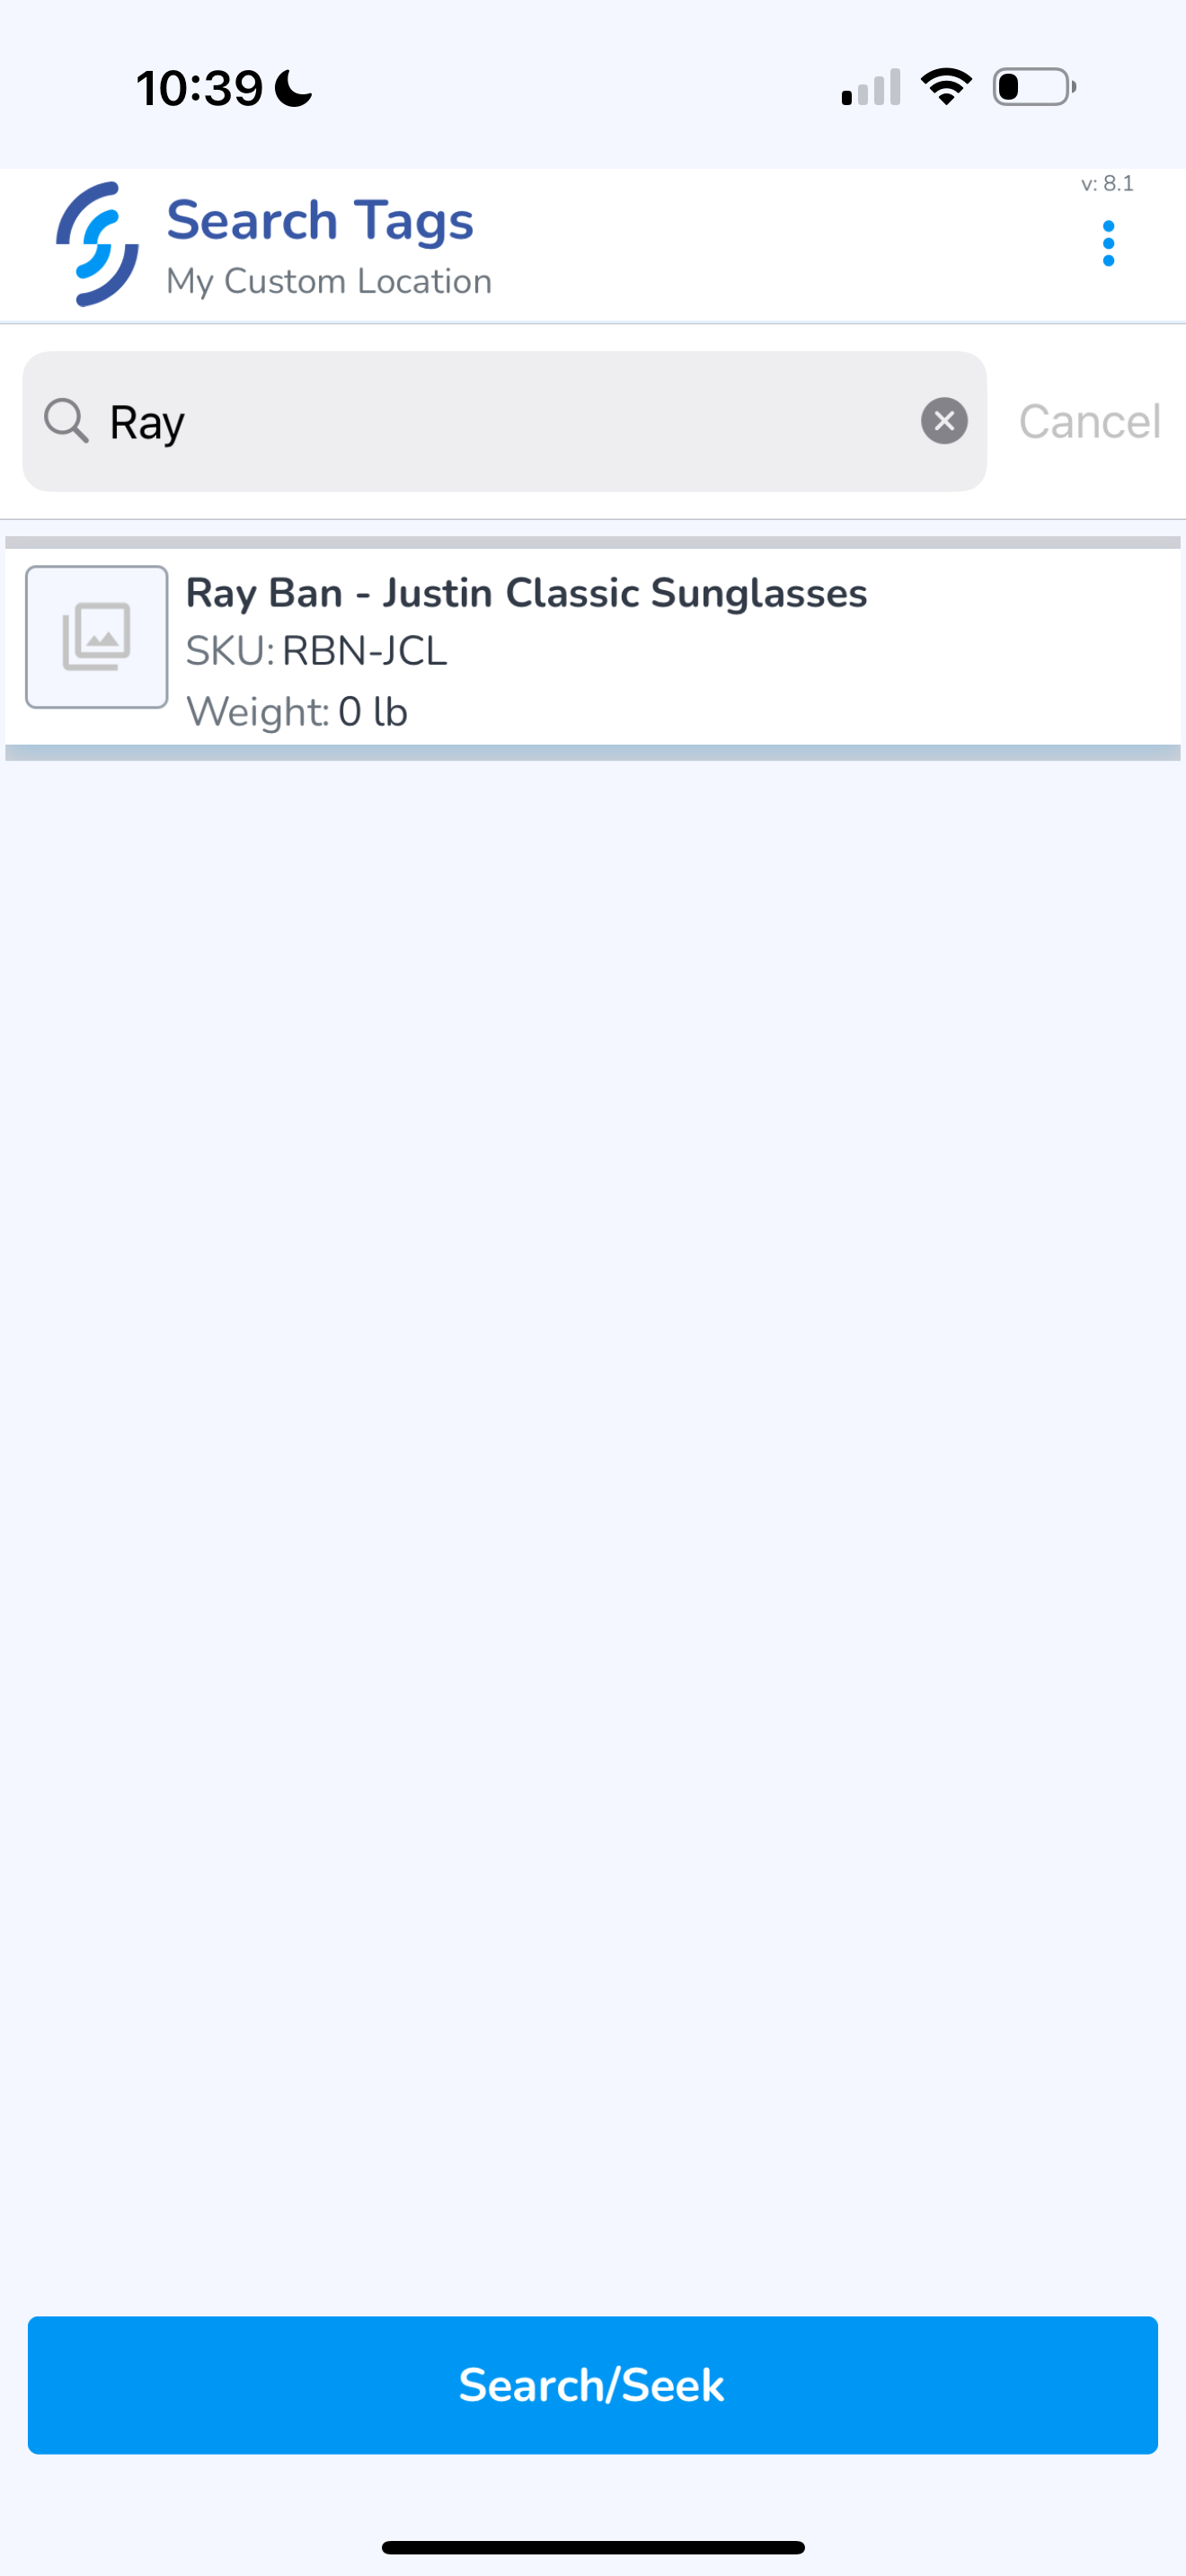
This will initiate Search mode.
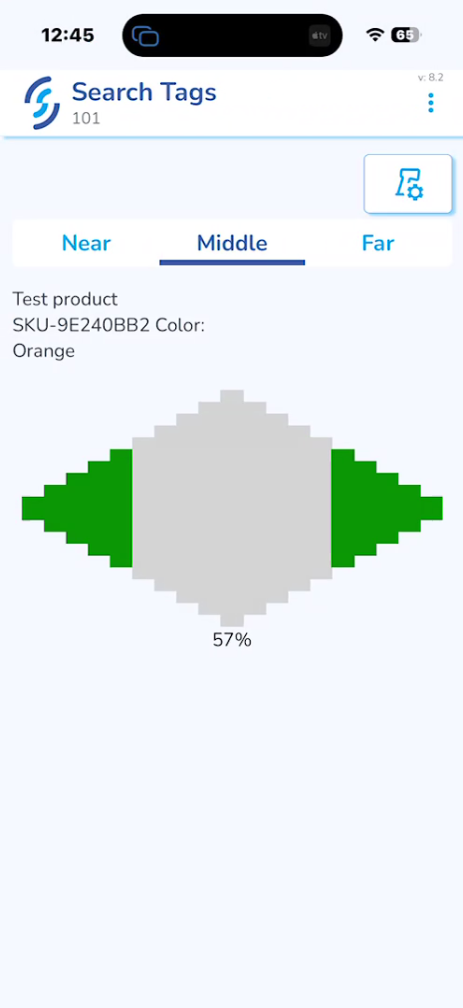
Choose Near, Middle or Far option to adjust the power.
Tip: Some environments may produce more reflection causing the reader to produce false positive results making it appear that the item is closer than it actually is. In these instances, once the signal is detected choose a lower power setting to reduce the read range which will help reduce the false positive signal
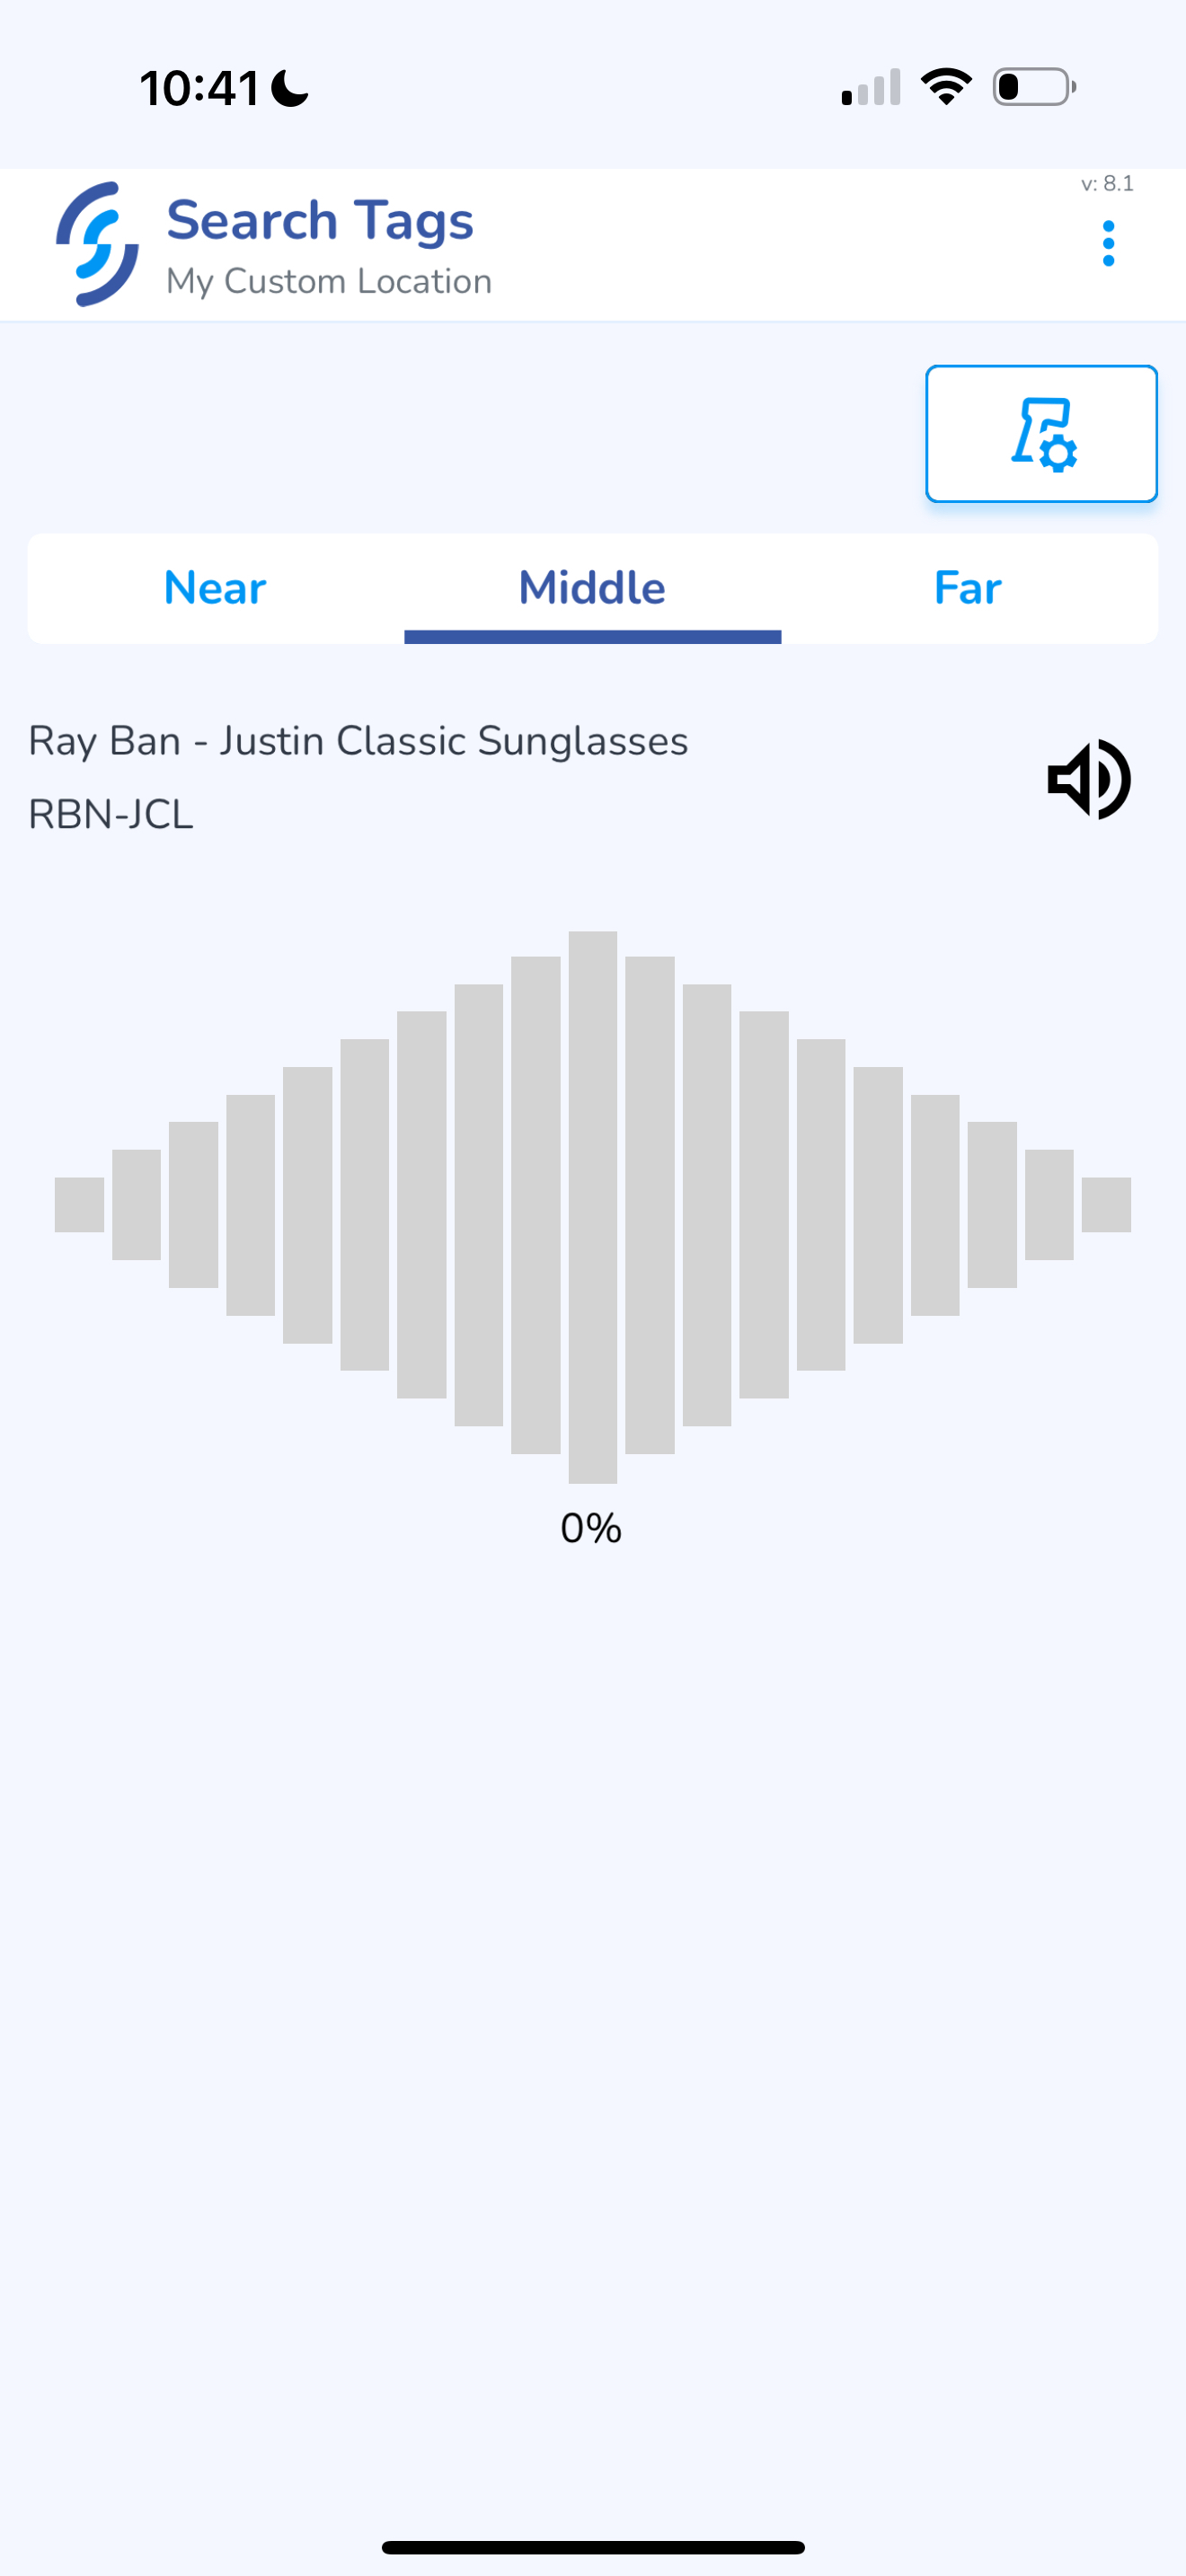
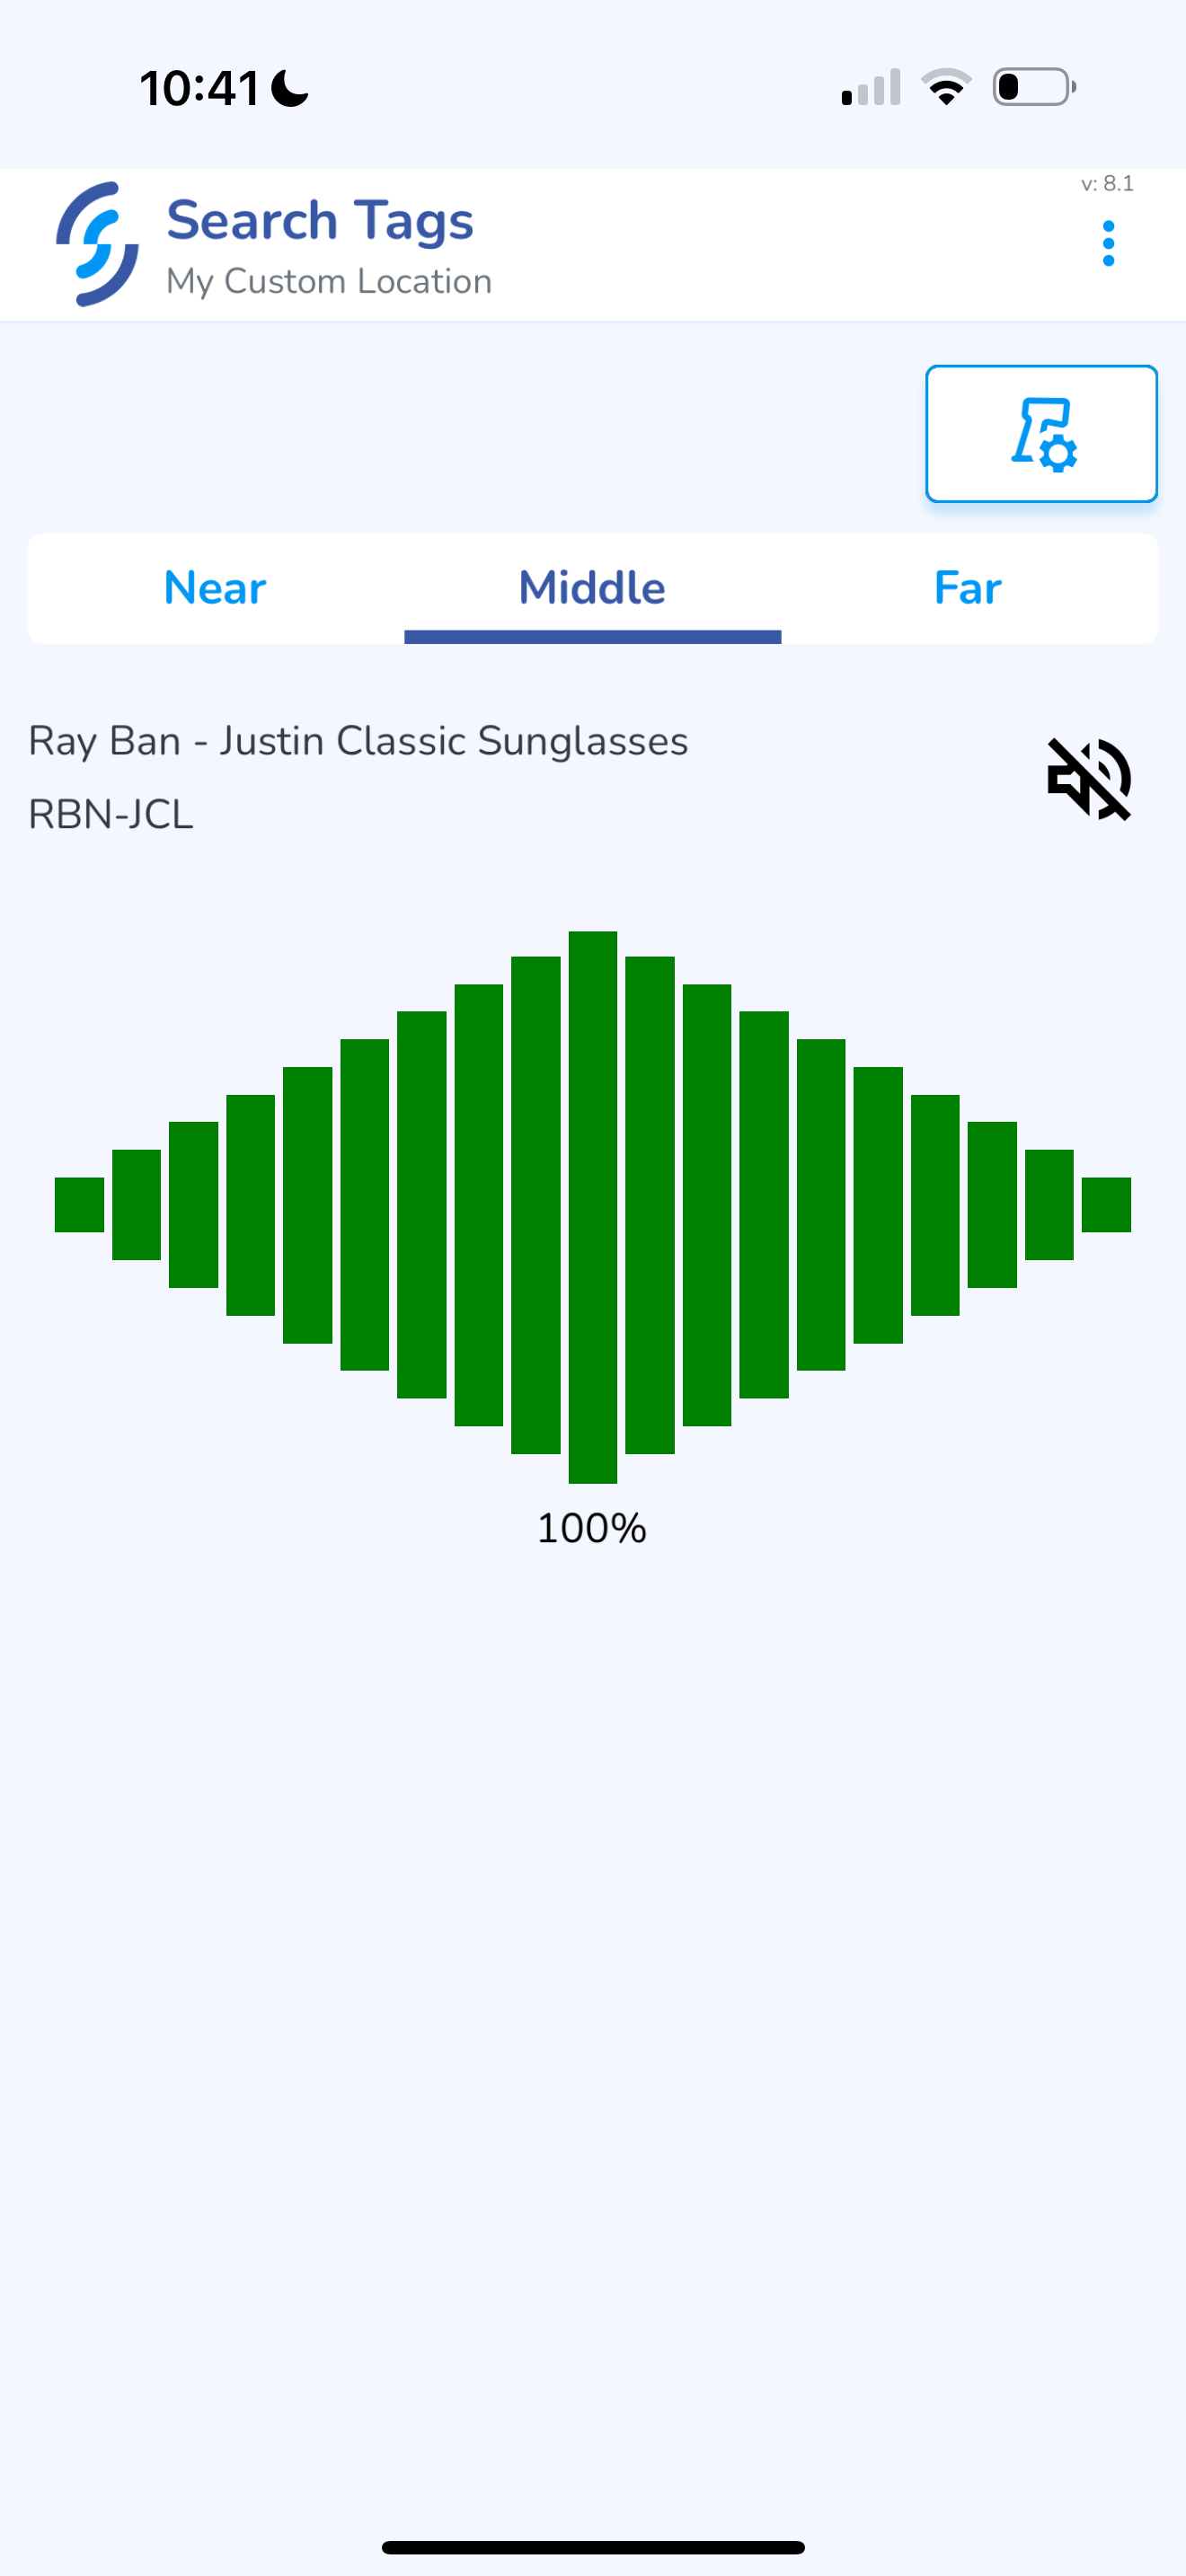
Pull the trigger on the reader. If the item is within range the signal will indicate
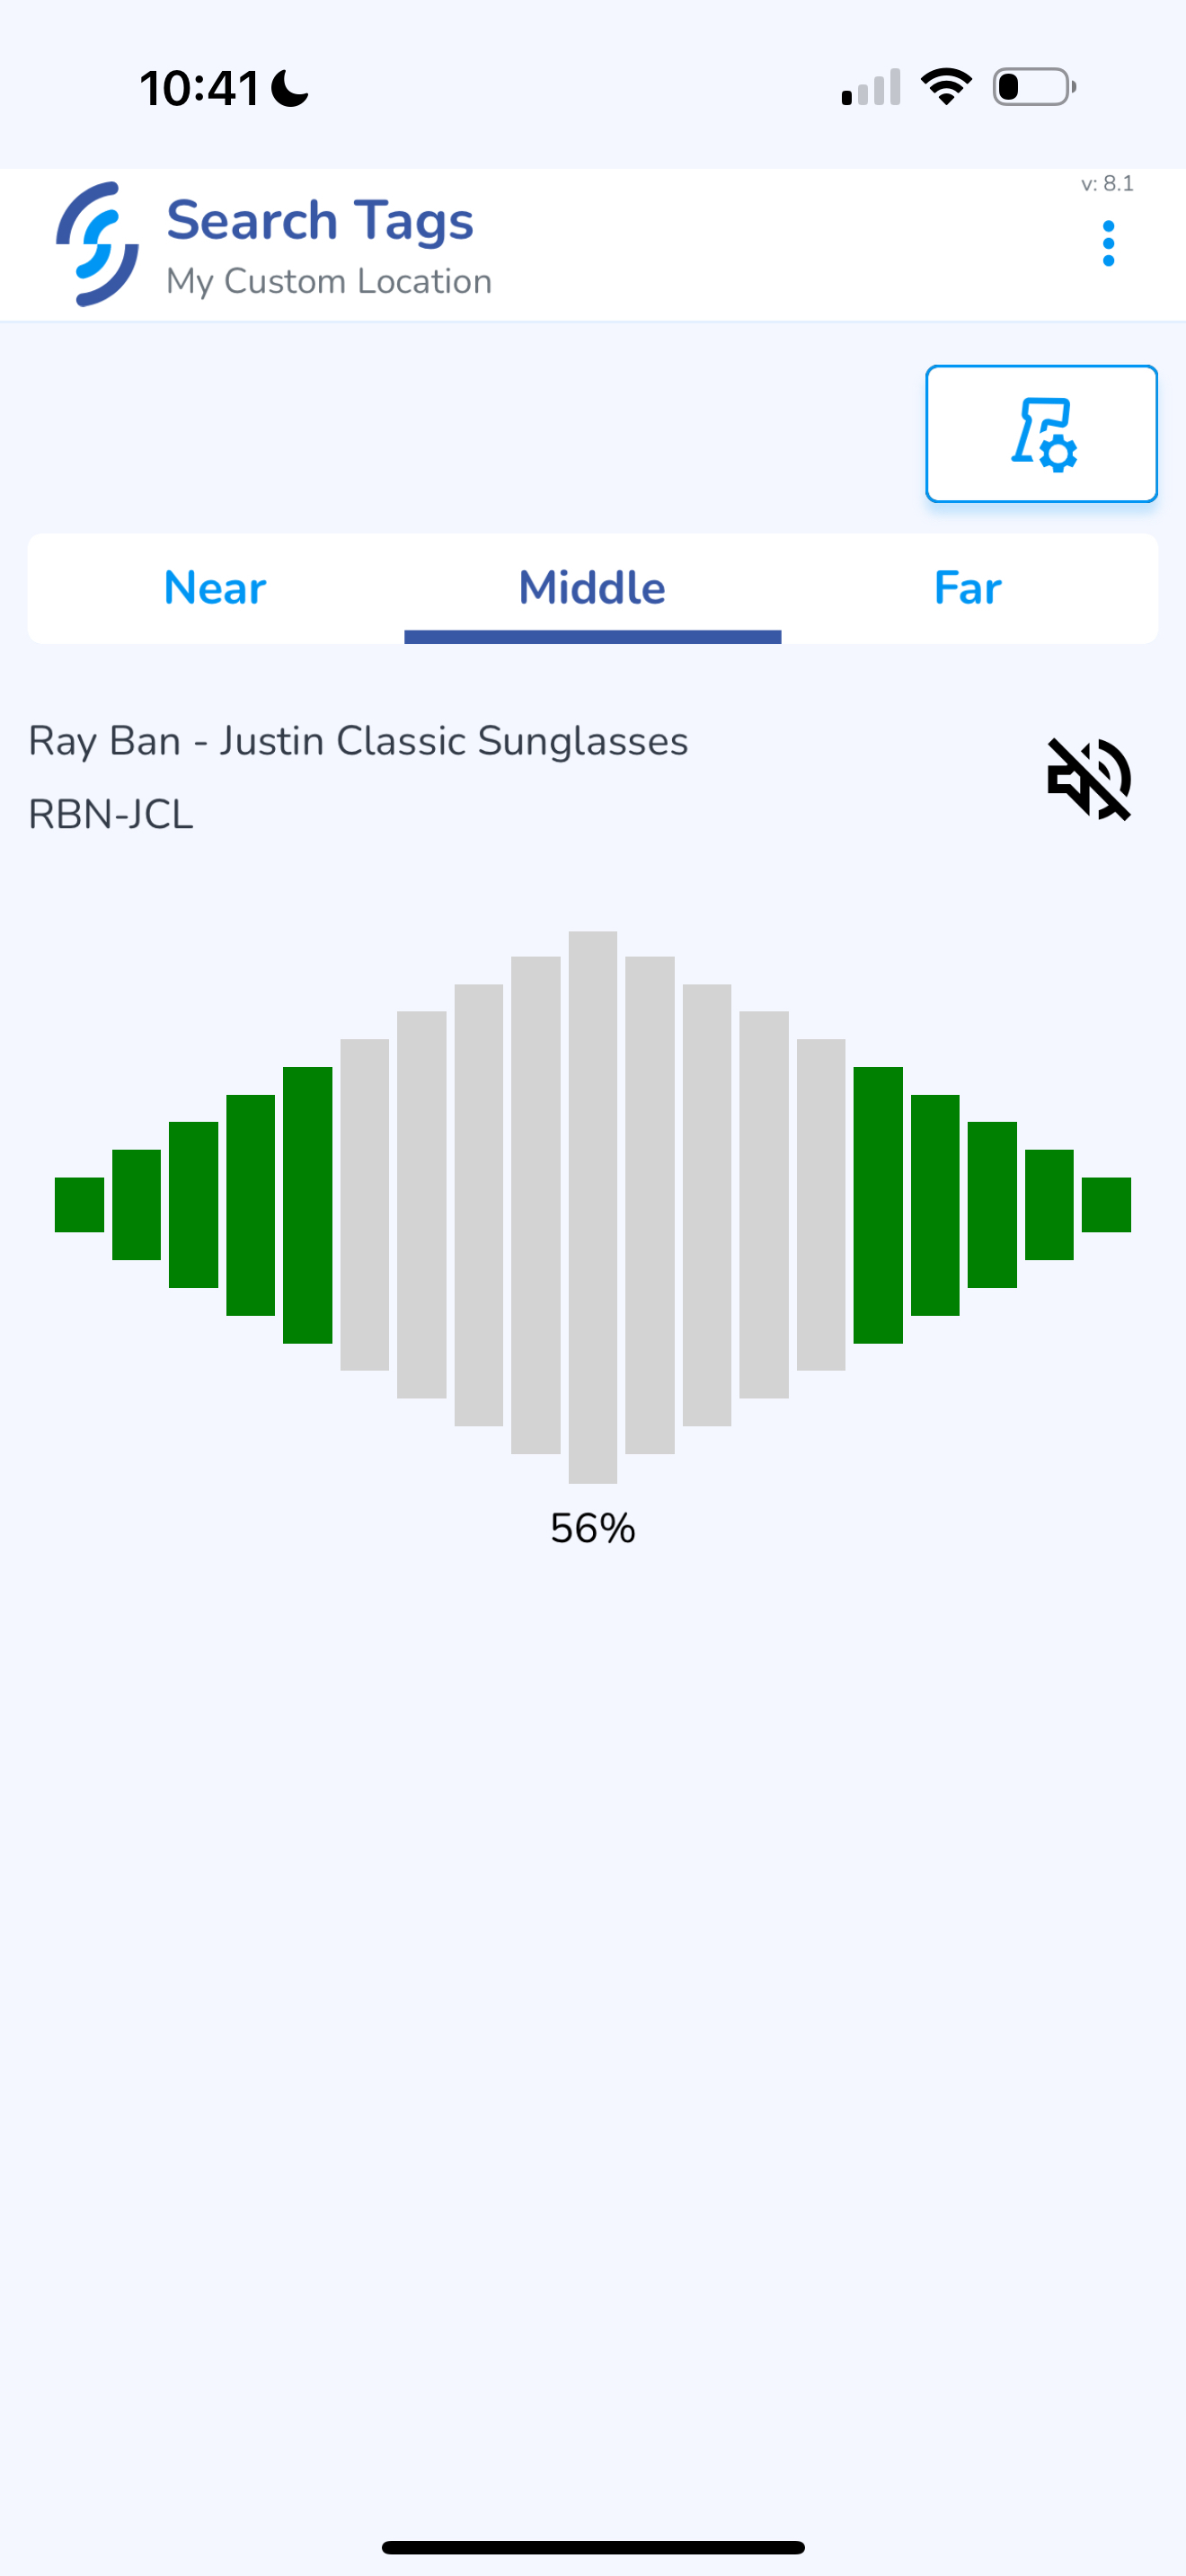
The grid will display 100% when the item is within 6"
Alternative Access to Search Tags feature
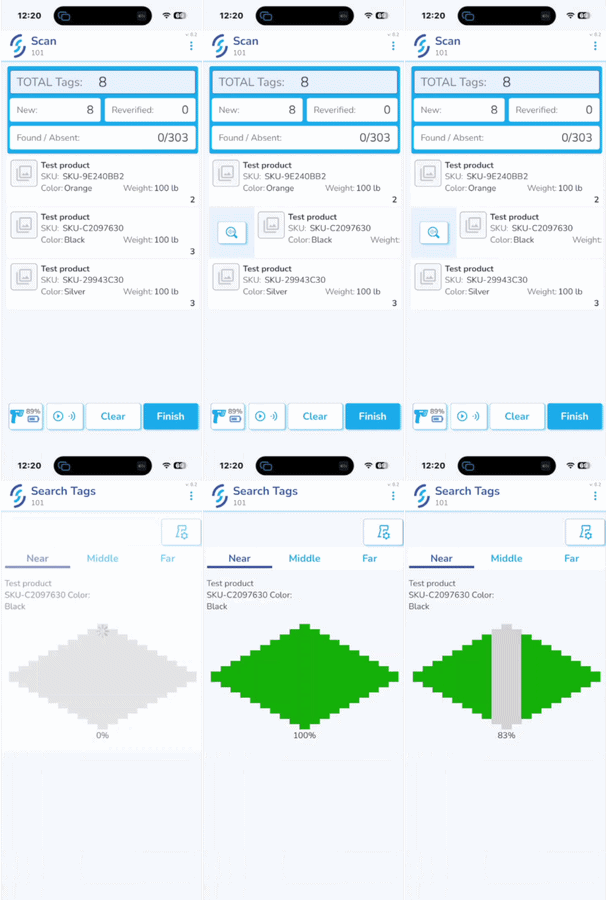
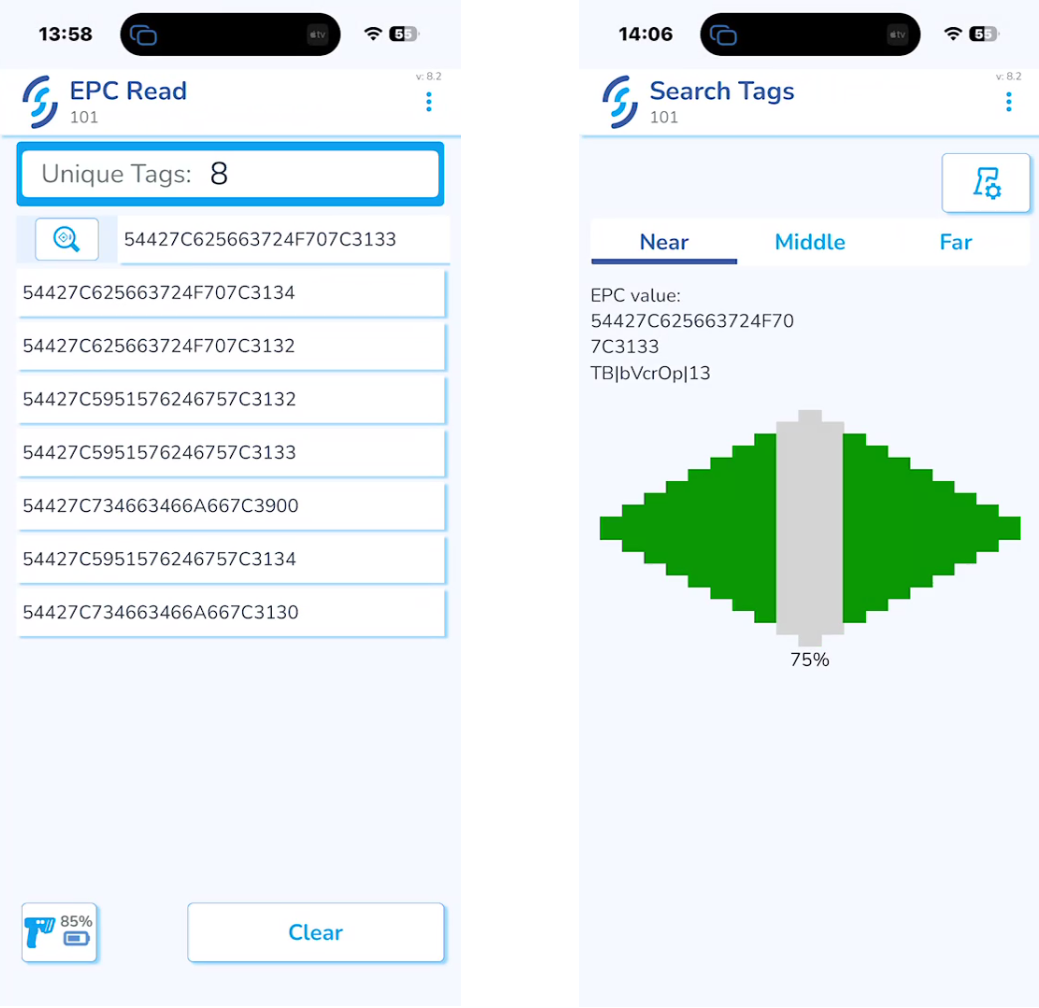
In addition to the standard Home Screen access, Search Tags can be accessed directly from the multiple locations, like Scan, Archive, Ship, Receive, EPC Read, Audi & Compare in the same way as it is shown in the example below:
This process can be used to search for unknown tags as well
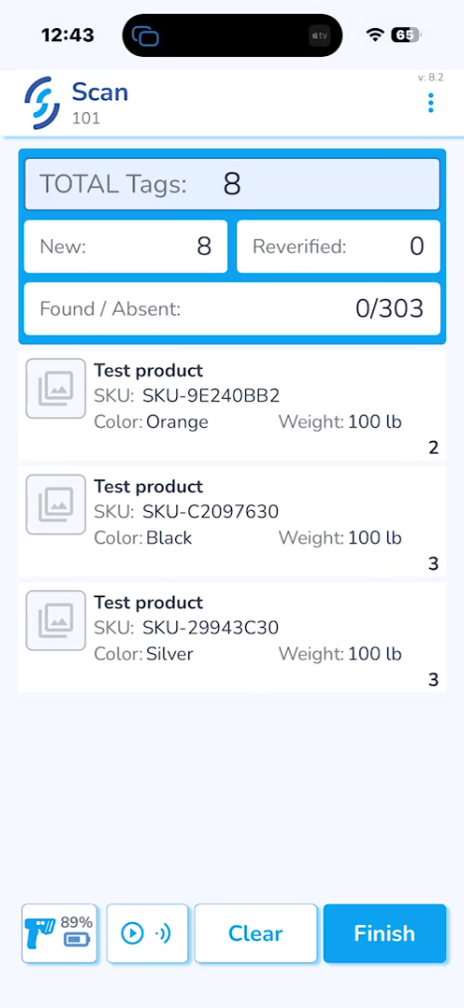
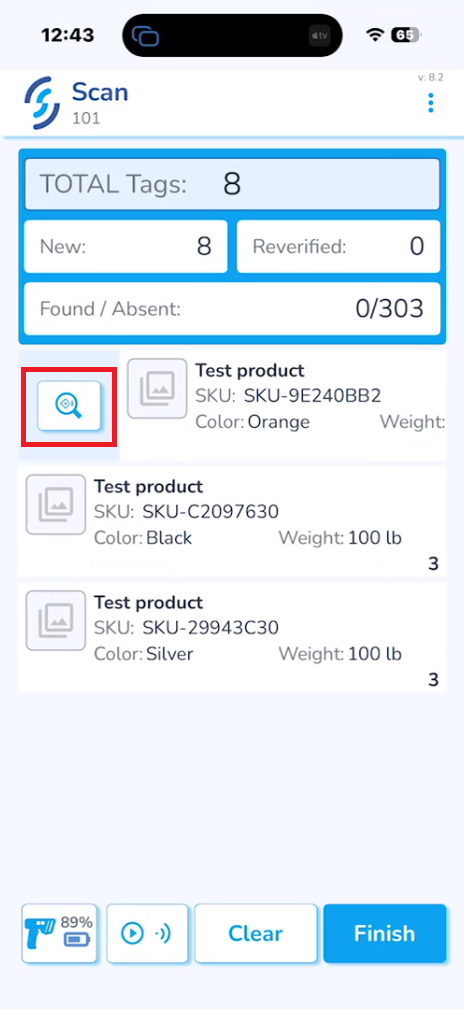
Swipe right on the product row.

A small icon will appear to the left of the product. Press this icon to jump immediately into the Search Tags feature with that item pre-selected.
Pull the trigger on the reader. A signal will appear if the item is nearby.
Functionality of the Search Tags from the Scan menu:
If using Search Tags feature from EPC Read menu it will be searching specifically for tags and not the whole products
Mobile App: Application Settings
The Application settings allows users to enable & disable features & views inside the app
Scan & Archive
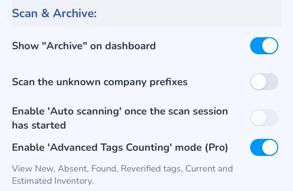
- Enable to display the "Archive" option. If this option is disabled the user will not see this option.
- Scan the unknown company prefixes. Enabling this option will allow the reader to capture tags not associated with your account
- Enable the "Auto-scanning" once the scan session has started. This option is not yet available for use.
- Enable "Advanced Tags Counting" mode (Pro)
Ship
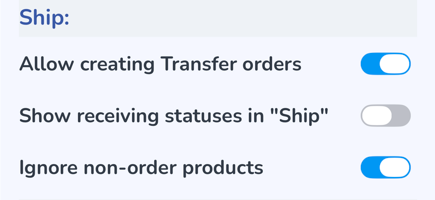
- Allow creating Transfer orders - enable if you wish to create Transfer orders from the app
- Show receiving statuses in "Ship" - enable if you wish to view the receiving statuses in the Ship menu
- Ignore non-order Products - enable if you want the scanner to only scan for matching products. This setting can be helpful for tag dense environments where the RFID signal is likely to capture tags nearby.
Receive
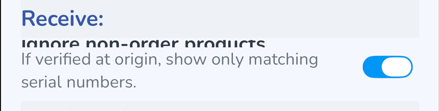
- Ignore non-order products - enable if you wish the scanner to ignore any product which doesn't match the order. This can be helpful to assist in receiving orders so as to not capture anything unrelated to the order. The draw back is that if the supplier sent something not included in the order it will be missed.
- If verified at origin, show only matching serial numbers. - enable if you are verifying the tags at the origin and only want the scanner to scan matching serial numbers scanned at the origin.
Product View
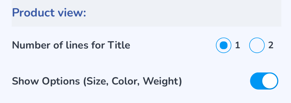
- Number of lines for Title can be adjusted from 1 to 2
- Show Options (Size, Color, Weight) displays the Variant properties
Reader Control
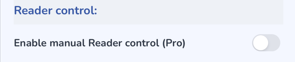
- Enable manual Reader Control (Pro) restores the original reader controls, and instead of Speed & Distance, the user can adjust the Scan Modes & Sessions. Instead of the preset power options of Near, Middle & Far, the reader power is a slider
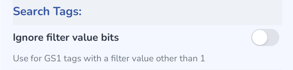
Actions
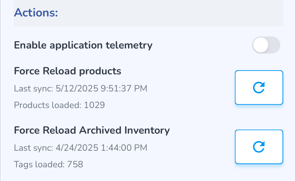
- Enable the application telemetry to provide additional details in logs sent to Support
- If, when scanning items, the product details (photos, name, size, etc.) do not appear, click this to reimport products
- If when scanning items, Archived inventory does not load, click this to reload Archived Inventory
Mobile App: Manual Reader Control
If you wish to control the reader via the standard RFID settings, you can enable in the Application Settings menu
Manual Reader Control (Pro) Enabled
These controls include;
Power Slider which is a single control to manage the reader power dynamically via a slider. Below this, a settings icon to manage the Scan Mode & Session of the Reader, and the current settings are displayed to the right of it. To the far right is the button to navigate to the Connected Reader
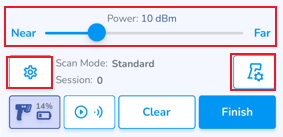
Session & Scan Mode
Sessions are 0, 1, 2 & 3
Scan Modes are Standard, Tag Focus, Many Tags, & Tag Refresh
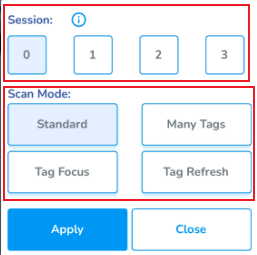
After making selection, click the Apply button to save changes
Click Close to exit the settings window
Mobile App: Increase Max Reader Power & Set Reader Sensitivity to Far
If you find that scans are appearing slowly, and or accuracy seems poor, you'll want to set the Reader power to the maximum output, and that the Reading Sensitivity is set to Far
Prerequisites
- Pair the RFID reader
- Navigate to the Scan View
Scan View
- Click on the Reader Connection icon (shows Bluetooth connection and Battery Power Percentage)
- Click on the Reader Connection button
Connected Devices
- From the Connected Devices page, click on the Reader Settings icon
Reader Settings
- Under the "Far" option, set the Reader power to 30 dBm using the right arrow
- Return back to the Scan View
- Ensure that the reader is set to Far range
Mobile App: Scan to Print Feature
Print to Scan feature requires the Barcode to be unique to each product
1- Login to the Simple RFID mobile app
- Select your Business and Location
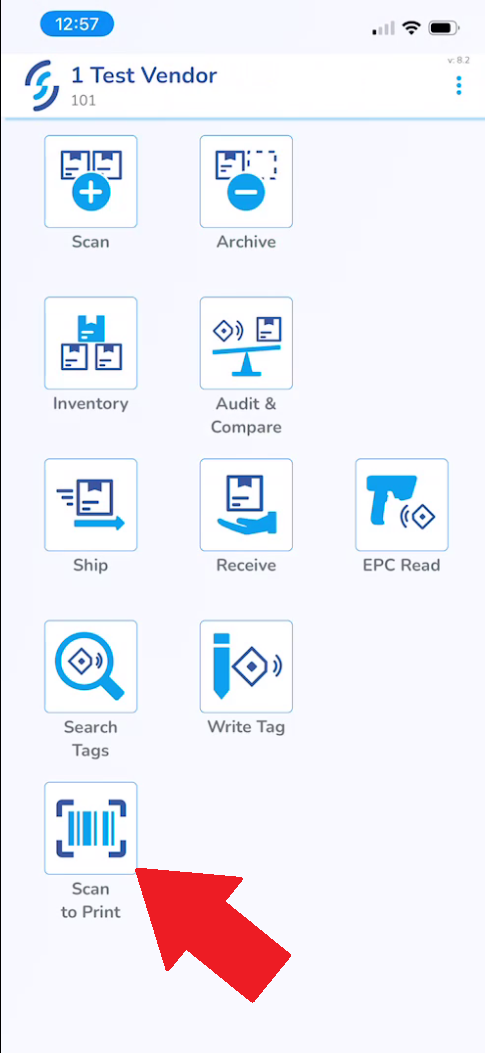
2- Select "Scan to Print"
- Scan to Print button will be located at the bottom of the home page

3 - Select Printer and Label Layout
- At the top of the Scan to Print page you have the option to select a printer
- At the top right of the page you can select the label layout you'd like to print
4 - Scan the unique SKU/Barcode
- At this point you are ready to start scanning tags to print
- Once scanned it will give you the option to select the quantity of tags you'd like to print
The "Instant Print" feature will instantly create a Print Job for one tag
5 - Errors?
- If you run into any errors please feel free to reach out to support with the link below
Mobile App: Restoring Archived Tags
Previously Archived tags can always be restored from the SimpleRFID app.
To restore archived tags, start a new Scan session.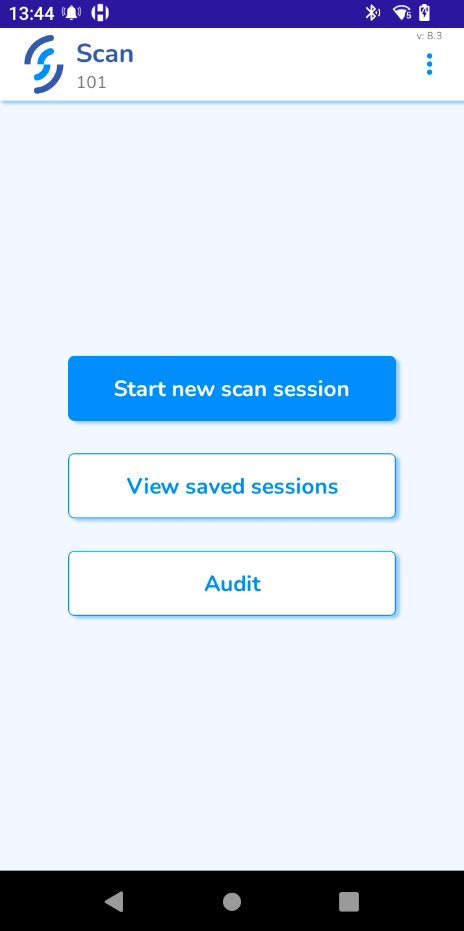
Start scanning the tags. You should now see Archived tags appear.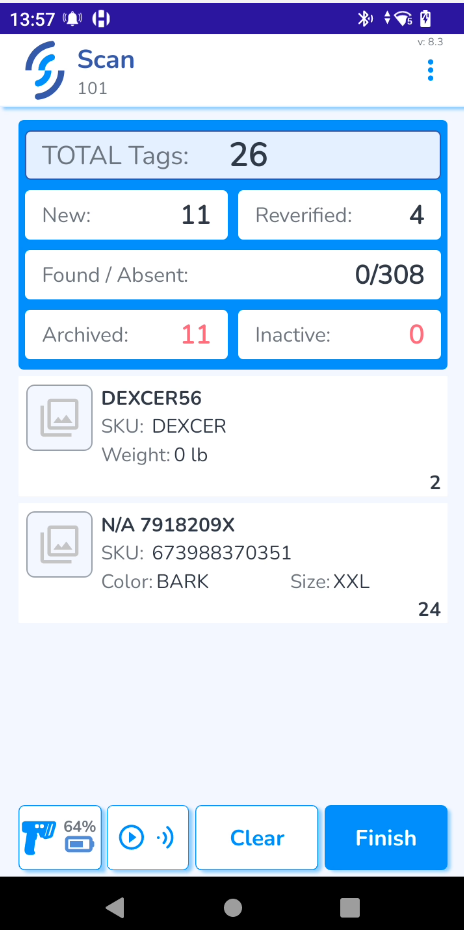
Click Finish. It will take you to the final screen, where the Archived tags can be restored.
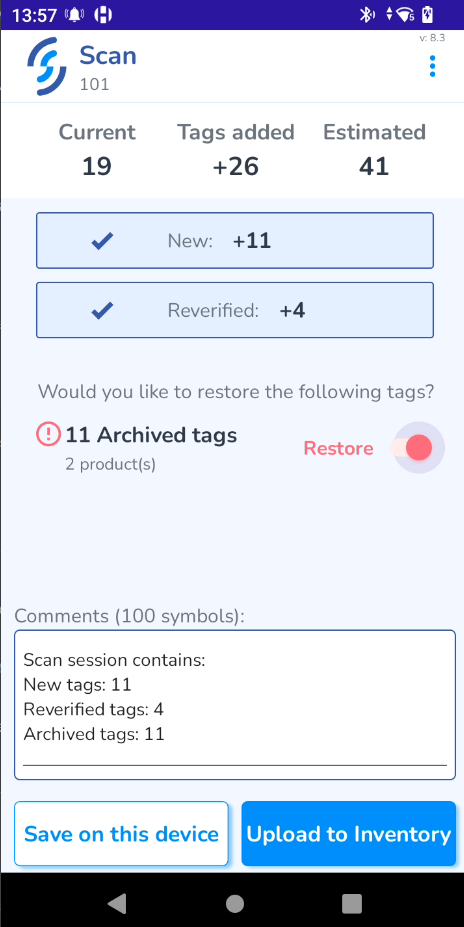
Click Upload to Inventory and then OK.
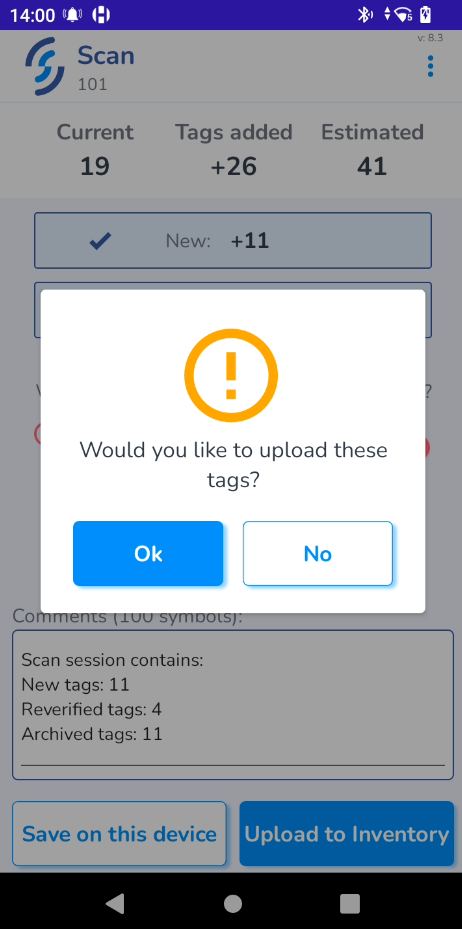
Archived tags should now be restored and added to your inventory.
Mobile App: Review & Resolve
Mobile App: Review Mismatches
Create page for Review Mismatches on mobile once completed.
Mobile App: RFID Actions (Pending Actions)
Once items are processed through the Mismatch Review page, actions are generated to realign the RFID and Partner quantities. If the actions involve RFID Actions the mobile user will follow this flow:
Pending Actions
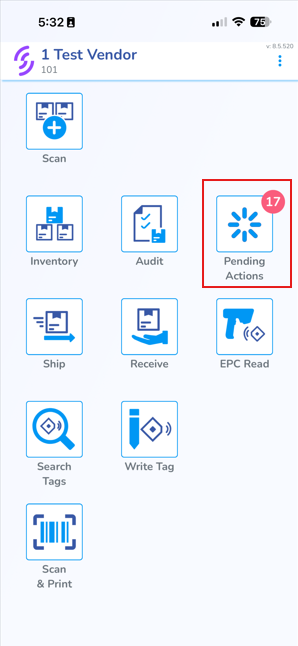
- Open the mobile app
- Click on the Pending Actions tab
Pending Actions tab (Mismatch Review)
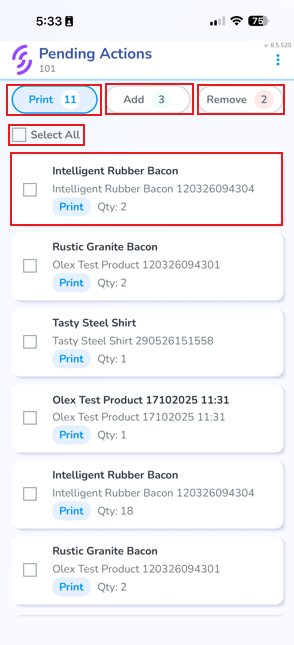
Choose a single product, or use the checkboxes on the left to choose multiple
Individual Product View
To view details of any Pending Action, click on the card:
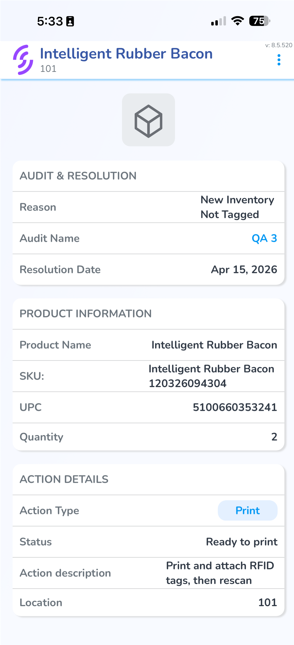
Printing
All printing tasks are grouped under Print. This window also displays the number of products which are pending print.
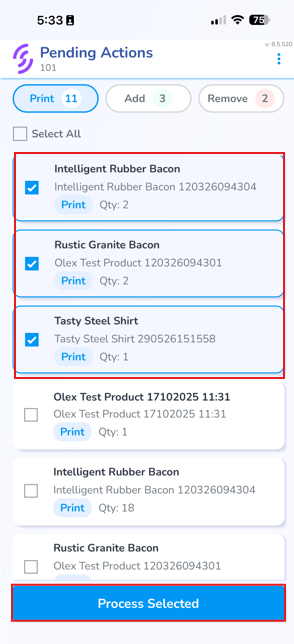
- Select one or more checkboxes
- Click "Process Selected"
Print Dialog
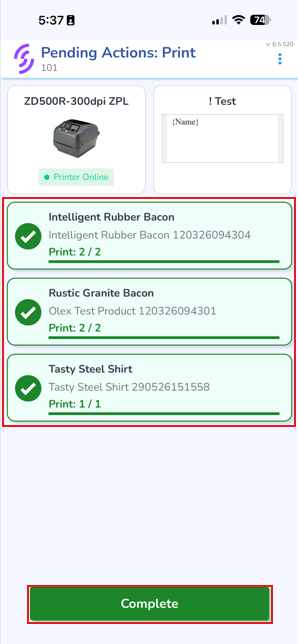
From the print page the user sees the printer they will be printing to, and label design the print job will use.
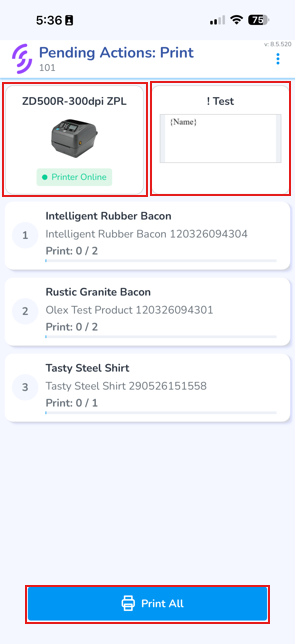
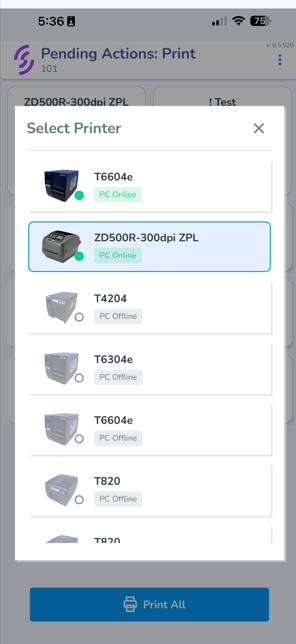
To choose a different printer click the image of the printer.
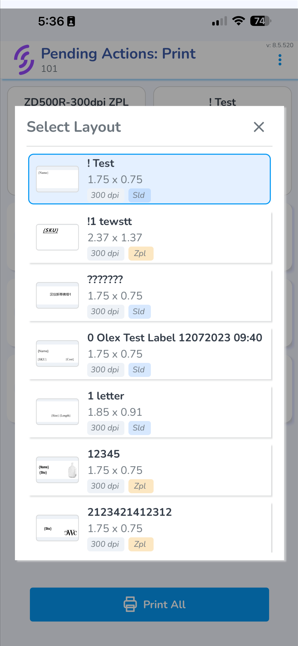
To choose a different label design template click on the Label Design.
Click Print All to iniciate the print job.
Once the print job has been completed, click "Complete" to end the print process and return to the list view.
Add Scans
Once needed labels have been printed an "Add Scan" task will be generated. The Add scan list represents all items which have been printed and are ready to be scanned and added to inventory.
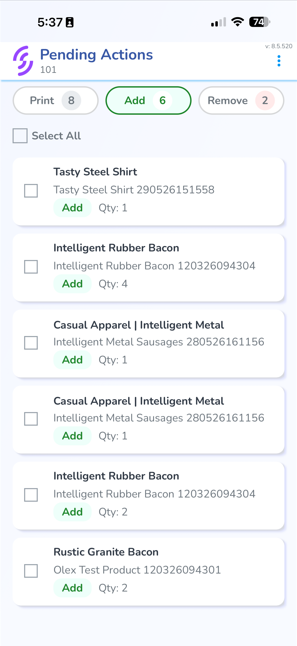
- Select one or more checkboxes
- Click
- Pair the RFID reader
- Scan the items you wish to add
- Confirm that the progress bar indicates that all items are added
Remove (Archive) Scans
Select one or more checkboxes