Scanning & Auditing
Scan to identify on hand inventory, identify absent items, & archive items.
Scan process
This article outlines the steps to scanning inventory in and out of inventory, as well as resetting inventory to identify what is on hand.
Adding Inventory (Scanning)
Retail Stores - Most retail stores can audit daily. Absent items can be compared against sold items to confirm.
Receiving
Any time items are added to your inventory, a ledger of the origin of the item, and where it came from (such as the Order #) should exist.
Receiving Purchases - Newly purchased product must be scanned to confirm receipt.
Receiving Transfers - Scanning product being received from internal sources (other stores or warehouses). If orders are managed in another system, the scans simply validate the actions executed match the order details
Audit & Compare
Before your audit, take time to review your Absent List to determine was moved to this list since the last audit. This list of items can be downloaded and compared against sales against a given period. Remember, items which are displayed as absent list pools items not scanned after an audit. Once the Absent list is cleared, the items are moved to Archived.
Remember, Archived items can be restored when scanning but will not be added back into inventory by default.
1. Compare Inventory - Identify mismatched items via the Compare Tool.
2. Start Audit. from the mobile app, or from the web portal.
3. Scan inventory - Use Speed to capture most items quickly. Density scan option to identify if tags have been missed.
4. Compare Inventory - Load the compare tool again to confirm mismatched items.
5. Resolve - If mismatches still exist,
- Manually check:
- Does the quantity match the partner On Hand?
- Are items missing tags?
- Are items packed too densely?
- Are there missing items?
- Are there items blocking the signal?
- Do you need to be closer to capture the tags?
- Try different tags if overall readability is poor
- Print Tags - for missing items
- Scan inventory to capture missing tags
- Scan new items
- Adjust inventory for missing items can mark them as shrinkage
6. Repeat Steps 4 & 5 until no Mismatches appear
Following these steps will promote confidence in the technology and ensure that your inventory is always accurate.
Removing Inventory (Archiving)
Archive Scan
Sales Order Verification scan
Shipping Transfers
Resolve & Sync
This article describes the process of resolving inventory count discrepancies and syncing to Shopify after you perform an Audit.
This feature is currently only available for customers using our Shopify integration. For all other customers, refer to the Audit & Compare article
What is a Resolution?
In Simple RFID, a Resolution is how we update Shopify's inventory counts to match our scanned counts. Each Mismatched product needs a Reason for that mismatch. A Reason could be missing tags, more products than Shopify expected, etc. Each reason has an Action attached to it. An Action could be printing tags, scanning tags, or updating Shopify's inventory count. The Resolution Center allows you to provide Reasons and perform Actions for products that are Mismatched.
Access the Resolution Center
From an Audit, you can go to the Resolution Center. This is where you can give reasons for specific items being Over- or Under-expected.
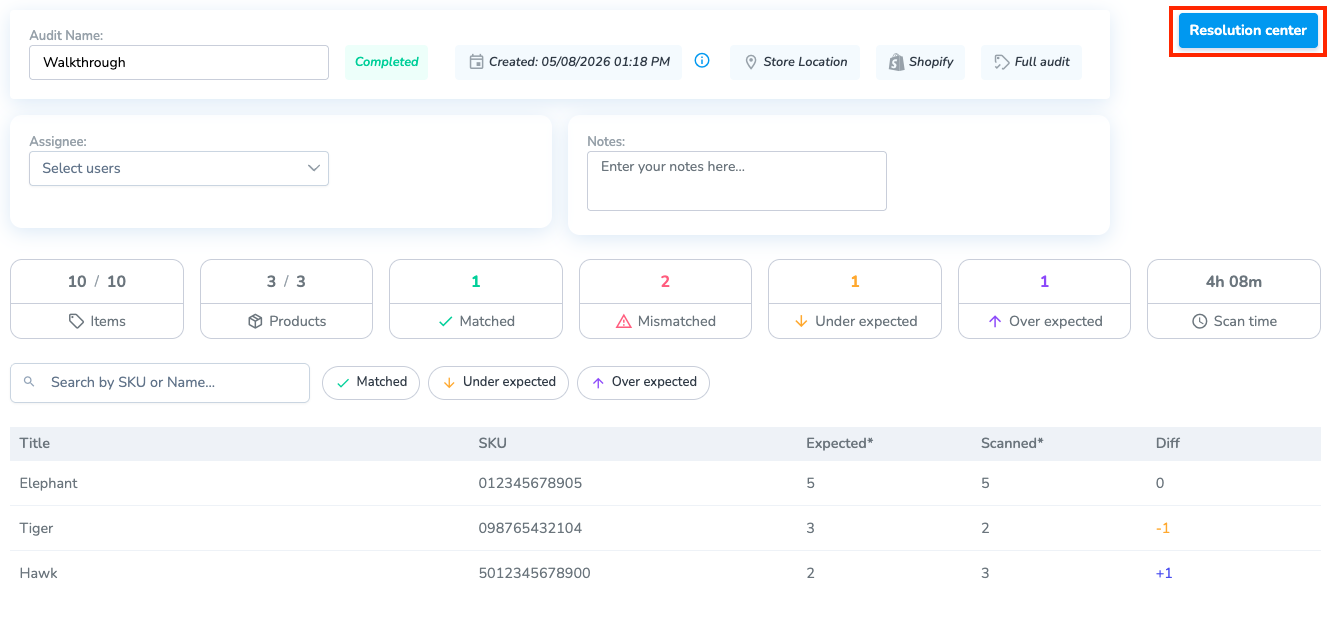
You can also access this page from the Resolve & Sync tab in the navigation menu.
Resolve Mismatched Products
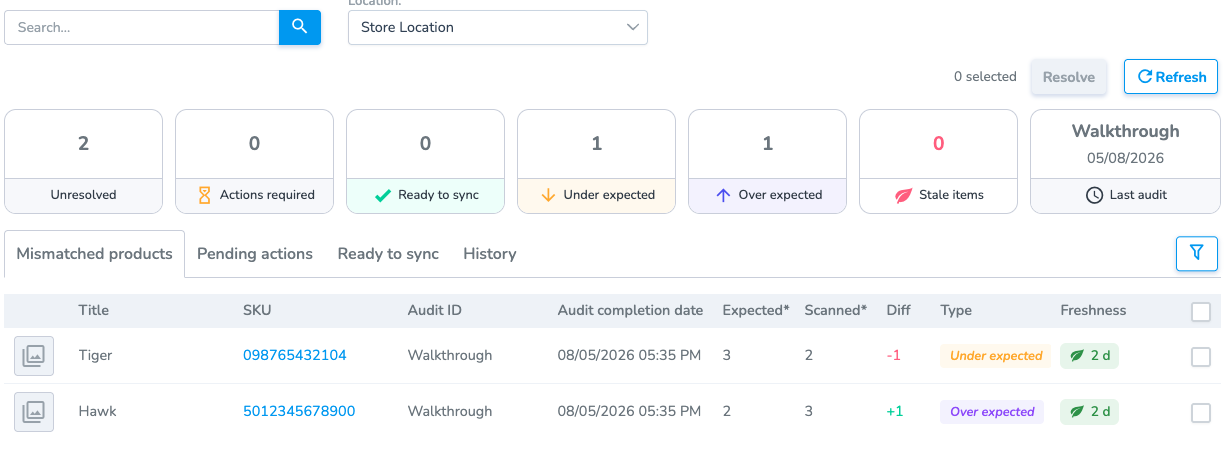
Each product can be in one of three categories:
- Mismatched Products: The products are either Under Expected or Over Expected without a Resolution
- Pending Actions: The products are waiting for a specific Action to be taken (printing, scanning, etc.)
- Ready to Sync: The products are waiting to be synced with Shopify
You can select one or multiple products, and click Resolve to bring you to the resolution step. There are two groups on this page: Under Expected and Over Expected.
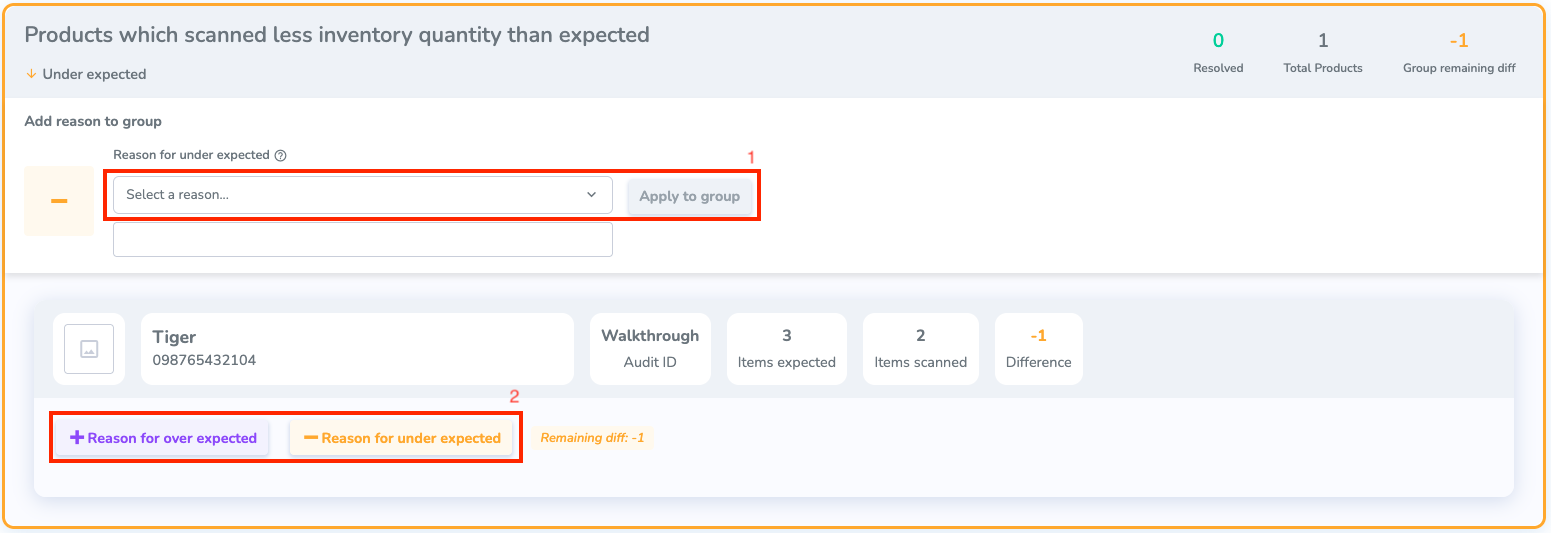
To Resolve a mismatch, you need to give it a Reason. Depending on the reason you give it, it will require a specific Action.
There are two different ways you can add a Reason:
1. Group Reason: Give the same reason for every product selected
2. Single Reason: Give a reason for a specific product
Once you have selected a Reason for all of the products, any that require an Action will be put in the Pending Actions section in the Resolve & Sync tab.
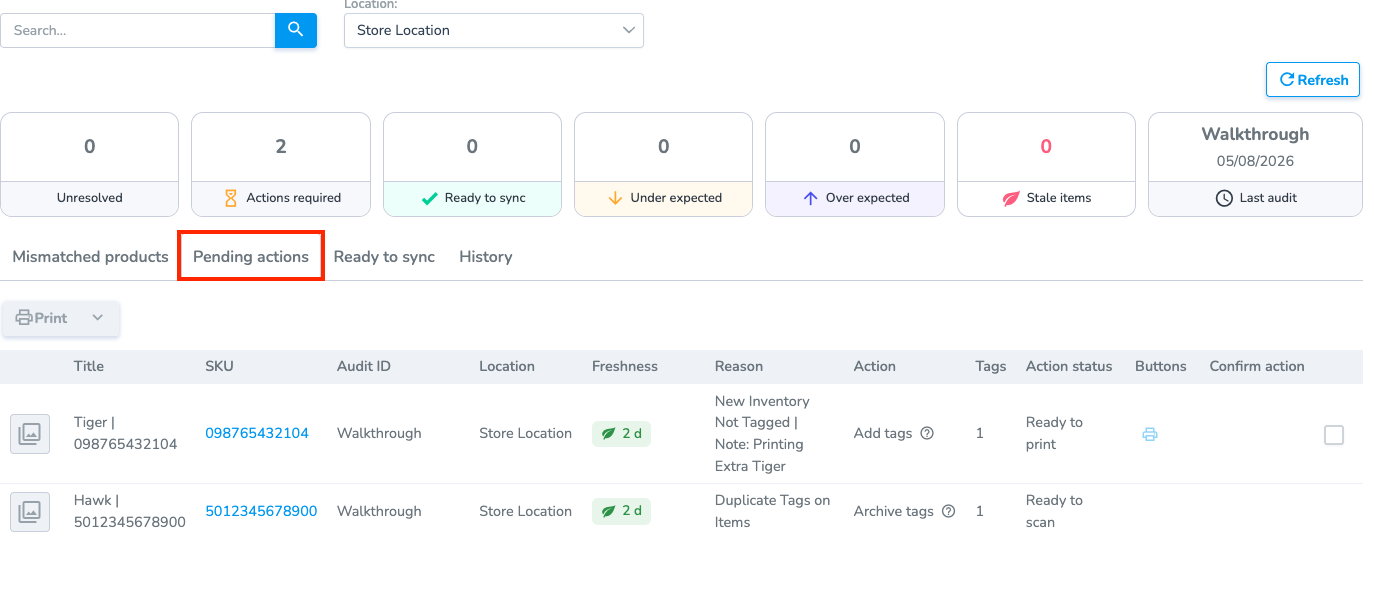
Some Actions can only be resolved on the Simple RFID mobile app. For example, archiving an extra tag.
From here, you can see the Action that needs to be taken. You can hover over the Action column to see what needs to be done.
Any products that need to be synced will be in the Ready to Sync tab.
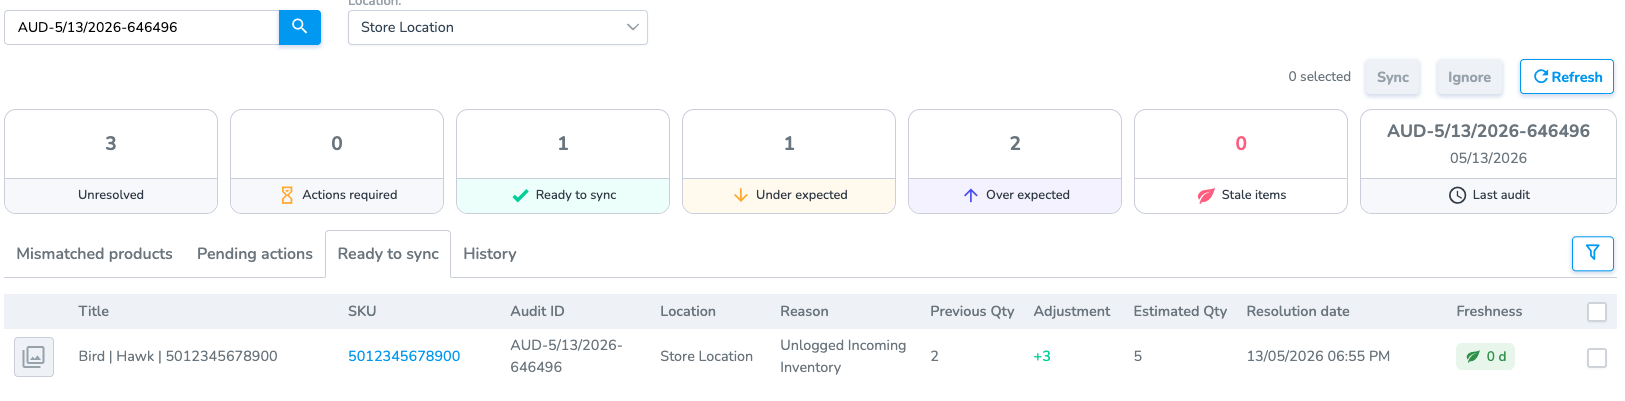
You can Ignore products; this will remove them from the Resolve page without updating Shopify
Compare Scan
This article describes the process of scanning inventory with a live comparison of your current inventory
For information on the different settings on the scan page, please read here
Starting a Compare Scan
There are multiple places where you can perform a Compare Scan. These include:
It's important to note that the Compare Scan has the same function in both places you perform it: You want to compare an inventory is matched with your current physical inventory in real time.
On the Scan page, there are two values for each product that you will want to keep track of
- Scanned: The number of tags that have been scanned this session
- Expected: The inventory count currently in the inventory
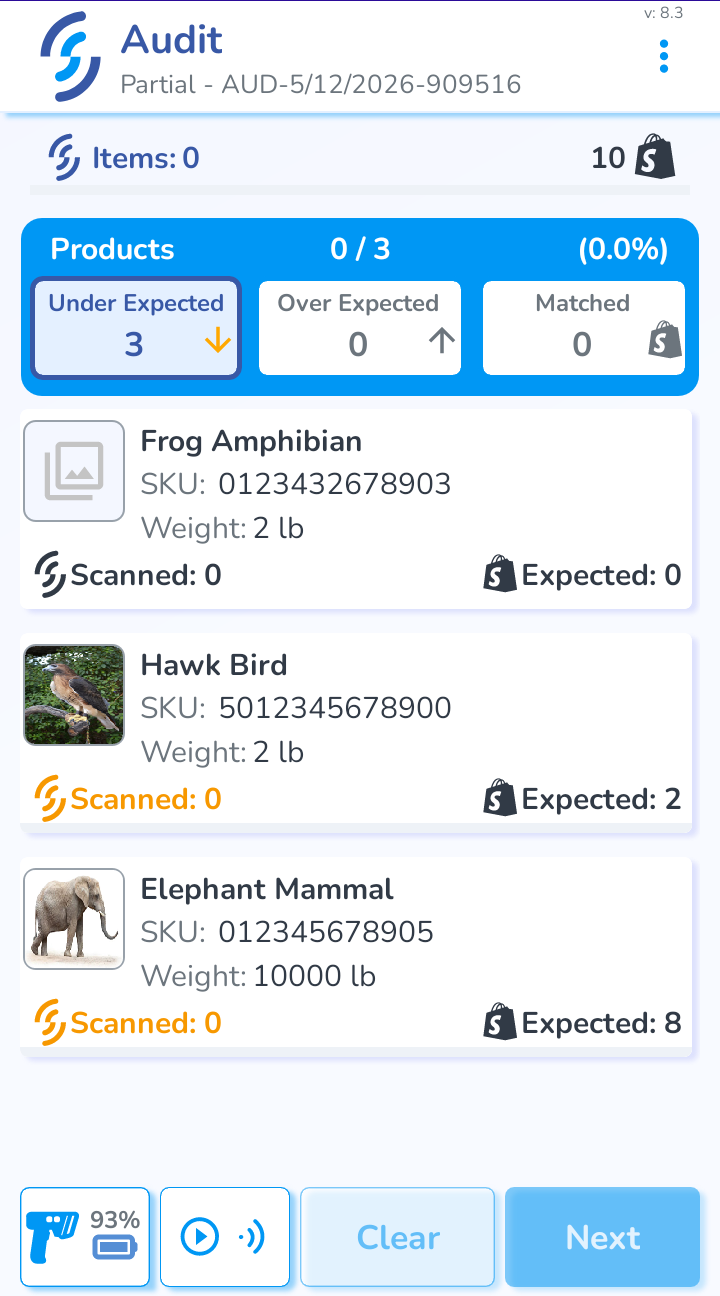
There are three possible states that a product can have:
- Under Expected: The Scanned amount is less than the Expected amount
- Over Expected: The Scanned about is more than the Expected amount
- Matched: The Scanned amount is equal to the Expected amount
Every product will be in the Under Expected section, because the Scanned amount starts at 0
Scanning Process
As you scan products, they will be put into the three sections explained previously. You can click on a section to view all of the products in that section.
While the scanner is active, there will be a loading screen in the product area. To view the counts for your products, stop scanning.

Once you feel confident that you have picked up everything, press Next. This will take you to the Summary Page.
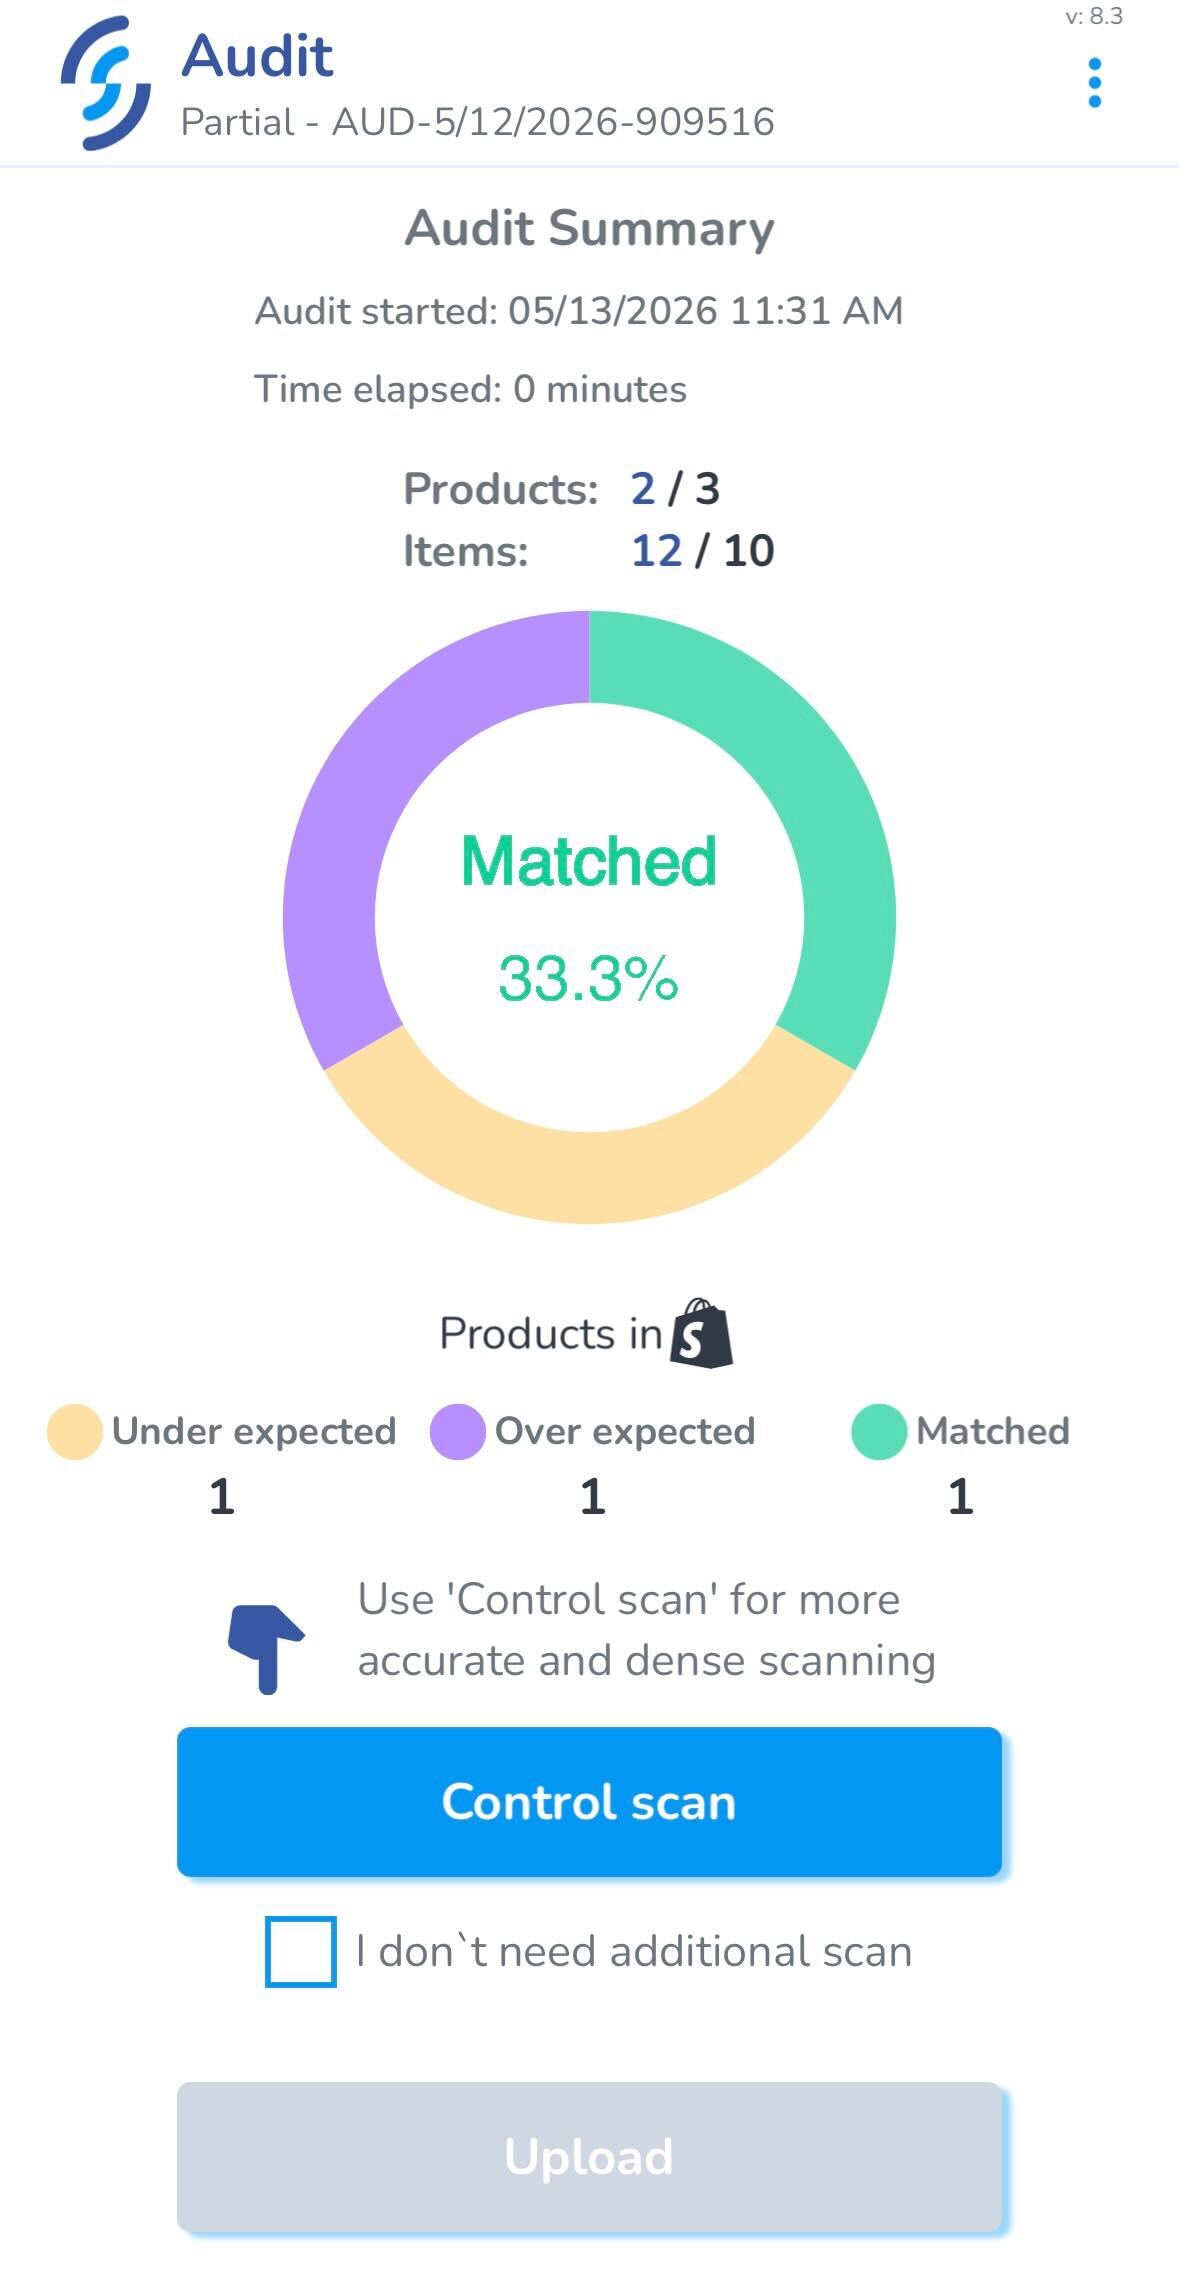
From here, you can see how many products are in each section, and how many items you picked up.
There are two options on this page:
- Control Scan: Perform another scan on Density mode to pick up any tags you may have missed
- Upload: Upload the scan to an Audit, or inventory
A Control Scan is recommended for greater accuracy, but you can click the checkbox below to go straight to an Upload
Viewing Compare Scan History
You can view all of the Scans you have performed in the Scan Sessions page on the Web Portal. The Scan Type for the Scan will be a Reset.
