Hardware: Readers & Printers
- RFID Readers
- Tag Persistence and Scan Modes
- DT50P All-in-One Reader: Install Battery
- DT50P All-in-One Reader: Set up MDM / Automatic Updates
- TSL Readers - Troubleshoot common issues
- TSL Readers: Install Battery for 2128P
- TSL Readers: Update Firmware
- TSL Readers: Installing VCP Drivers - Windows for ARM
- RFID Printers
- Identifying your Printer Model
- What is a Platen Roller?
- Printronix: What Needs to Be Plugged Into a Printronix Printer?
- Printronix: ENTER SWITCH LOCKED
- Printronix: Unpause your printer
- Printronix Printers: Loading Media & Ribbon
- Printronix: T800: Loading Media & Ribbon
- Printronix: T4000: Loading Media & Ribbon
- Printronix: T6000: Loading Media & Ribbon
- Printronix: GAP NOT DETECTED
- Printronix: Calibration
- Printronix: Alignment
- Printronix: Darkness
- Printronix: Connecting to Wi-Fi
- Printronix: Check Firmware Version
- Printronix: Update Firmware via Webpage
- Printronix: Job in Process
- Printronix: Updating Firmware via Flash Drive
- Configuring your Printronix Printer after a reset
- Printronix: Change Interface
- Printer Setup Instructions
- Printronix: How do I know if my printer is ready to print?
- Zebra: Updating Firmware
- Zebra Printers: Loading Media & Ribbon
- Zebra: ZD500R: Manual Calibration
- Zebra: ZD500R: Calibrate from Printer's Interface
- Zebra: ZD500R: Alignment
- Zebra: ZD500R: Reset to Factory Defaults
- Zebra: ZD621R: Calibrate from Printer's Interface
- Zebra: ZD621R: Alignment
- Zebra: ZD621R: Reset to Factory Defaults
- Zebra: ZD621R: Adjust Darkness
- Zebra: ZD621R: Setup Wireless Connection (Wi-Fi)
- Zebra: ZT411R: Load Labels & Ribbon
- Zebra: ZT411R: Adjust Print Darkness
- Zebra: ZT410R: Load Media & Ribbon
- Zebra: ZT411R: RFID Calibration
- Zebra: ZT410R: Calibrate
- Calibrate from the printer directly
- Fixed Readers
- Fixed Reader Installation and Setup Instructions
- Fixed Reader Overview
- Restarting Fixed Reader Client
- Impinj xSpan - Update Firmware
- Impinj xSpan - Troubleshooting Connection
- Impinj R220
- Impinj R420
- Hardware Policy
- POS (Point of Sale) Readers
- Loss Prevention Portals
RFID Readers
Tag Persistence and Scan Modes
Tag States A and B
During a scan, RFID tags transition between two primary states:
State A (Not Charged): The tag is at rest and ready to be read.
State B (Charged): The tag has been energized and read by the scanner.
Once a tag is scanned and enters State B, it must fully discharge and return to State A before it can be accurately registered in a new, distinct scanning session. The time required for this transition is known as the persistence or "cooldown" period.
Selecting the Appropriate Scan Mode
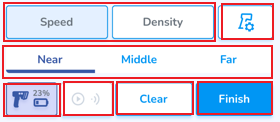
To manage this charging cycle effectively, your system provides two scanning modes: Speed and Density.
Speed Mode
The mode is designed for rapid, continuous scanning operations.
Functionality: The scanner charges tags for a minimal, unnoticeable duration.
Benefit: Because the charge is brief, tags discharge almost instantly, eliminating the cooldown period. This allows you to conduct back-to-back scan sessions without delay.
Recommended Use: Ideal for standard daily operations where wait times are undesirable, such as quick spot-checks or rapid order processing.
Density Mode
The mode is designed for thoroughness and high-volume scanning in crowded environments.
Functionality: The scanner applies a longer charge to the tags to capture a higher volume of data within a single session.
Benefit: Maximizes the number of tags read, ensuring comprehensive capture even in dense or tightly packed areas.
Requirement: Because the tags receive a longer charge, they require approximately 5 minutes to discharge and return to State A. Initiating a new scan before this cooldown completes may result in unread tags.
Recommended Use: Best suited for comprehensive audits, cycle counts, or scanning densely packed pallets. It can also be used effectively as a control scan when performing an Audit. You must plan for the 5-minute wait time between scans in the same area.
Configuring Scan Settings
You can toggle between Speed and Density modes directly within the application interface:
DT50P All-in-One Reader: Install Battery
This article describes the process of installing the battery when your All-In-One reader arrives.
Instructions
The battery is included in the packaging along with the reader.
1. On the bottom backside of the reader, unlock the handle
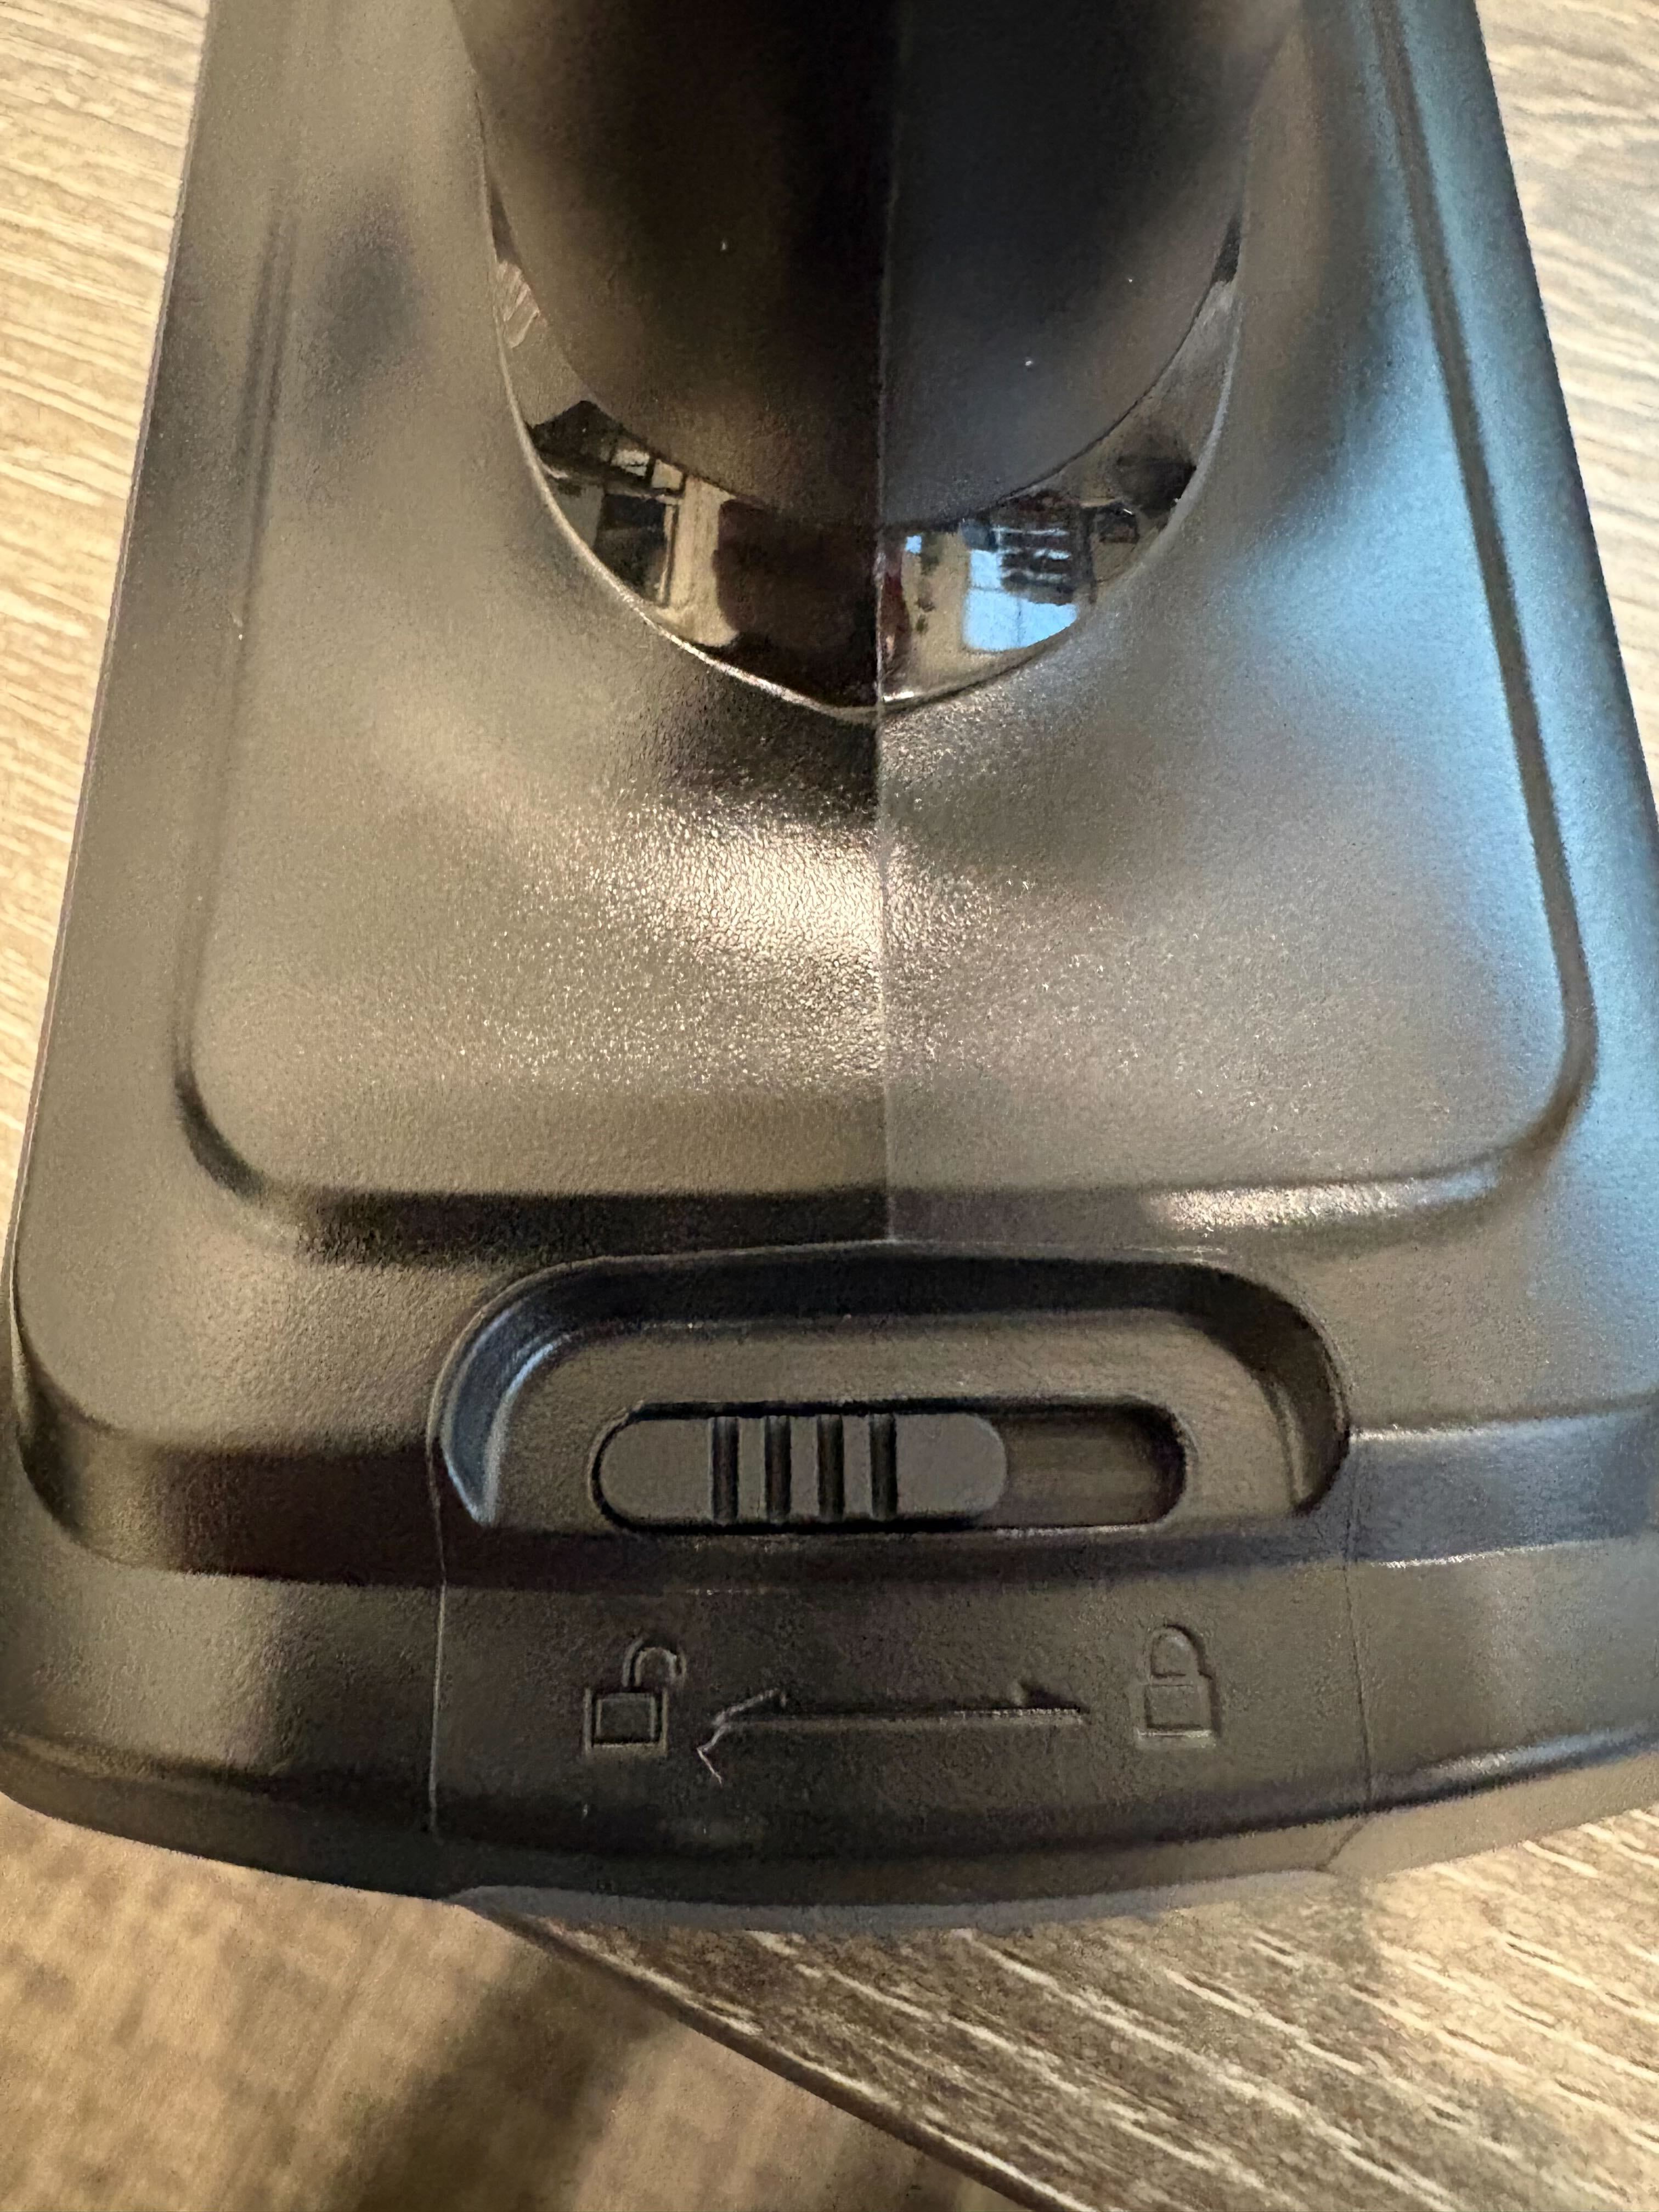
2. Pull the handle off of the reader. It might take some force.
3. Install the battery inside the red rubber band. Ensure that the arrows on the battery are facing towards the top of the reader.

4. Put the handle back on the reader and lock it
5. Hold the power button on the top of the phone until it buzzes
The Simple RFID app should be preinstalled and ready to use on the home screen.
You will need to connect to your WiFi network in the settings on the reader.
DT50P All-in-One Reader: Set up MDM / Automatic Updates
This article describes the process of setting up the reader to get automatic updates.
What is an MDM?
MDM stands for Mobile Device Management. It is software that runs on our UROVO devices, that allows us at Simple RFID to manage the device remotely. This allows us to send automatic updates, and troubleshoot issues. This means that we have visibility on when the device is used. We DO NOT have access to any location data, camera, or microphone. If you have any more questions or concerns about this software, please send a message to the support team.
This will completely reset the reader. If you are using the phone attached to the reader for anything other than Simple RFID, be aware that it will be deleted.
Hard Reset Device
- Open the Settings app
- Scroll down to the bottom and select System
- Scroll down and select Reset options
- Select Erase all data (factory reset)
- Select Erase all data
- Select Erase everything & Reboot

It will reset to the factory default settings. This may take a few minutes. After it is reset, you will see a screen that says Hi There
Do not select Start. If you do, set up the phone and reset again to get on this page.
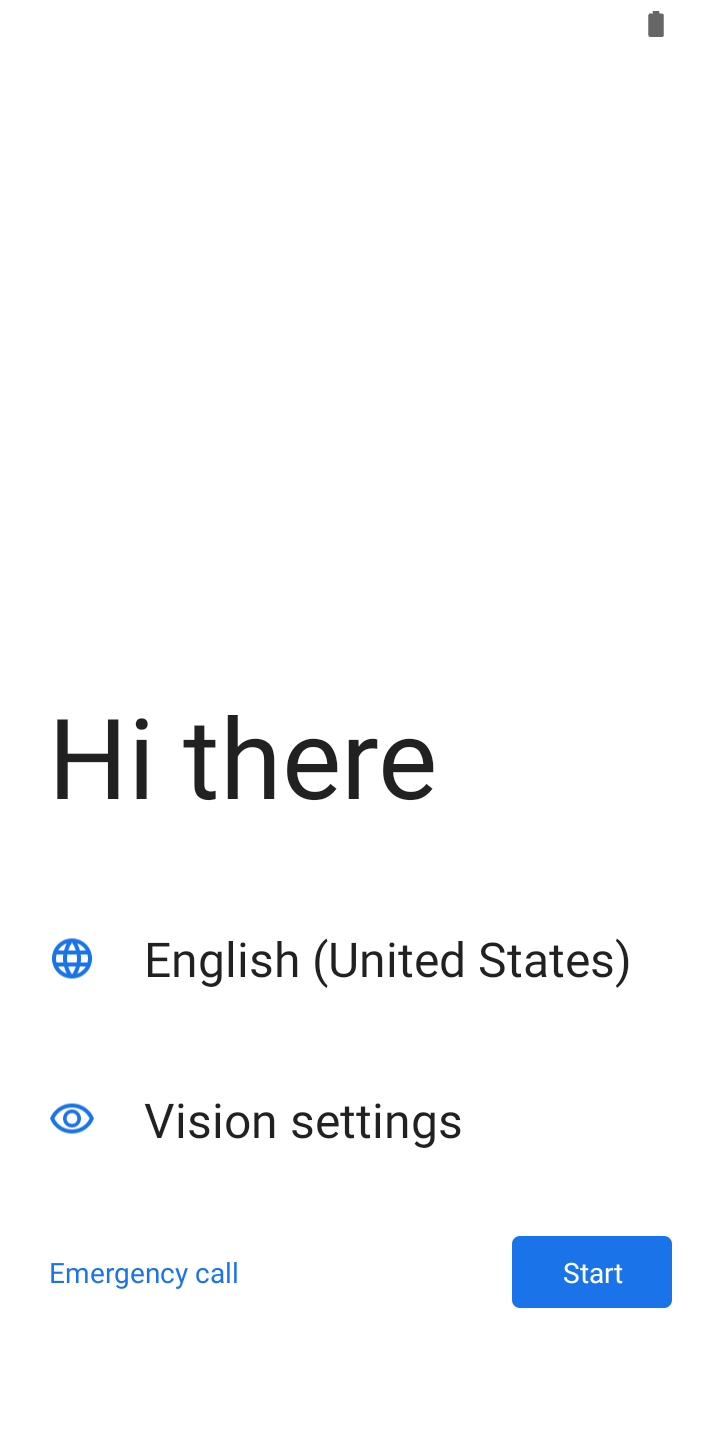
Tap the screen above the text 7 times in rapid succession. This will pull up a camera that is looking for a QR code. Scan this QR code:
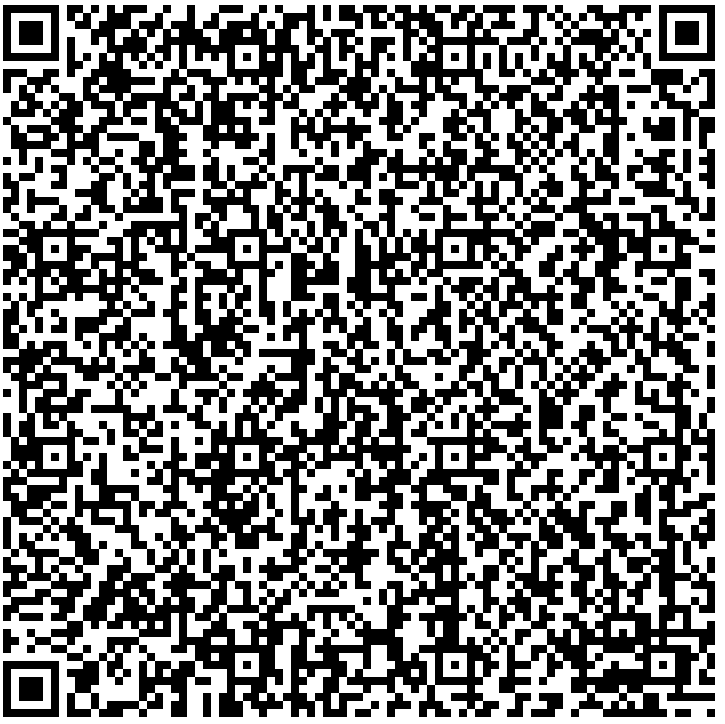
This will download our software, and allow us to keep track of the reader. Accept all of the prompts, and you are all set!
TSL Readers - Troubleshoot common issues
Issue: The reader will not turn on.
- Charge the reader. If the reader will not turn on, it's usually because the battery has no charge. Use the included USB cable or docking cradle to charge the reader.
- Make sure the battery is inserted. The readers do not ship with a battery installed; this must be done manually. Remove the handle by lifting the yellow latch on the back of the reader, and pulling the handle backwards. This will expose the battery cover, which can be lifted to access the battery.
Issue: The reader will not pair with a device.
If you're unable to pair your reader with a mobile device via Bluetooth, take the following troubleshooting steps:
- Make sure the reader is in pairing mode.
In pairing mode, the blue light on the left side of the reader will be flashing.- If the blue light is off, press the trigger on the reader to wake it up.
- If the blue light is solid, the reader is already connected to a host. Make sure the reader is not paired with another device nearby, or plugged into a computer with a USB cable.
If the reader is in pairing mode, but not showing up in your device's Bluetooth menu, try updating the reader's firmware, which will also perform a Bluetooth reset.
Issue: The reader will not charge.
When the reader is charging, the orange light on the side will flash (once, twice, or three times depending on the current charge). When the reader is fully charged, the orange light will remain solid. If the orange light is flashing rapidly, or not on at all, there is an issue with charging: follow the steps below.
- Try a different charging source.
Some power sources don't provide enough energy to charge the reader's battery effectively. Try plugging the reader directly into a wall outlet using the provided adapter. - Try a different USB cable.
If you're not using the original cable included with the device, the cable may not be suitable for charging. If possible, use the original cable; otherwise, ensure you choose a cable that can deliver a charge. - Check the battery.
If the battery isn't inserted correctly, the device will not charge.- TSL 1128: Make sure the 4 contacts on the battery align with the pins on the reader. Additionally, make sure the battery cover is in place securely.
Issue: The reader does not read any tags.
When the reader scans a tag, it will beep and vibrate (unless you have the Buzzer or Vibrate setting disabled in the Reader Settings). If the reader is not providing this feedback, check to make sure that the
- Restart the Simple RFID mobile app.
Occasionally, failed reader commands can cause the application to lose its connection to the reader; even if it still displays the reader as connected. Fully close the Simple RFID app, then re-open it and try again.- Android:
- Open the Recent Apps screen (usually by swiping up from the bottom and holding, or tapping the square/recent button).
- Swipe the app left or right (or up, depending on the device) to close it.
- iOS:
- Swipe up from the bottom and pause in the middle of the screen (or double-press the Home button on older models).
- Swipe the app up off the screen to close it.
- Check the reader's battery level.
If the reader's battery is too low, it won't be able to scan any tags, even if it's still powered on. Charge the device until the battery level reaches at least 25%, then try scanning again.
Issue: The reader is "stuck" on the blue light
If the reader stays turned on with the constant blue light while application is closed, please follow these steps
- Disconnect from iOS devices when not used.
Please also make sure that surrounding iOS devices have Bluetooth disabled or are not paired with this reader.
This is a known behavior when iOS devices tend to connect to the readers in the background thus "intercepting" the connection - Reset the reader by reinstalling the battery.
Remove the handle by lifting the yellow latch on the back of the reader, and pulling the handle backwards. This will expose the battery cover, which can be lifted to access the battery.
If you continue to have issues with your scanner, please contact support for further assistance.
TSL Readers: Install Battery for 2128P
Battery Installation
Your reader may have shipped with the battery already installed.
First, lift the yellow latch on the back of the reader, then slide the handle backwards to remove it:
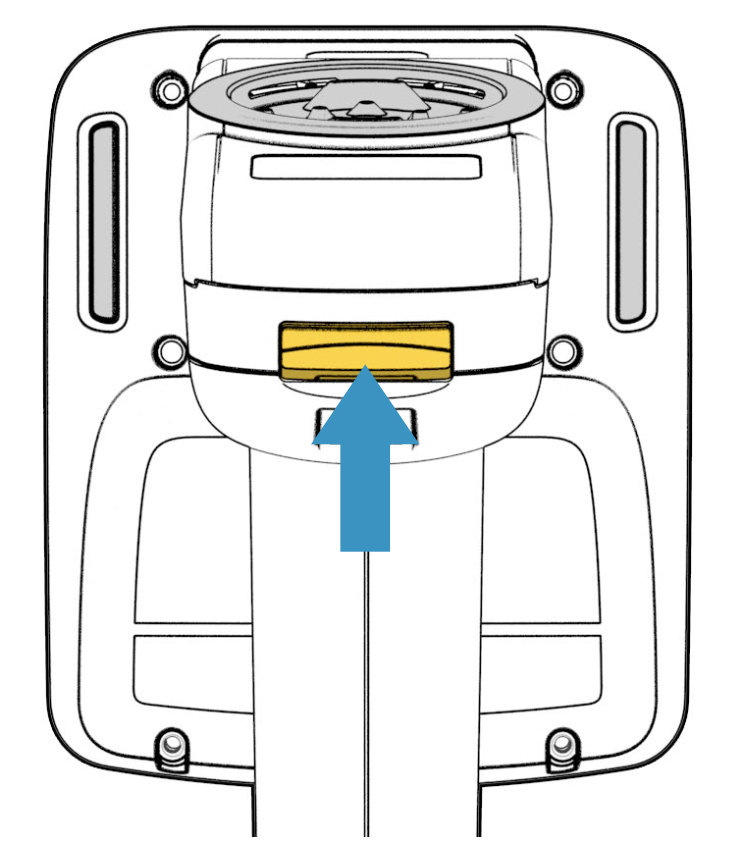
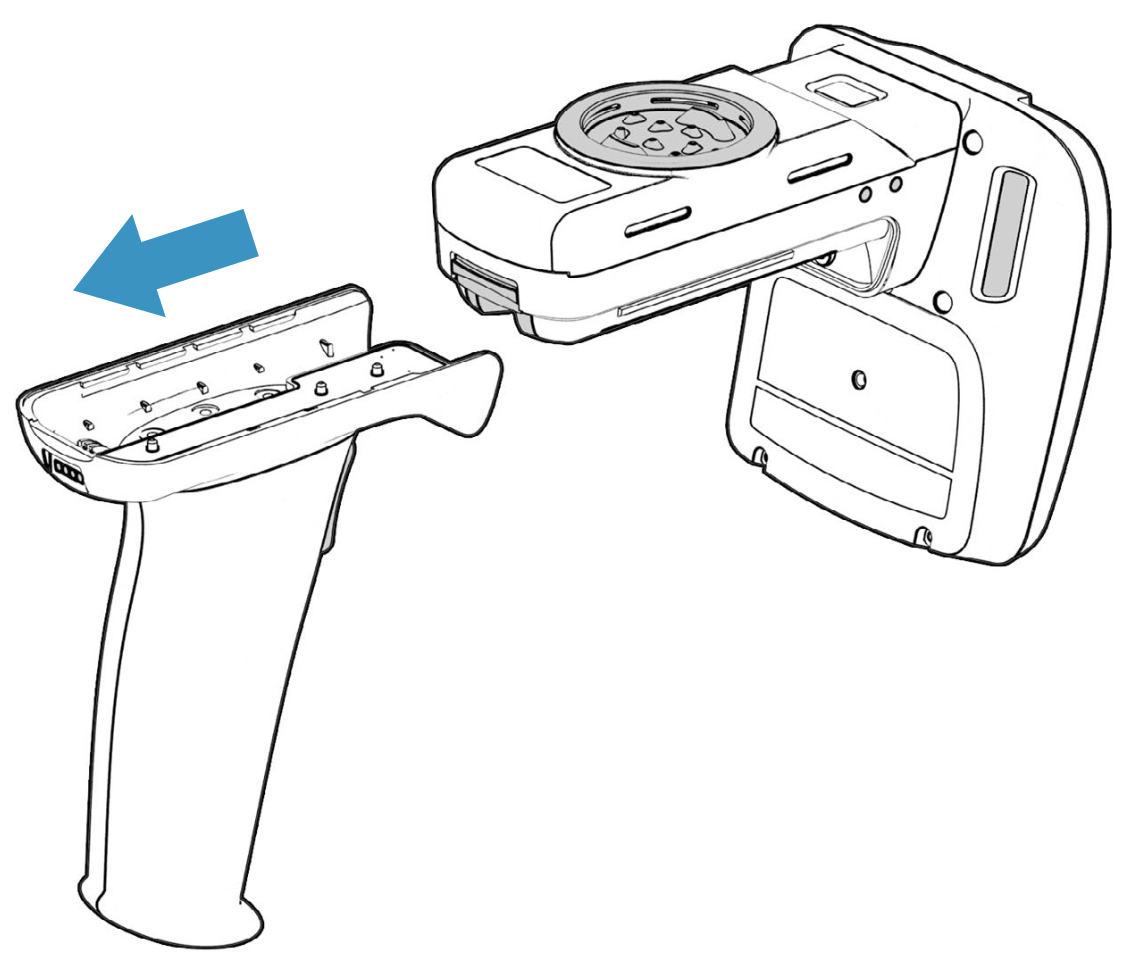
Then, remove the battery cover:
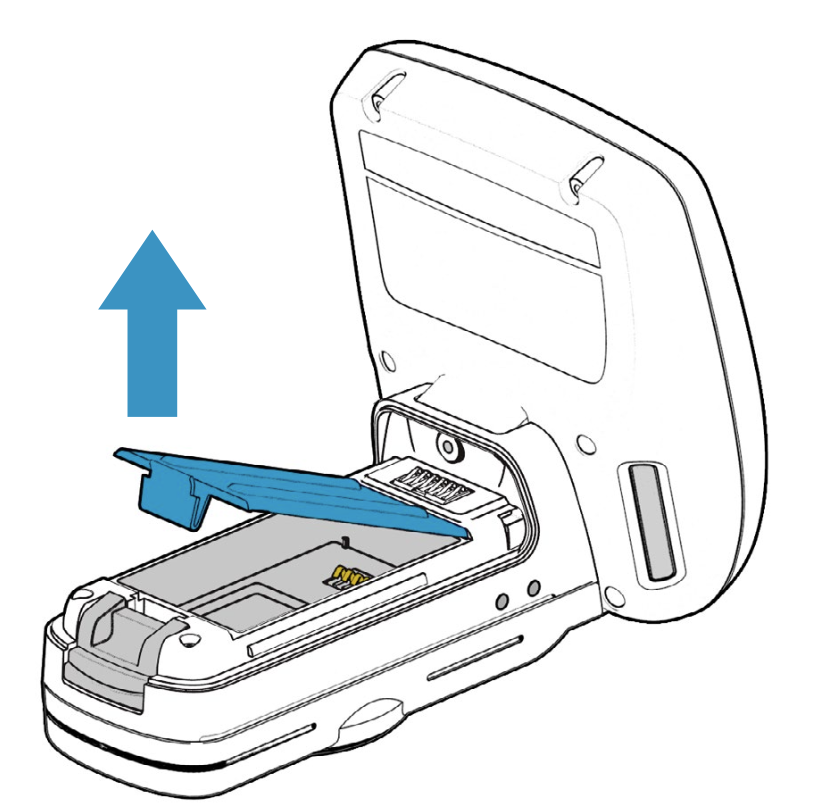
Place the battery in the reader, lining up the pins with the contacts:
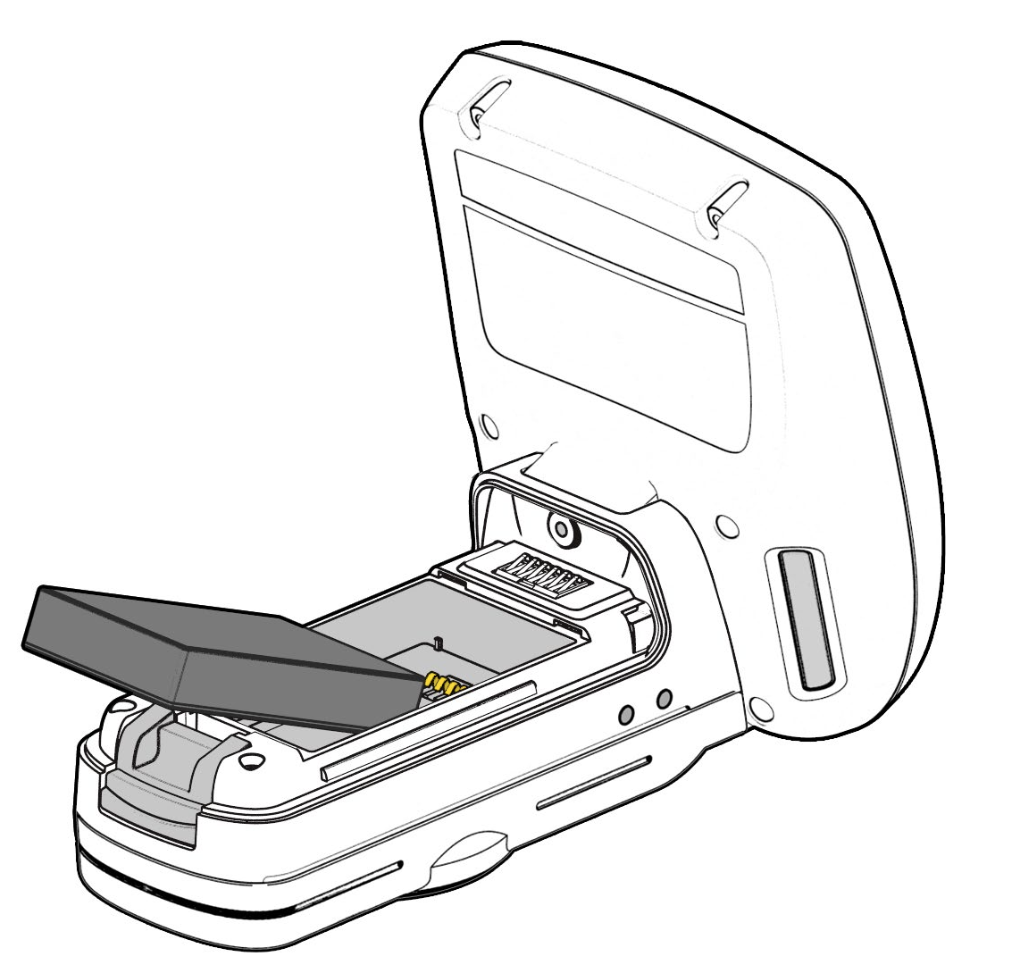
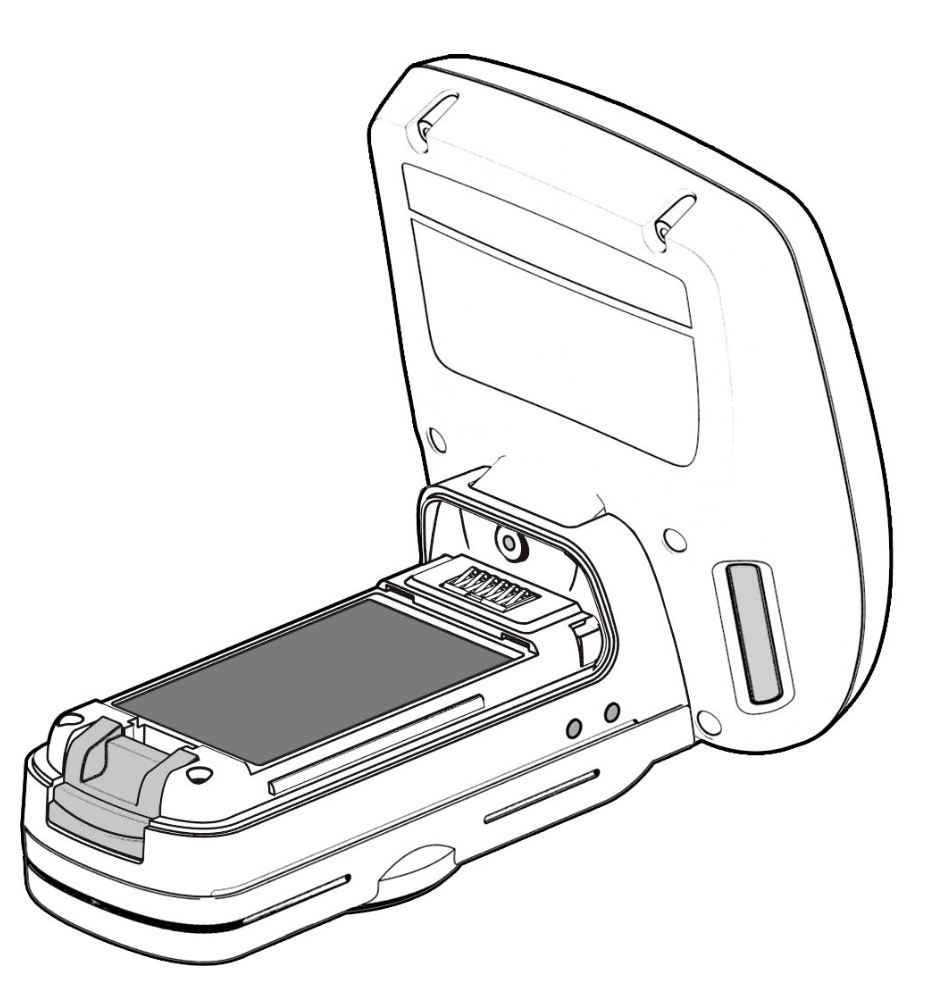
Last, replace the battery cover and the handle:
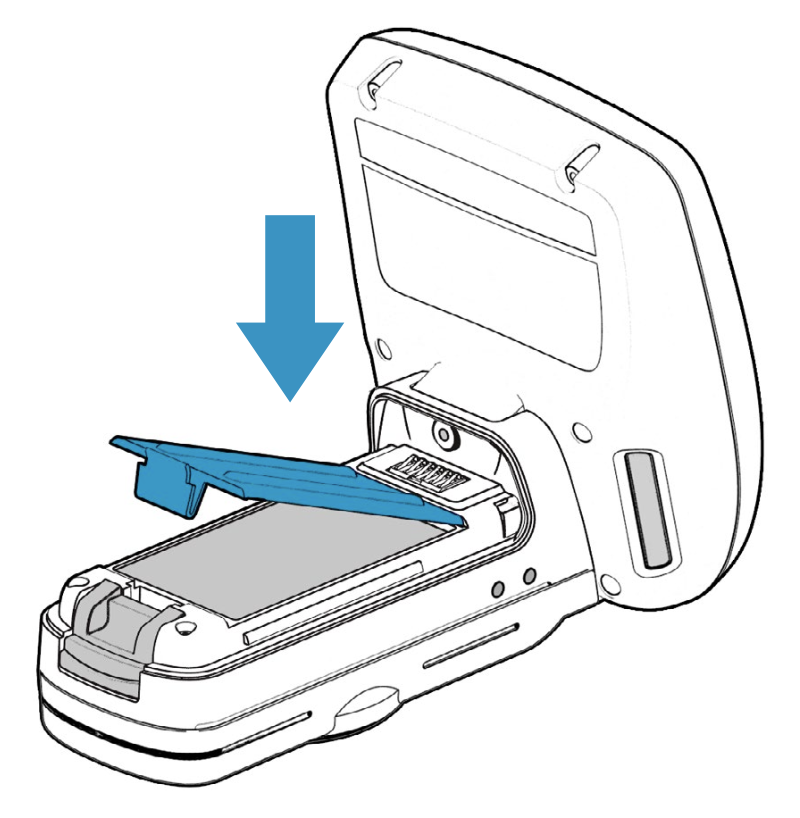
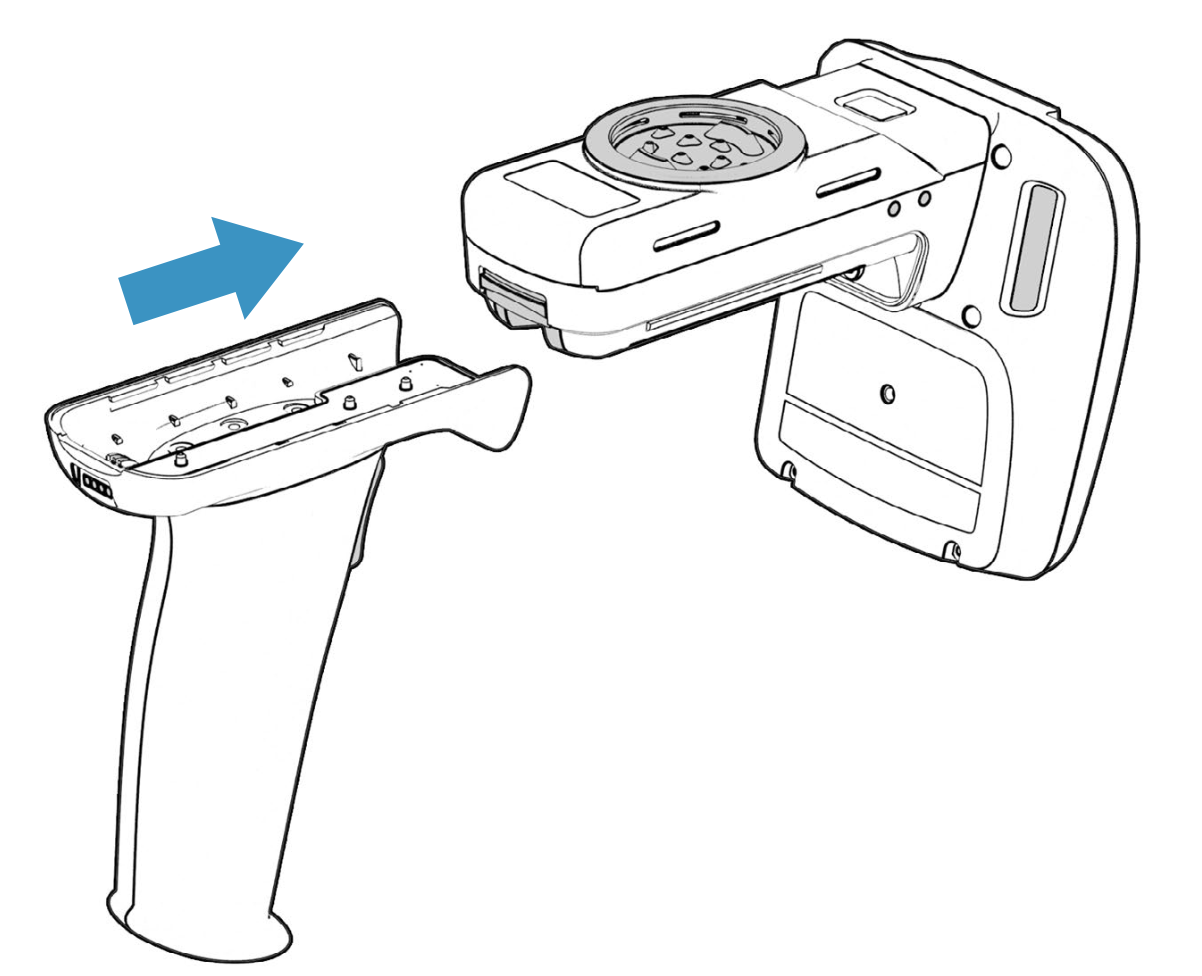
Next, pair your reader to your device.
TSL Readers: Update Firmware
Updating the firmware on your TSL handheld reader can improve the performance of your scans, as well as ensuring you have important fixes that have been pushed by the manufacturer.
If you are using Windows for ARM, you need to install extra drivers. Click here for instructions.
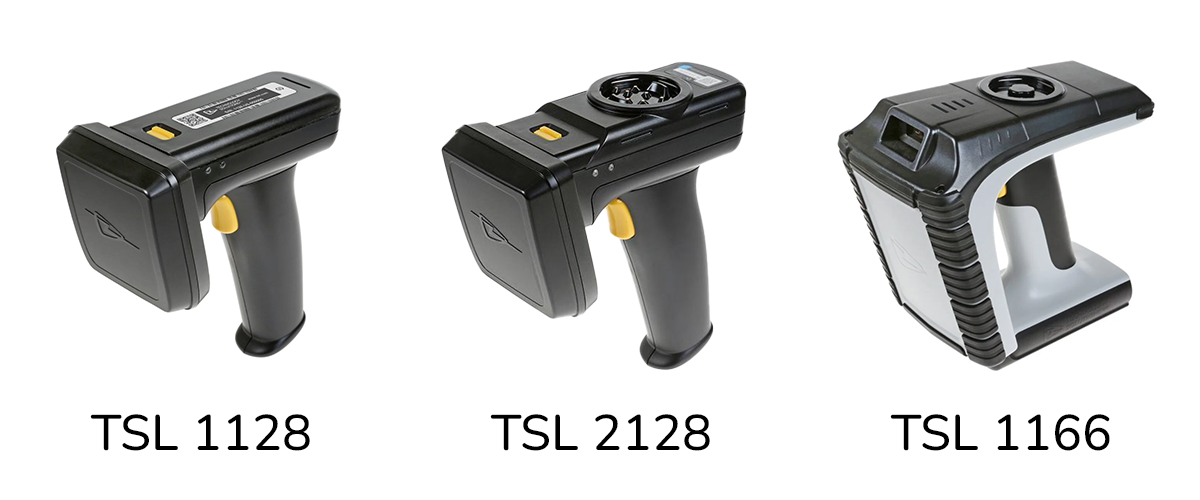
Requirements:
- TSL Reader with battery installed and at least partially charged
- PC or tablet running Windows 10 or higher
- For TSL 1128:
- Included Micro-USB cable to connect the reader to your PC
- For TSL 2128:
- Included docking cradle
- Included Mini-USB cable to connect the docking cradle to your PC
- For TSL 1166:
- Included docking cradle
- Included Mini-USB cable to connect the docking station to your PC
You may be able to use a cable that was not included with your scanner; however not all cables can transmit data.
Step 1 - Download the Desktop Firmware Loader, and firmware for your reader
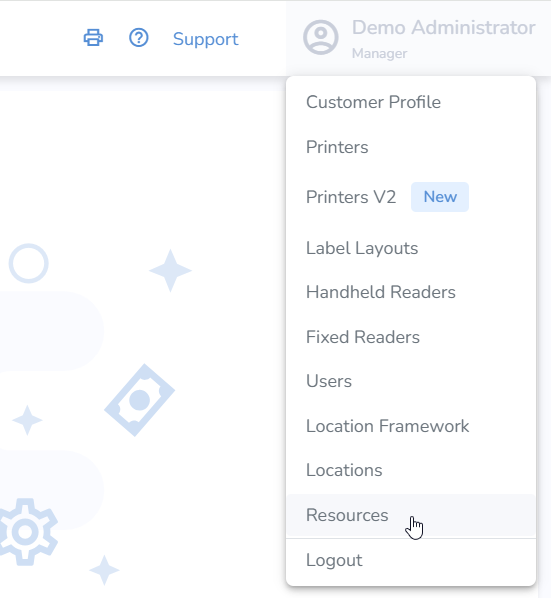
On the web portal, click your account name at the top-right of the page and select Resources
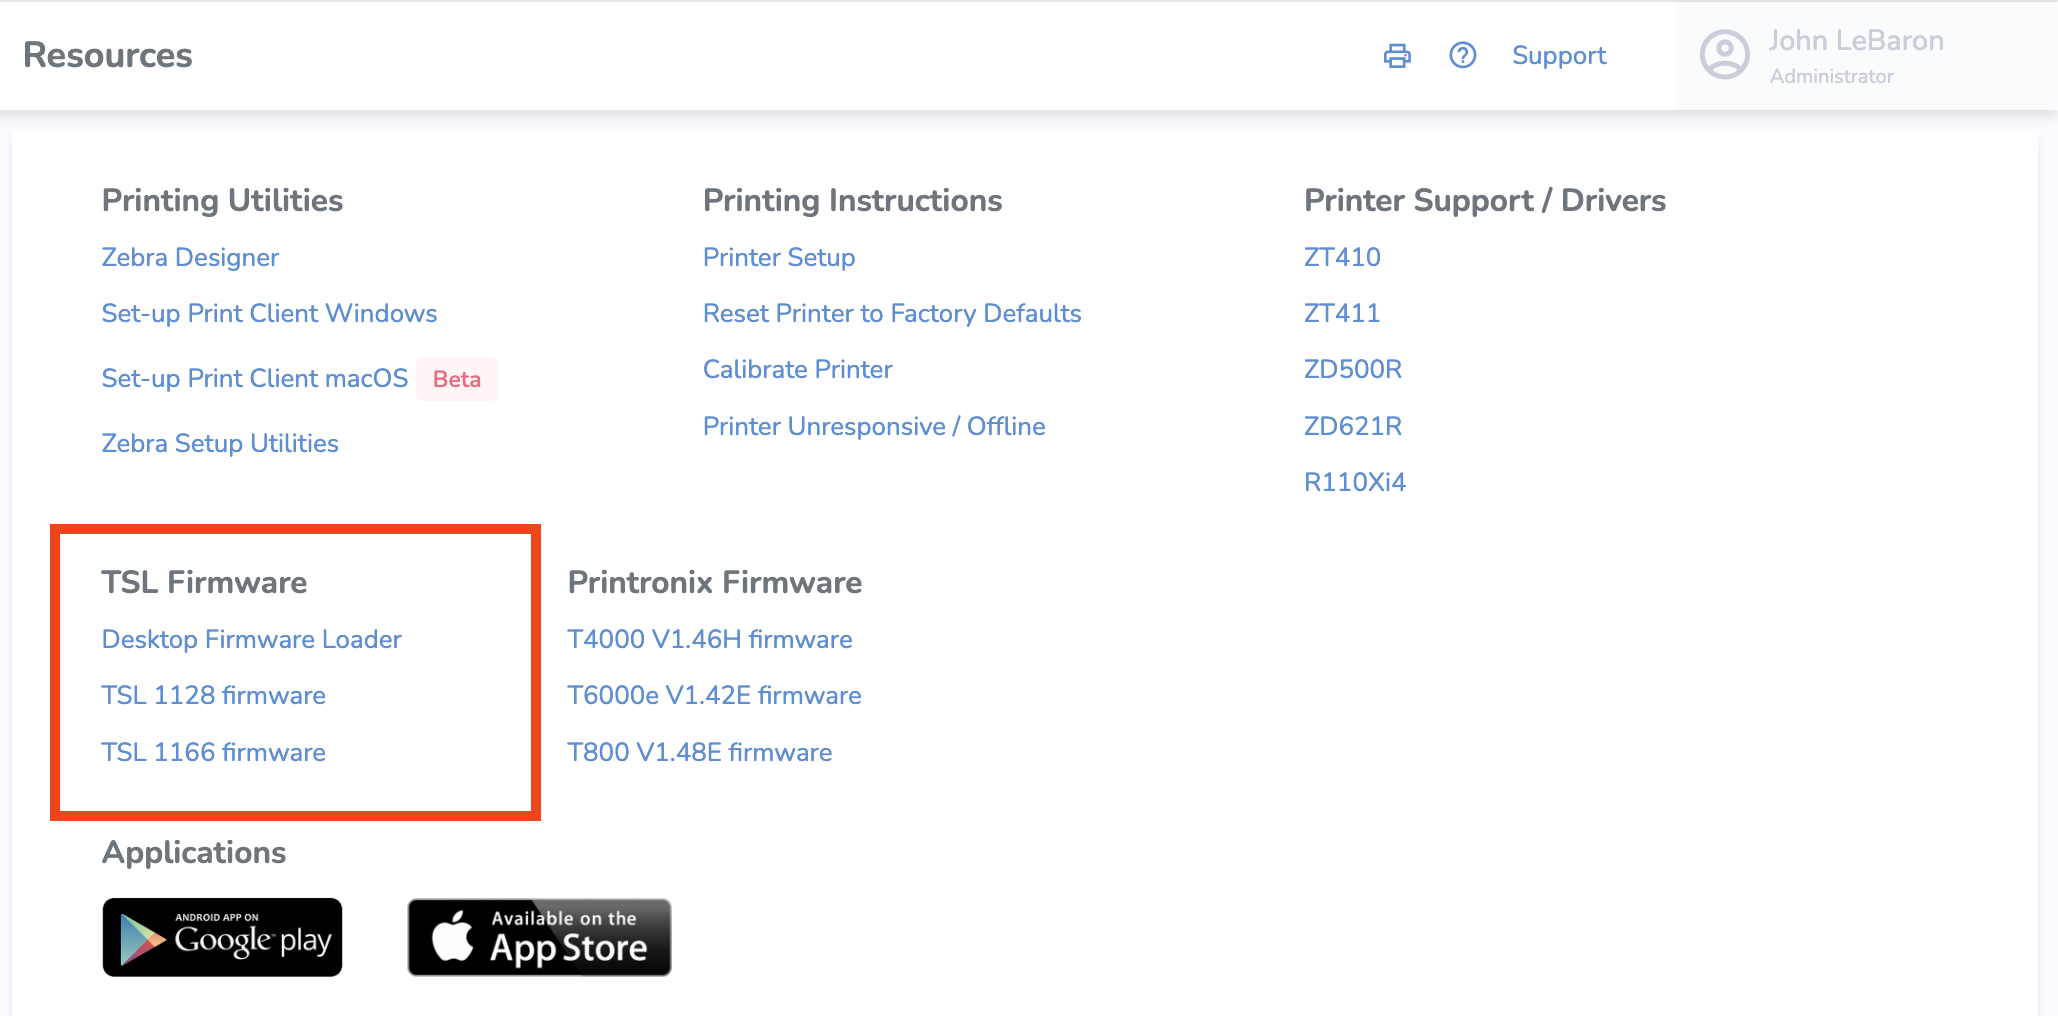
In the "TSL Firmware" section, click "Desktop Firmware Loader," then click the TSL Firmware link that corresponds with your reader:
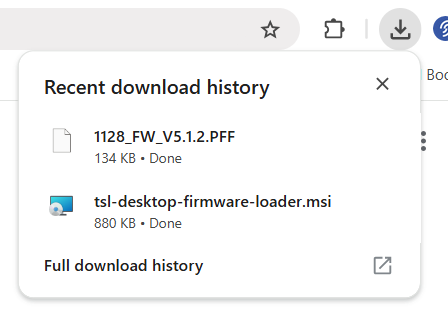
The Firmware Loader installer will be a .msi file, and the firmware itself will be a .pff file.
Step 2: Install the Desktop Firmware Loader
Open the downloaded installer, tsl-desktop-firmware-loader.msi
Follow the setup wizard. If you're asked to allow changes to your computer, select Yes.
Step 3 - Upgrade the firmware
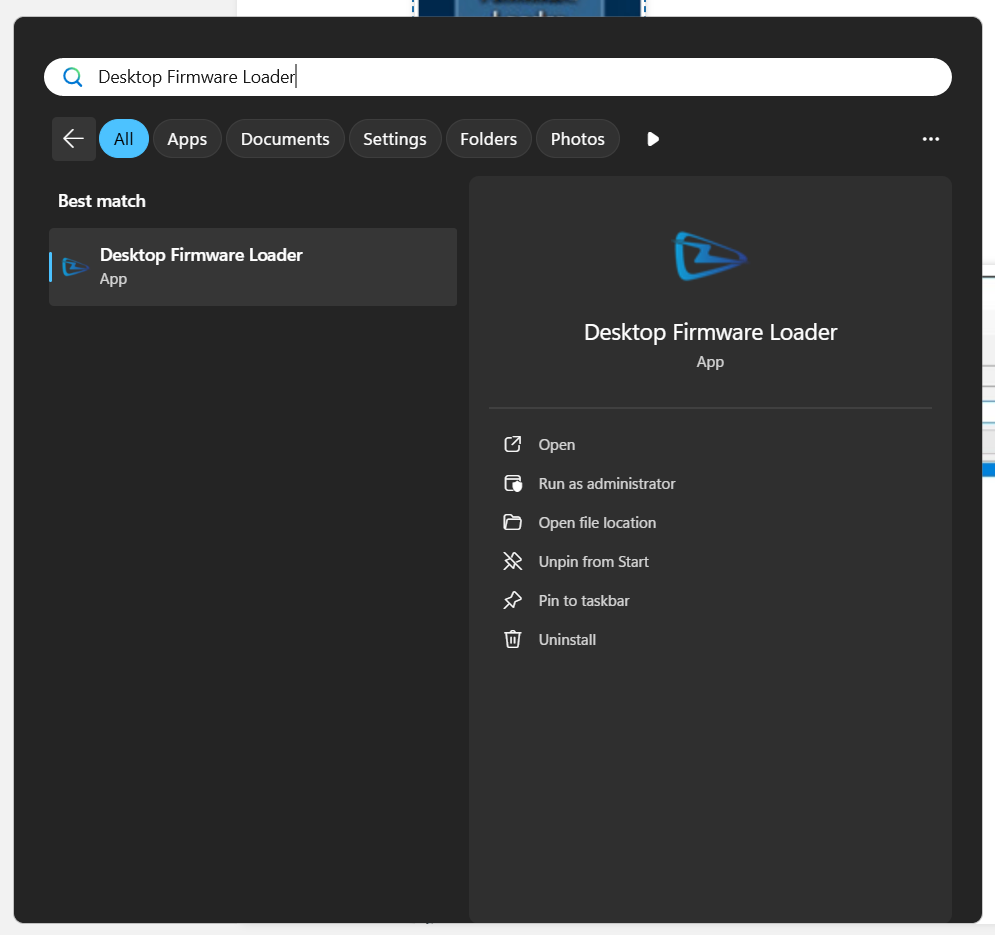
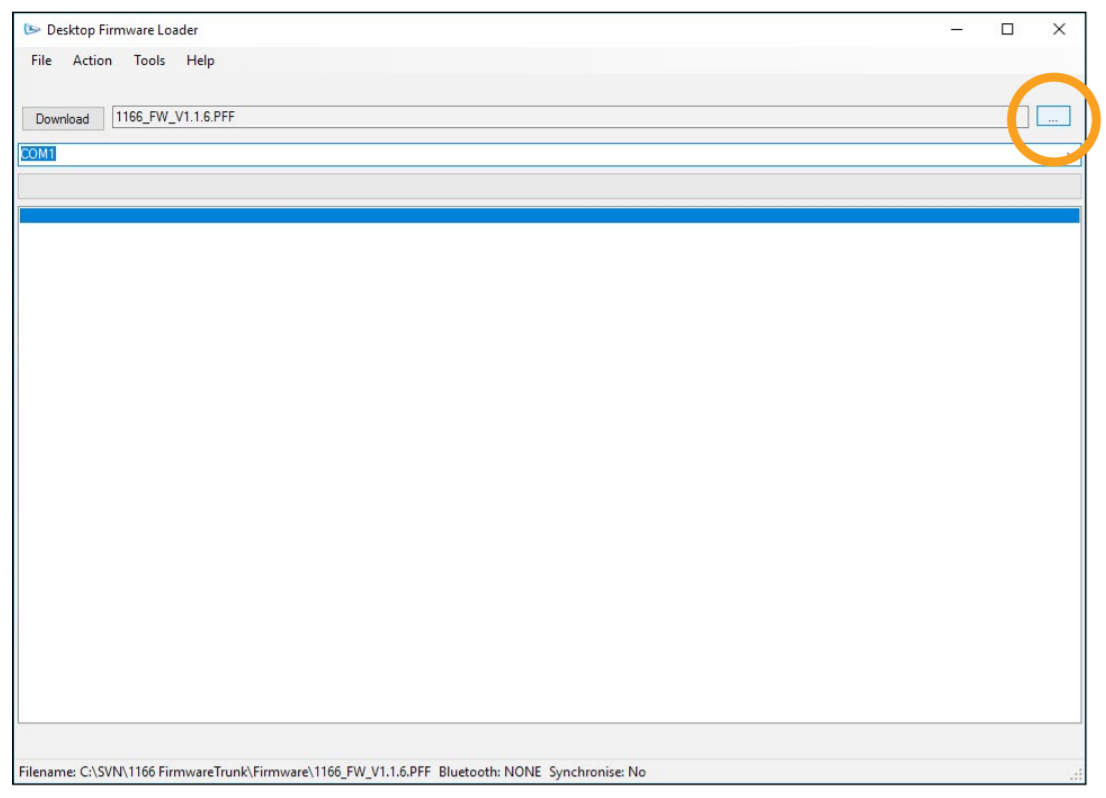
Select “…” to choose the firmware file to download
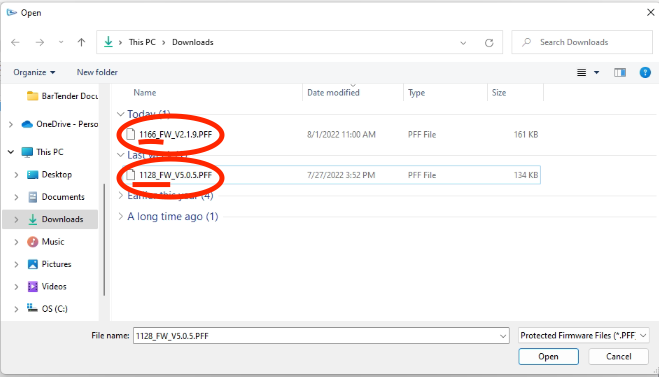
Locate and select the PFF file
Connect the reader to the computer using the supplied USB cable. For TSL 1166 and TSL 2128, you will need to slide your reader into the docking cradle and connect the docking cradle to the computer via USB cable.
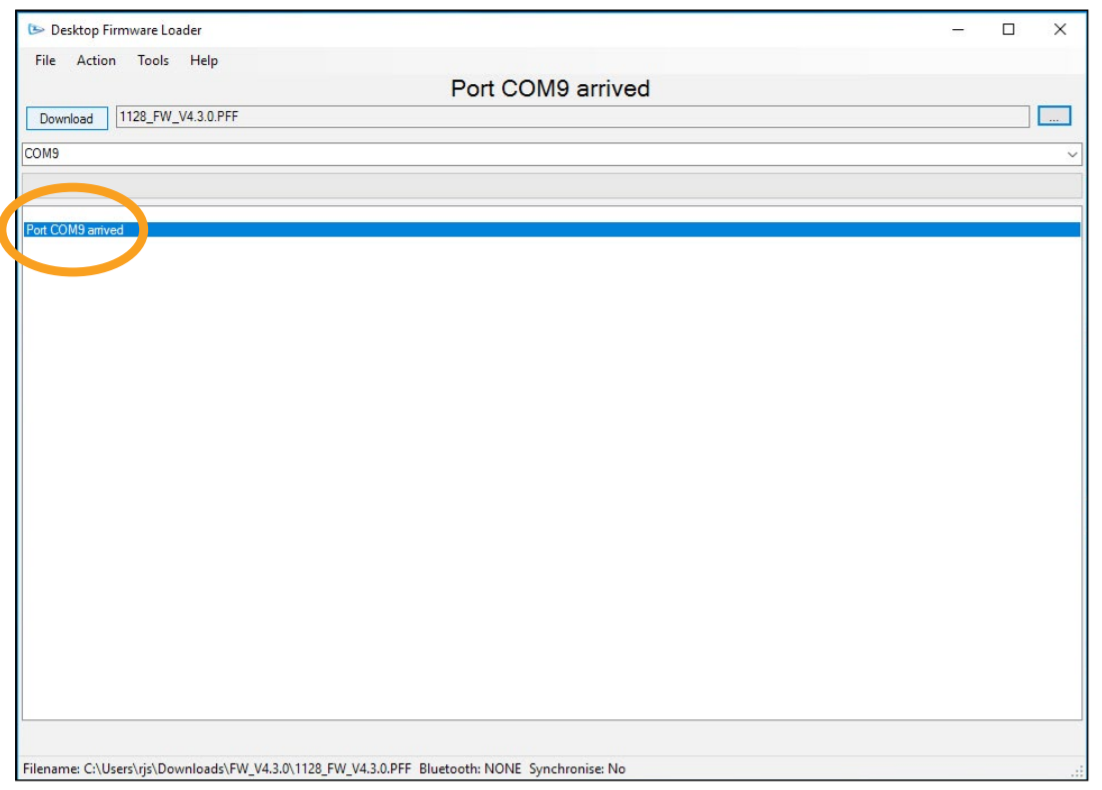
If you don't see a message that a COM port has arrived (e.g. Port COM9 arrived), you may need to use a different USB cable.
Click “Download” to start the update process.
Follow the download instructions.
- You may be asked to wake the reader by pressing the trigger during the update process.
- When you see the message that "Any iOS device must forget and re-pair with this reader before it can be used", the upgrade process is complete.
"Forget" the device from your Bluetooth list in your system settings.
Verify Successful Installation
PLEASE NOTE: After firmware updates, any iOS devices MUST forget the scanner, then complete the pairing process again.
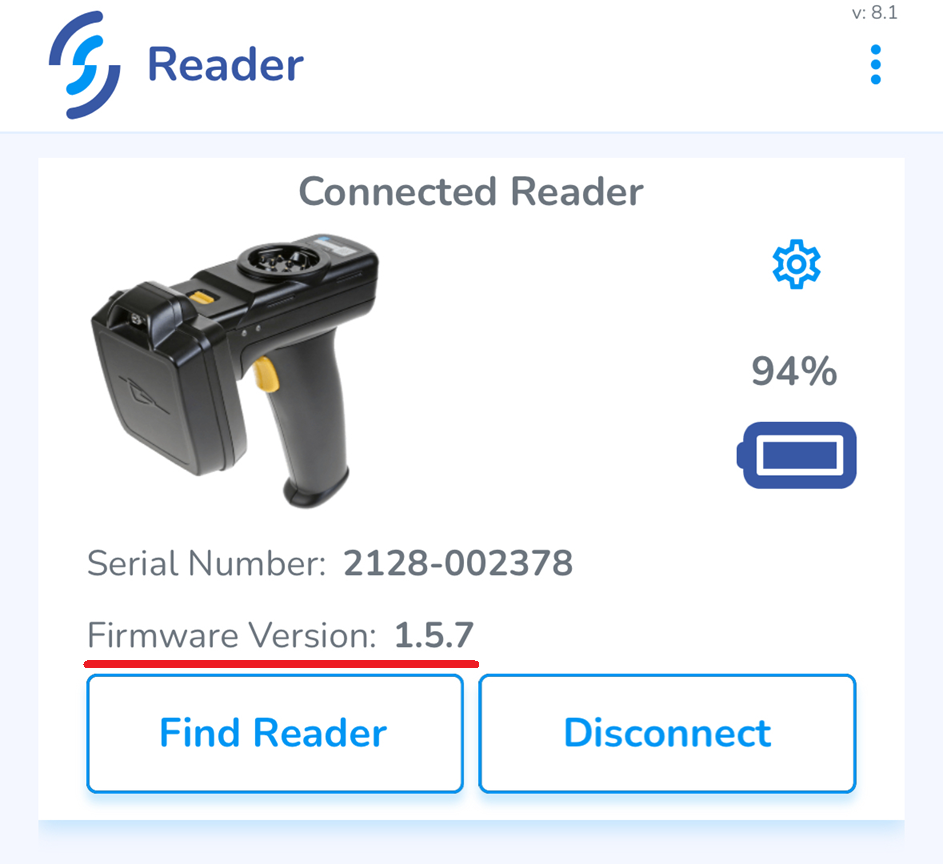
Once you have paired the app you can confirm the firmware version from the Connect Reader screen:
TSL Readers: Installing VCP Drivers - Windows for ARM
TSL readers' USB connection uses a Virtual COM port, which requires extra driver installations on Windows for ARM. These are the steps to install the drivers.
Step 1: Install the bus layer driver
First, plug the reader into your PC using the supplied USB cable.
Download the ZIP file containing the drivers and extract the files to any location.
To locate the device manager on Windows 10/11, right click on the Microsoft logo at the bottom left-hand corner of the screen and select Device Manager.
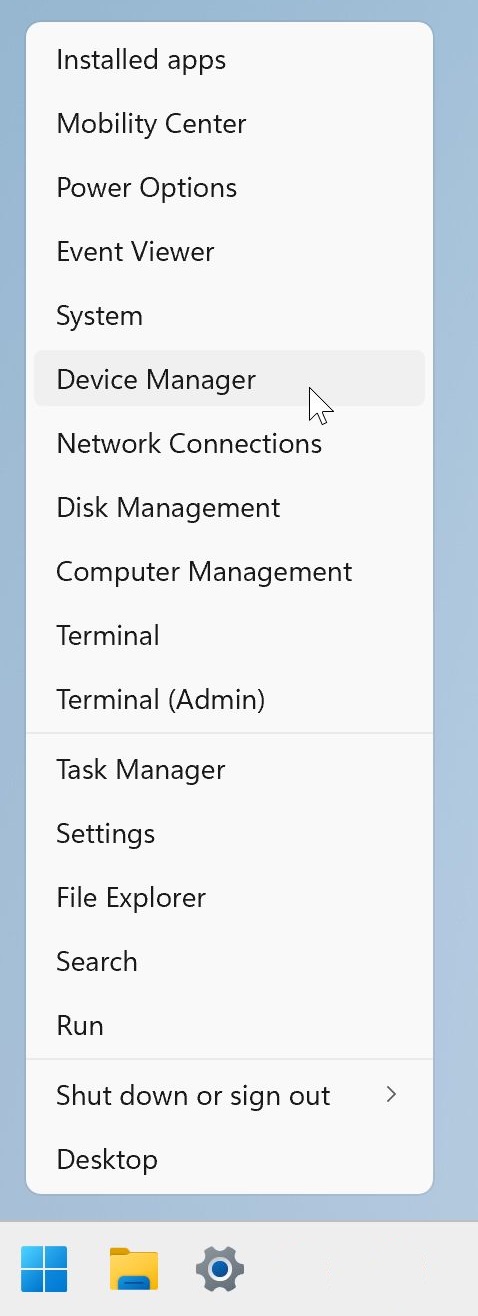
In the Device Manager window there should be a device under Other Devices with a yellow warning symbol to indicate a problem i.e. no driver installed, as shown below.
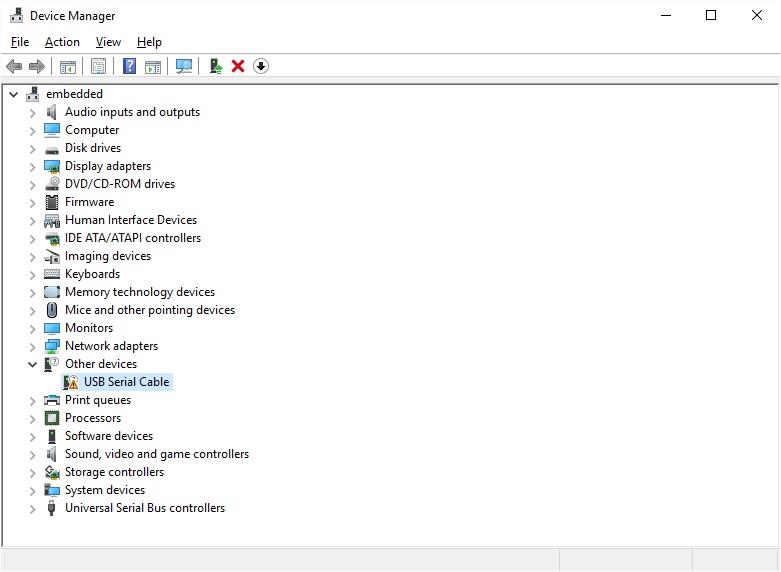
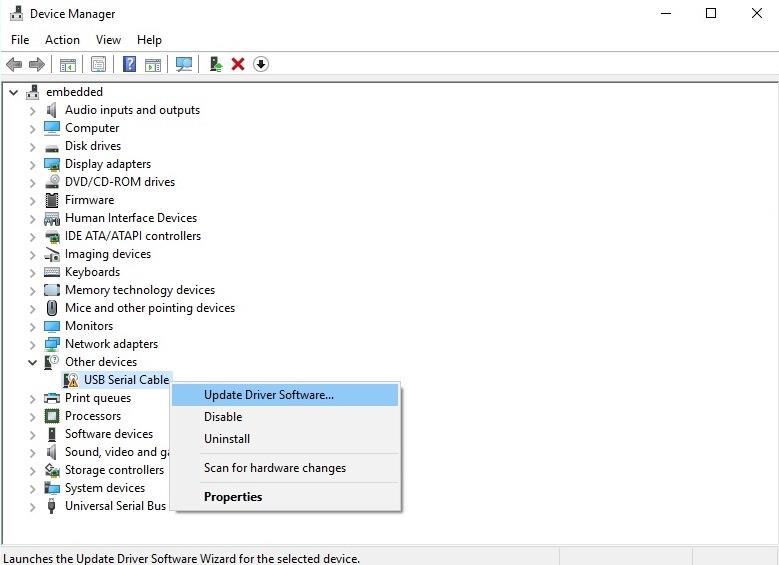
Right click on the device, then select “Update Driver Software…”
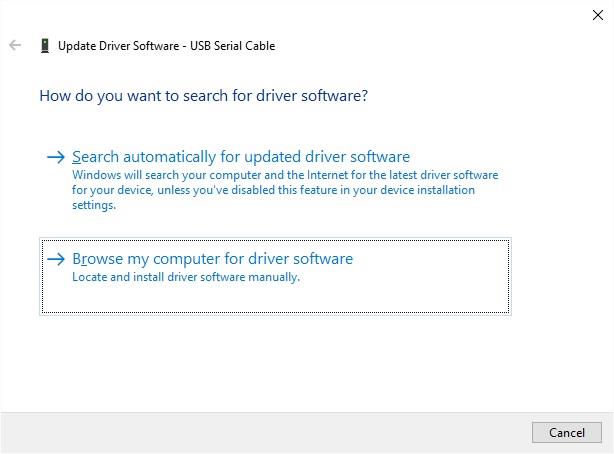
This then displays the option for an automatic search or a manual search. Select the second option to browse manually.
Click Browse... and select the top-level folder of the extracted files (the location shown in the screenshot will not necessarily be the same as the location you choose).
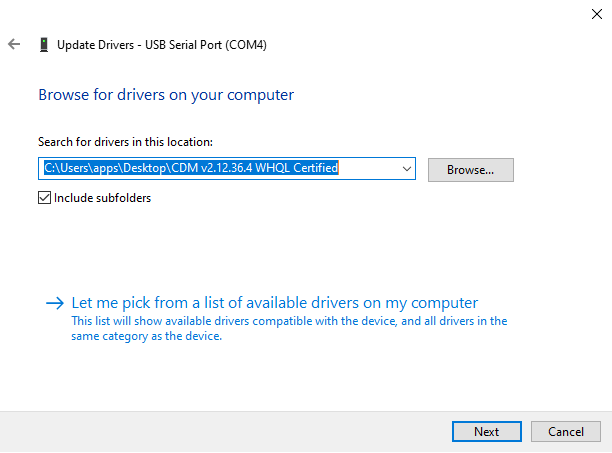
Select “Next” to start the installation.
When the installation has finished a completion screen is displayed. Press Close to close this window and go back to the Device Manager window.
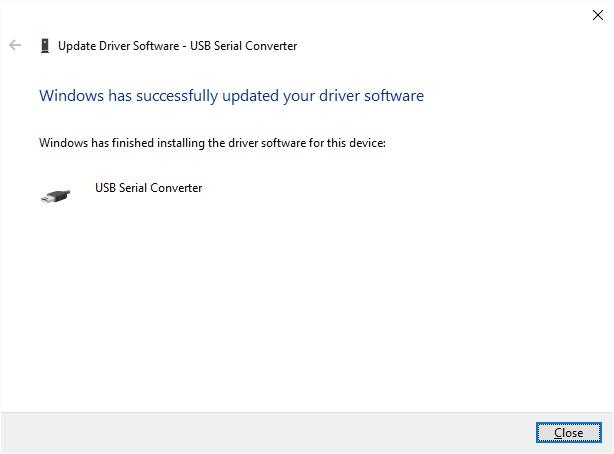
Step 2: Install the Virtual Com Port layer of the driver
Device Manager will show a device under Other Devices but in addition to this there is a new entry under Universal Serial Bus Controllers as the USB Serial Converter. This indicates the bus layer of the driver is installed.
Installing the Virtual Com Port layer of the driver is a repeat of the last few steps.
Right click on the other device (USB Serial Por in this example) to bring up a menu as shown below. From the displayed menu select “Update Driver Software…”
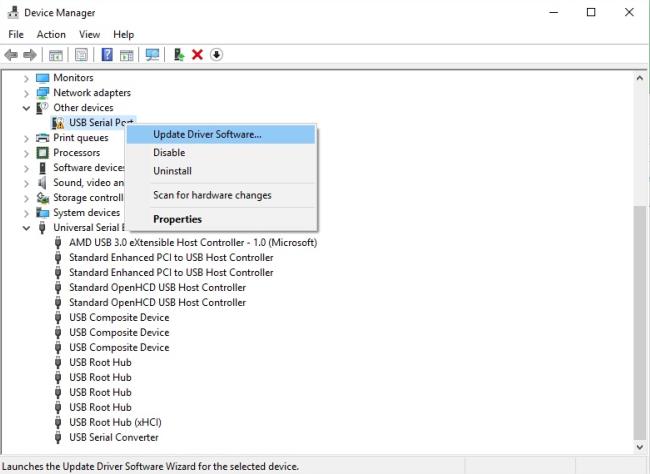
This then displays the option for an automatic search or a manual search. Select the second option to browse manually.
Click Browse... and select the top-level folder of the extracted files (the location shown in the screenshot will not necessarily be the same as the location you choose).
Select “Next” to start the installation.
When the installation has finished a completion screen is displayed. Press Close to close this window and go back to the Device Manager window.
This time Device Manager does not have an entry under Other Devices but does show entries under Universal Serial Bus Controllers and Ports (COM & LPT). The image below displays a correct installation. The device is now ready to use.
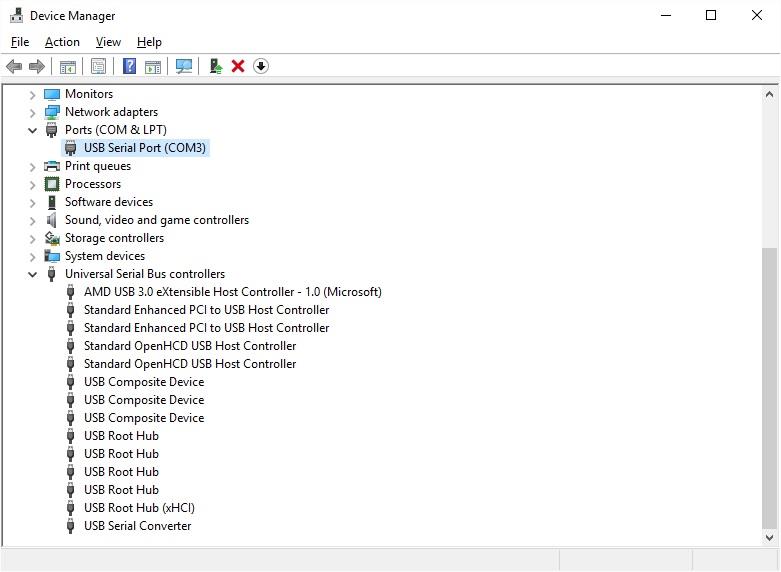
RFID Printers
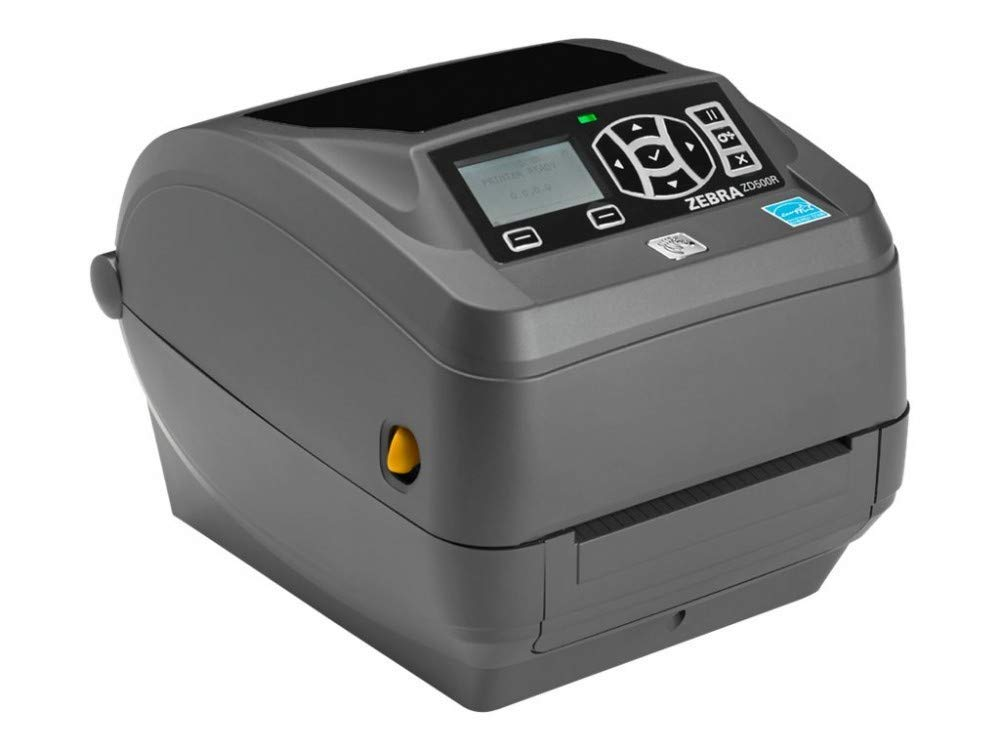
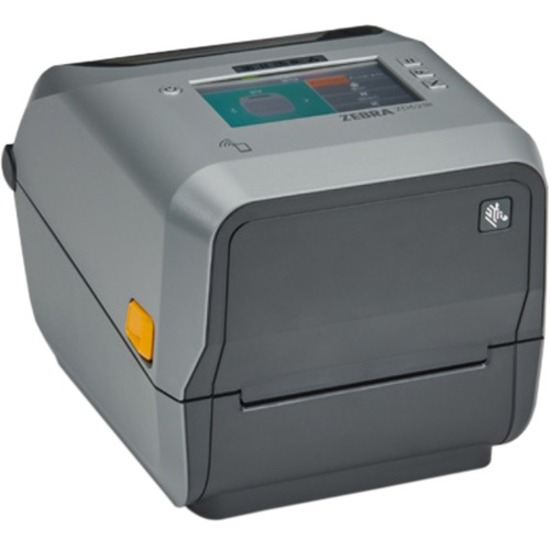
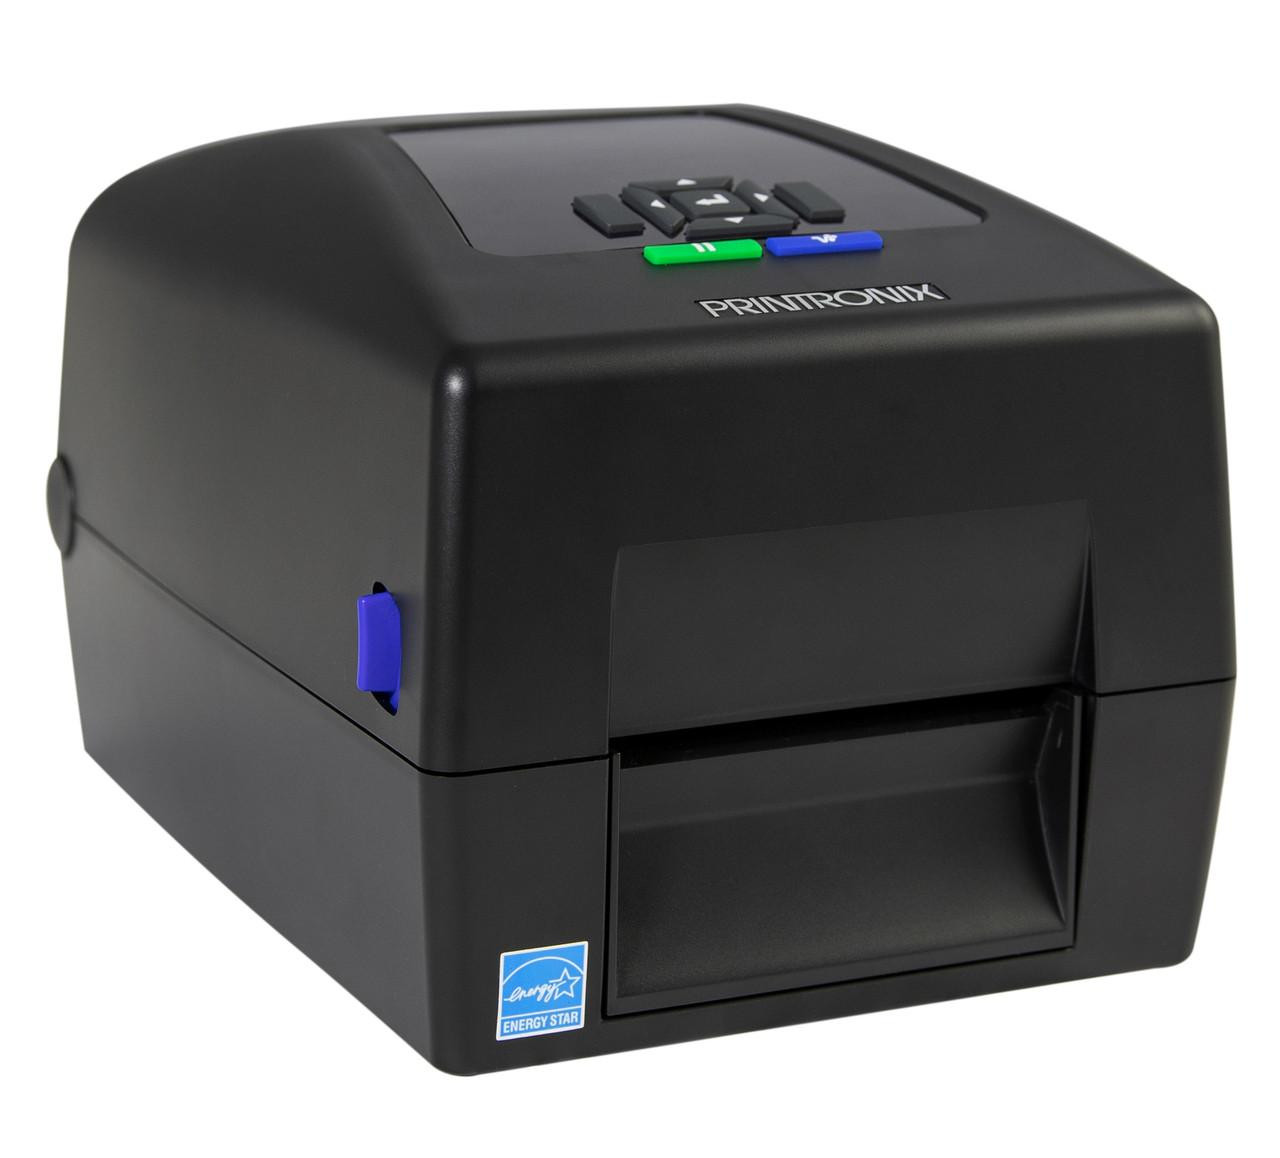
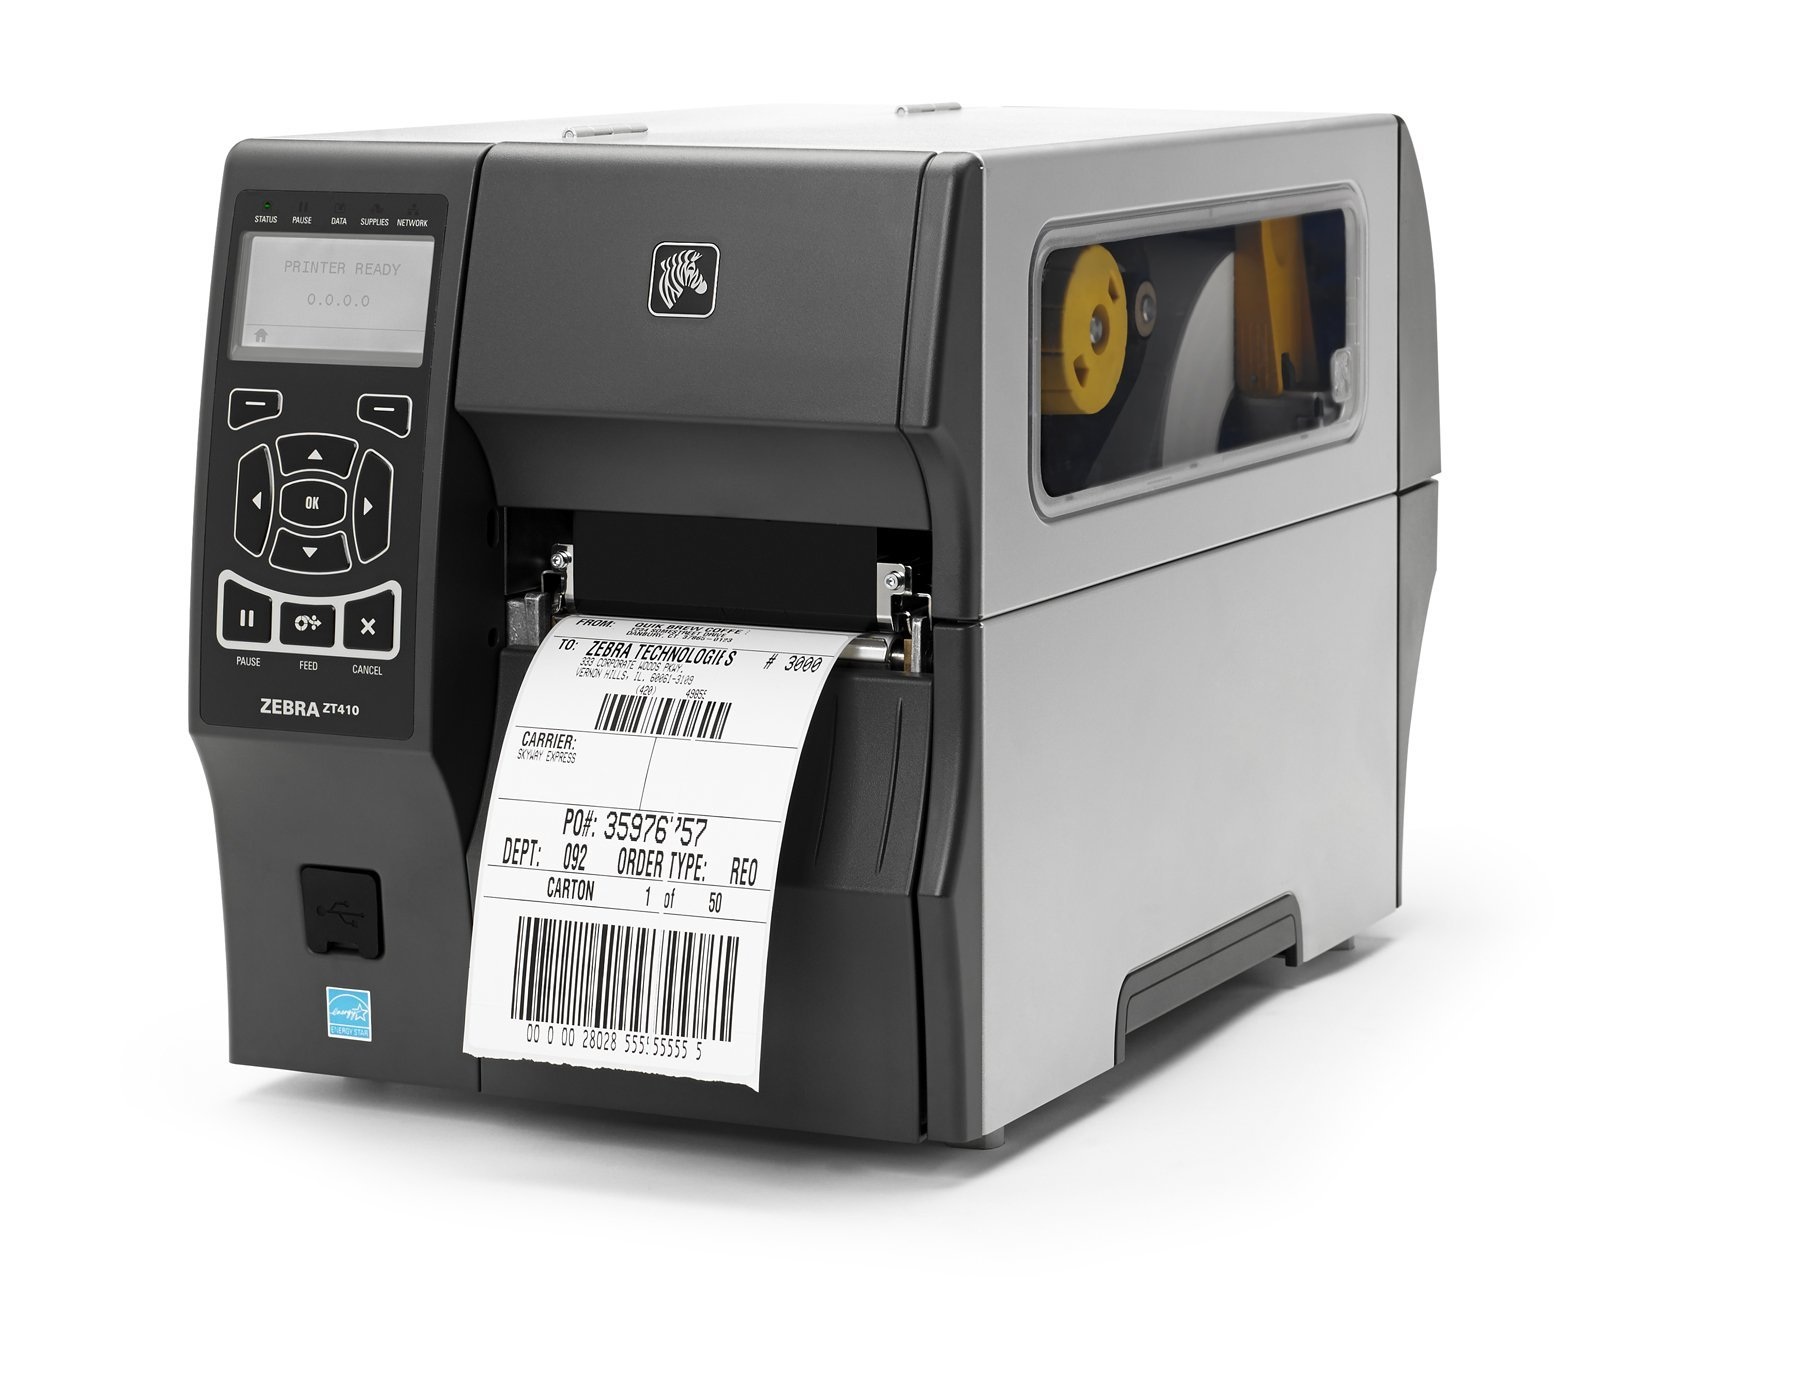
Identifying your Printer Model
Desktop printers
These printers can easily be identified visually.
Zebra ZD500R:
Zebra ZD621R:
Printronix T800 (T820, T830):
Industrial Printers
These printers can be harder to tell apart visually, however you can usually find the model number printed on the front as well.
Zebra ZT410:
Zebra ZT411:
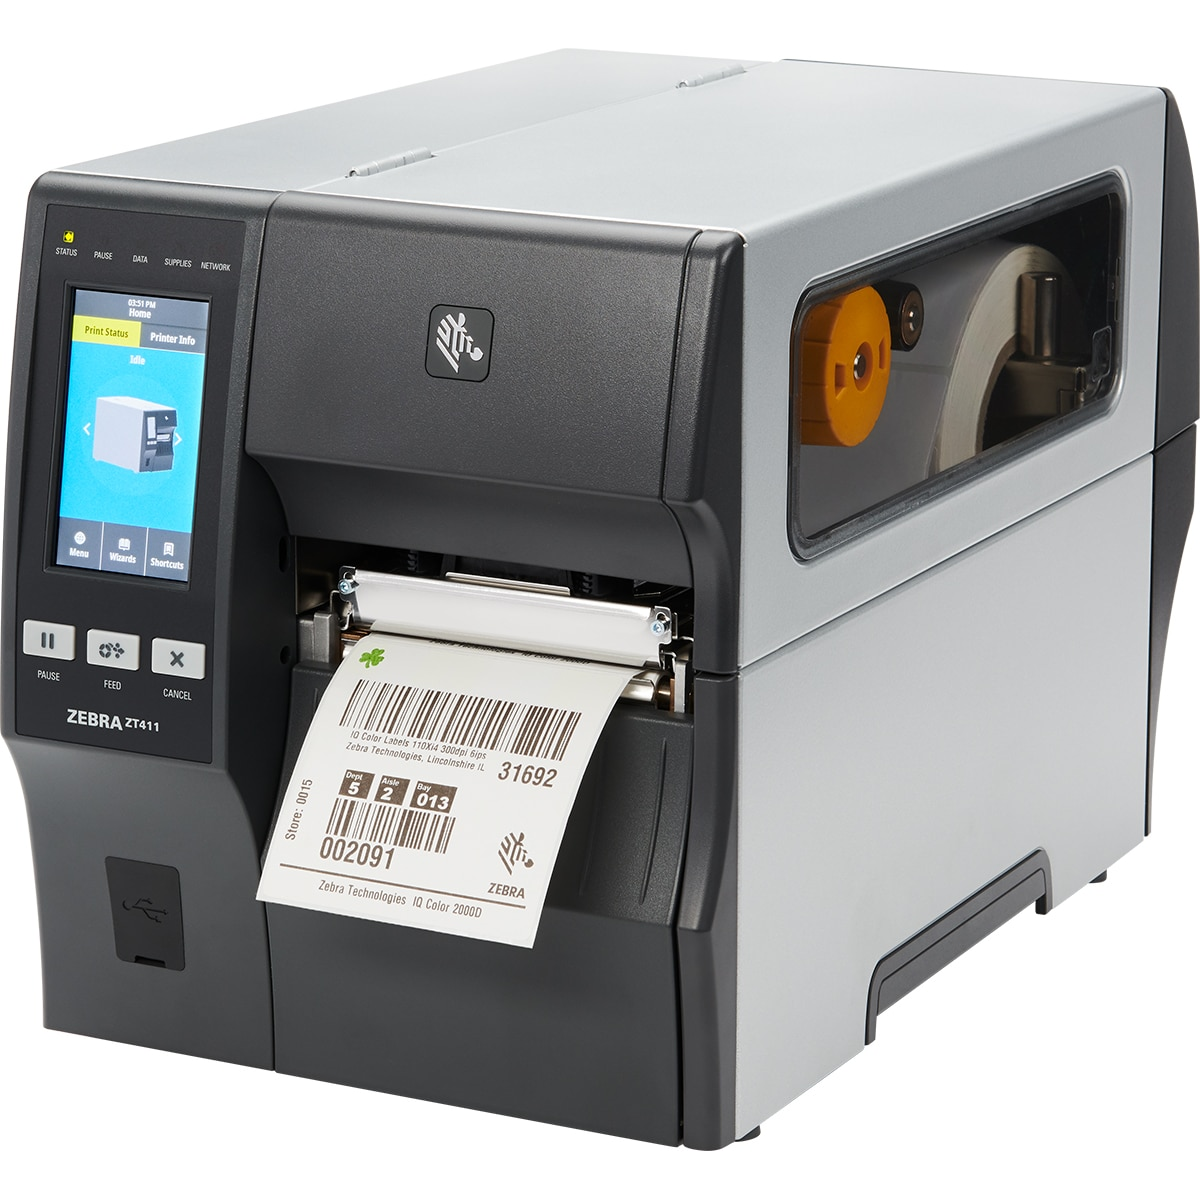
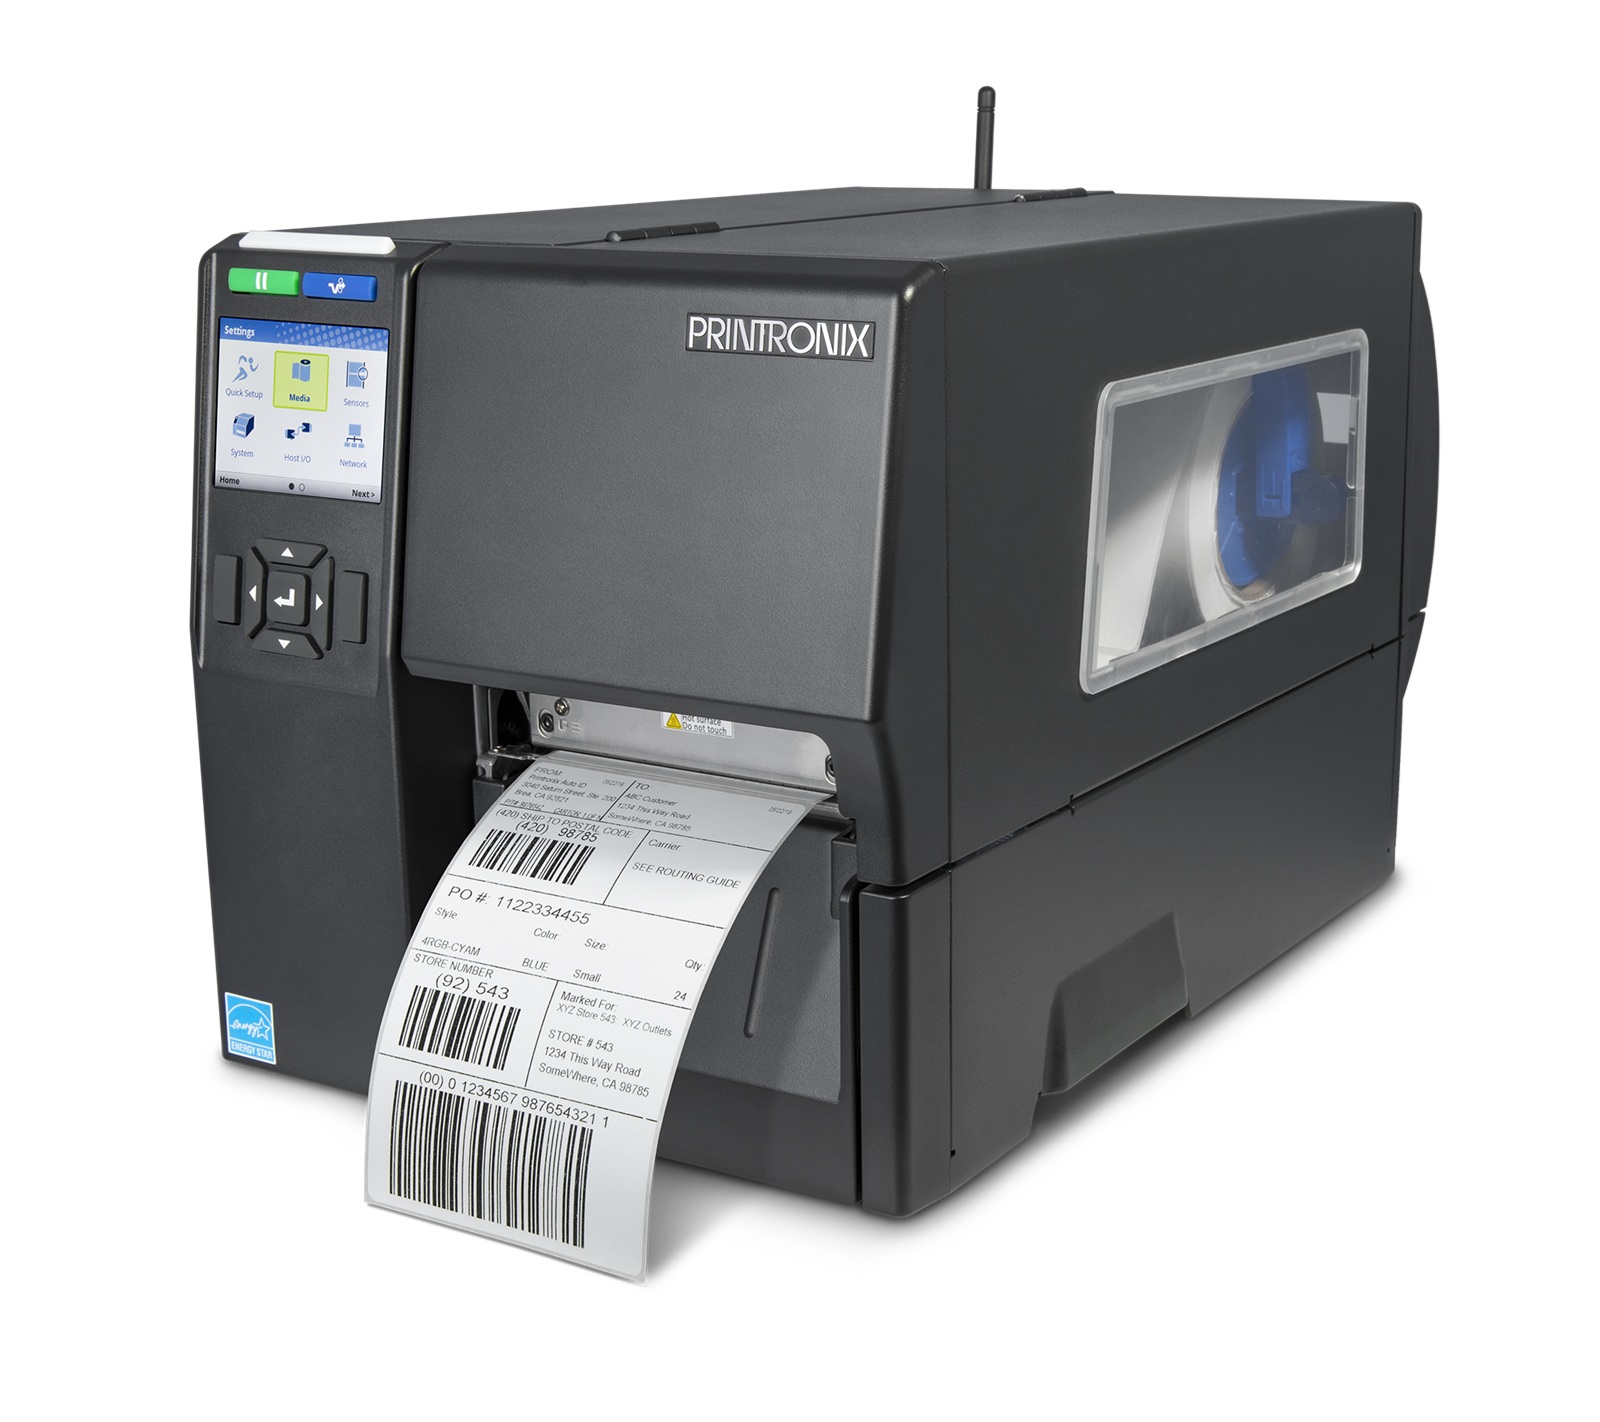
Printronix T4000:
Note: The T4000 has a media cover that can fold when opened, whereas the T6000e does not.
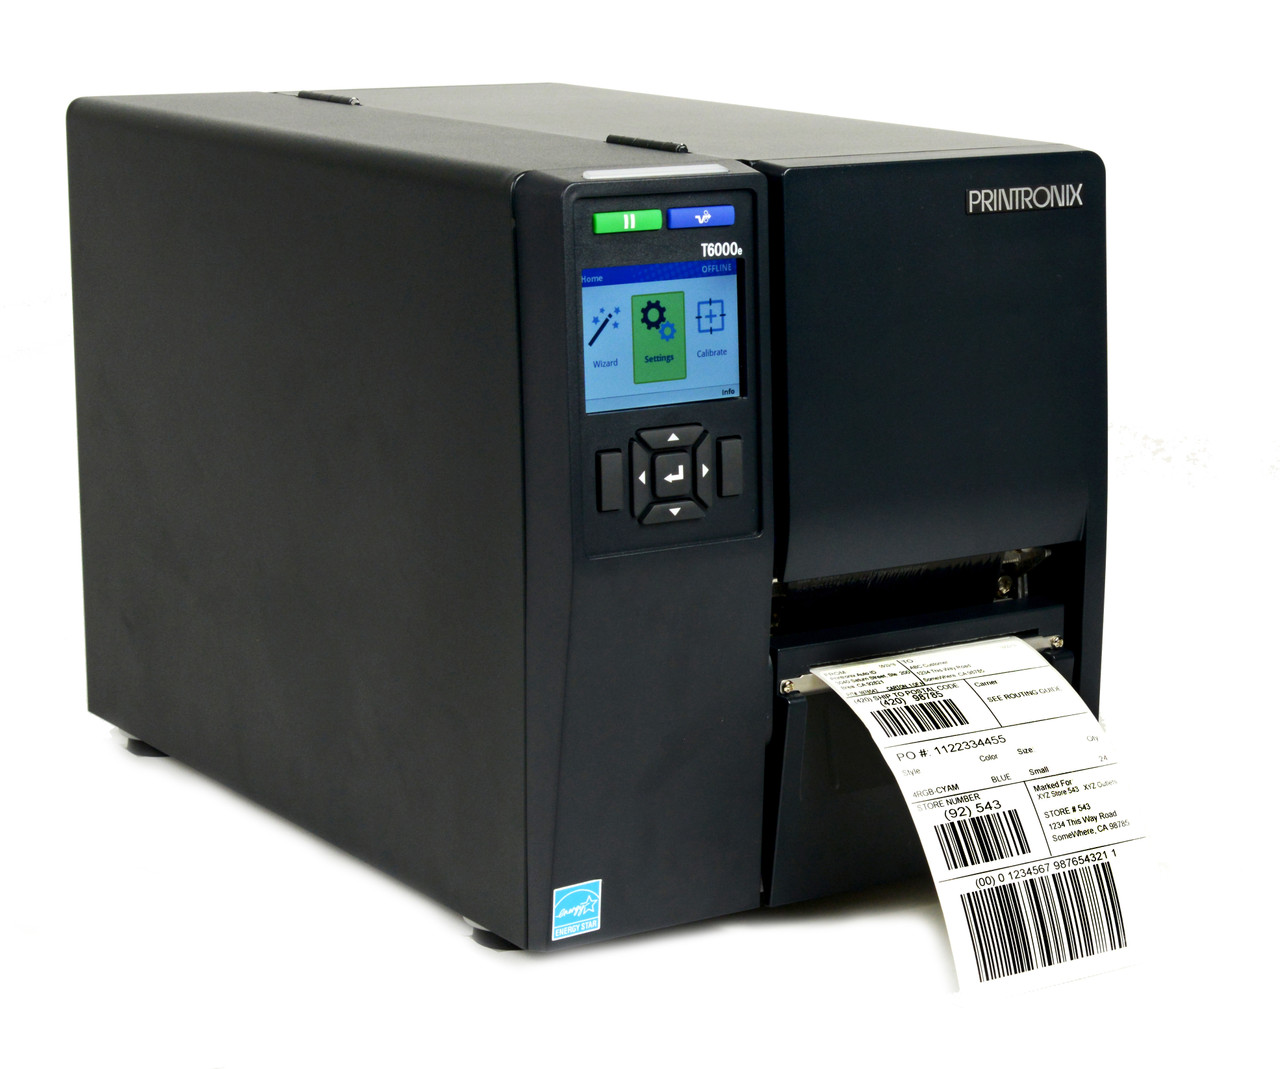
Printronix T6000e:
Note: The T4000 has a media cover that can fold when opened, whereas the T6000e does not.
What is a Platen Roller?
A platen roller is a rubber-coated cylinder in printers and labelers that drives media (paper/labels) past the printhead, ensuring proper, consistent pressure for high-quality, crisp printing. It serves as a hard, smooth surface against which the printhead presses, crucial for feeding materials without jamming or slippage.
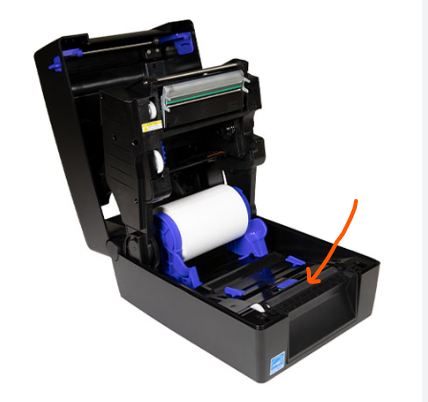
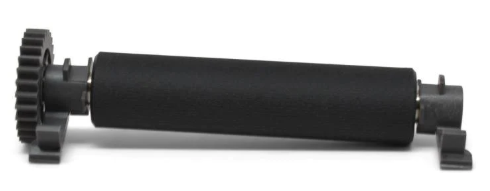
Key Functions and Details
- Media Transport: It moves labels or paper through the printer, often serving as the primary drive mechanism.
- Print Quality: By providing an even surface, it ensures that thermal transfer ribbons or direct thermal media make full contact with the printhead.
- Wear and Maintenance: Over time, these rollers can develop "dips," become damaged by debris, or harden.
- Signs of Failure: Faded, inconsistent, or wrinkled print, as well as frequent paper jams or slipping labels, indicates a need for cleaning or replacement.
Printronix: What Needs to Be Plugged Into a Printronix Printer?
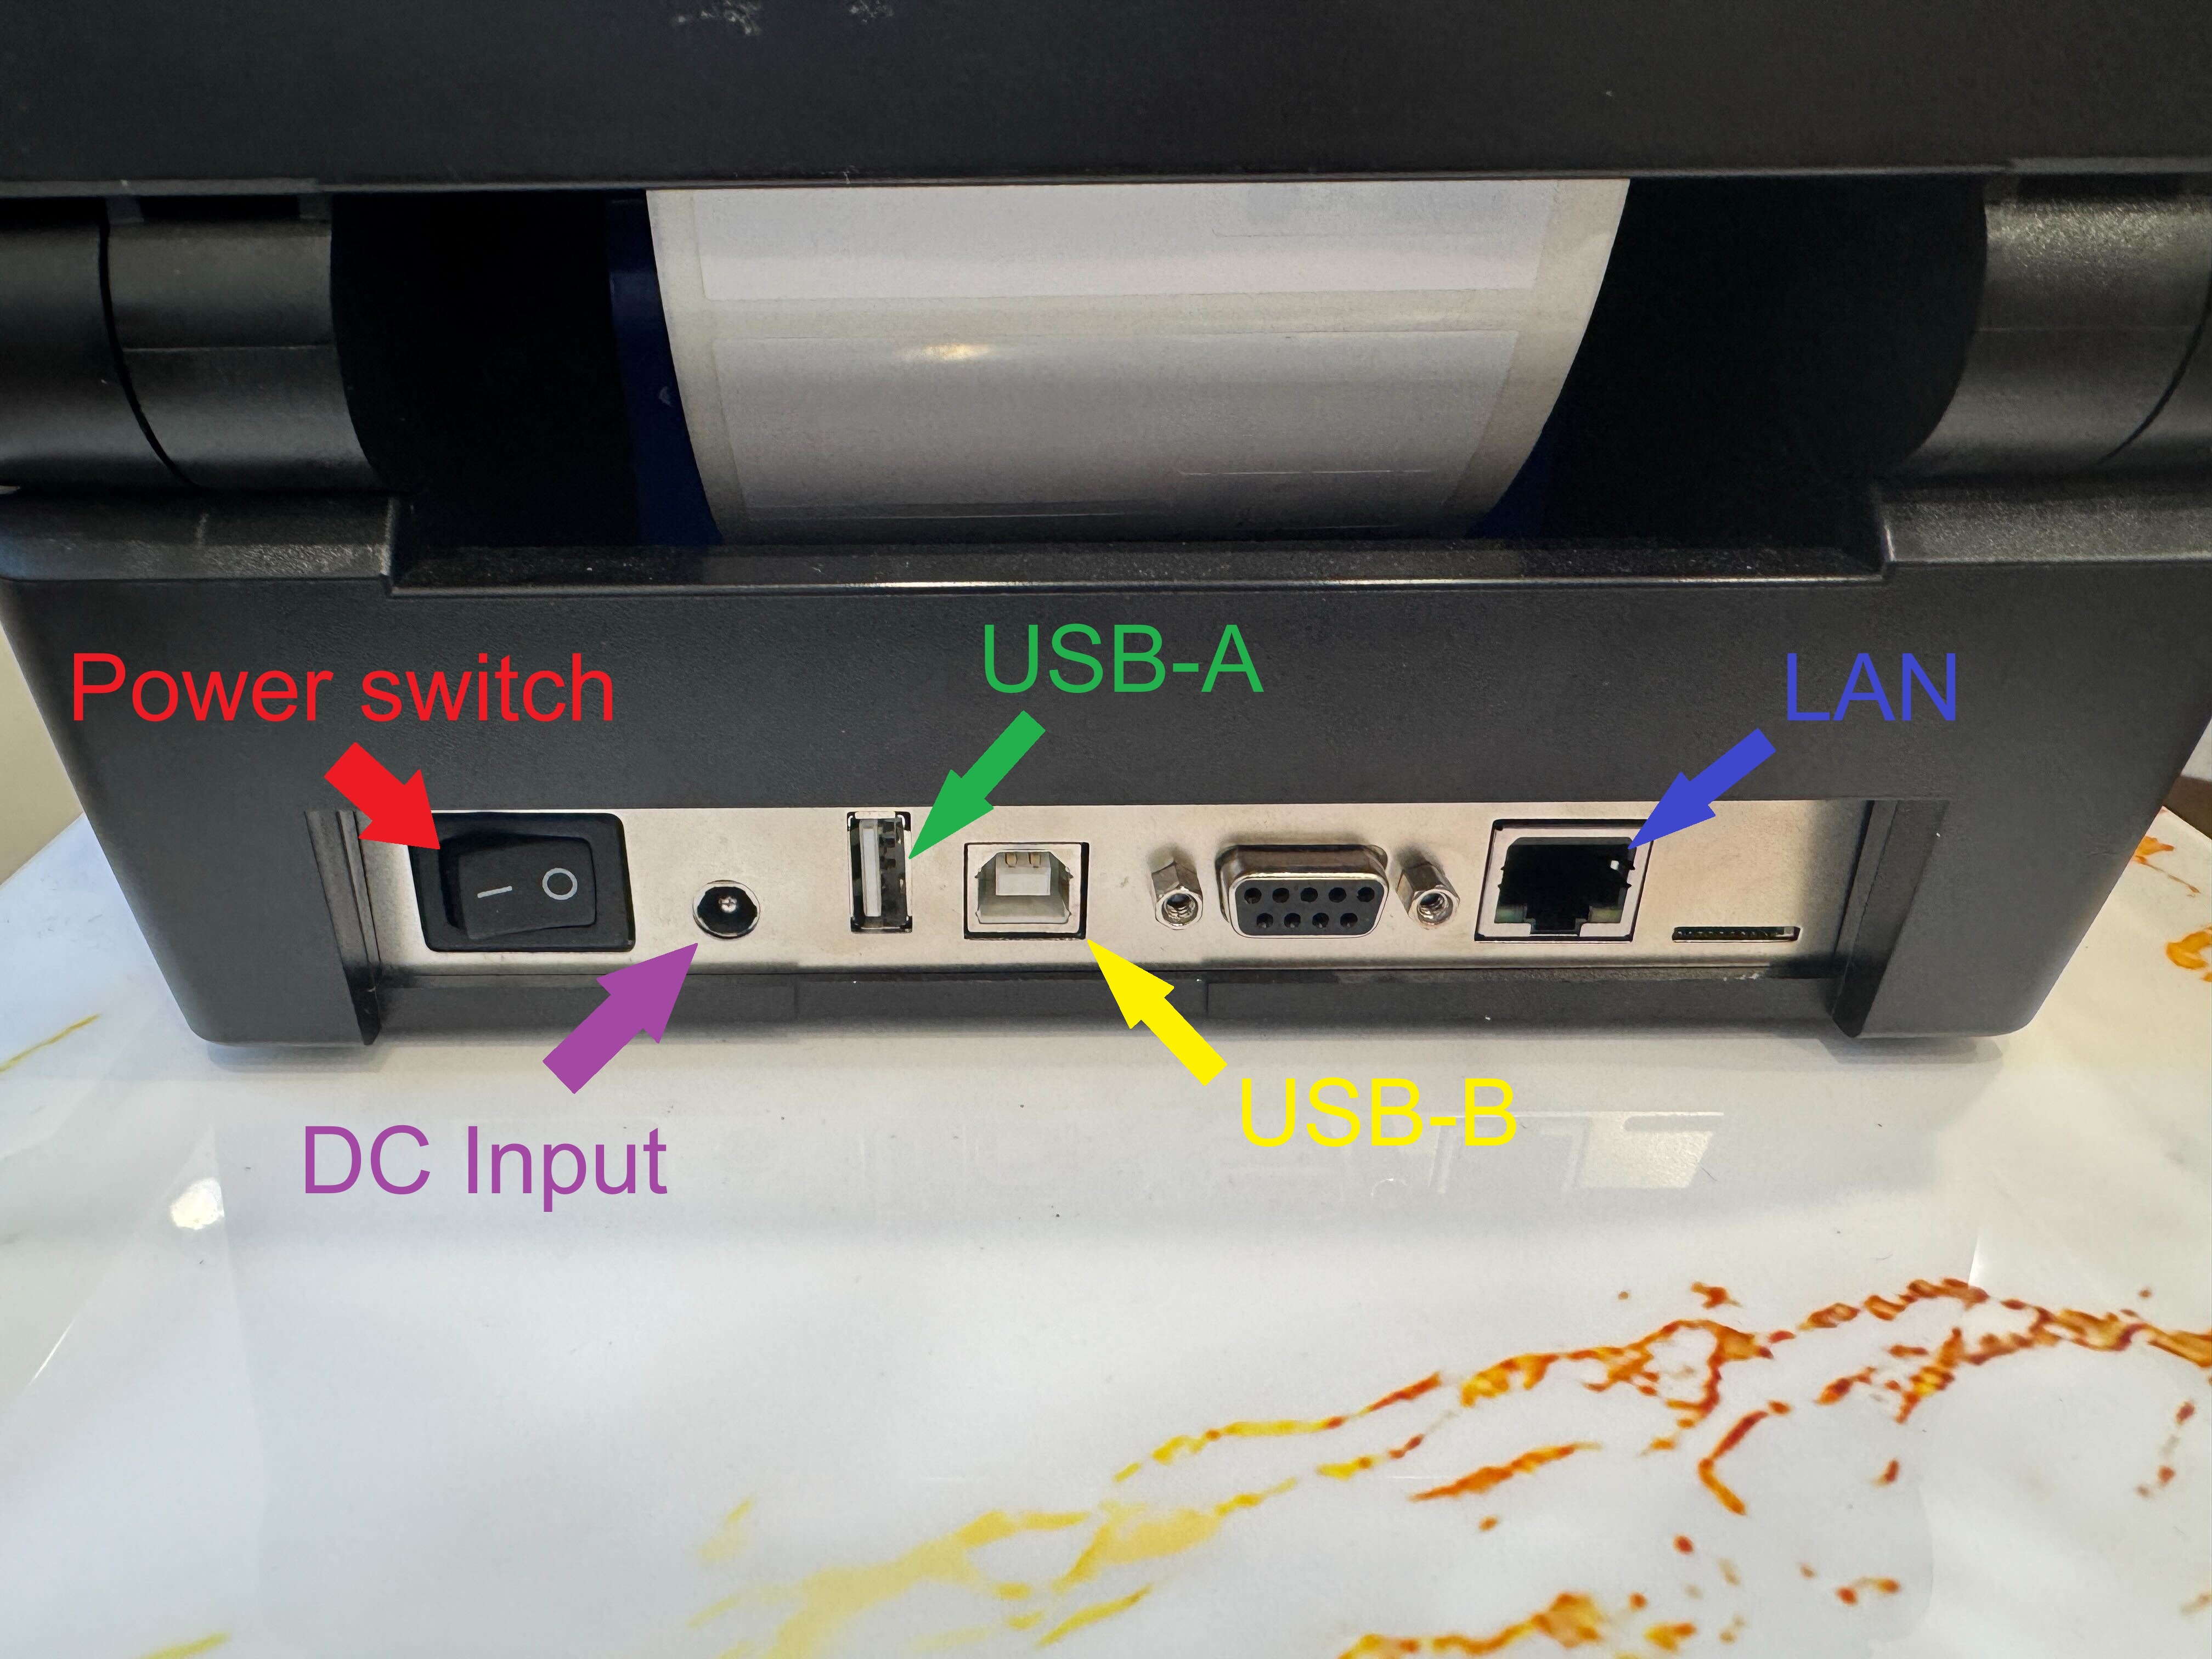
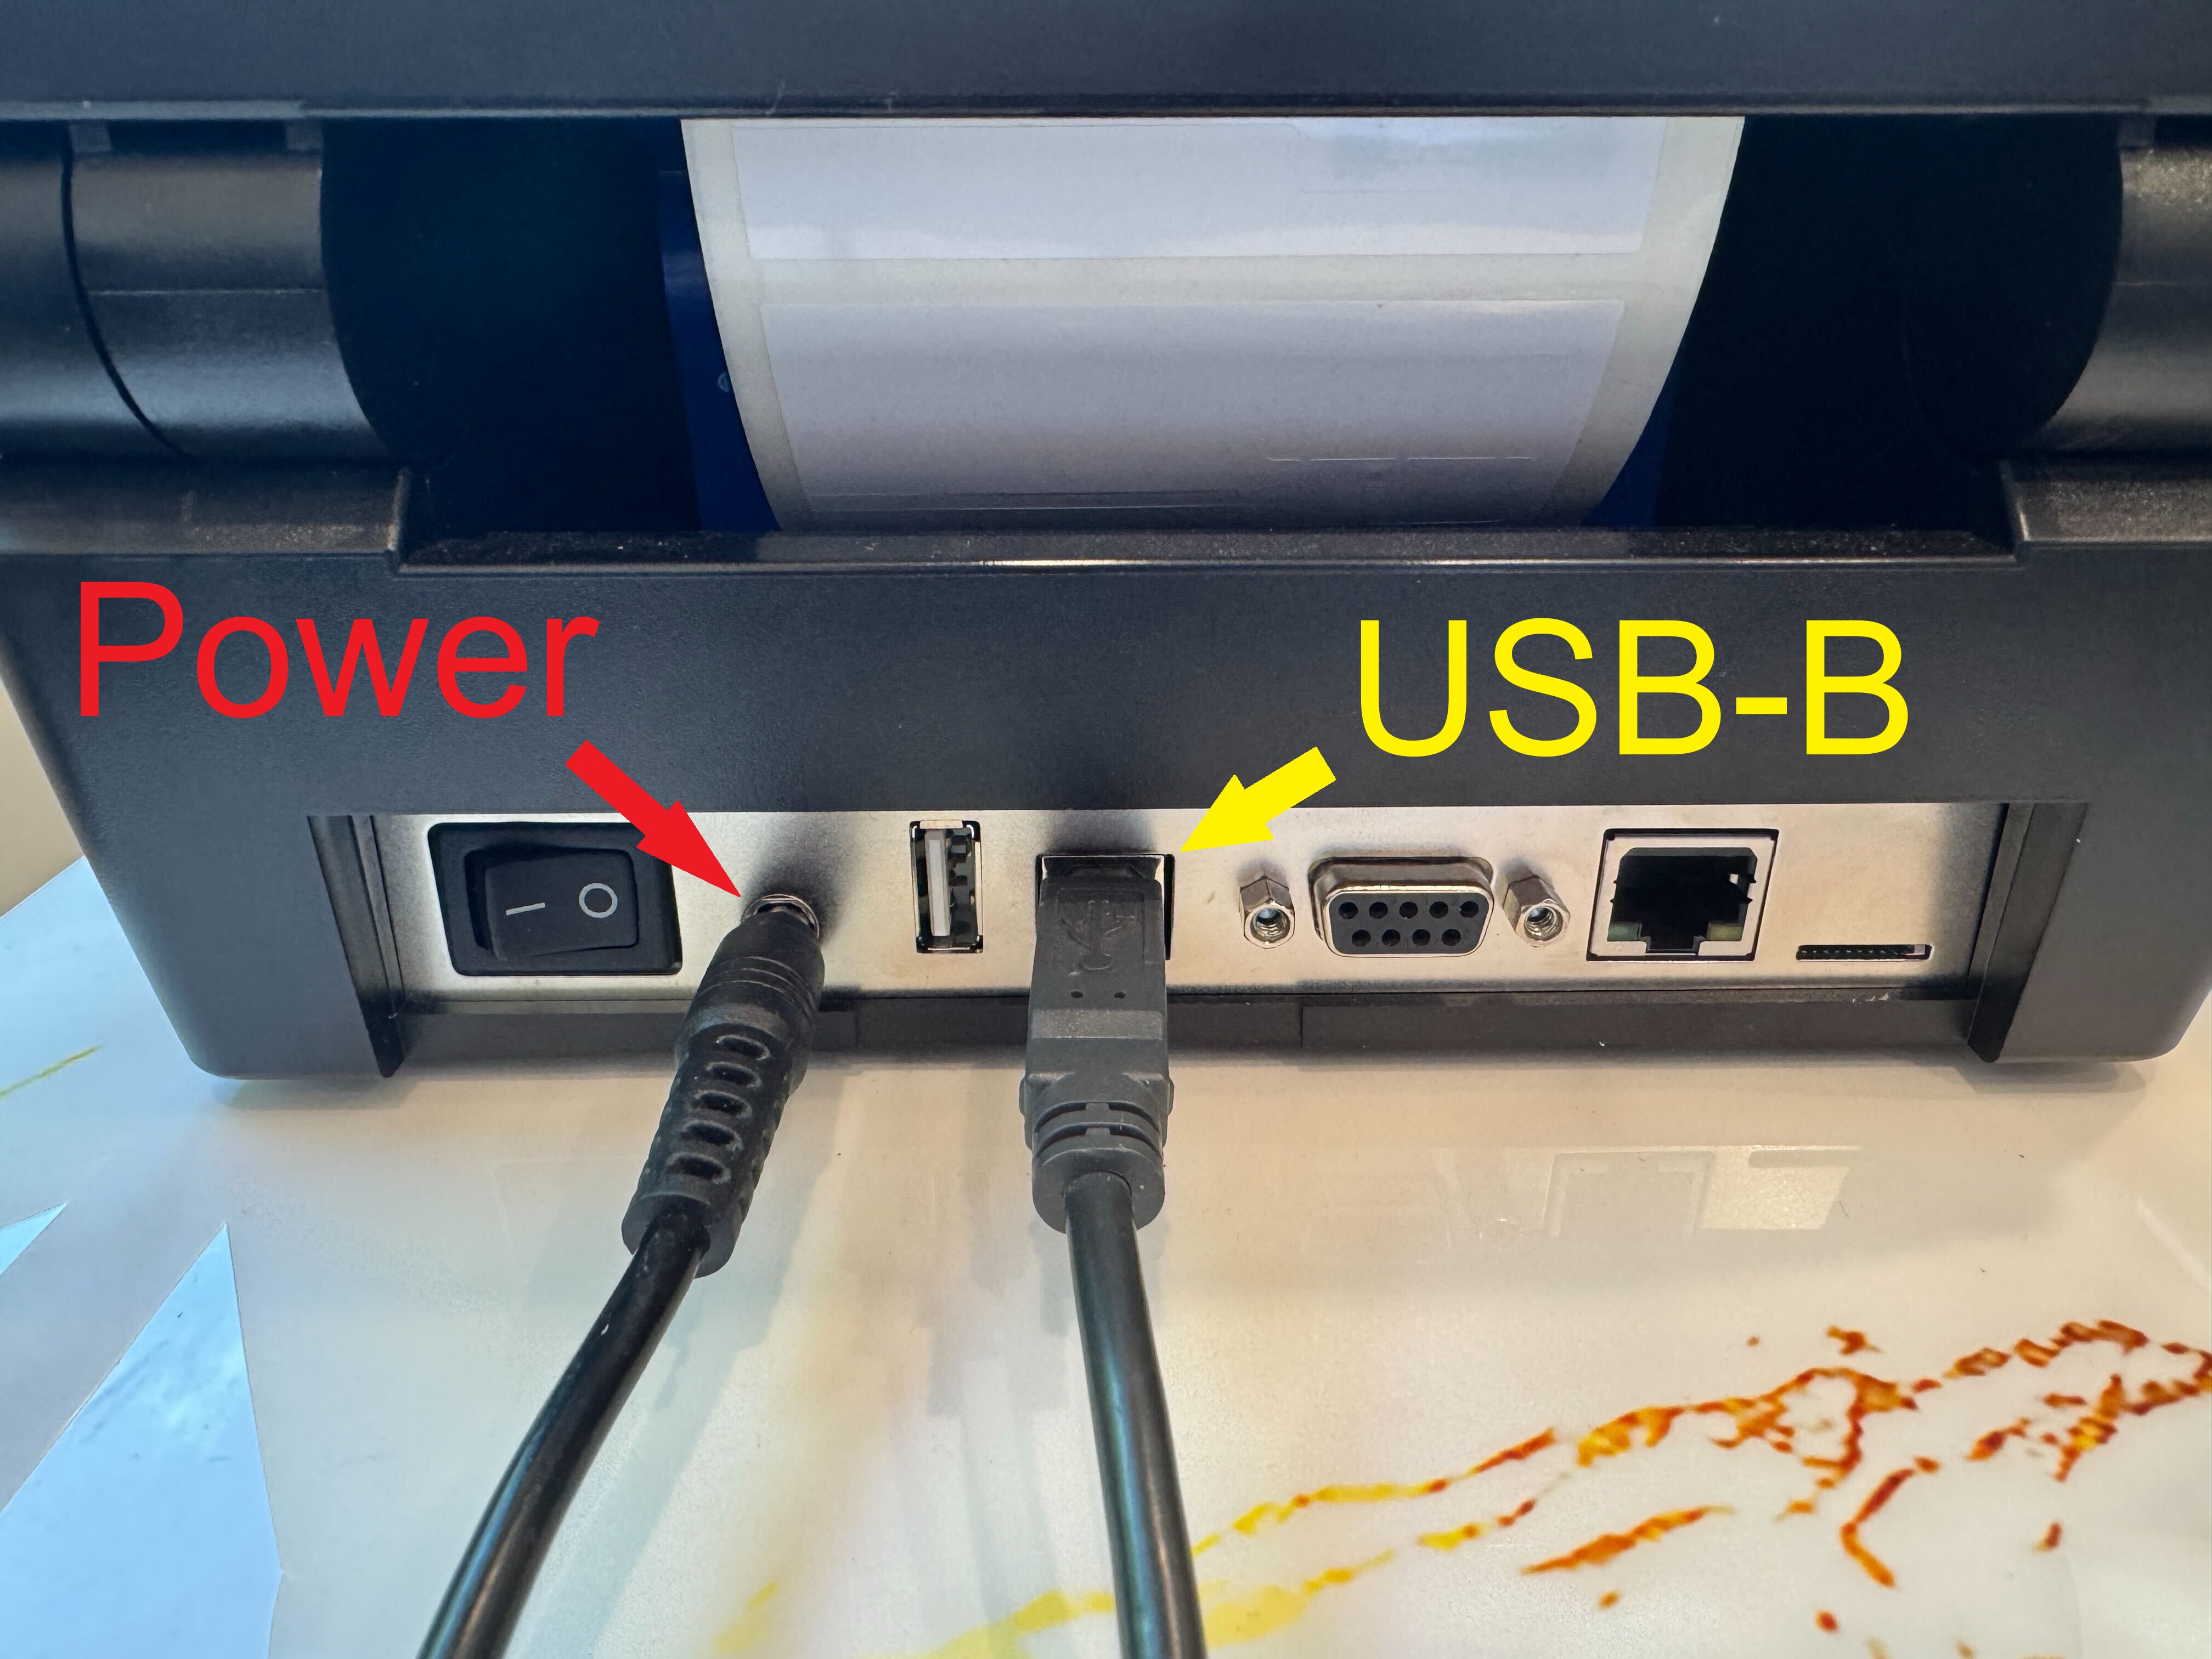
1. Power Connection (Required)
The first and most critical connection is the power supply.
- The T800 uses an AC power cord connected to a standard electrical outlet.
- The power cable plugs into the back of the printer.
- Once connected, the printer can be turned on using the power switch.
Without power, none of the other connections matter—the printer will not initialize or respond.
2. Media and Ribbon (Required for Printing)
Although not “cables,” these are essential physical components:
- Label roll (media) – the material the printer prints on
- Thermal ribbon (for thermal transfer models) – required for certain print types
These are loaded inside the printer. Without them, the printer may power on but cannot produce labels.
If you need help with loading media you can visit this Article.
3. Data / Communication Cables
To send print jobs, the printer must be connected to a computer or network. The T800 supports several connection types:
Simple RFID recommends using an Ethernet (LAN) connection for the best stability. USB connections can be used, but Ethernet will provide a more reliable connection.
Ethernet (LAN) Connection (Most Common)
- Uses an RJ-45 Ethernet cable
- Connects the printer to a router, switch, or network wall port
- Allows multiple users to access the printer over a network
This is one of the most widely used setups in warehouses and offices. The printer supports 10/100 Ethernet LAN connectivity
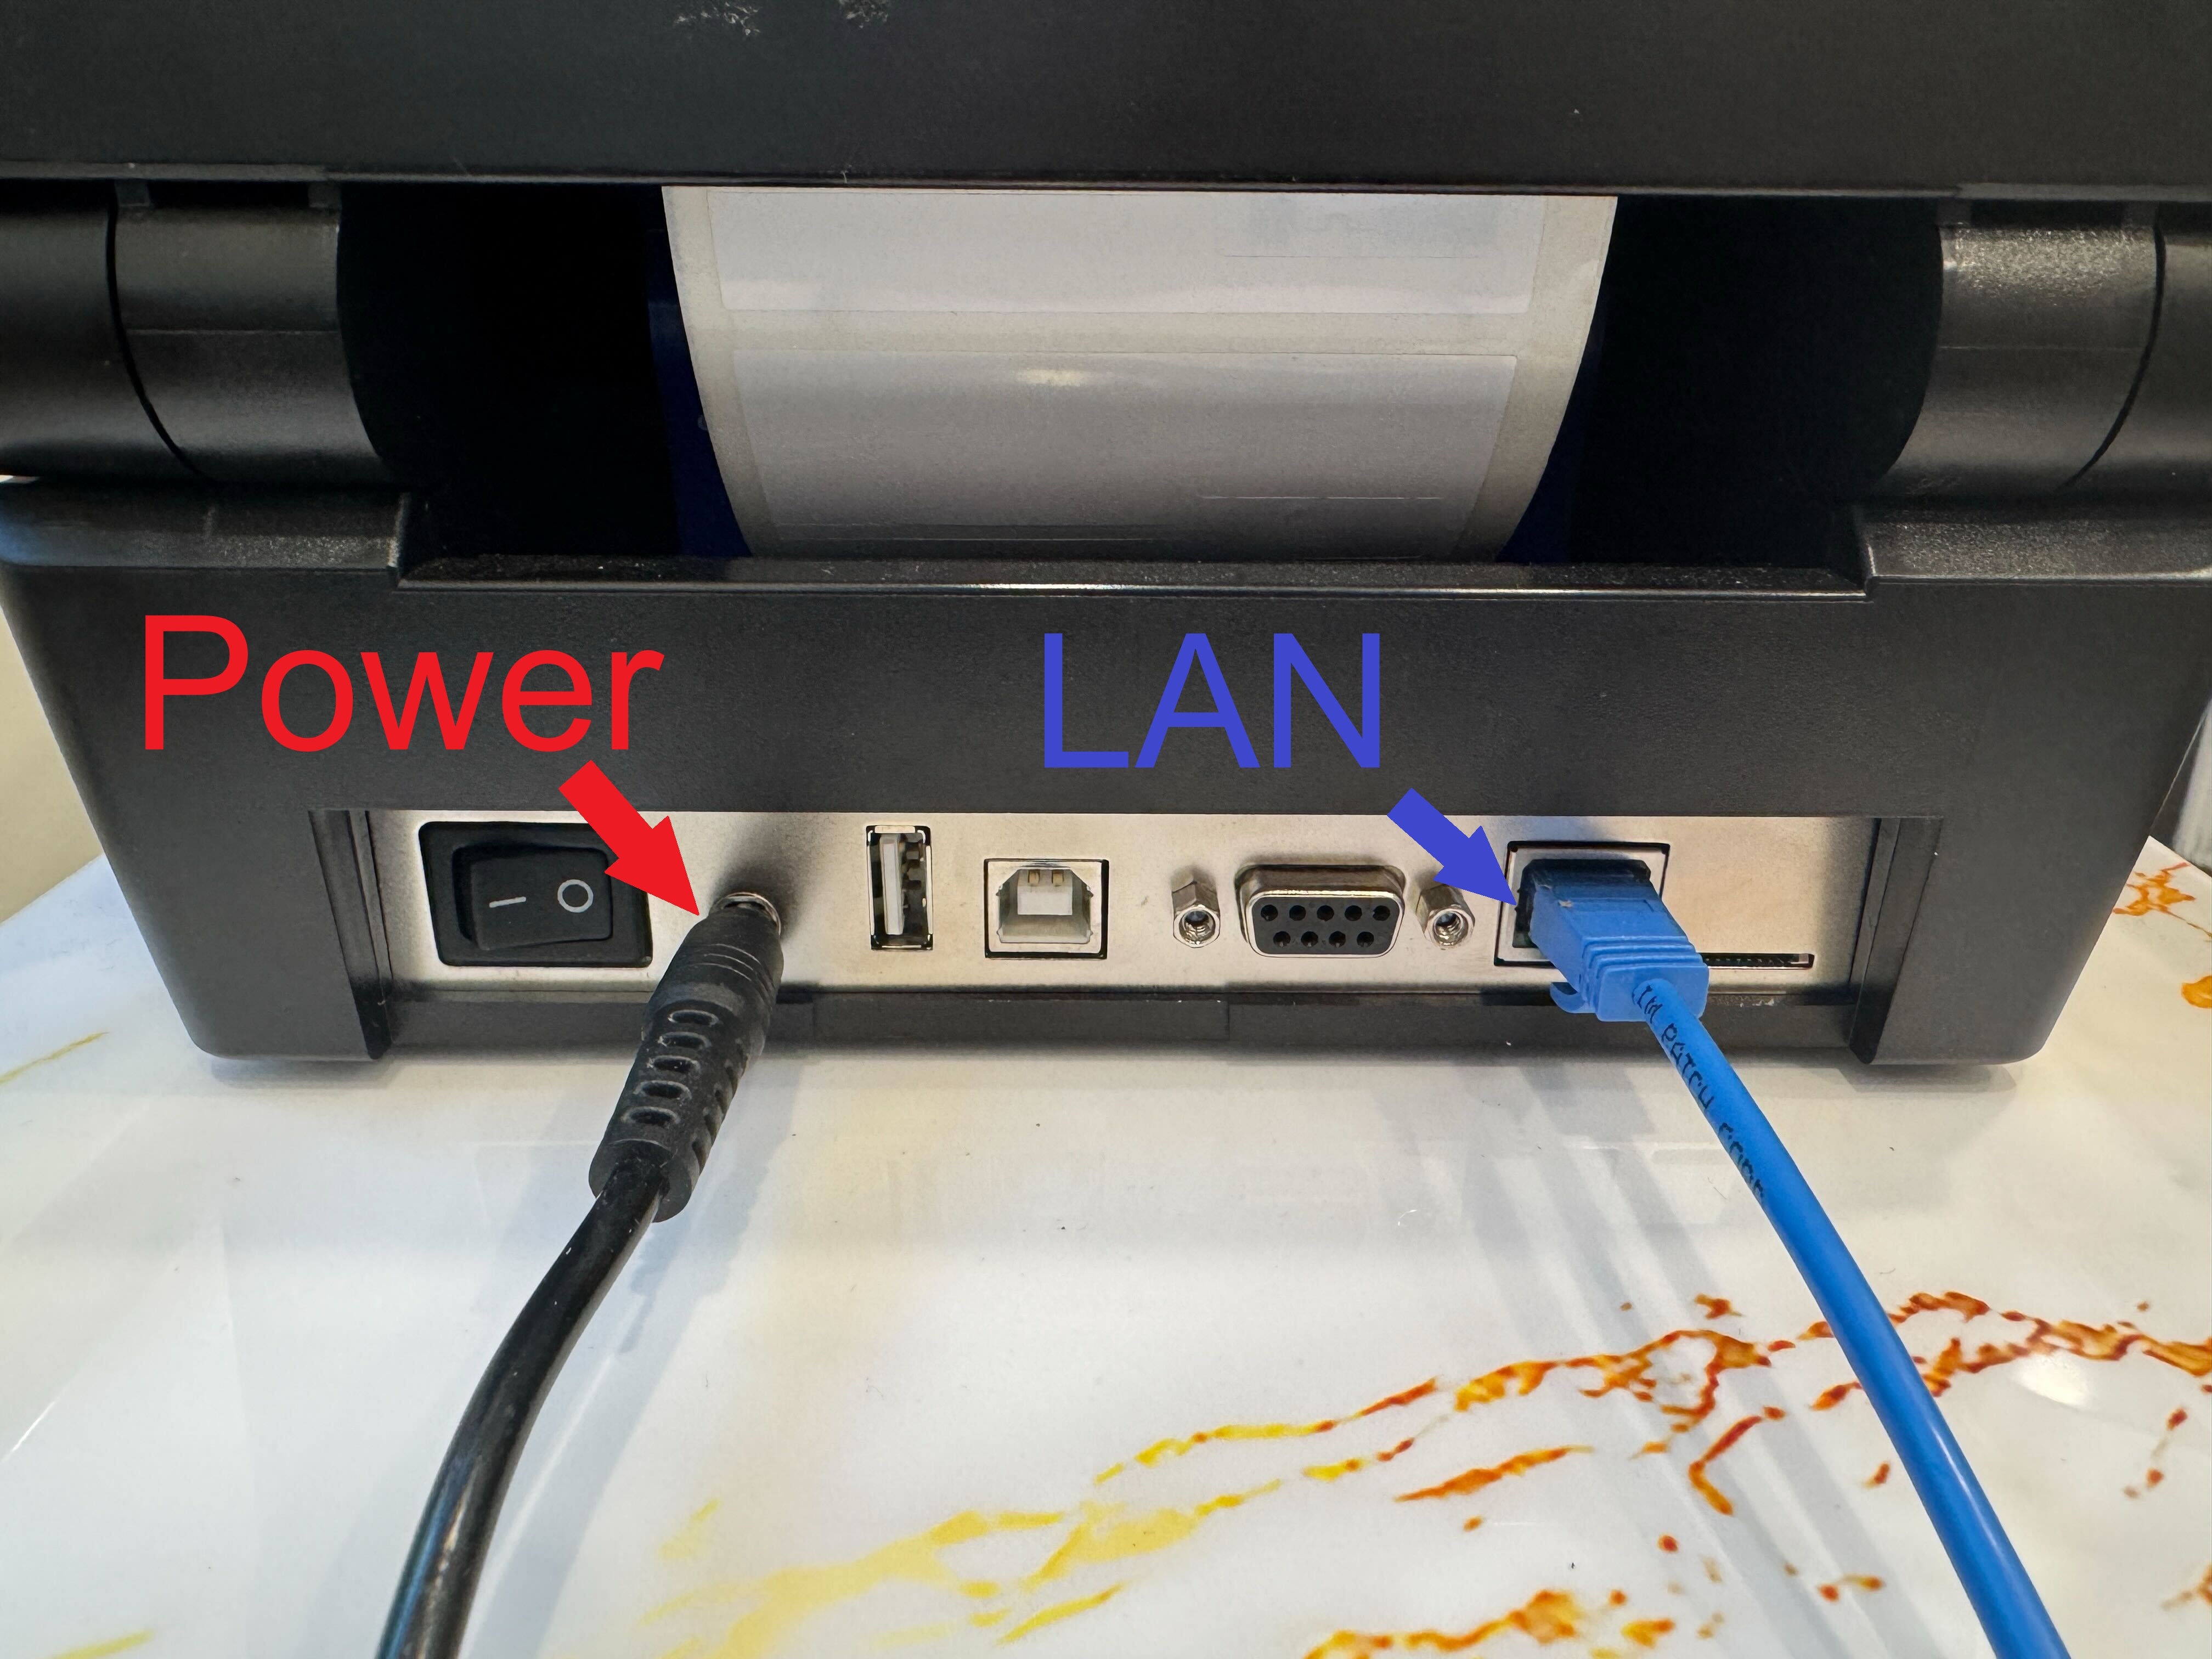
Printer will not work if the connection interface is set up incorrectly in the printer settings! Follow this article to configure the interface properly.
USB Connection
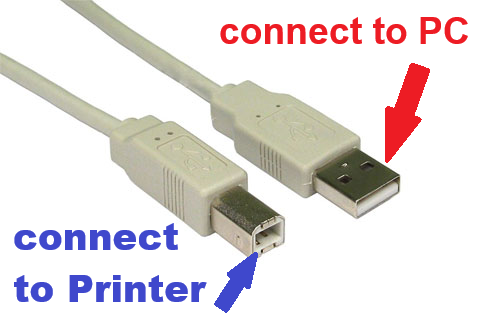
- Uses a USB Type-B cable (printer port) to a computer
- Plug one end, USB-B, into the printer and the other, USB-A, into a PC
- Ideal for direct, single-computer setups
The T800 includes USB as a standard interface
Printronix: ENTER SWITCH LOCKED
Printronix printers lock the Enter switch to prevent accidental changes to settings. If you see the ENTER SWITCH LOCKED message, just press the Up and Down arrow keys at the same time, and you should then see ENTER SWITCH UNLOCKED.
Printronix: Unpause your printer
Printers will not print or calibrate if they're paused. Depending on the model of your printer, you'll see different indicators if the printer is paused.
How to tell if your printer is paused
T800: "OFFLINE" in top-right corner

The OFFLINE text means the printer is paused. Unpause it using the green pause button [ I I ] below the screen. If prompted to save settings, choose Save Permanently in Active Config. You should then see ONLINE in the top-right corner of the screen, meaning the printer is ready.
ZD621R: Pause indicator above screen

If the PAUSE light is lit up yellow, the printer is paused. Unpause it using the Pause button [ I I ] to the right of the screen.
ZD500R: PRINTER PAUSED message flashing on screen
If the printer's screen flashes PRINTER PAUSED, unpause it using the Pause button [ I I ] to the right of the screen.
Printronix Printers: Loading Media & Ribbon
Load media & ribbon into your:
Printronix Printers
T800 Models :
T6000 Model:
T4000 Model :
Printronix: T800: Loading Media & Ribbon
Printronix: T4000: Loading Media & Ribbon
Printronix: T6000: Loading Media & Ribbon
Printronix: GAP NOT DETECTED
A “GAP NOT DETECTED” error means that the printer was not able to find the gap/mark between labels. There are a few potential causes for this error:
- The printer has not performed a media calibration on the labels
- Solution: Calibrate your printer.
- The labels are not feeding out of the printer correctly (most often because the labels were back-fed too far into the printer)
- Solution: Ensure that at least 1 label is sitting past the platen roller.
- The media sensor is in the wrong place (it should be underneath the labels, lined up with the gap)
- Solution: Ensure that the media sensor is sitting directly under the labels, so the gap between the labels will pass over the sensor when feeding/calibrating.
- After adjusting the sensor, please calibrate your printer again.
- The printer is set to the wrong media type (Gap vs. Mark)
- Solution: Ensure that the Sensors > Control > Gap/Mark Sensor is set to the value that matches your labels (e.g. Gap).
Printronix: Calibration
Printronix T800, T4000, T6000 - Calibrate from the Printer's Interface
ATTENTION: We suggest first performing the calibration from the website. If the calibration fails, then follow these steps.
Note: Before proceeding with calibration, it is best practice to ensure the onboard RAM is cleared by shutting off the printer, and waiting 30 seconds to power it back on.
Step 1: Media Calibration
First, press the green Pause button on your printer to access the main menu. The menu looks like this: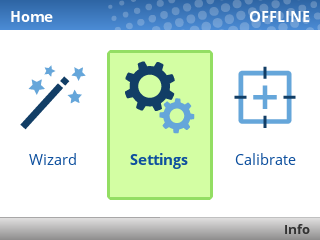
Press the right arrow key on the printer to select "Calibrate", then press the Enter key.
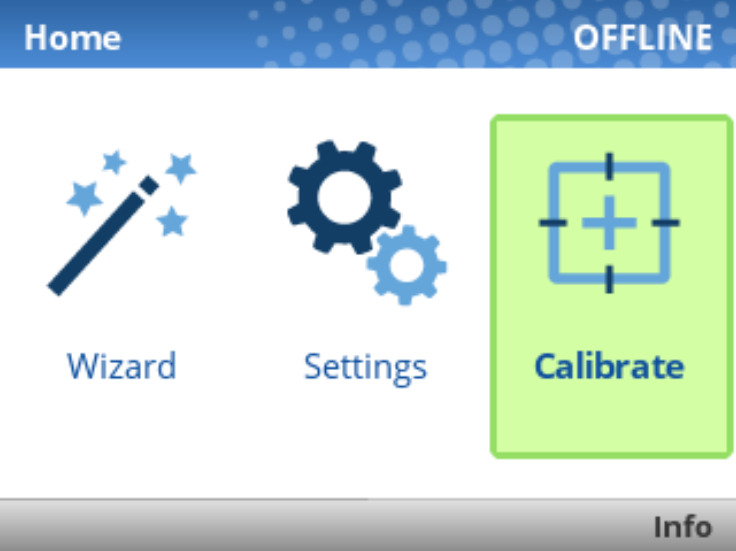
The media calibration should only take a few seconds, and once finished, you may see an error similar to the following: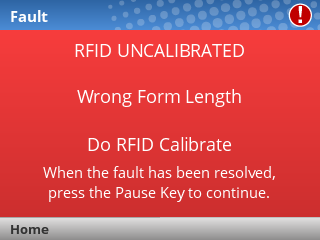
You can ignore this for now. Press Pause to dismiss the error.
Step 2: RFID Calibration
With the printer paused, using the arrow keys, navigate to Settings > RFID (second page) > Tag Calibration > RFID Calibrate.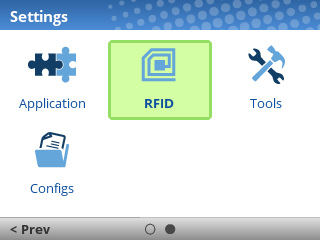
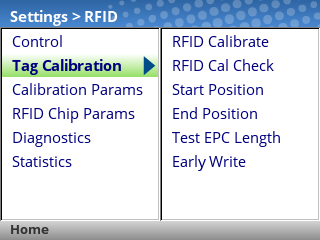
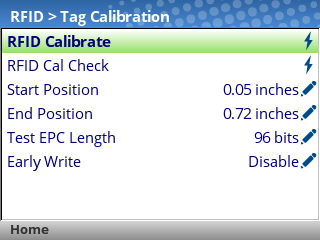
If you see an "ENTER SWITCH LOCKED" error, just press the Up and Down keys once, at the same time. You should then see "ENTER SWITCH UNLOCKED" and then you can perform the calibration.
The printer may take a few minutes to complete the RFID calibration. While in progress, you'll see the following window, which will update as progress is made: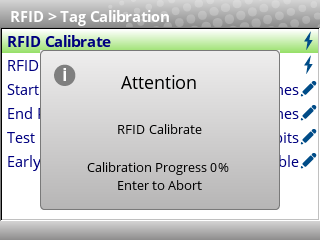
Once the calibration is completed, you'll see the following confirmation message: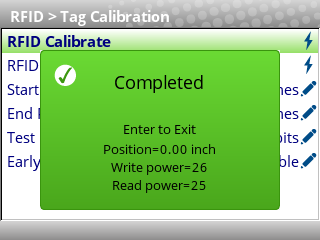
Press the green Pause button to unpause the printer, then select "Save permanently in Active Config."
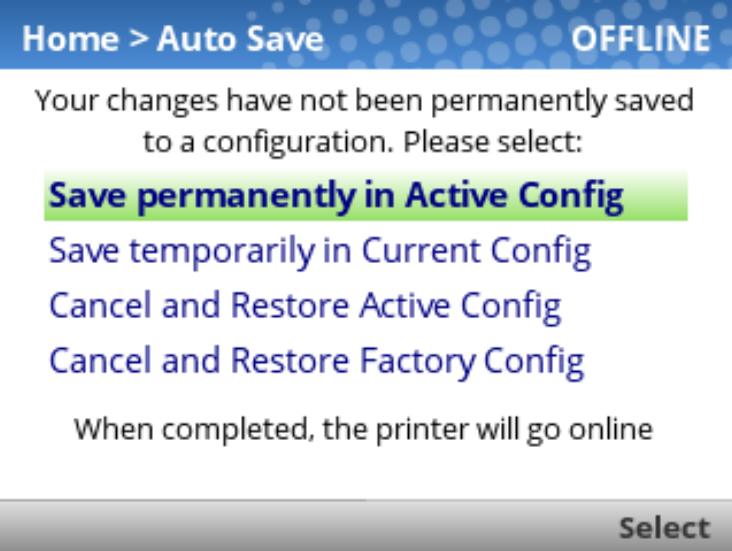
When all the steps have been completed, the printer should show "ONLINE" in the top-right corner of the screen:
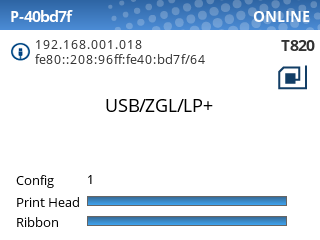
Throughout the calibration process, quite a few labels will be fed out of the printer. These blank labels can still be used, so we recommend opening the printer and rolling these labels back up into the printer before printing.
Make sure to unpause the printer again after closing it.
Possible Scenario: "Open Media Bay, Peel off Label"
If you see a message on the printer like the following, you need to perform an extra step to complete the RFID calibration. This is common for smaller labels, such as Mini:
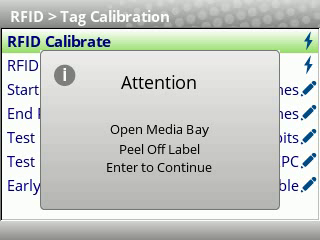
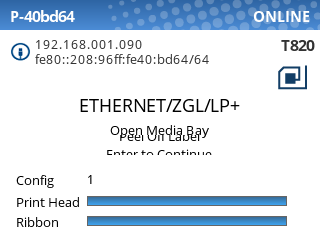
T800
In this case, you will need to do the following:
- Open the printer
- Peel off a label from the backing, somewhere behind the media sensor:

- Close the printer
- Press Enter to continue the calibration.
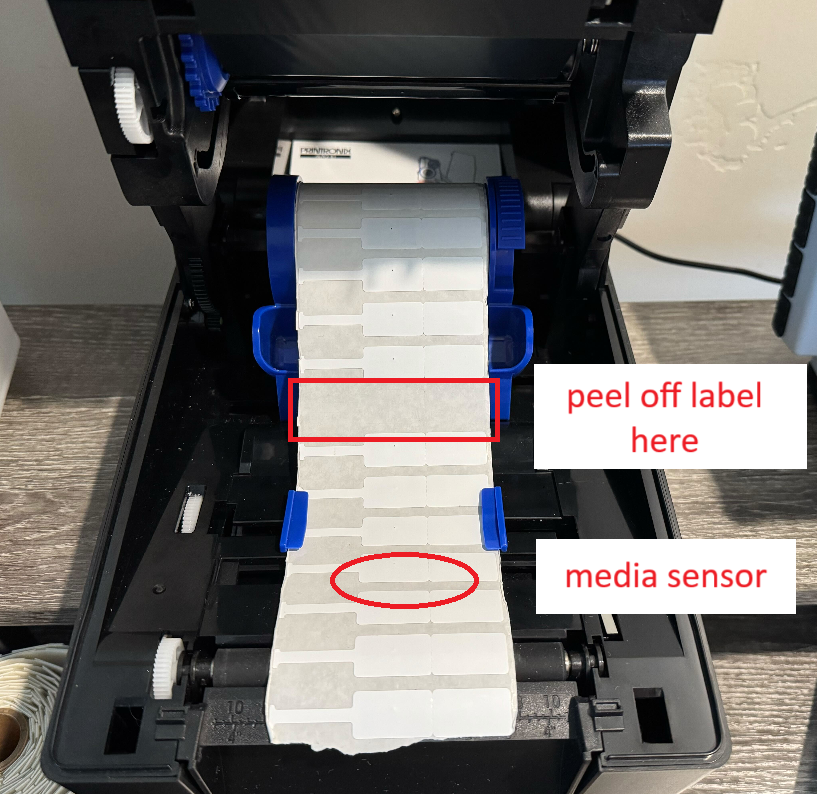
T4000 & T6000
- Open the printer cover (DO NOT open the printhead!)
- Peel off a label from the backing, somewhere behind the media sensor:

- Close the printer
- Press Enter to continue the calibration.
Now, the printer will feed labels until it reaches the empty space, then complete the last step of the RFID calibration.
Printronix: Alignment
Step 1:
Pause your printer using the green Pause button
Using the arrow and enter keys, navigate to Settings > Media > Image and locate the Vertical Shift and Horizontal Shift settings:
NOTE: The values you see here will not necessarily be the values you need to set.
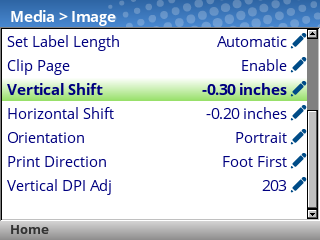
Adjust the values for these settings according to your needs.
- Vertical Shift: Positive values will shift the image up, and negative values will shift the image down.
- Horizontal Shift: Positive values will shift the image to the left, and negative values will shift the image to the right.
- If you encounter the message ENTER SWITCH LOCKED, press the Up and Down arrow keys together, then wait until the screen says ENTER SWITCH UNLOCKED. You will then be able to edit these settings.
When you've adjusted these settings unpause the printer using the green Pause button, then select Save permanently in Active Config
Step 2:
Try printing another label, and see if any further adjustments are necessary.
After adjusting these settings, the printer will feed a few labels before printing again. This is expected behavior.
Printronix: Darkness
If using wax ribbon, we recommend your darkness is set between 0 and 5.
If using resin ribbon, we recommend your darkness is set between 10 and 15.
Press the green Pause button on your printer to open the main menu.
Use the physical navigation keys to navigate to Settings > Media > Image > Print Intensity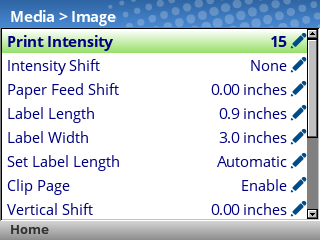
Press the Enter key, and use the Up and Down arrow keys to adjust the value.
If you see the ENTER SWITCH LOCKED message, just press the Up and Down arrow keys at the same time, and you should then see ENTER SWITCH UNLOCKED.
Press Enter again to apply your settings, then unpause the printer and choose Save Permanently in Active Config.
Keep in mind that print quality/darkness is also affected by the Print Speed. The slower the Print Speed, the less energy is needed to transfer the ink; so the Print Intensity should also be lowered accordingly.
Printronix: Connecting to Wi-Fi
If you purchased a Printronix printer with Wi-Fi capabilities, follow these instructions to connect the printer to your network.
This article assumes that your Wi-Fi network is protected by WPA Personal with an ASCII passphrase, which covers most cases. If your network is set up differently, contact your network administrator for the correct settings.
Press the Pause button, then use the Left Arrow Key to navigate to Wizard. Press Enter.

Press Enter again to select Wizards.

Use the Down Arrow Key to navigate to WLAN, then press Enter.

If you see the ENTER SWITCH LOCKED message, just press the Up and Down arrow keys at the same time, then wait up to 5 seconds and you should then see ENTER SWITCH UNLOCKED.
You'll now be guided through the setup steps to connect to your Wi-Fi network. Press the Right Arrow Key to advance to the next screen.

First, you 'll be asked for the SSID of your network. This is also known as the name of your Wi-Fi network.

Press Enter to edit the SSID Name field, then use the provided keyboard to type the SSID. (Enter your own Wi-Fi name, not Simple RFiD 5G.)


The SSID name is case-sensitive, and must be an EXACT match in order to connect. Take care to capitalize the correct letters, and use spaces where needed.
Finally, press the Right Soft Key under "Apply" to move to the next setting.
Next, you'll be asked for the Security Type. In most cases, this should be set to WPA Personal. Press Enter to edit the field, then choose the correct option and press Enter again.


Next, you'll be asked for the WPA Pass-Phrase Format. In most cases, this should be set to ASCII. Press Enter to edit the field, then choose the correct option and press Enter again.


Next, you'll be asked for the WPA Pass-Phrase. This is your Wi-Fi password. Press Enter to edit the field, then use the provided keyboard to type the password (case-sensitive!).


Finally, press the Right Soft Key under "Apply" to move to the next setting.
Next, you'll be asked whether you'd like to enable DHCP. In most cases, this should be set to Enable.

Press the Right Arrow Key to move to the next screen. you'll see a confirmation that you've completed the wizard.

Press the Right Arrow Key to exit the wizard.
Next, we'll change the Host I/O settings to ensure that the printer is listening for print jobs over the network.
Press the Left Arrow Key until you're back to the Home screen, then select Settings:
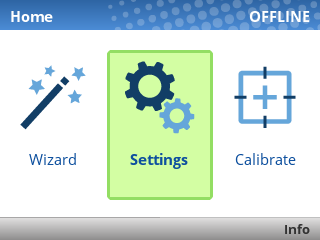


Last, unpause the printer, and select Save Permanently in Active Config.
The printer will automatically reboot at this point, and when it finishes starting up you should see that your Wi-Fi connection is active:

Printronix: Check Firmware Version
From the web portal, click the Available Printers menu.

Locate your printer, then click the Settings icon.

Check the value for the Firmware property.

At the time of writing, these are the latest firmware versions:
- T800 (T820, T830): V1.48E
- T4000 (T4204): V1.46H
- T6000e (T6304, T6604): V1.42E
To update your printer, follow this guide: Printronix: Update Firmware
Printronix: Update Firmware via Webpage
To use this upgrade method, your printer must be connected to your network. If a network connection is unavailable, update the firmware via a USB flash drive.
Requirements:
- A device with a web browser, on the same network (LAN) as your printer
- This device must be able to download and upload files.
- An RJ-45 Ethernet cable to connect your printer to the network (unless you have a Wi-Fi enabled printer)
Step 1: Download the latest firmware file
Choose the appropriate file for your printer model:
Step 2: Connect the printer to your network
Make sure all USB cables are disconnected from the printer before continuing.
Using an Ethernet cable with RJ-45 connectors, or Wi-Fi on supported models, connect the printer to your network.

When the printer is connected to the network, you will see its IP address at the top-left of the screen:
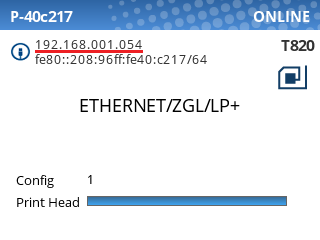
(If you don't see this screen, you may need to unpause the printer using the green pause button [ I I ].
Step 3: Navigate to the printer's web page
Type the printer’s IP address into a web browser. You can omit leading zeros in each octet:

You should be greeted with the printer's home page:
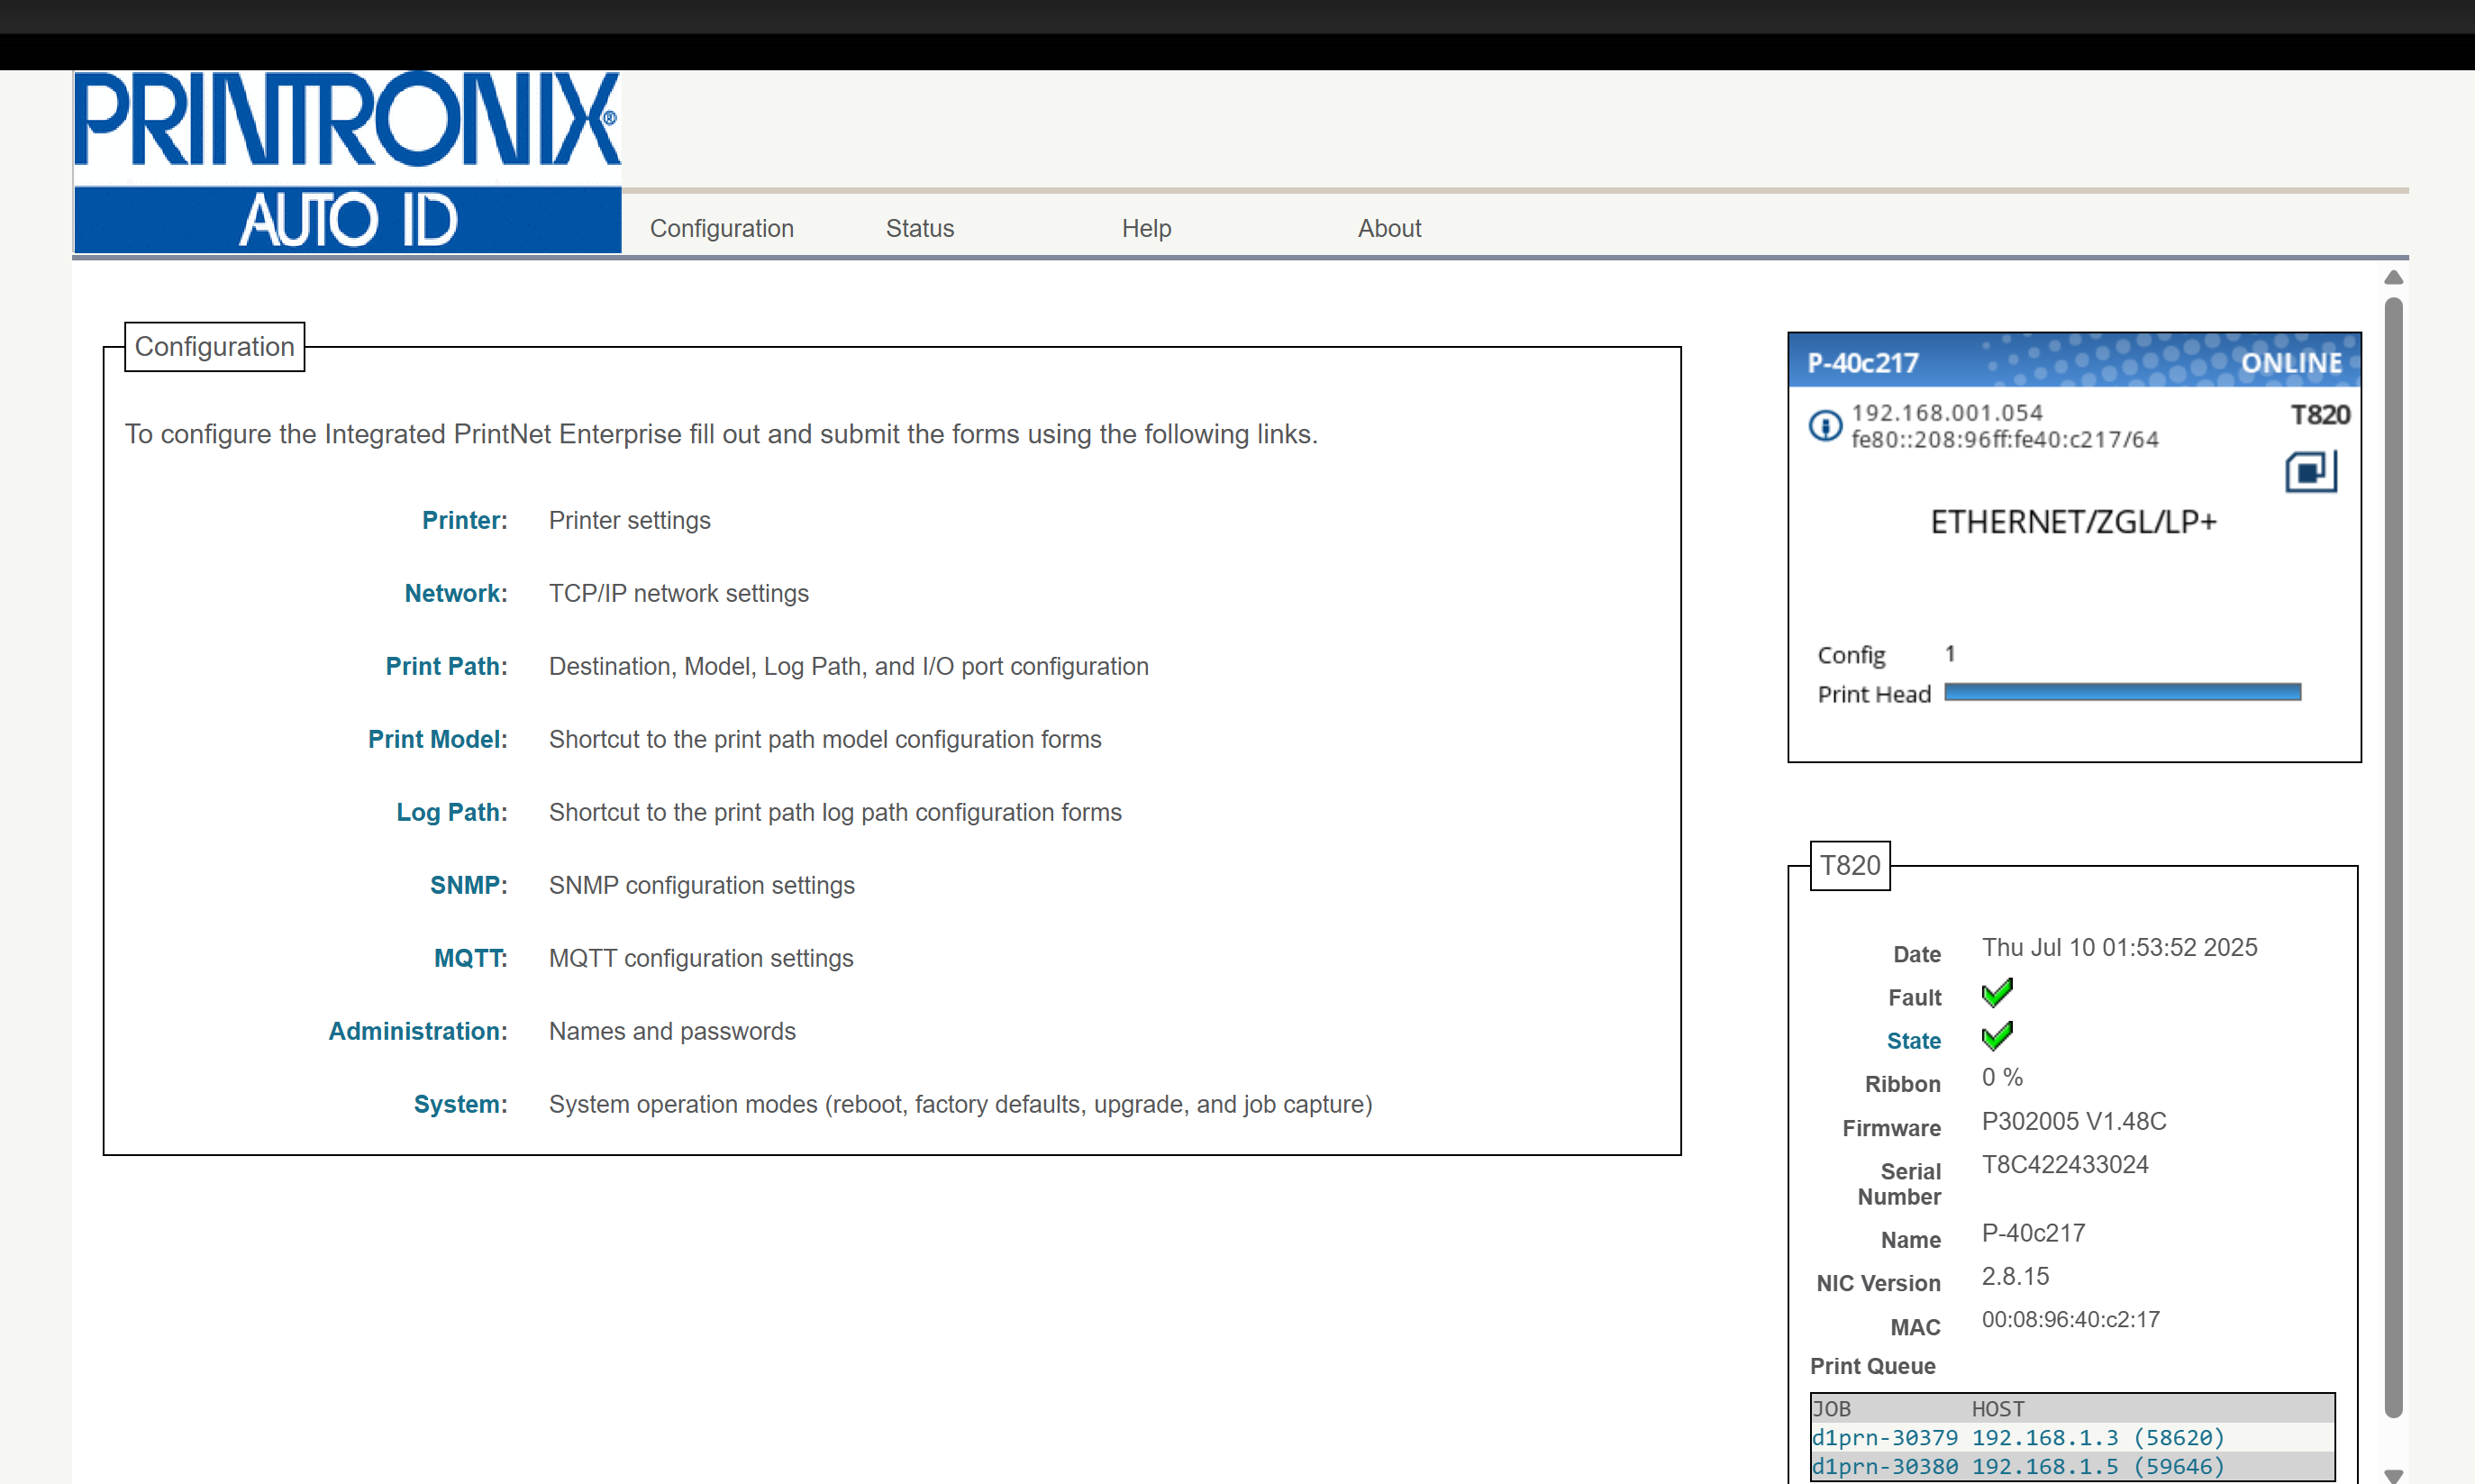
If you see a page asking you to set a password, we recommend setting it to Print123! to remain consistent with other guides.
If you set the password to something else, make sure you store the password somewhere it can be retrieved later.
Step 4: Capture the printer's current configuration
When you upgrade the firmware, the printer's current settings (including calibration, print intensity, vertical/horizontal shift, and more) will be lost. We will save the printer's current configuration to a file so we can restore it after the upgrade is complete.
Click the Printer link at the top of the Configuration list.
You may be prompted for a username and password at this point. The username is root and the password is Print123! or whatever you set it to in the previous step.
If Print123! doesn't work, try leaving the password field blank.

Click the Configuration Management link near the top of the page:

Click the Upload button. This will download a file containing the printer's current configuration. Save this file; we'll use it later to restore the configuration.

If you see a message like Insecure download blocked, make sure to Keep the download.
Step 5: Perform the upgrade
Click the Configuration link at the top of the page:
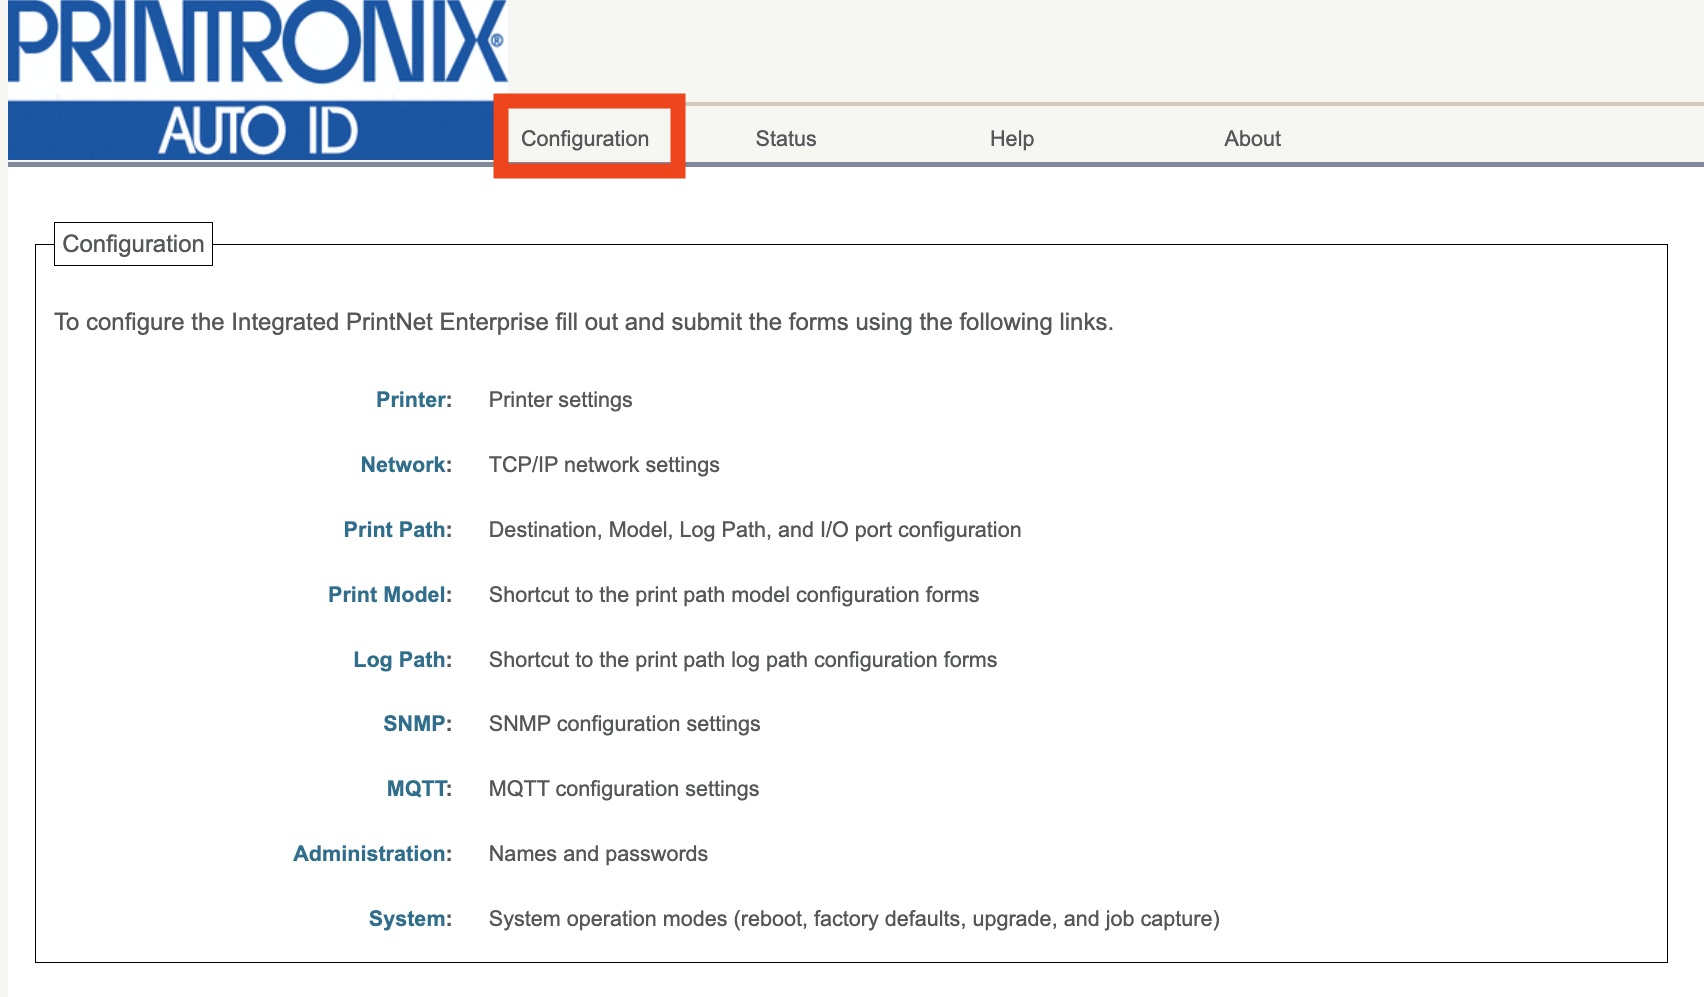
Click the System link at the bottom of the Configuration list:

You may be prompted for a username and password at this point. The username is root and the password is Print123! or whatever you set it to in the previous step.
If Print123! doesn't work, try leaving the password field blank.
Next, click the Upgrade button in the System menu:

Click Choose File, then choose the .prg firmware file you downloaded earlier. After selecting the file, you'll see its name listed next to the button.

Click the Upgrade button. You'll be asked to confirm the operation: click OK.

The firmware will now be downloaded to the printer. You should see a message on the printer stating that the Download is in progress:
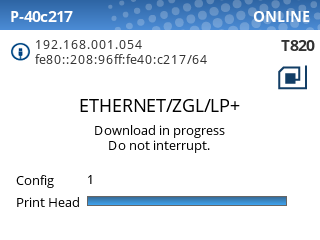
When the printer has downloaded the firmware, the web page will prompt you to perform a restart. Click Yes.

After a few minutes, the printer will reboot itself and apply the update. During this time, the web page will be unresponsive. After ~2-3 minutes, the upgrade will be complete.
Step 6: Restore your previous printer config
Refresh the web page so you're back at the Configuration page.
If you see a page asking you to set a password, we recommend setting it to Print123! to remain consistent with other guides.
If you set the password to something else, make sure you store the password somewhere it can be retrieved later.
Click the Printer link at the top of the Configuration list.
Click the Configuration Management link near the top of the page:
Click the Choose file button, and select the Printer.ptx configuration file we created earlier. Then, click the Download button.

You'll see a message confirming that the configuration has been downloaded:

Wait for the page to be redirected, or refresh the page manually if it doesn't redirect within 15 seconds.
Click the Load link at the top of the list.

Make sure 1 is selected in the Load Config: dropdown, then click Submit.

Your printer is now fully updated and configured; you can close the web page and use your printer as normal.
If you have some issues configuring the printer, you can manually configure it: Configuring Your Printronix Printer after a reset
Printronix: Job in Process
Printronix printers often state "Job in Process" (often misread as "Job in Progress") on their screen, as shown below:

This message indicates that the printer is processing data from the host. Since this includes periodic status checks and other information, the Job in Process message does not necessarily mean that a print job is in progress. If the printer is idle (not currently printing), then you should be able to submit new print jobs without any issues.
If you are unable to print, the most common cause is that the printer is offline. Follow the steps in this article to troubleshoot: Printer Offline
Printronix: Updating Firmware via Flash Drive
This upgrade method will replace your printer's configuration with default values from Simple RFID, so you may need to adjust some settings after the upgrade to restore ideal print performance. If you'd like to preserve your current settings, update the firmware via the webpage.
Make sure there is no important data stored on the flash drive before using this method. Formatting the drive will erase ALL data stored!
Requirements:
- Flash Drive formatted with FAT32 and MBR partitioning
- Printer set up with Power
Step 1: Download the CCM Zip File
Download the ZIP file from the link below which corresponds with your printer model:
- T800 (T820, T830): T800 CCM 1.52E.zip
- T6000e (T6204e, T6304e, T6604e): T6000e CCM 1.42E.zip
Step 2: Extract the file onto your Flash Drive
After downloading, open up file explorer to the file and Extract All from the zip file onto the Flash Drive. At this point the Flash Drive is ready. (Video instructions of this process can be found at the top of this article).
Step 3: Turn off the Printer
With the power cord still plugged in, switch the power off.
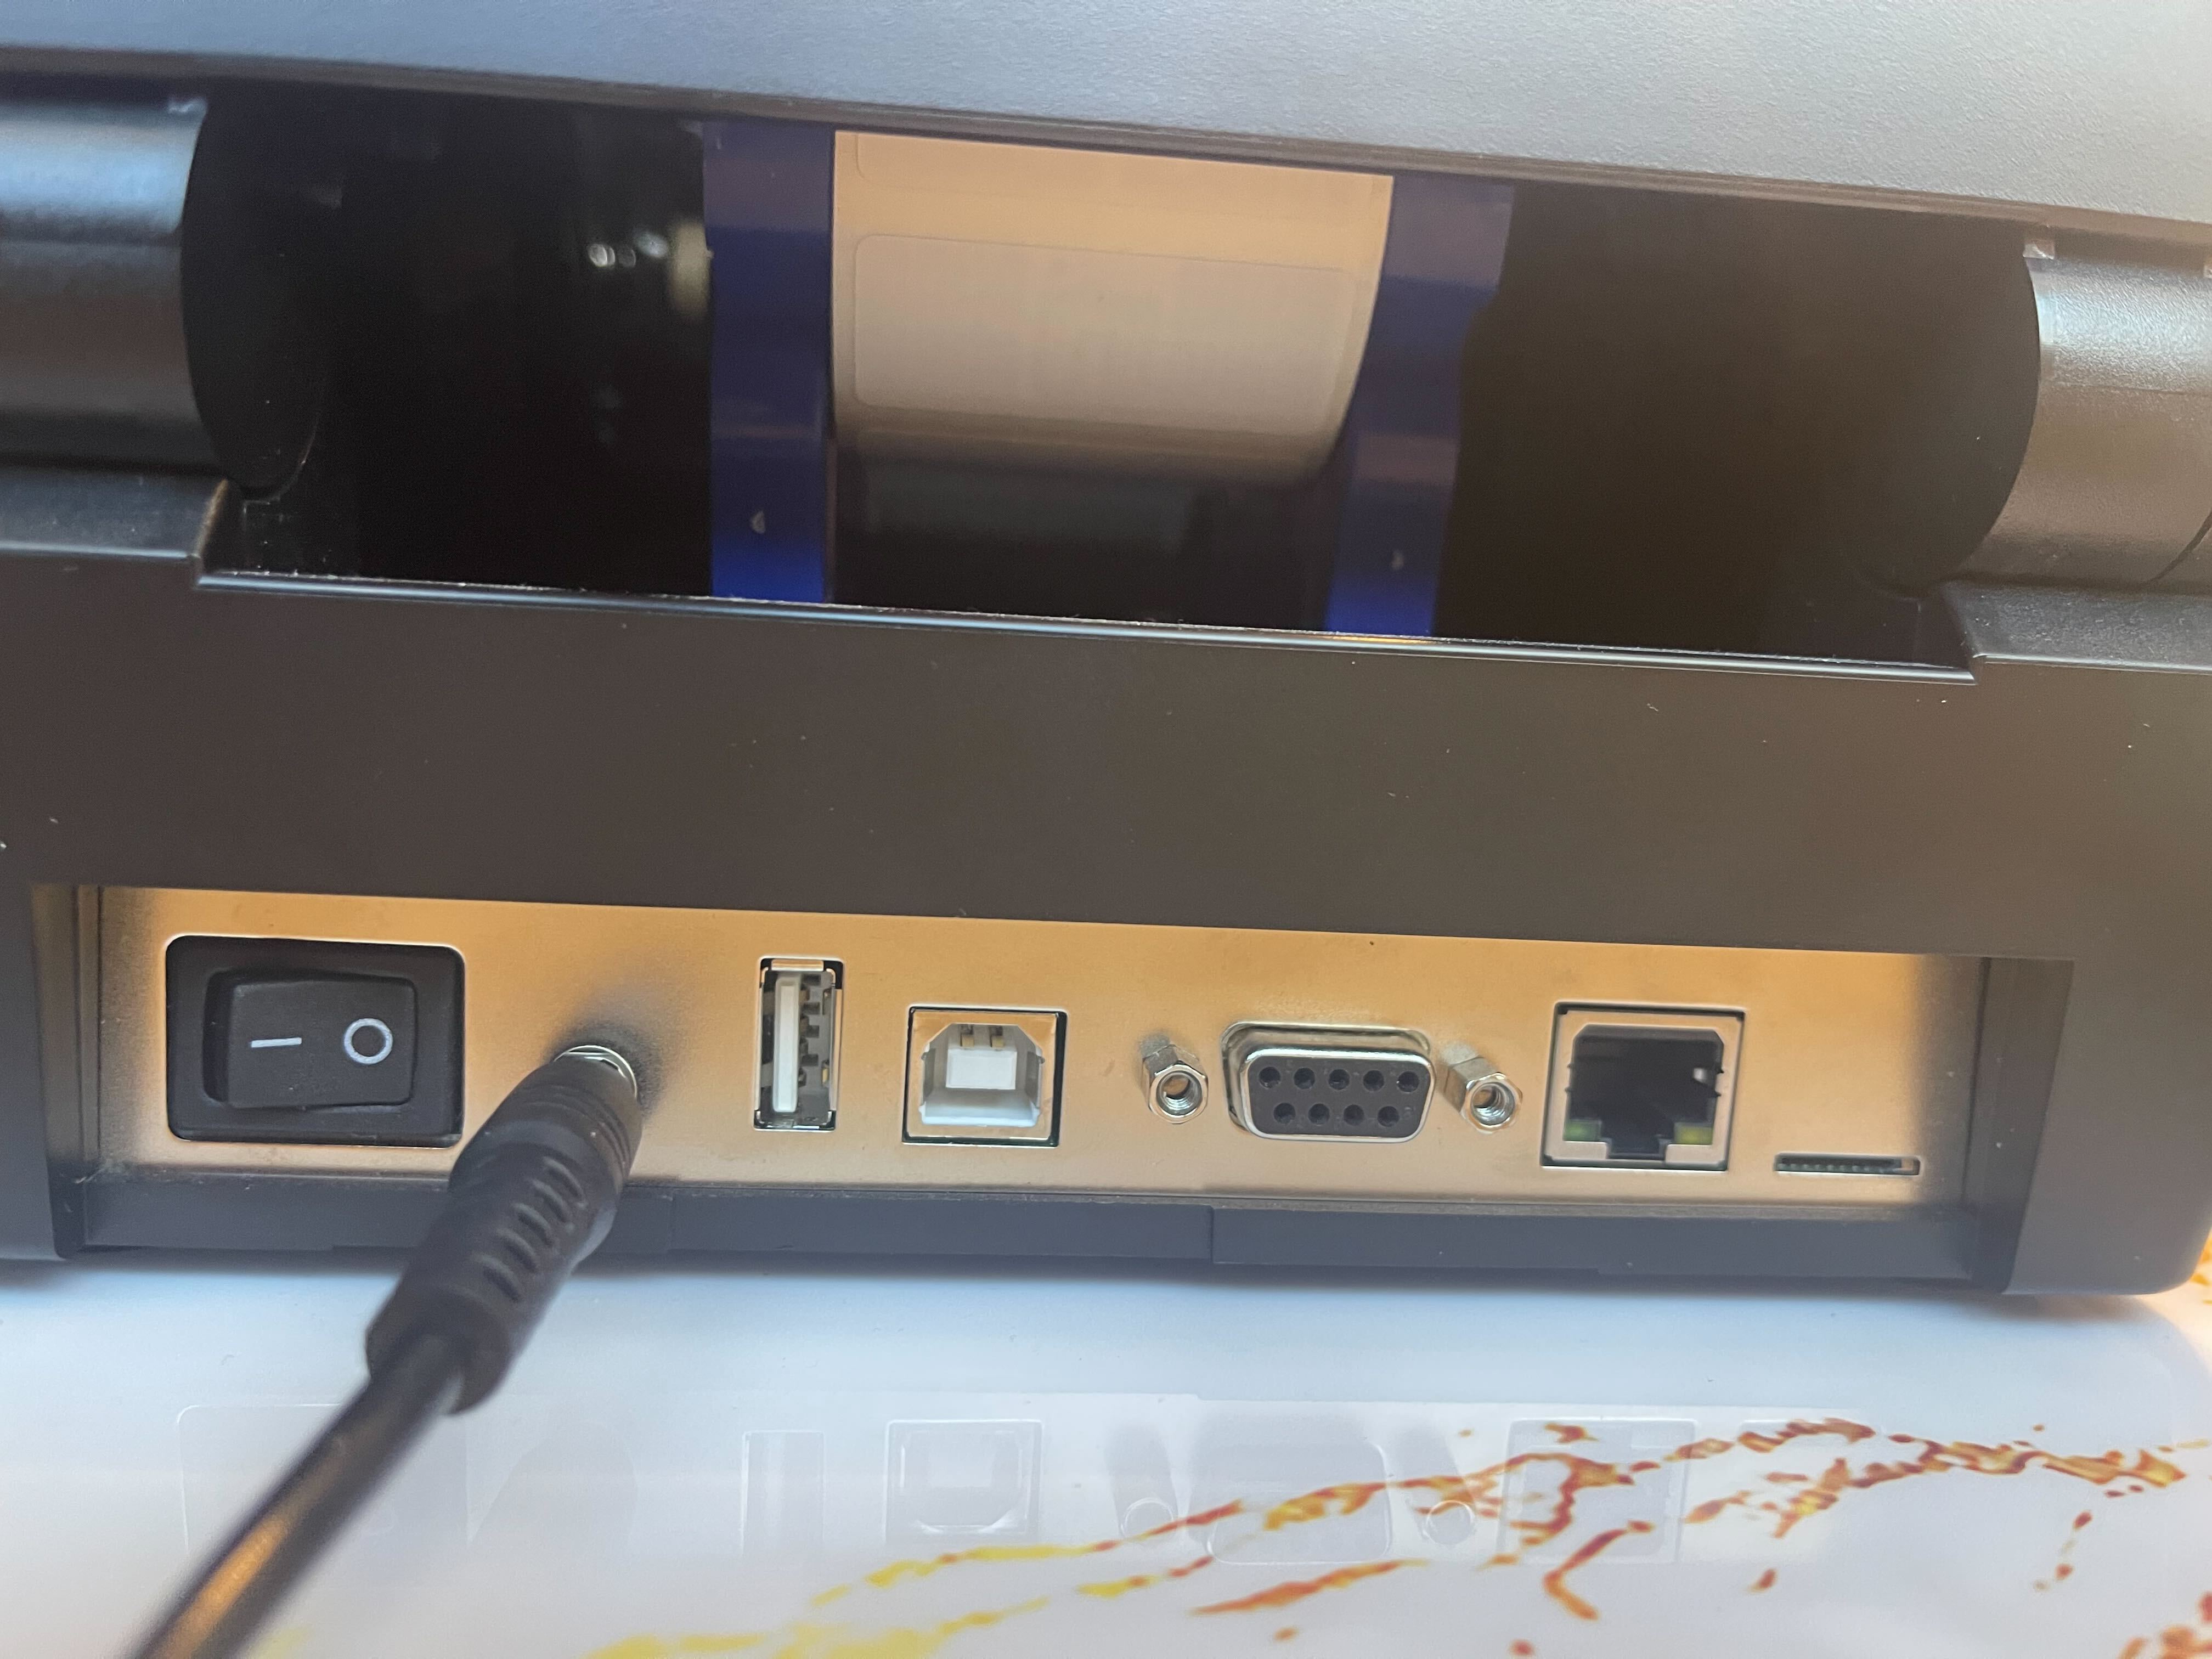
Step 4: Plug the Flash Drive into your Printer
- Plug the Flash Drive into your Printer.
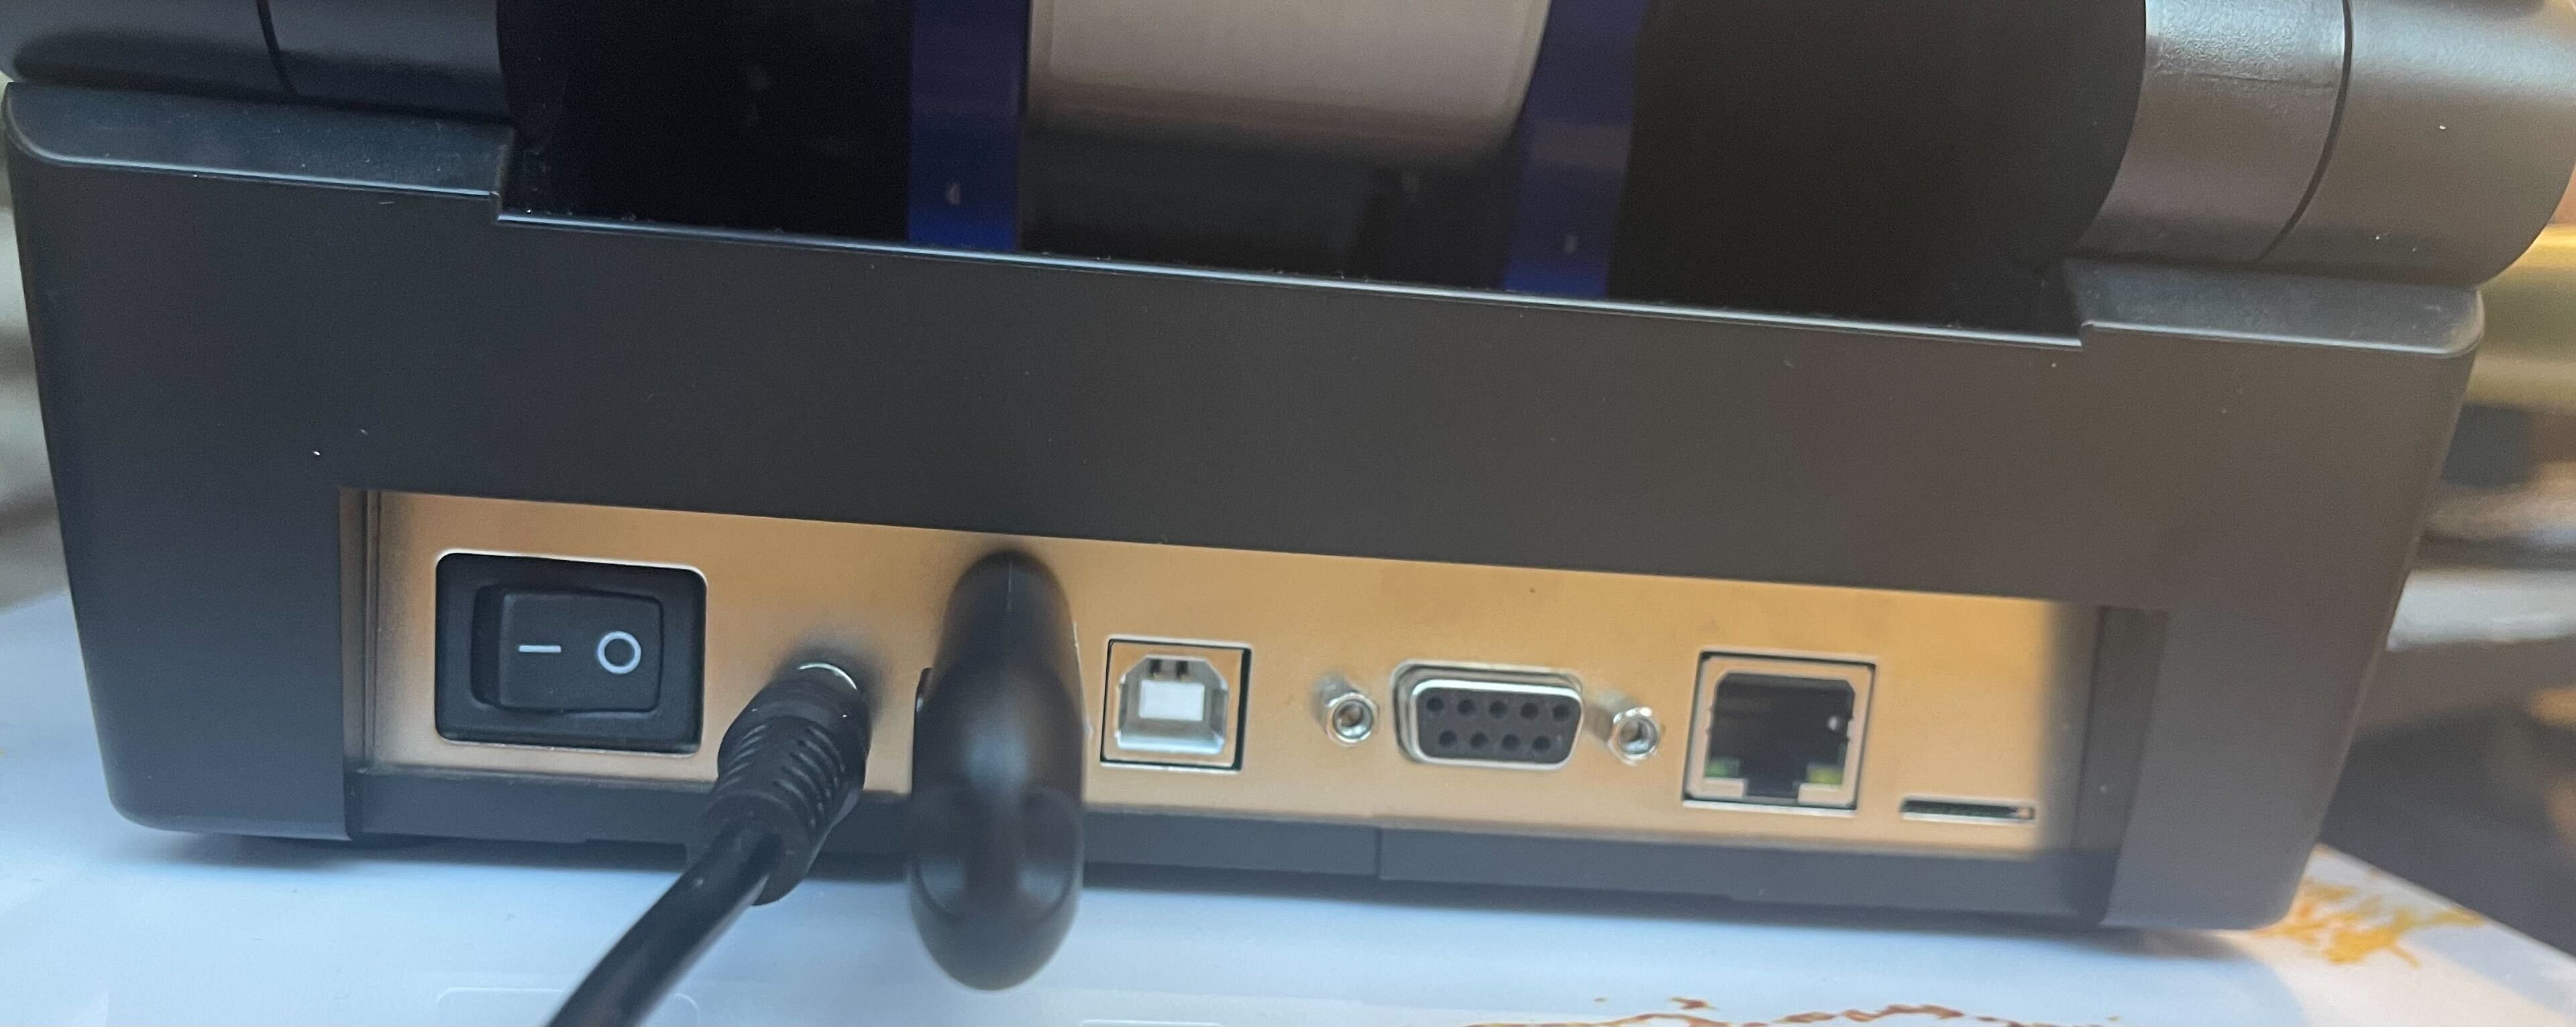
Step 5: Power on and hold down the Up Arrow
- While you flip the power switch on, hold down on the up arrow on the printer. Keep holding that down until you see "Config Module Detected" on the printer screen.

Step 6: Wait for the Printer to Reboot
- At this point you will have to wait for the printer to process the files and upgrade. Wait until you see the printer reboot (the printer may reboot multiple times) and a screen that says "Printer Config Installed".

Step 7: Unplug the Flash Drive and Turn off the Printer
- Go ahead and turn off the printer and take the flash drive out. At this point the printer is configured and updated. Go ahead and plug in the rest of your connections and power on. (Remember to Calibrate before printing again).
The printer will be in Ethernet mode after the upgrade. If you're using a USB connection, change the printer's Interface setting to USB (Pause the printer > Settings > Host I/O > Interface).
Configuring your Printronix Printer after a reset
When you update the firmware on your Printronix printer, or if you have to reset its settings during troubleshooting, you'll need to configure a few settings for the printer to work with Simple RFID.
- First, navigate to the Home screen of the printer by pressing the Pause button. You should see this screen:
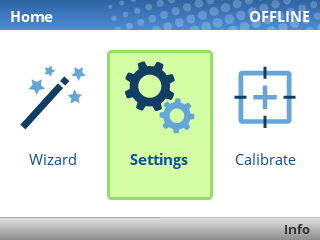
- Click the Settings button
- Within the Settings menu, set the following values:
If you see an ENTER SWITCH LOCKED error, press the Up and Down keys at the same time, once. You should then see ENTER SWITCH UNLOCKED, and then you can perform the calibration.
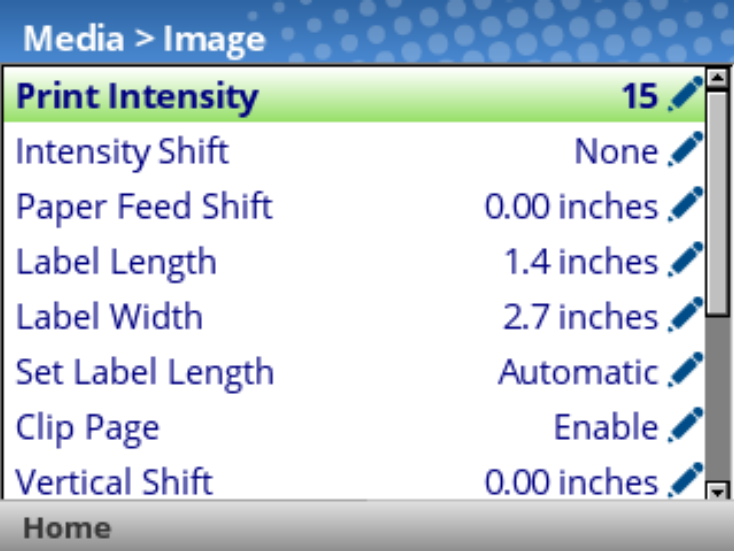
- Media > Image
- Print Intensity: 15
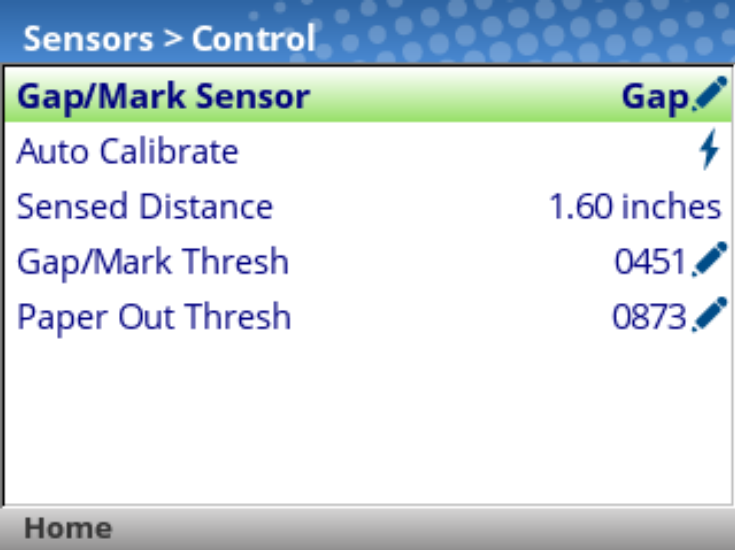
- Sensors > Control
- Gap/Mark Sensor: Gap
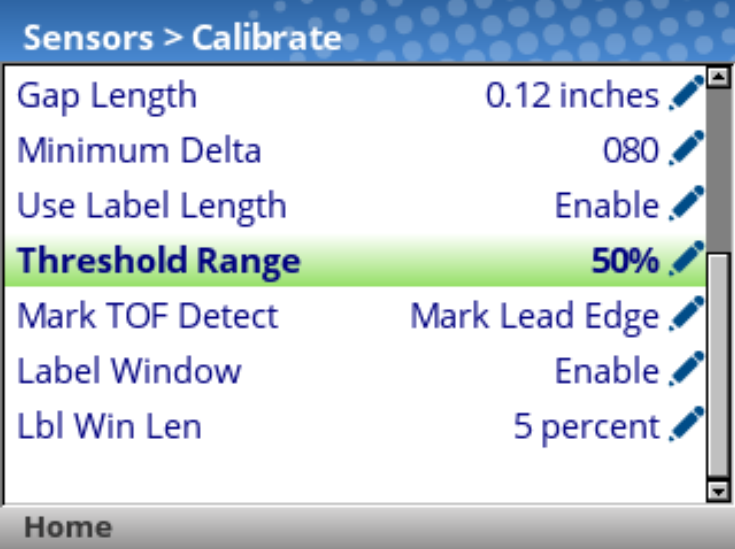
- Sensors > Calibrate
- Power-Up Action: Disable
- Head Close Action: Seek TOF
- Threshold Range: 50%
- Label Window: Enable
- Host I/O > Control
- Interface: USB or Ethernet depending on how the printer is connected

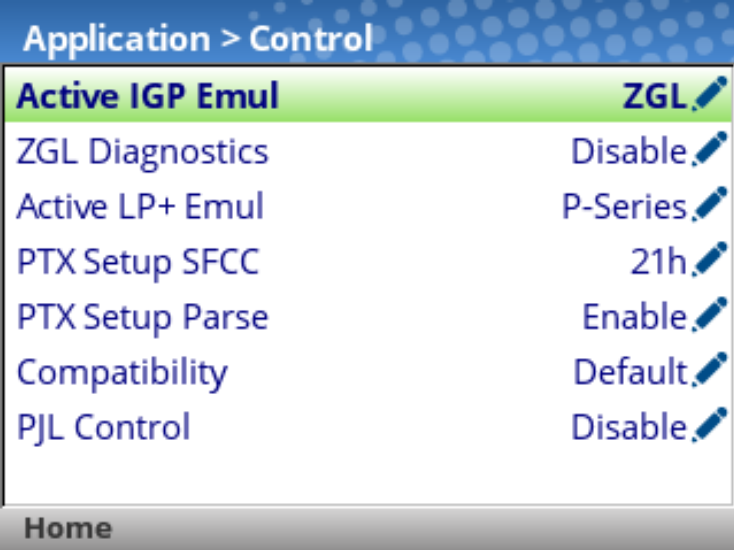
- Application
- Control
- Active IGP Emul: ZGL
- Control
-
- ZGL Setup
- Preparser: Enable
- ZGL Setup
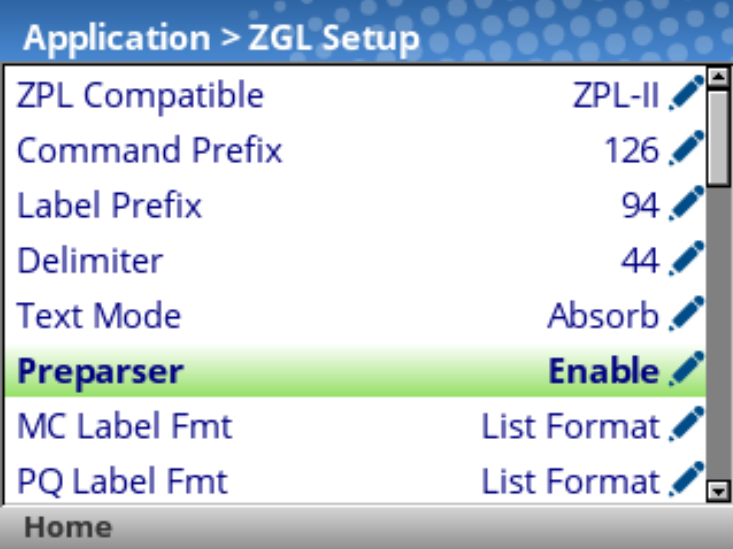
After changing these settings, press the green Pause button to unpause the printer, then select "Save permanently in Active Config".
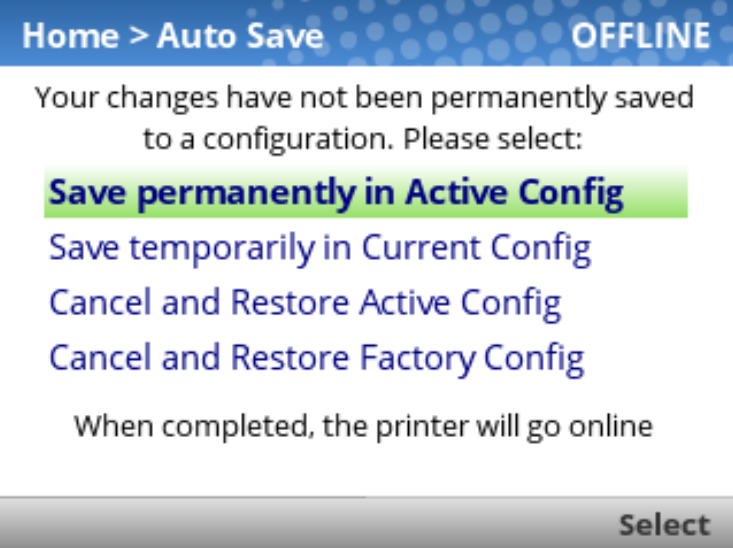
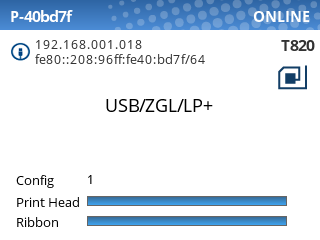
When all the steps have been completed, the printer should show "ONLINE" in the top-right corner of the screen:
You should now be ready to calibrate the printer with either Auto or Manual calibration.
Printronix: Change Interface
The Interface setting determines which interface the printer will be listening for print jobs on. It's important to have this set correctly, or your printer won't accept print jobs and may not even be detected by the Print Client.
The current interface will show on the printer's Online screen:
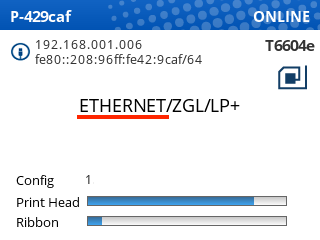
Changing the Interface setting
- First, pause your printer.
- Open Settings
- Navigate to Host I/O > Control
- Press Enter to edit the Interface setting
- If you see ENTER SWITCH LOCKED, follow these steps: ENTER SWITCH LOCKED
- Use the up/down arrow keys to scroll to Ethernet or USB depending on how the printer is connected
- Press Enter to select the correct setting
- Unpause the printer, and choose Save Permanently in Active Config.
The printer should now display the correct interface.
Follow this article if you are not sure what needs to be plugged into a Printronix printer.
Printer Setup Instructions
Set up your printer
Watch the video corresponding to your printer model for setup instructions, then continue for instructions to install the Print Client.
Make sure you do both of these steps before your first onboarding call!
Desktop Printers
Zebra Printer (ZD621R, ZD500R)
Printronix Printer (T800)
Industrial Printers
Zebra Printer (ZT411, ZT410)
Printronix Printer (T6000e)
Printronix Printer (T4000 series)
Install the Print Client
Step 1. Connect the printer to the device
The printer can be connected to the PC via Network or USB. Network method is generally more reliable, and therefore preferred if possible.
WARNING: MACOS DEVICES
The macOS version of the Print Client is currently in beta. As such it has the following limitations:
- The macOS Print Client requires Apple Silicon (M1 or later). Macs with Intel processors are not compatible.
- The macOS Print Client does not support Printronix printers via USB. Zebra printers can be connected via USB, but Printronix printers can only be connected via local network.
- The macOS Print Client will not work if certain USB storage devices are connected. This can include flash drives, external hard drives, or even mobile phones. If you disconnect these devices, the print client will run.
Network method
If connecting via network, use the provided CAT6 cable, or a network cable of your own, to attach the printer to your network.
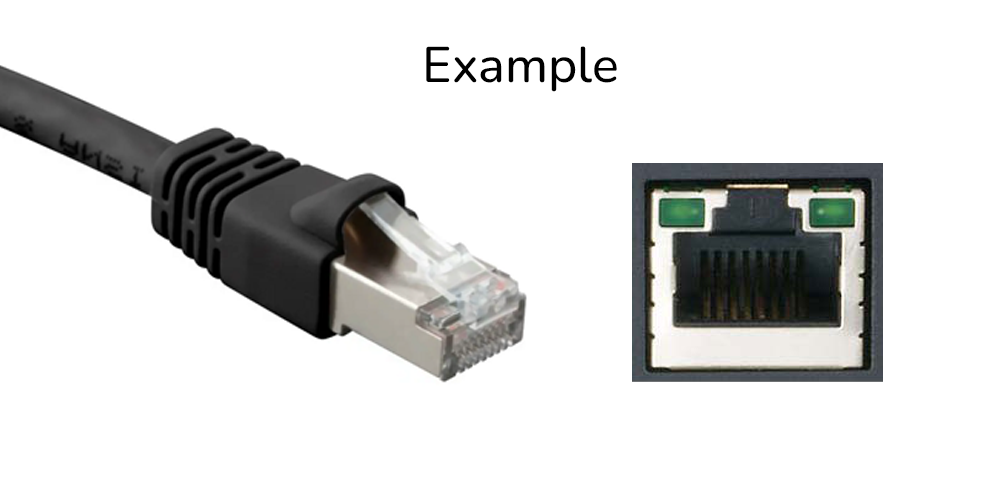
The printer must be on the same subnet as the host PC in order to be detected by the Print Client.
USB method
If connecting via USB, plug the provided USB cable into your PC and printer. The USB-A connector should be plugged into the PC, while the USB-B connecter should be plugged into the printer:
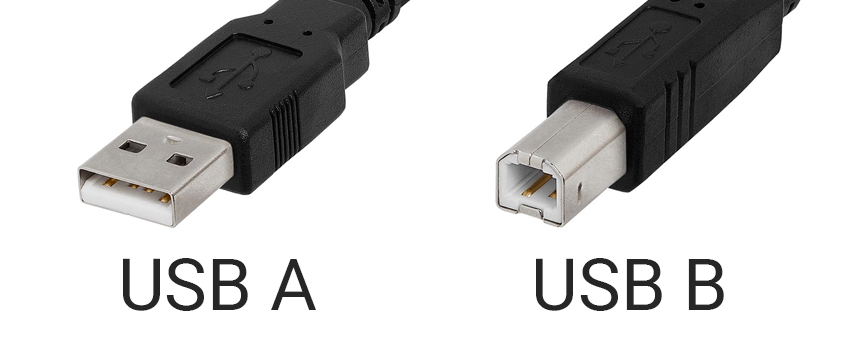
Last, for the USB method, you'll need to change the Interface setting on the printer to USB.
Such cable type is often used by regular inkjet/laser printers as well.
Step 2. Install Print Client
If you are connecting a Printronix printer via USB, you must use the Windows version currently. macOS only supports Printronix printers via network connection.
Download the Print Client:
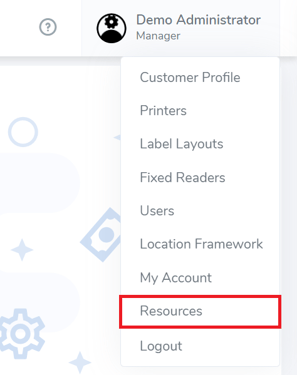
- Login to the web portal
- Click on your account name in the top-right corner
- Click "Resources"
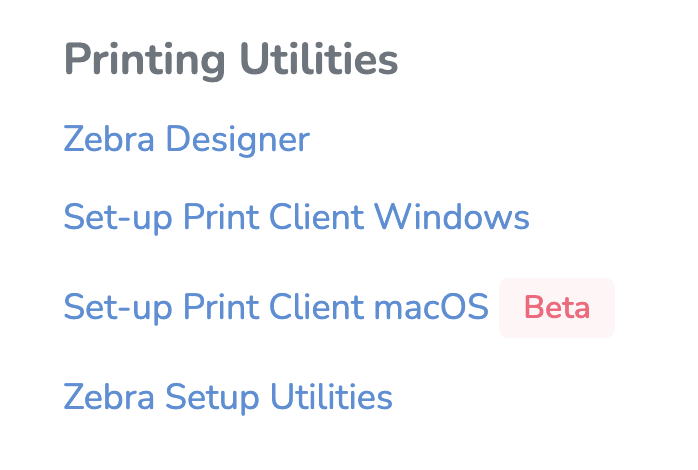
- On the resources page, under Printing Utilities, click "Set-up Print Client Windows" or "Set-up Print Client macOS" to download
Install Client
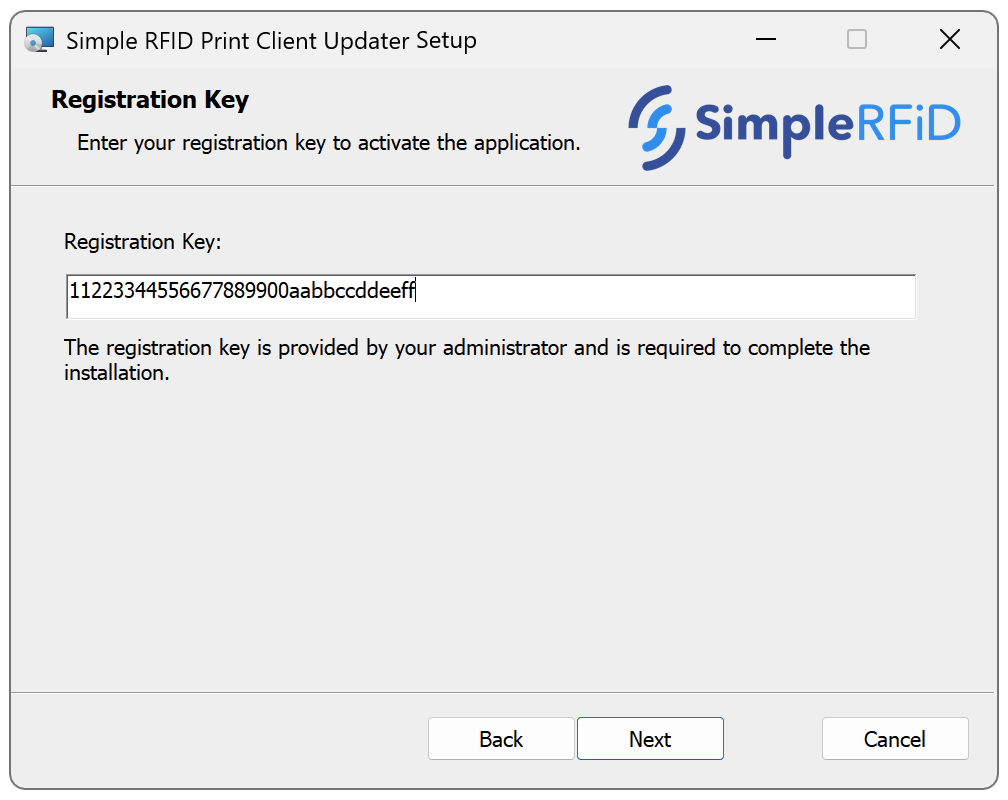
- Open the downloaded file (PrintClient.Updater.Installer.msi or PrintClientUpdater.Installer.pkg). This will launch the installer.
- Follow the steps in the installer. You will need to provide Administrator approval to complete the installation.
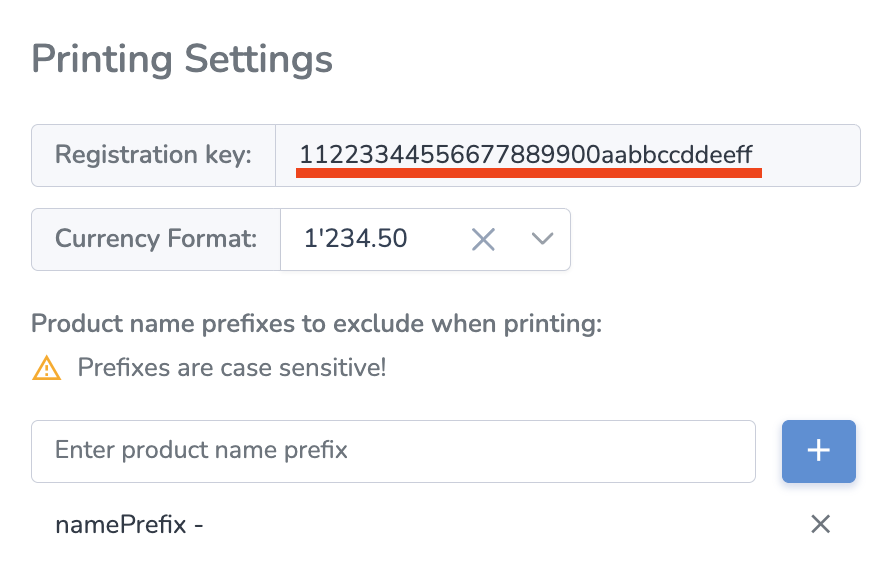
- Enter your Registration Key when prompted. You can find this key on the web portal, on the Customer Profile page under Printing Settings.
If you don't have access to the key, reach out to your manager.
If you are not prompted to enter the key, finish the installation, then reach out to Simple RFID support to connect your printer.

- When the installation is completed successfully, you can close the installer.
Step 3. Assign Location
Please ask your manager to assign the location.
Here are the steps for manager:
- Go to User Menu (click on the name on the top right)
- Select Printers
- Find the new Print Station (often on top, will have "Not assigned" under the location column)
- Click the gear icon (
 ) on the right from the Print Station)
 - In the Location dropdown, set the desired location
- Click Apply

Once the printer is connected, it will appear on the Printers page, and in the Available Printers menu.
Printronix: How do I know if my printer is ready to print?
You'll know the printer is ready to print when it displays "ONLINE" in the top-right corner of its screen and isn't online on the web portal. If either of these conditions isn't met, you can usually resolve it by checking the Printer Offline troubleshooting steps.
Zebra: Updating Firmware
The following article describes upgrading the firmware for Zebra printers.
Download the latest firmware file for your printer from Zebra's website. The download will be a .zip file, extract it to find the firmware file (.zpl).
Network Methods
These methods are recommended over USB for reliability
Using cURL (cross-platform)
Use curl in your system terminal to send the firmware file directly to the printer:
curl -T <path_to_firmware_file> ftp://<printer_ip_address>Zebra Printers: Loading Media & Ribbon
ZD500R & ZD621R
Ribbon & Media
ZT410R & ZT411R
Ribbon & Media
Zebra: ZD500R: Manual Calibration
- Press the button under the HOME symbol.
- Use the left-right arrow keys to select TOOLS, then press ENTER.
- Use the left-right arrow keys to navigate to MANUAL CALIBRATION, then press START.
- The printer should now say LOAD BACKING, PRINTER PAUSED.
- Open the printer, remove labels from the first three inches of backing. Roll the labels back so that the empty backing is directly over the media sensor. Make sure there is still some backing over the platen roller.


- Close the printer.
- Press the Pause button to begin the calibration.
- The printer will take a few seconds to measure the sensor through the empty backing.
- When the printer says RELOAD ALL, press Pause again.
- The printer will feed labels out until it identifies the gap successfully.
- The manual calibration is now complete. Press the button under the HOME symbol twice to return to the main screen.
Zebra: ZD500R: Calibrate from Printer's Interface
ATTENTION: We suggest first performing the calibration from the website. If the calibration fails, then follow these steps.
Step 1: Media Calibration
Hold the PAUSE + CANCEL buttons for 2 seconds to start the media calibration.
Step 2: RFID Calibration
Press the menus ‘Home’ ( ) button. Navigate to the ‘RFID’ (
 ) menu button and press the ‘Select’ ( — ) button.
Use the Left and Right navigation arrows to browse to the RFID CALIBRATE procedure. Press the select button ( — ) below the START on the lower right hand of the display.
The printer will slowly feed a label while adjusting the location and RFID read/write communication settings for your chosen RFID tag/label.
The printer will feed an additional label in some cases when calibration has completed successfully with the display message reading: READY
At this point, you can open the printer and roll the excess labels back inside. Then, close the printer, unpause it, and you will be ready to print.
Zebra: ZD500R: Alignment
Adjusting the vertical print position on your labels
From the main screen, press the Home button (house icon).
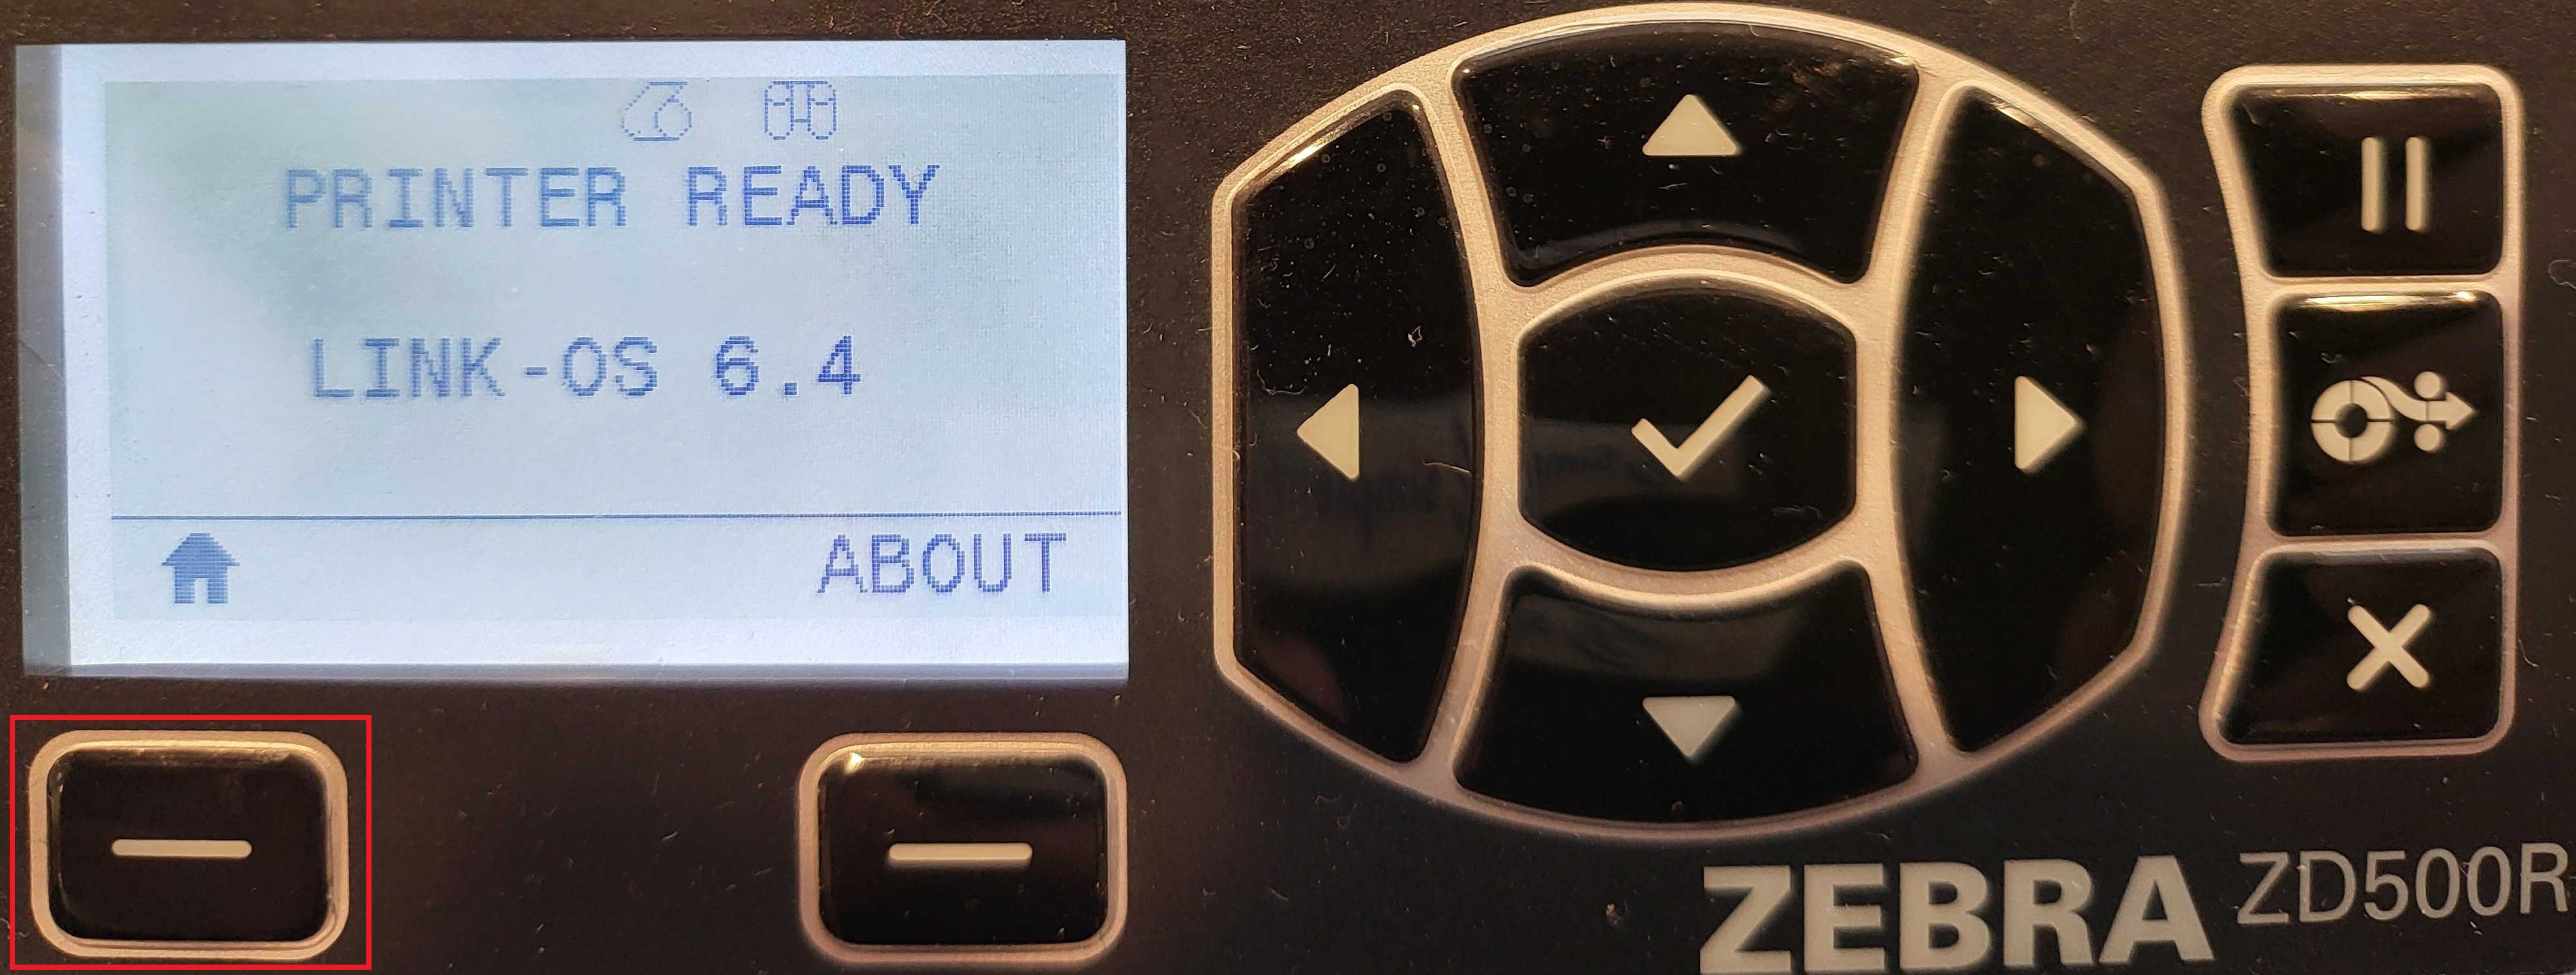
Select Settings (gear icon).
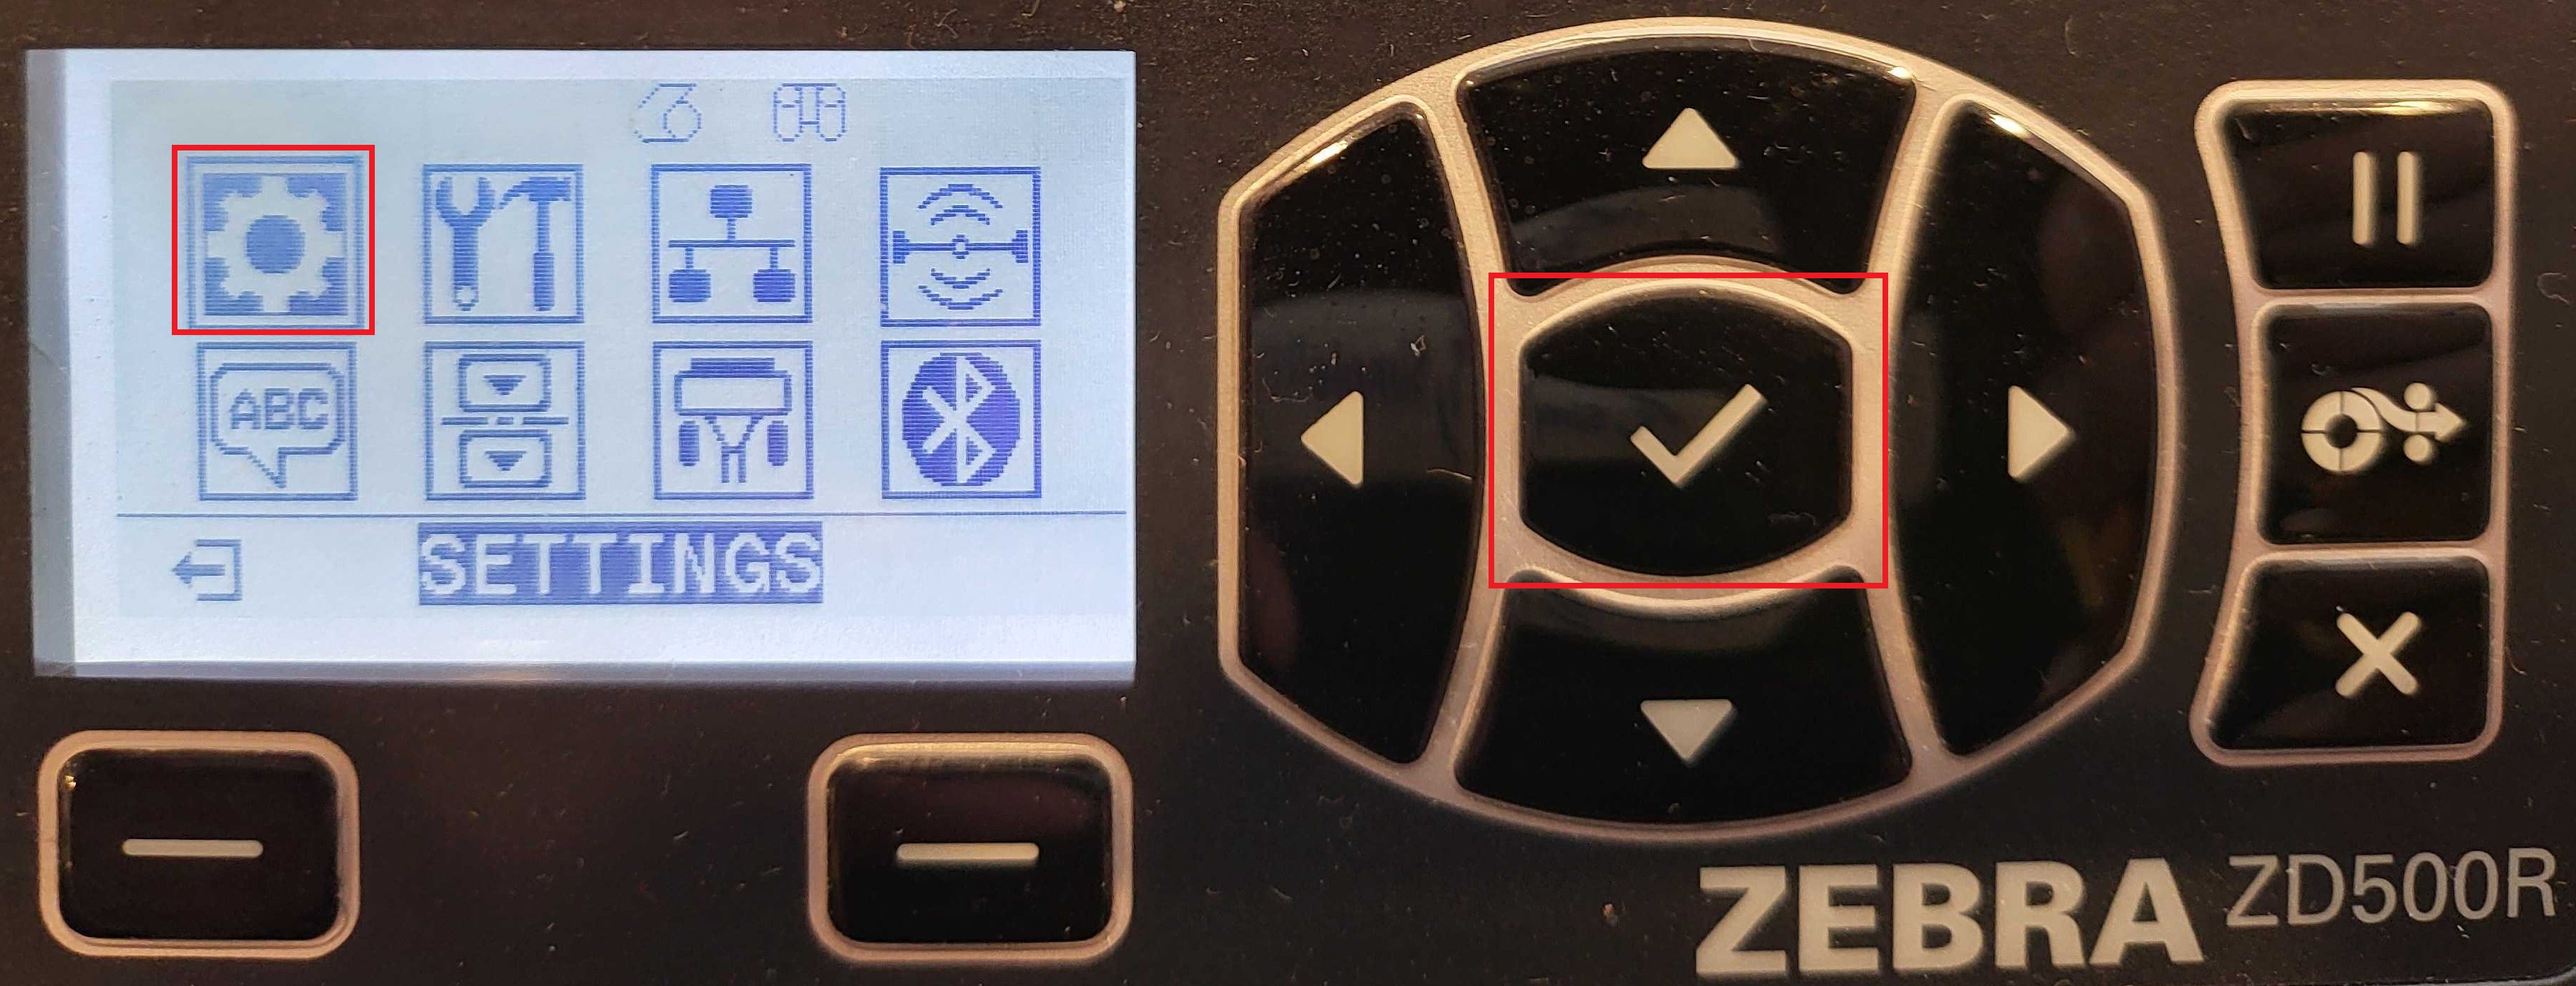
Use the right arrow on the navigation buttons until you reach LABEL TOP.
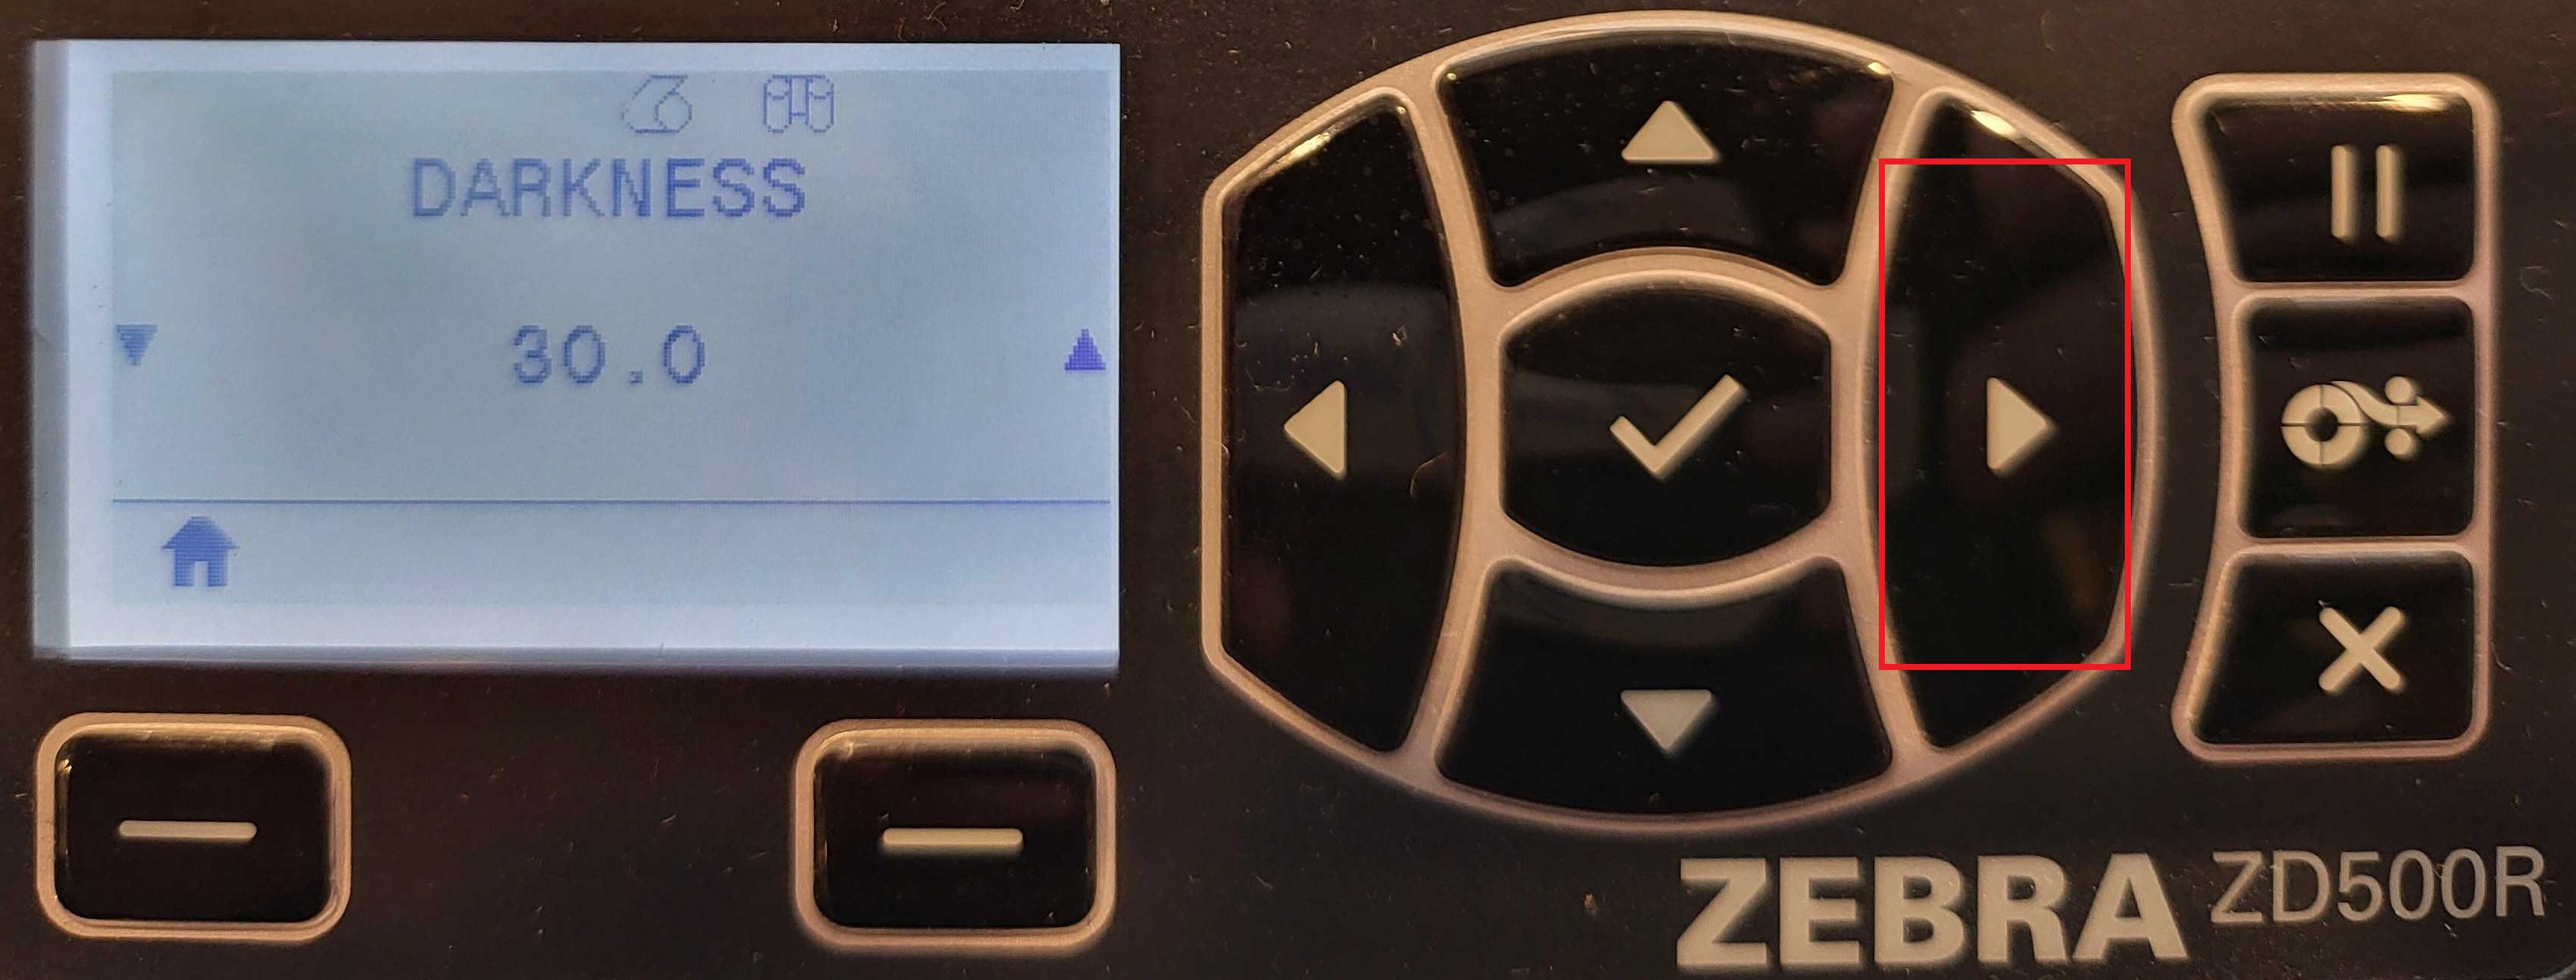
Use the up/down arrows to adjust the value:
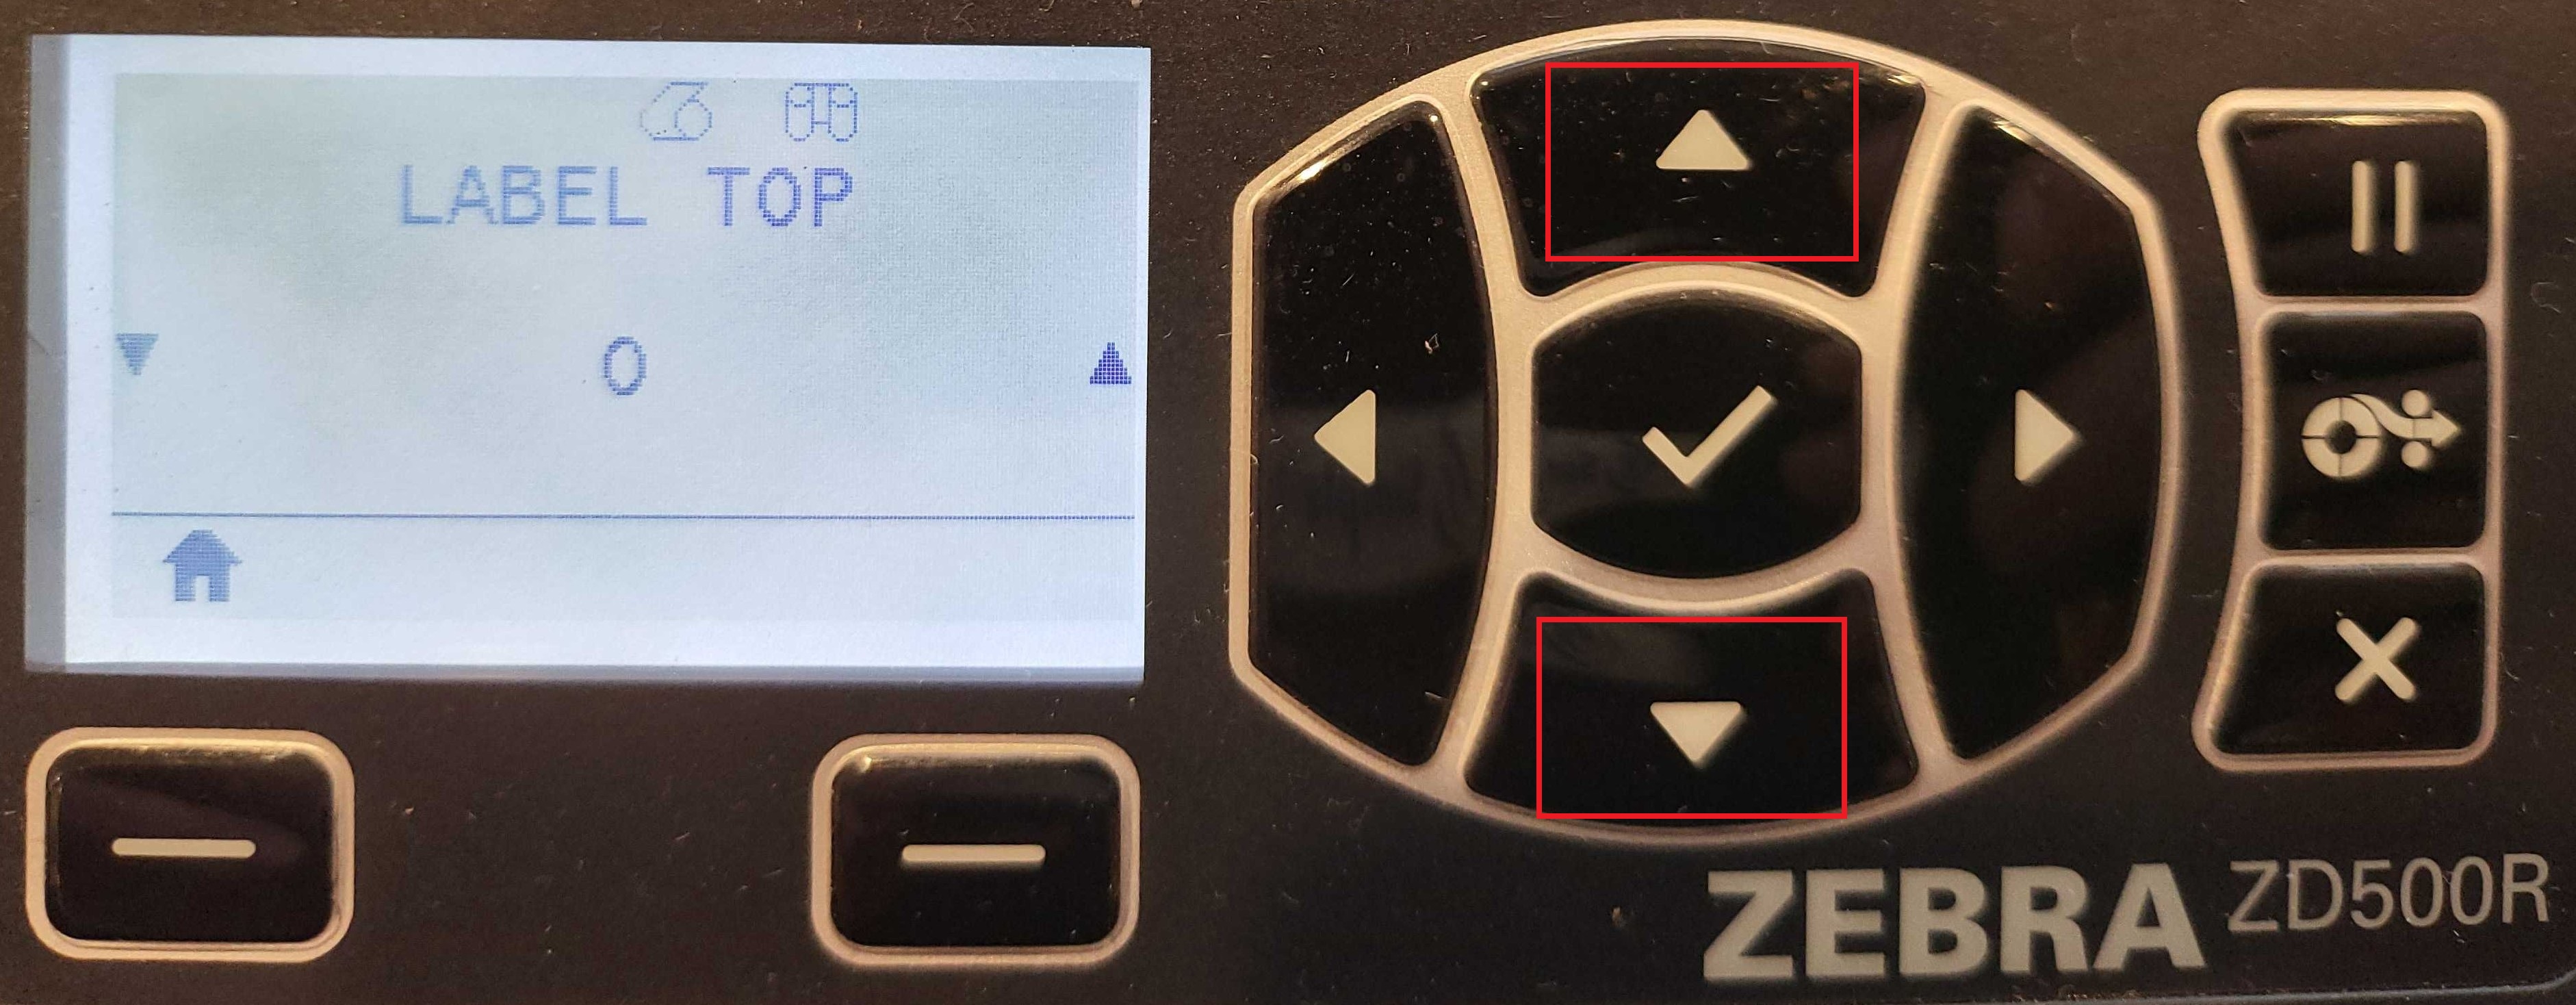
- Negative values move the print toward the top of the label.
- Positive values move it away from the top.
- Accepted range: –120 to 120.
When you're done, press the Home button again. Your changes will be automatically saved.
Zebra: ZD500R: Reset to Factory Defaults
Turn off the printer using the switch on the back.
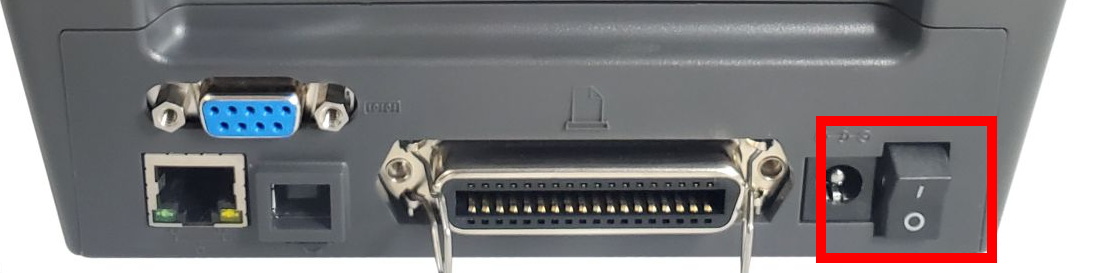
Press and hold FEED + PAUSE while turning on the printer.
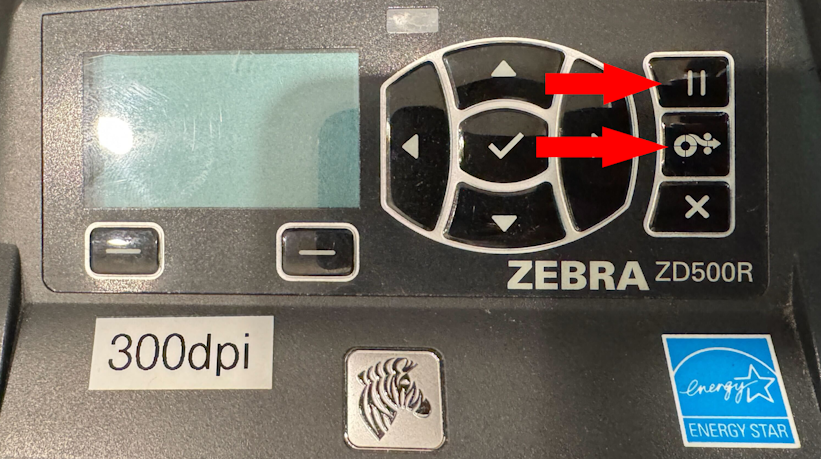
Continue holding FEED + PAUSE until the first control panel light turns off.
The printer configuration is now reset to the factory default values.
Zebra: ZD621R: Calibrate from Printer's Interface
ATTENTION: We suggest first performing the calibration from the website. If the calibration fails, then follow these steps.
Step 1: Media Calibration
First, make sure media is properly loaded, the printer cover is closed, and printer power is ON.
To perform a Media Calibration, press and hold PAUSE + CANCEL buttons for two seconds.
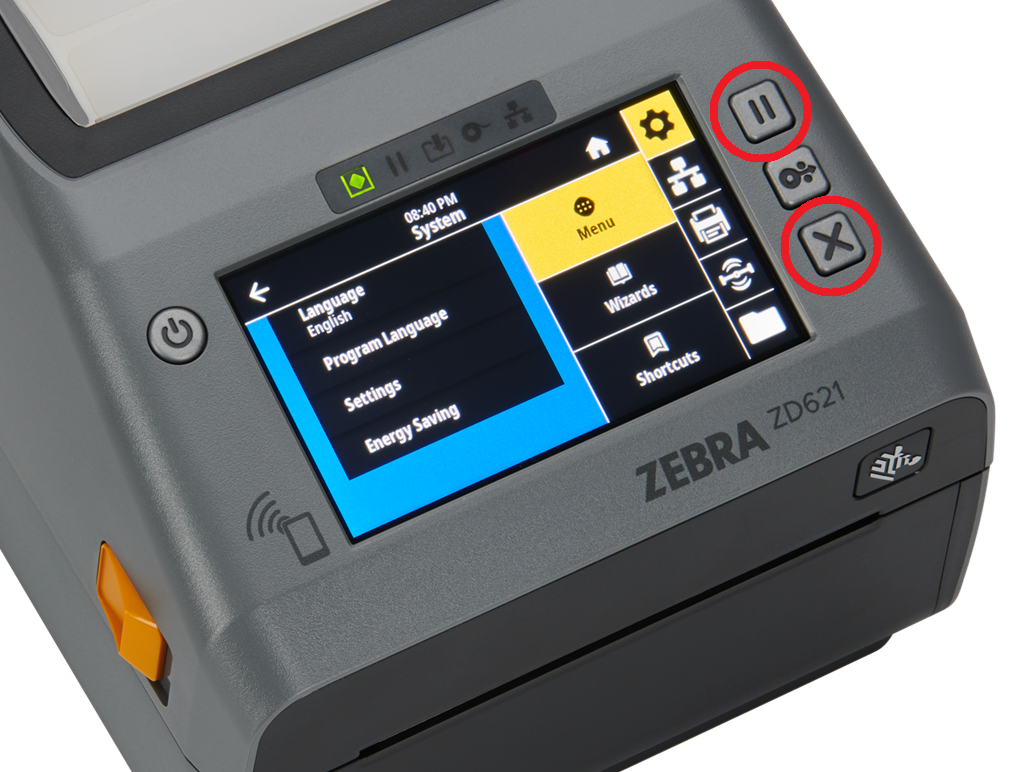
Step 2: RFID Calibration
From the printer's Home screen, press the Menu button:
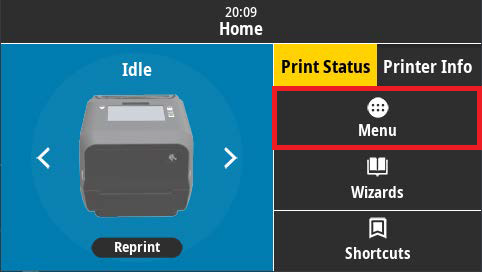
Next, tap the RFID icon on the right side of the screen, then tap the RFID menu option:
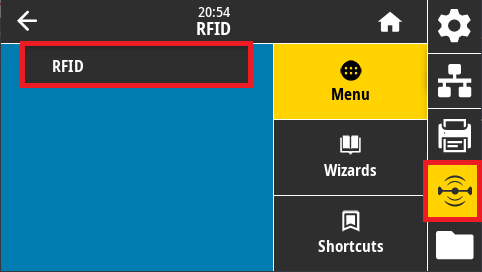
Tap RFID Calibrate:
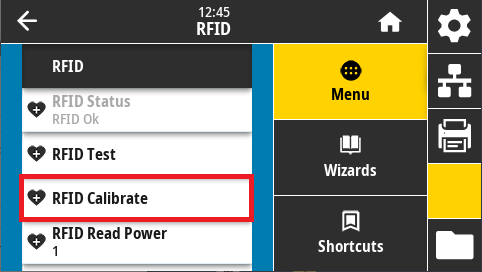
Last, tap Start Calibration to perform the RFID calibration:
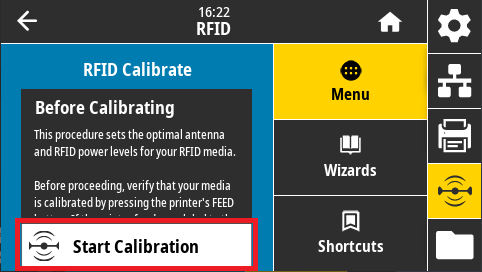
Zebra: ZD621R: Alignment
Select Menu from the home screen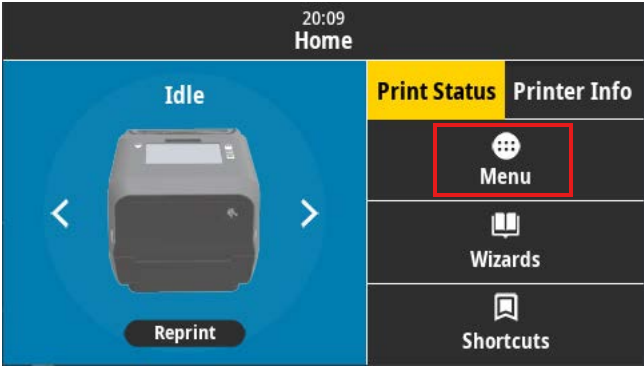
Select the Print icon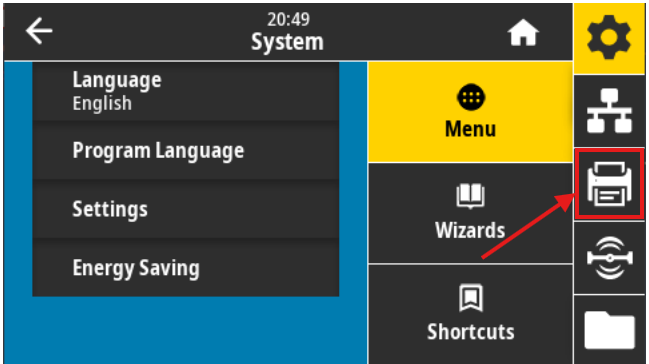
Select Label Position/Image Adjust 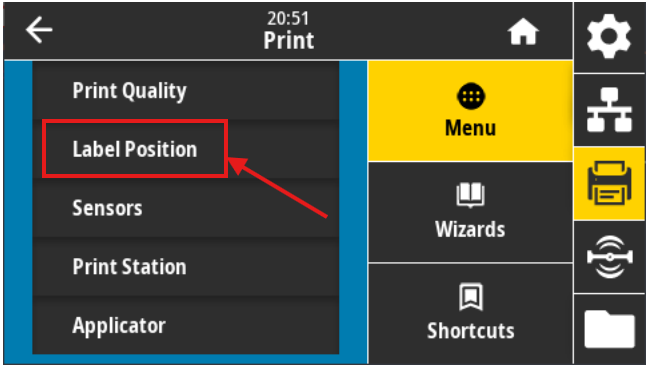
Select Vertical Label Offset or Horizontal Label Offset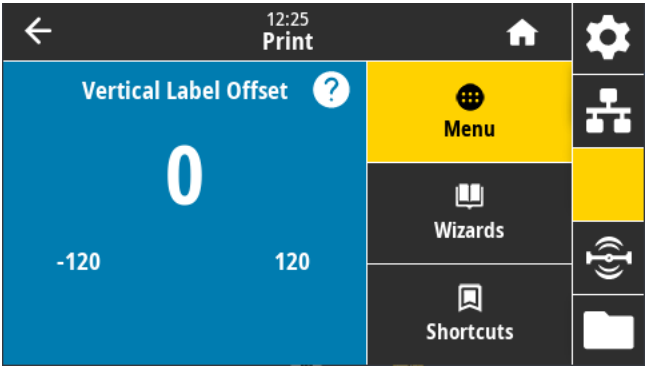
5. Adjust the value (Accepted values: -120 to 120)
Vertical Label Offset: Lower numbers shift everything higher on the label face. Inversely, higher numbers shift everything farther down on the label face, by the specified number of dots.
Horizontal Label Offset: Lower numbers shift everything to the right on the label face. Inversely, higher numbers shift everything to the left on the label face, by the specified number of dots.
Zebra: ZD621R: Reset to Factory Defaults
After starting the printer, use the touchscreen to click "Menu"
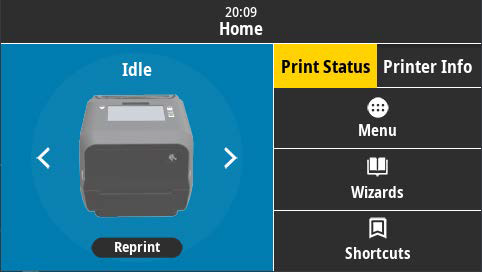
On the left side of the screen, click "Settings"
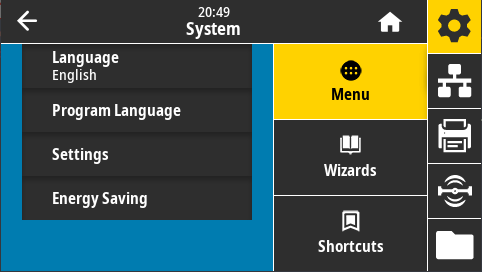
Scroll down and click "Restore Defaults"
Click on "Restore Printer" and accept the prompt
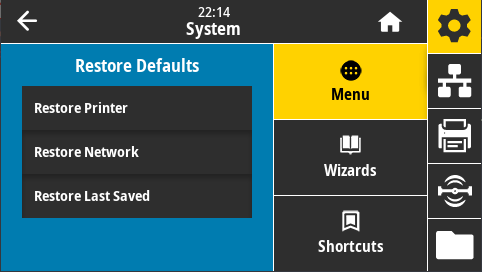
This will reset the printer to factory defaults.
Zebra: ZD621R: Adjust Darkness
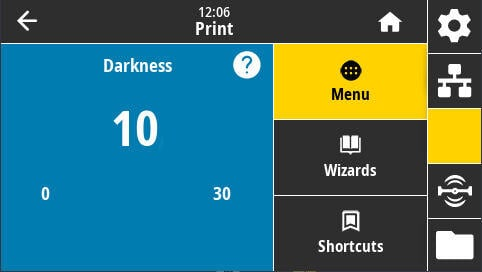
- Using your printer's touchscreen, navigate to Menu > Printer (icon) > Print Quality > Darkness:

- Use the plus buttons, or slide the slider to increase or decrease the darkness setting.
- If you are using resin ribbon, and you usually use wax, you will need to increase this value by at least 10.
- The setting will be automatically applied; press the Home button to return to the Idle screen.
Zebra: ZD621R: Setup Wireless Connection (Wi-Fi)
This setup guide ensures your printer is properly configured for network printing with secure WiFi connectivity.
Prerequisites
Before starting the setup, please make sure that your station has the "Show network printers" option set in your Print Station settings. Contact your Manager if you need assistance.
Connection Setup Steps
1. Launch Wizards
On the printer home screen, tap Wizards.
2. Select Connection
Tap Connection and then Start Connection.
3. Configure Network Settings
Wi-Fi Configuration
- Select Wi-Fi > Tap ✓
- Set IP Port to
6101 - Set IP Alternate Port to
9100> Tap ✓ - Set Wired IP Protocol to
All> Tap ✓
Wireless Network Settings
- Set the country > Tap ✓
- Select WPA PSK > Tap ✓
- In Pre-shared Key, enter your WiFi password > Tap ✓
- Tap Set All > Tap ✓
Network Name and Protocol
- In ESSID, set your WiFi name > Tap ✓
Note: Case sensitive - must match exactly as shown in other devices' WiFi lists.
Example: Wifi_Network_Name12345
- Set WiFi IP Protocol to
All> Tap ✓
Bluetooth Configuration
- Set Bluetooth On/Off to
Off> Tap ✓ - Set Bluetooth Discovery to
Off> Tap ✓
Security Settings
- In Friendly Name, Tap ✓
- In Security, set value to
3> Tap ✓ - In Authentication PIN, > Tap ✓
- In Bluetooth Bonding, set to
Off
4. Complete Setup
Tap End Wizard.
Verification
You should see the message: "Connection Wizard Complete"
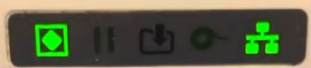
After completion, observe the network indicator (right side of screen):
- Will display red for approximately 1 second
- Will then turn green (indicating successful connection)
- Printer should appear as Online in Simple RFID Website
Zebra: ZT411R: Load Labels & Ribbon
Zebra: ZT411R: Adjust Print Darkness
To adjust the print darkness on your ZT411 printer, take the following steps:
- On the home screen of the printer, tap the Menu button
- Tap the Print icon, then Print Quality, then select the Darkness option
- Adjust the darkness setting using the slider or + and - buttons.
- The darkness setting ranges from 0 to 30.
- For wax ribbon, the recommended darkness setting is 10-15.
- For resin ribbon, the recommended darkness setting is 25-30.
- After adjusting the darkness, tap the Home button at the top-right of the screen to return to the home screen.


Zebra: ZT410R: Load Media & Ribbon
Zebra: ZT411R: RFID Calibration
ATTENTION: We suggest first performing the calibration from the website. If the calibration fails, then follow these steps.
If the web calibration fails, please watch the video below to calibrate the RFID directly from the printer.
Zebra: ZT410R: Calibrate
ATTENTION: We suggest first performing the calibration from the website. If the calibration fails, then follow these steps.
To calibrate your printer directly from the printer follow the steps from this video:
Calibrate from the printer directly
Step 1.
Identify the model of your printer
Step 2.
Select the article for your corresponding printer
Step 3.
Open the related "Calibrate from the Printer's Interface" article (e.g. Printronix T800, T4000, T6000)
Note:
Each printer has its own approach of calibrating it.
If you encounter any issues or have any questions, feel free to email us at support@simplerfid.com !
Fixed Readers
Fixed Reader Installation and Setup Instructions
The following article outlines the steps to setting up a fixed reader within Simple RFID


Not Included:
- Ethernet Cable (Cat5/6) - This
Install Simple RFID Print Client
Download and Install the Simple RFID Fixed Reader Client from Simple RFID
- Open a web browser and navigate to web.simplerfid.com
- Login
- Go to Settings (gear icon)
- Select Resources
- Download Fixed Reader Client
Confirm that you can see the device on the network
Check reader availability on the network
You can check if the reader is accessible within the network, by accessing its Web Interface:
1. a) Go to https://speedwayr-xx-yy-zz (or https://speedwayr-xx-yy-zz.local if the reader is connected directly to the PC),
where xx-yy-zz is the last three sections of the Speedway reader's MAC address.
or
b) Enter local network IP of your reader in the address bar (e.g. 192.168.1.5)
2. Enter credentials:
Login: root
Password: impinj
(the password may not be shown as you type them)
Set a static IP address on Impinj Speedway RAIN RFID reader
Please note:
The reader has DHCP
Default IP of Reader 192.168.1.5
You may want to change the IP address of the Speedway reader from the default DHCP to a static address.
- Download PuTTY from the link below, if you have not already done so:
http://www.putty.org/ - Launch PuTTY. If prompted, run it as administrator.
- In "PuTTY Configuration" screen, follow the appropriate steps depending on which port on the Speedway reader you are connected to:
A) Connect the Ethernet cable to the Ethernet port on the Speedway reader (not the Console port),
A-1) Choose "SSH" Connection type (default).
A-2) Enter the Speedway reader's hostname in the "Host Name (or IP address)" field. The hostname for the Speedway reader is: speedwayr-xx-yy-zz where xx-yy-zz is the last three sections of the Speedway reader's MAC address.

4. Click the "Open" button.
5. You should get an RShell login prompt. If you see a blank screen, hit the "Enter" key once.

6. Type the following login and password information:
Login: root
Password: impinj
(the password may not be shown as you type them)
7. Once you've successfully logged in, you will see something similar to the following. You are now logged into the reader's RShell interface.

8. To find out the Speedway reader's IP address, type the following at the RShell prompt:
> show network summary
The results (as shown below) indicate a couple of things:
a) ipAddressMode = 'Dynamic' means this Speedway reader is set to acquire its IP address via DHCP. If this Speedway reader was set to a static IP address, it would say 'Static'.
b) ipAddress = '192.168.0.20' indicates this is the IP address for this Speedway reader.

9. To change the IP address, type the following at the RShell prompt:
a) To set the Speedway reader to DHCP:
> config network ip dynamic
b) To set the Speedway reader to a static IP address:
> config network ip static xxx.xxx.xxx.xxx
("xxx"s are values between 1 and 255. For example, "config network ip static 192.168.0.20")
--or--
> config network ip static xxx.xxx.xxx.xxx xxx.xxx.xxx.xxx xxx.xxx.xxx.xxx xxx.xxx.xxx.xxx
For example, if you type:
> config network ip static 192.168.0.20 255.255.255.0 192.168.0.1 192.168.0.255
you are configuring the IP address, Netmask, Gateway, and Broadcast Address respectively, separated by a space character)
NOTE: consult the RShell Reference Manual for additional details.
10. To exit from the RShell interface, type the following at the RShell prompt:
> exit
Notify Simple RFID that the Reader has been connected
- Record the name of the PC (This will allow Simple RFID)
- Install AnyDesk.com to allow remote access
- If possible set a password for unattended access (as simple123)
- Email the PC name and AnyDesk ID to support@simplerfid.com
____________________________________________________________________________
Verify Reader is Sending Data to Simple RFID
- After the reader is connected to the customers account you will need to Enable the reader

https://support.impinj.com/hc/en-us/articles/202756488-Troubleshooting-Reader-Connectivity-Issues
Fixed Reader Overview
Our Fixed Reader setup guide provides complete instructions on installing the Fixed Reader Client, configuring, and connecting to the web portal.
After the fixed reader has been configured, if the reader goes offline you can restart it by restarting the services.
Get the latest firmware from the Impinj website here.
Restarting Fixed Reader Client
Install Print Client
Restarting the Fixed Reader Client on the host PC can usually resolve issues related to fixed reader connectivity.
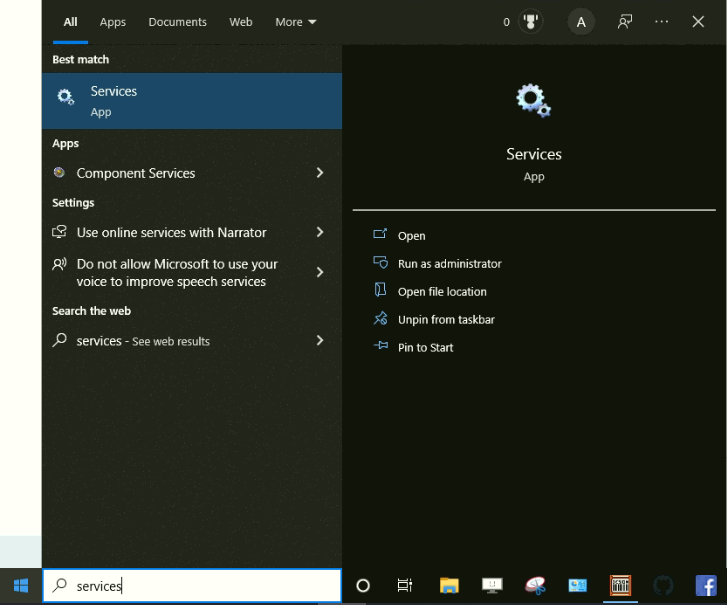
- From the HOST PC, type into the Windows start menu "Services."
- Then from the HOST PC Services page
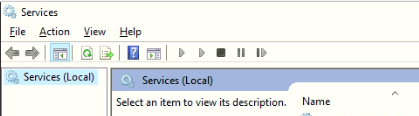
- Scroll down until you locate "SimpleRFID Fixed Reader Client" (The list is alphabetized)
- Click "SimpleRFID Fixed Reader Client"
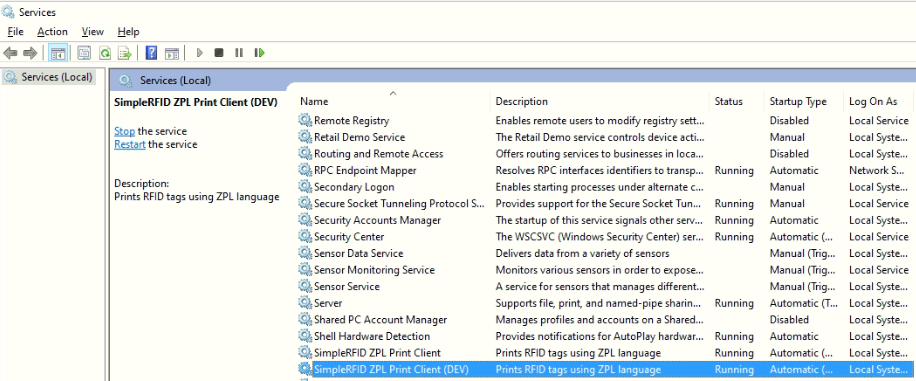
- On the left, click "Restart."
After a few minutes, you should see your fixed reader back online. If the device is still offline, confirm that the host PC is connected to the internet, and contact support@simplerfid.com.
Impinj xSpan - Update Firmware
To update the firmware on an Impinj xSpan reader, you can use either the Web UI or a USB flash drive. The Impinj Support Portal outlines both methods, including steps to download the firmware, prepare the USB drive, and initiate the upgrade.
Method 1: Web UI
- Connect to the reader's Web UI: Access the xSpan reader's web interface using a web browser and its IP address.
- Log in: If prompted, enter the administrator credentials.
- Navigate to the Firmware Upgrade section: Look for a section related to reader upgrades, firmware updates, or software updates.
- Browse and select the firmware file: Use the browse button to locate and select the .upg firmware file you downloaded.
- Initiate the upgrade: Click the upgrade or install button.
- Reboot the reader: Once the firmware upgrade is complete, reboot the reader to activate the new firmware.
Method 2: USB Flash Drive
- 1. Prepare the USB drive:
Format the USB drive to FAT32 and create the necessary directory structure: `impinj\revolution\upgrade\images\`. - 2. Download the firmware:
Place the firmware image file (.upg) within theimagesfolder on the USB drive. - 3. Connect the USB drive:
Plug the USB drive into the xSpan reader's USB Host port while the reader is powered on. - 4. Initiate the upgrade:
The reader will automatically detect the firmware and begin the upgrade process. - 5. Monitor the upgrade:
The reader's power LED will flash amber during the upgrade and become solid green upon completion. - 6. Reboot the reader:
Manually reboot the reader to activate the new firmware.
Impinj xSpan - Troubleshooting Connection
The xSpan reader should by default have DHCP enabled, allowing you to connect via:
http://xspan-XX-XX-XX.local(where the X values are the last 3 bytes of the MAC address)http://<ip-address>- username:
root - password:
impinj
However, if you're unable to connect, DHCP may be disabled, in which case you need to connect to the device on its local link address (most likely 169.254.1.1) and use RShell to enable DHCP.
- Determine the reader's self-assigned IP address by pinging the hostname:
- Windows (PowerShell):
ping xSpan-XX-XX-XX.local- You should see something like this:
Pinging xSpan-13-68-53.local [fe80::216:25ff:fe13:6853]%11 with 32 bytes of data: - The address in [brackets] is the address of the reader.
- macOS (Terminal):
ping -c 1 xspan-XX-XX-XX.local- You should see something like this:
PING xspan-13-69-b9.local (169.254.1.1): 56 data bytes - The address in (parentheses) is the address of the reader.
- Windows (PowerShell):
- Log in via ssh and enable DHCP using RShell:
ssh root@<ip address>- password:
impinj > show network summary- You'll likely see
ipAddressMode='Static'. This confirms that DHCP is disabled.
- You'll likely see
> config network ip dynamic- This will enable DHCP and reboot automatically.
After completing these steps, you should be able to access the reader on your LAN.
Impinj R220
The Impinj R220 is a two port reader designed for applications that require 2 antennas (or fewer), such as choke-points, overhead readers, or smart shelving.
Updating Firmware
To update the firmware on an Impinj Speedway Revolution R220 reader, you can use either the Web UI or a USB flash drive. The Web UI method involves connecting the reader to your network, logging in, and selecting the "Reader Upgrade" option to upload the firmware. The USB flash drive method requires formatting the drive to FAT, placing the firmware file on the drive, and inserting it into the reader's USB HOST port.
Web UI Method:
- Connect to the reader's Web UI: You can access the Web UI by connecting your computer to the same network as the reader and accessing the reader's IP address in a web browser. The default IP address is typically http://169.254.1.1.
- Log in: Use the default credentials: username "root" and password "impinj".
- Navigate to Reader Upgrade: In the Web UI, locate and select the "Reader Upgrade" section.
- Upload the firmware: Browse for the firmware file on your computer and upload it.
- Upgrade and Reboot: Select the "Upgrade" button and then "Reboot" to apply the new firmware.
USB Flash Drive Method:
- Prepare the flash drive: Format the USB drive to the FAT file system and create the following folder structure: `impinj\revolution\upgrade\images\`.
- Place the firmware file: Download the firmware file and place it in the `impinj\revolution\upgrade\images\` folder on the flash drive.
- Insert the flash drive: Insert the flash drive into the reader's USB HOST port.
- Wait for the upgrade: The firmware will automatically upload to the reader.
- Reboot the reader: Manually reboot the reader to complete the firmware update.
Impinj R420
Update Firmware
To update the firmware on an Impinj R420 reader, you can use either the Web UI or a USB flash drive. The Web UI method involves connecting to the reader's IP address, logging in with the default credentials, and selecting the "Reader Upgrade" section to upload the firmware file. Alternatively, you can format a USB flash drive to FAT, copy the firmware file to it, and insert it into the reader's USB HOST port, where it will automatically upload the firmware.
Using the Web UI:
- Connect to the Reader: Ensure the reader is powered and connected to your network.
- Locate the IP Address: Find the reader's IP address (it may be a default address like
http://169.254.1.1). - Log In: Access the reader's Web UI, and log in using the default credentials: username
rootand passwordimpinj. - Select Reader Upgrade: Navigate to the "Reader Upgrade" section within the Web UI.
- Browse and Select: Click "Browse" to locate the firmware file (.upg) on your computer and select it.
- Upgrade and Reboot: Click "Upgrade" to start the upload. Once complete, click "Reboot" to apply the new firmware.
Using a USB Flash Drive:
- 1. Format the Drive:
Format a USB flash drive to FAT. - 2. Copy Firmware:
Download the firmware file (e.g., .upg) and place it on the flash drive, preferably in a directory structure likeimpinj\\revolution\\upgrade\\images\\. - 3. Insert and Wait:
Insert the flash drive into the reader's USB HOST port while the reader is powered on. The power LED will flash amber during the upload. - 4. Reboot:
Once the power LED turns solid green, manually reboot the reader to apply the new firmware.
Hardware Policy
All sales are final
TERMS & CONDITIONS All Sales Final All purchases are non-refundable and final upon completion. No refunds will be issued under any circumstances.
SOFTWARE Software as a Service (SaaS) Terms 1-Year Agreement – This agreement reflects a mutual investment, allowing both parties to fully benefit from setup, training, support, and long-term success. Service Period – Begins on the first day of account setup and continues for 12 months. Access – Onboarding materials and access instructions are provided upon payment. Invoicing & Billing – An active payment method must be maintained for supply orders and invoiced charges.
HARDWARE Hardware Requirements Handheld Reader – Requires an Android or iOS smartphone/tablet. RFID Printer – Requires a Windows OS host to run the Print Client. Hardware Warranty Coverage – One-year manufacturers warranty for defects in materials or workmanship affecting functionality.
Exclusions – Does not cover damage from misuse, accidents, negligence, modifications, or normal wear and tear. Customer Responsibility – Maintenance of printheads, platen rollers, and batteries. Regular firmware updates required. Extended Warranty – Additional coverage for up to three years available for purchase.
RFID MEDIA (Labels, Ribbons, RFID Tags) Safeguards Verification – Customers must verify labels are printed and encoded correctly before applying them to products. Regular Checks – Inspect for label shifting during large print jobs and calibrate printers daily or when media changes. Support & Liability Simple RFID does not support media purchased from other providers. Not liable for voided labels, printing/encoding errors, poor print quality, inventory discrepancies, or related losses. Following safeguards helps prevent these issues.