The battery is included in the packaging along with the reader.
1\. On the bottom backside of the reader, unlock the handle [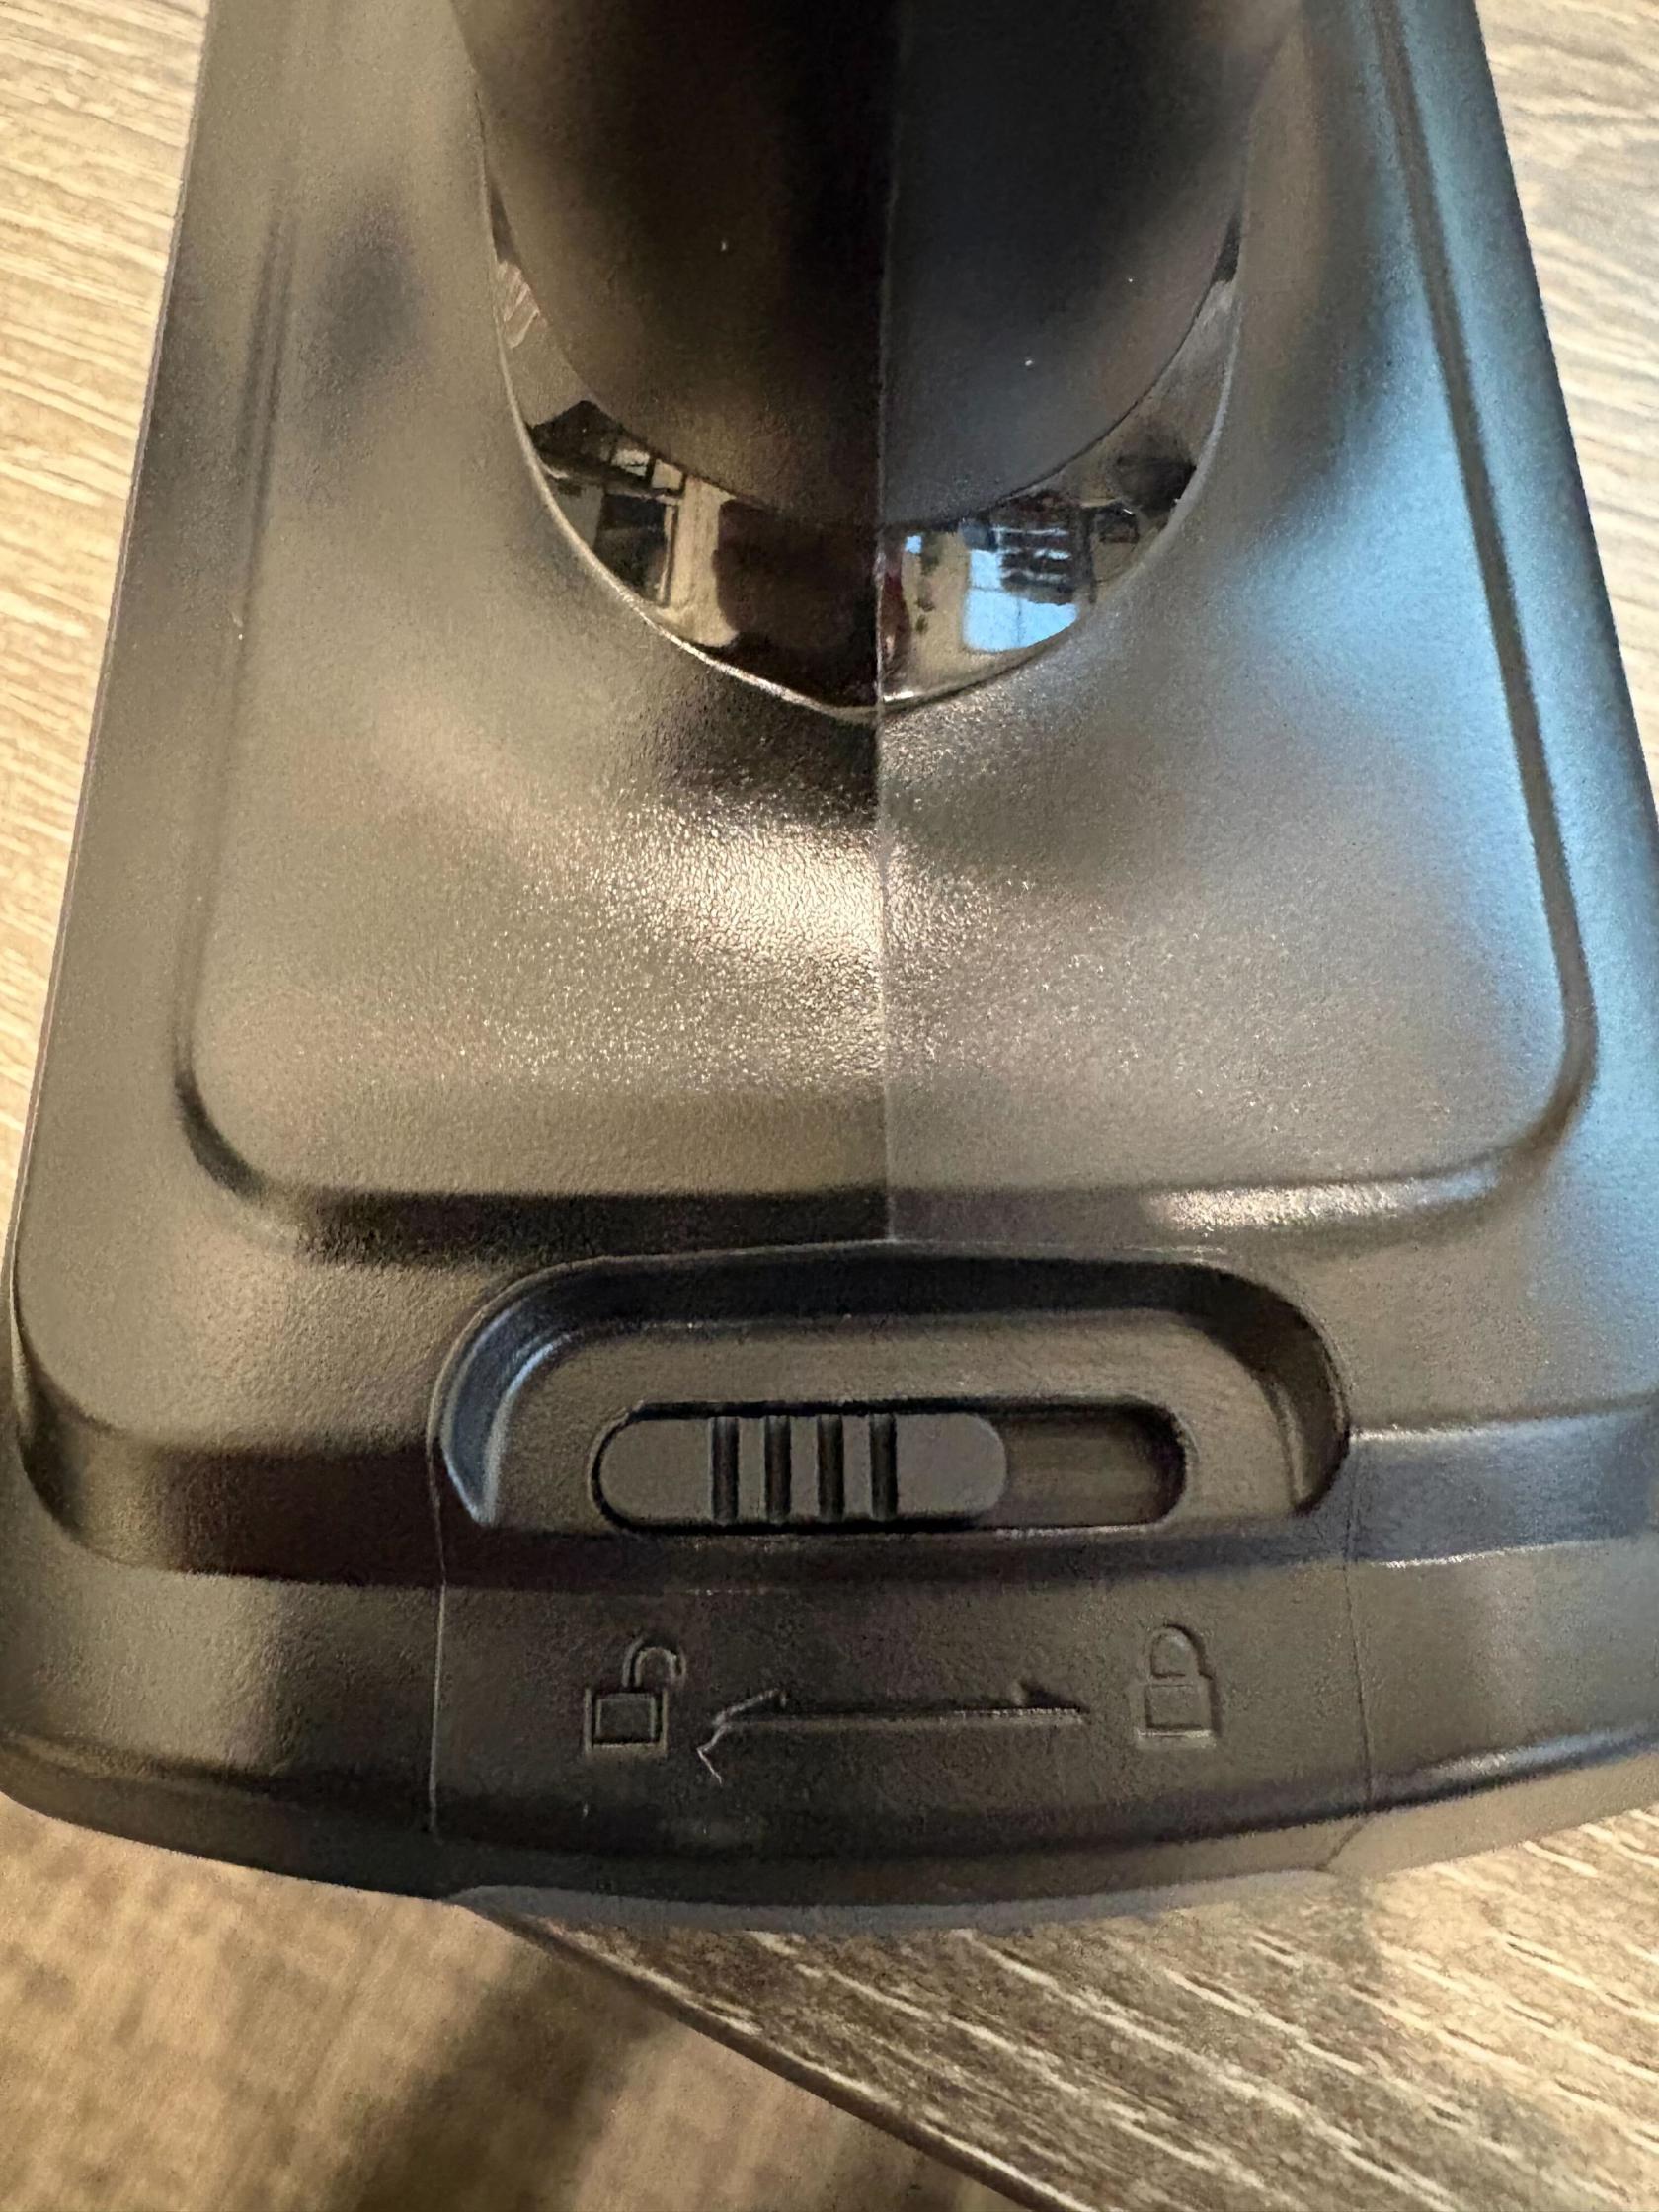](https://kb.simplerfid.com/uploads/images/gallery/2026-03/img-4675.jpg) 2\. Pull the handle off of the reader. It might take some force. 3\. Install the battery inside the red rubber band. Ensure that the arrows on the battery are facing towards the top of the reader. 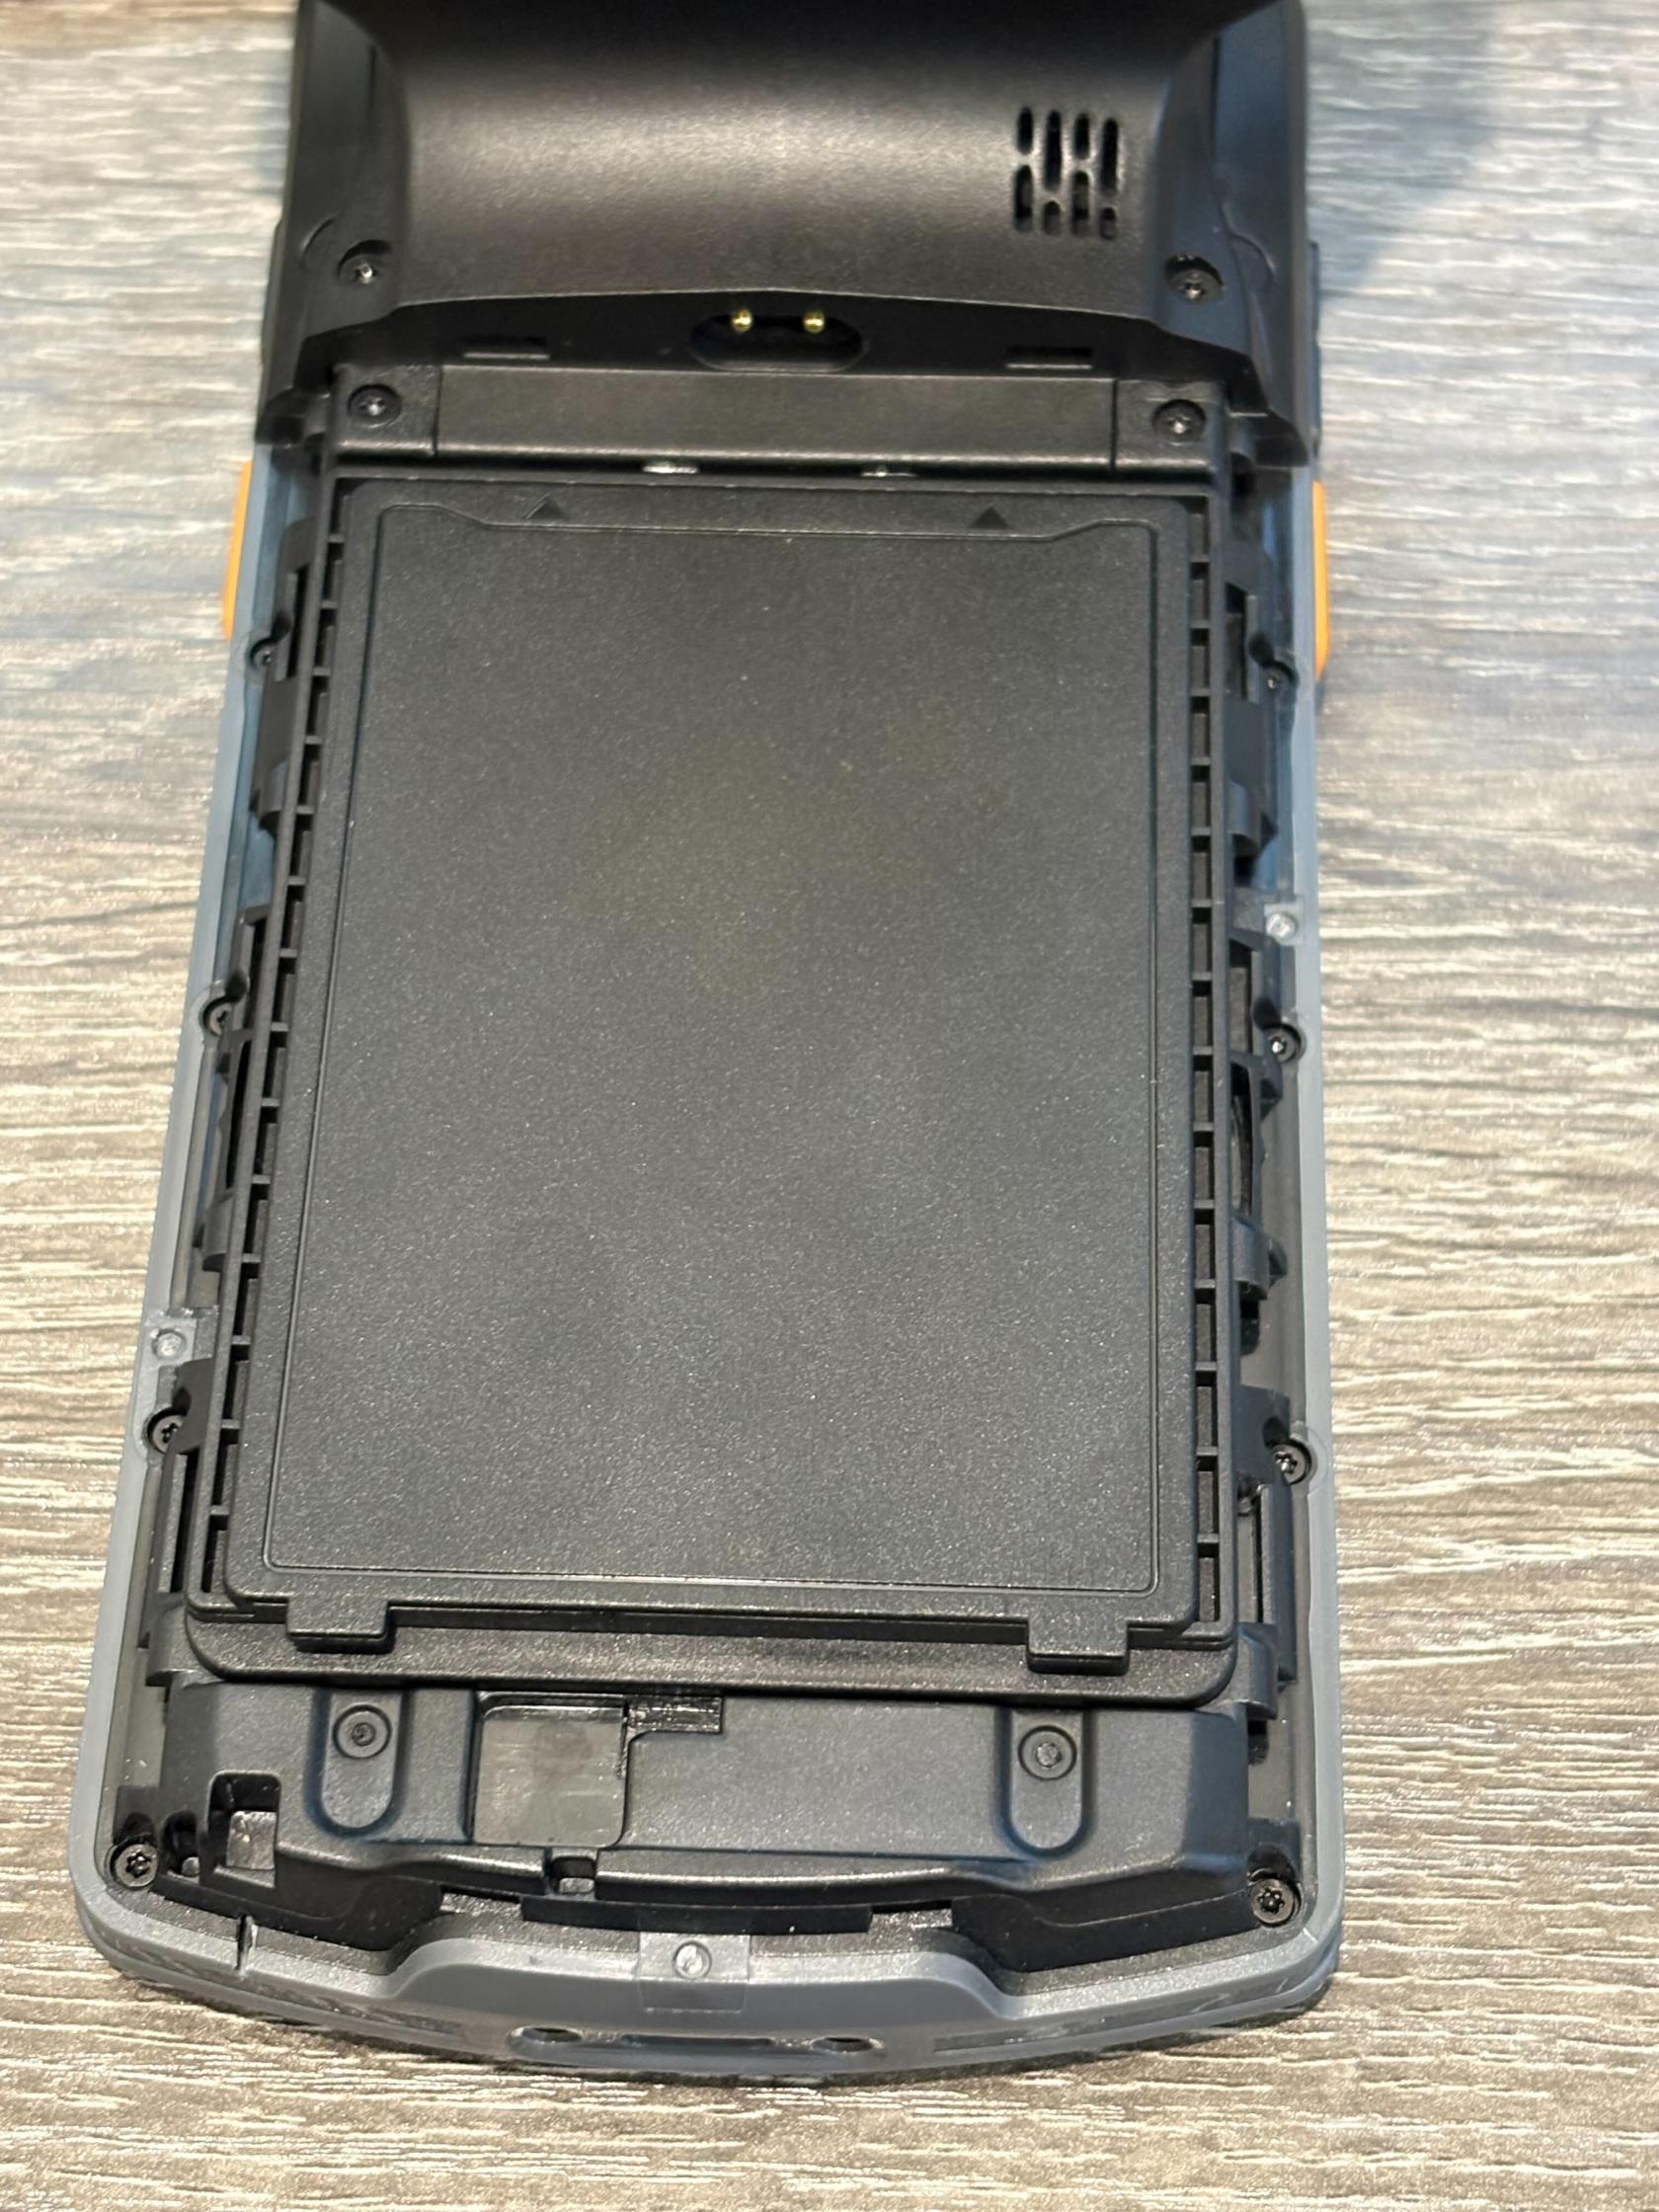4\. Put the handle back on the reader and lock it 5\. Hold the power button on the top of the phone until it buzzes The Simple RFID app should be preinstalled and ready to use on the home screen.You will need to connect to your WiFi network in the settings on the reader.
# DT50P All-in-One Reader: Set up MDM / Automatic Updates This article describes the process of setting up the reader to get automatic updates. ### What is an MDM? MDM stands for Mobile Device Management. It is software that runs on our UROVO devices, that allows us at Simple RFID to manage the device remotely. This allows us to send automatic updates, and troubleshoot issues. This means that we have visibility on when the device is used. We DO NOT have access to any location data, camera, or microphone. If you have any more questions or concerns about this software, please send a message to the support team.This will completely reset the reader. If you are using the phone attached to the reader for anything other than Simple RFID, be aware that it will be deleted.
### Hard Reset Device 1. Open the Settings app 2. Scroll down to the bottom and select ****System**** 3. Scroll down and select ****Reset options**** 4. Select ****Erase all data (factory reset)**** 5. Select ****Erase all data**** 6. Select ****Erase everything & Reboot**** [](https://kb.simplerfid.com/uploads/images/gallery/2026-04/screen-20260421-112724-1.gif) It will reset to the factory default settings. This may take a few minutes. After it is reset, you will see a screen that says ****Hi There****Do not select ****Start****. If you do, set up the phone and reset again to get on this page.
[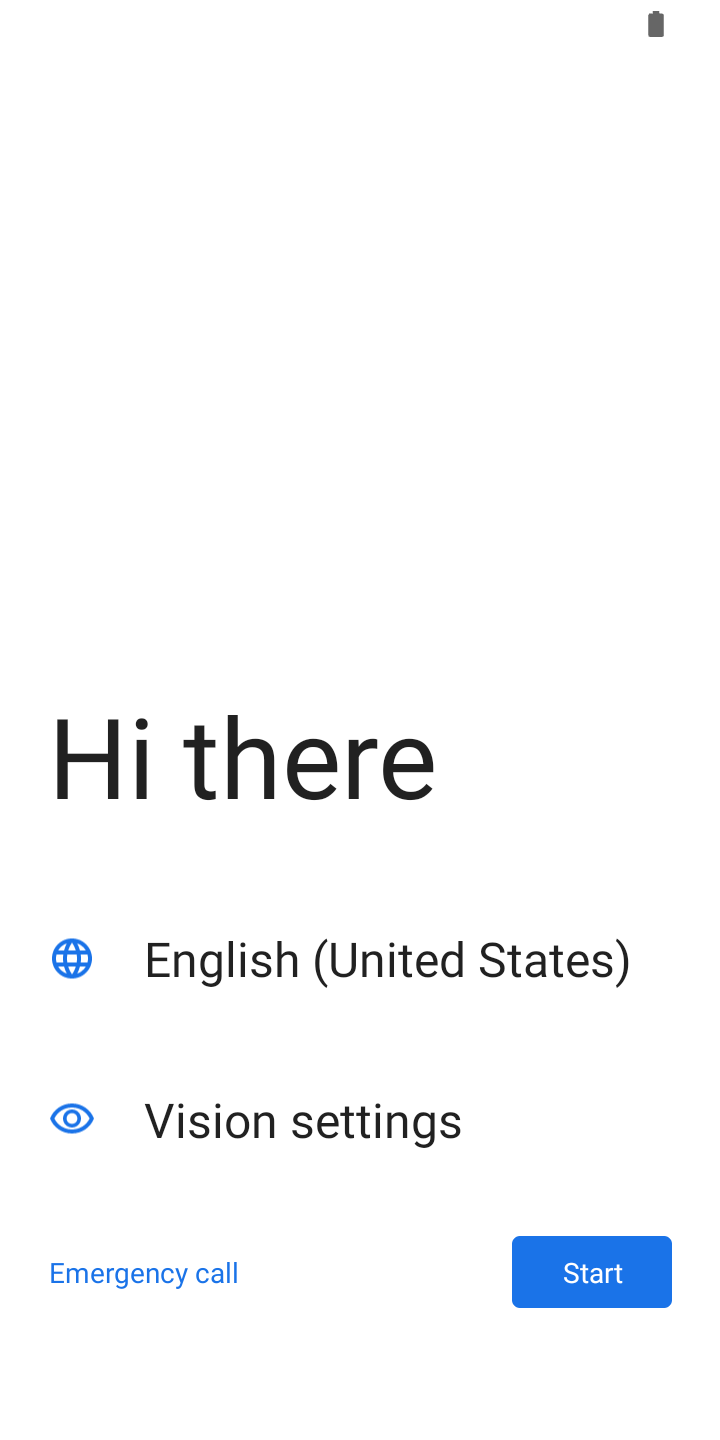](https://kb.simplerfid.com/uploads/images/gallery/2026-04/Wn9screenshot-20260107-072129.png) Tap the screen above the text 7 times in rapid succession. This will pull up a camera that is looking for a QR code. Scan this QR code: [](https://kb.simplerfid.com/uploads/images/gallery/2026-04/hbuimage.png) This will download our software, and allow us to keep track of the reader. Accept all of the prompts, and you are all set! # TSL Readers - Troubleshoot common issues #### ****Issue: The reader will not turn on.**** - ****Charge the reader****. If the reader will not turn on, it's usually because the battery has no charge. Use the included USB cable or docking cradle to charge the reader. - ****Make sure the battery is inserted.**** The readers do not ship with a battery installed; this must be done manually. Remove the handle by lifting the yellow latch on the back of the reader, and pulling the handle backwards. This will expose the battery cover, which can be lifted to access the battery. --- #### ****Issue: The reader will not pair with a device.**** If you're unable to pair your reader with a mobile device via Bluetooth, take the following troubleshooting steps: - ****Make sure the reader is in pairing mode.**** In pairing mode, the blue light on the left side of the reader will be flashing. - If the blue light is off, press the trigger on the reader to wake it up. - If the blue light is solid, the reader is already connected to a host. Make sure the reader is not paired with another device nearby, or plugged into a computer with a USB cable. If the reader is in pairing mode, but not showing up in your device's Bluetooth menu, try [updating the reader's firmware](https://kb.simplerfid.com/books/hardware-readers-printers/page/tsl-readers-update-firmware), which will also perform a Bluetooth reset. --- #### ****Issue: The reader will not charge.**** When the reader is charging, the orange light on the side will flash (once, twice, or three times depending on the current charge). When the reader is fully charged, the orange light will remain solid. If the orange light is flashing rapidly, or not on at all, there is an issue with charging: follow the steps below. - ****Try a different charging source.**** Some power sources don't provide enough energy to charge the reader's battery effectively. Try plugging the reader directly into a wall outlet using the provided adapter. - ****Try a different USB cable.**** If you're not using the original cable included with the device, the cable may not be suitable for charging. If possible, use the original cable; otherwise, ensure you choose a cable that can deliver a charge. - ****Check the battery.**** If the battery isn't inserted correctly, the device will not charge. - TSL 1128: Make sure the 4 contacts on the battery align with the pins on the reader. Additionally, make sure the battery cover is in place securely. --- #### ****Issue: The reader does not read any tags.**** When the reader scans a tag, it will beep and vibrate (unless you have the Buzzer or Vibrate setting disabled in the Reader Settings). If the reader is not providing this feedback, check to make sure that the - ****Restart the Simple RFID mobile app.**** Occasionally, failed reader commands can cause the application to lose its connection to the reader; even if it still displays the reader as connected. Fully close the Simple RFID app, then re-open it and try again. - ****Android:**** - 1. Open the ****Recent Apps**** screen (usually by swiping up from the bottom and holding, or tapping the square/recent button). 2. Swipe the app ****left or right**** (or up, depending on the device) to close it. - ****iOS:**** 1. Swipe ****up from the bottom**** and pause in the middle of the screen (or double-press the Home button on older models). 2. Swipe the app ****up**** off the screen to close it. - ****Check the reader's battery level.**** If the reader's battery is too low, it won't be able to scan any tags, even if it's still powered on. Charge the device until the battery level reaches at least ****25%****, then try scanning again. --- #### ****Issue: The reader is "stuck" on the blue light**** If the reader stays turned on with the constant blue light while application is closed, please follow these steps - ****Disconnect from iOS devices when not used.**** Please also make sure that surrounding iOS devices have Bluetooth disabled or are not paired with this reader. This is a known behavior when iOS devices tend to connect to the readers in the background thus "intercepting" the connection - ****Reset the reader by reinstalling the battery.**** Remove the handle by lifting the yellow latch on the back of the reader, and pulling the handle backwards. This will expose the battery cover, which can be lifted to access the battery. --- ##### ****If you continue to have issues with your scanner, please**** [****contact support****](https://kb.simplerfid.com/books/support-troubleshooting/page/contact-support) ****for further assistance.**** # TSL Readers: Install Battery for 2128P ### Battery InstallationYour reader may have shipped with the battery already installed.
First, lift the yellow latch on the back of the reader, then slide the handle backwards to remove it: [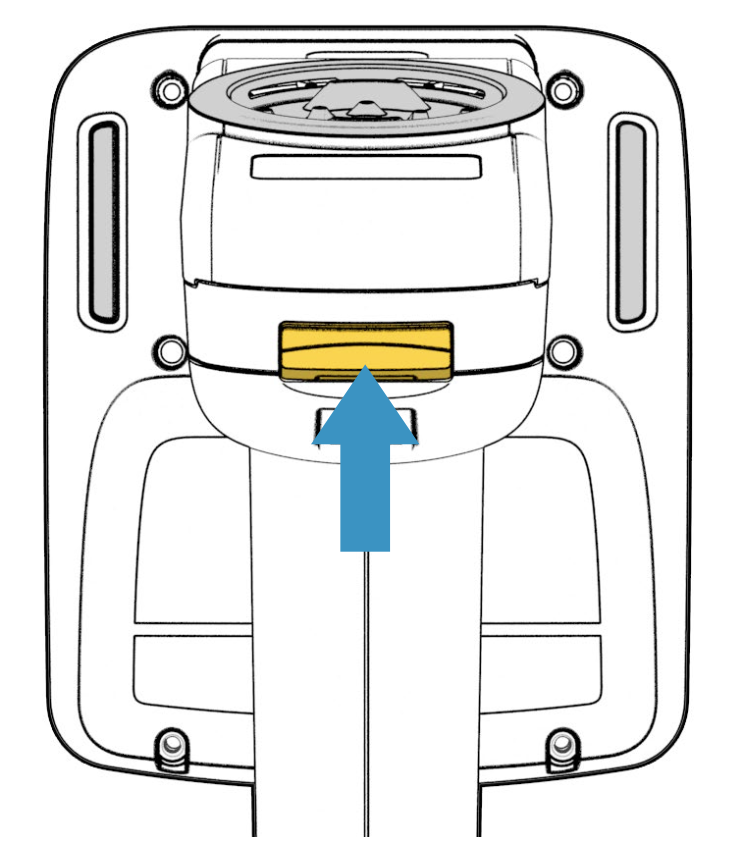](https://kb.simplerfid.com/uploads/images/gallery/2026-01/L3gscreenshot-2026-01-29-at-4-38-24-pm.png)[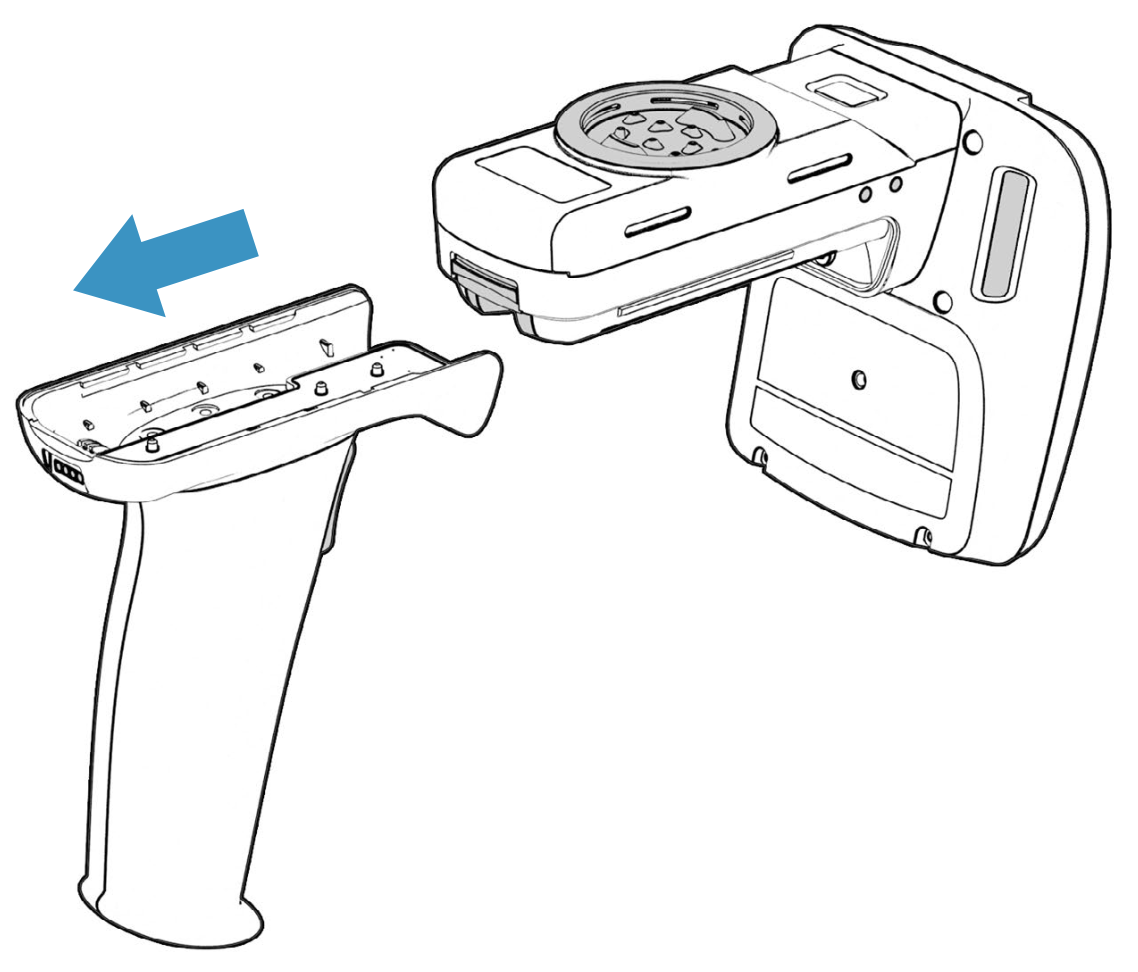](https://kb.simplerfid.com/uploads/images/gallery/2026-01/screenshot-2026-01-29-at-4-22-42-pm.png) Then, remove the battery cover: [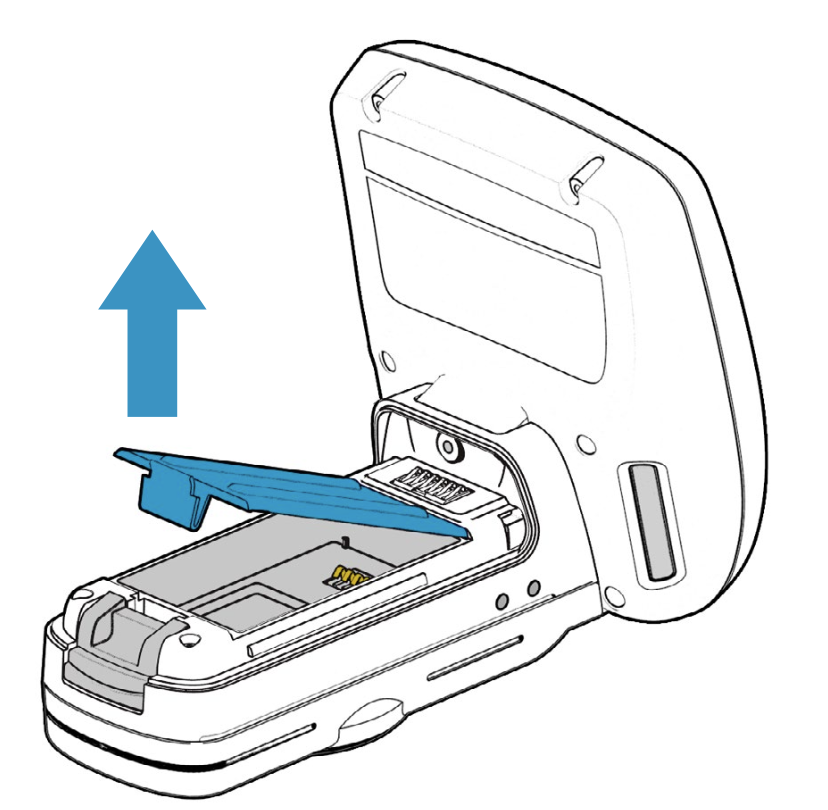](https://kb.simplerfid.com/uploads/images/gallery/2026-01/screenshot-2026-01-29-at-4-27-08-pm.png) Place the battery in the reader, lining up the pins with the contacts: [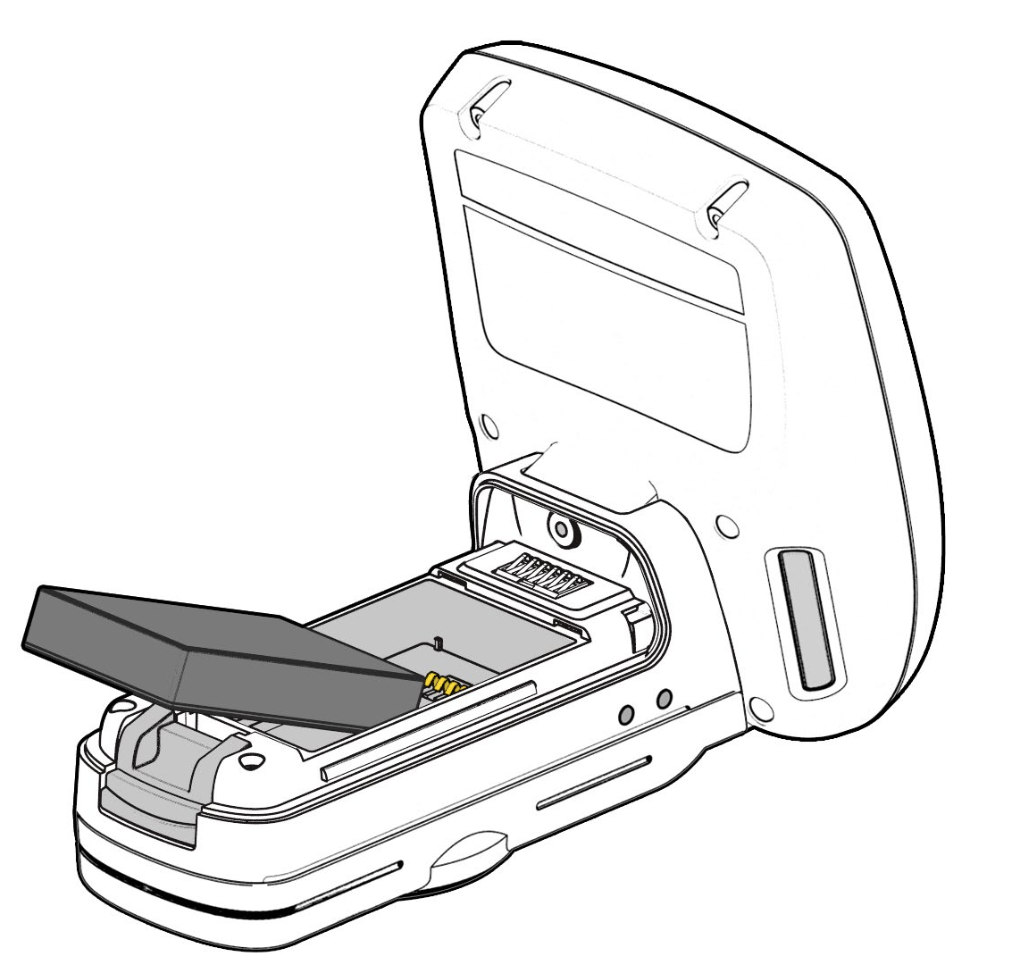](https://kb.simplerfid.com/uploads/images/gallery/2026-01/screenshot-2026-01-29-at-4-28-12-pm.png)[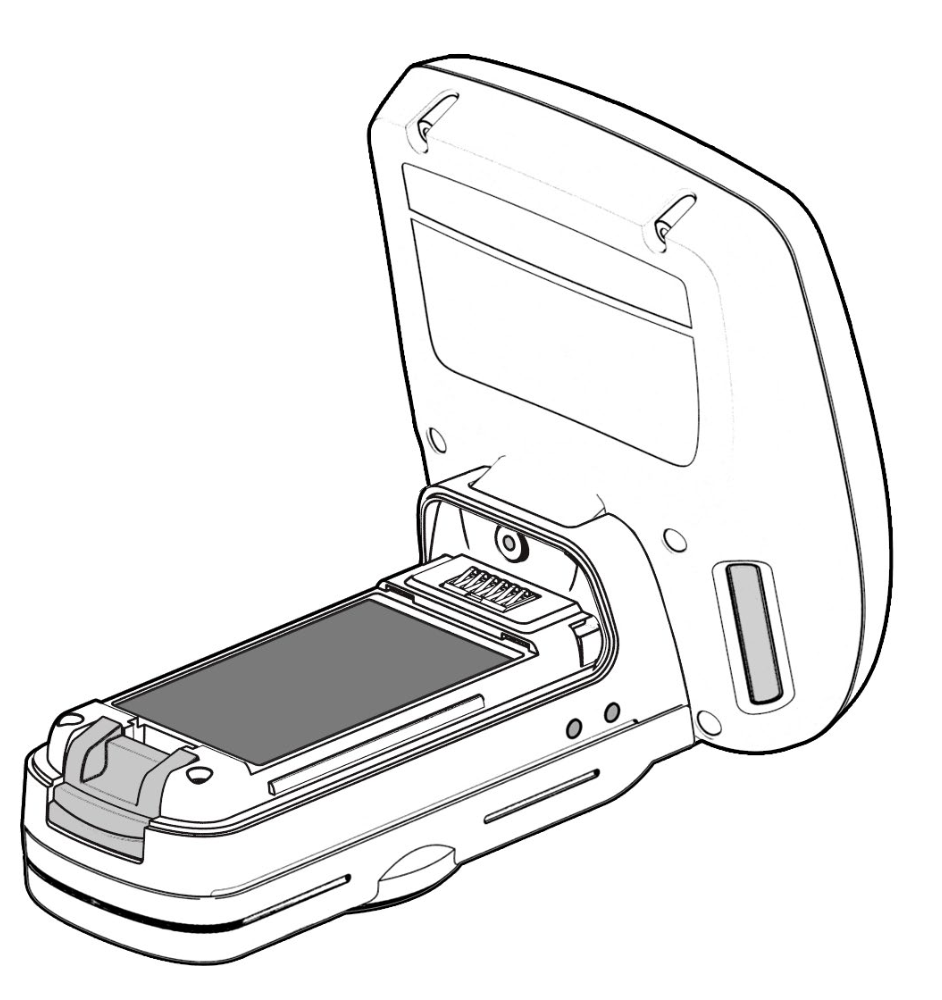](https://kb.simplerfid.com/uploads/images/gallery/2026-01/screenshot-2026-01-29-at-4-28-39-pm.png) Last, replace the battery cover and the handle: [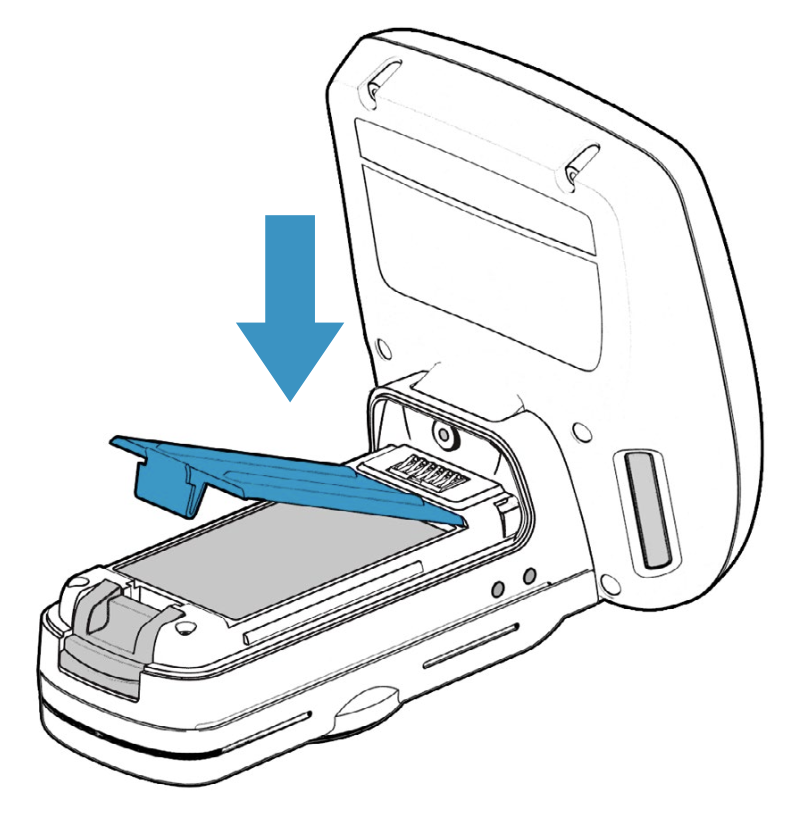](https://kb.simplerfid.com/uploads/images/gallery/2026-01/screenshot-2026-01-29-at-4-31-57-pm.png)[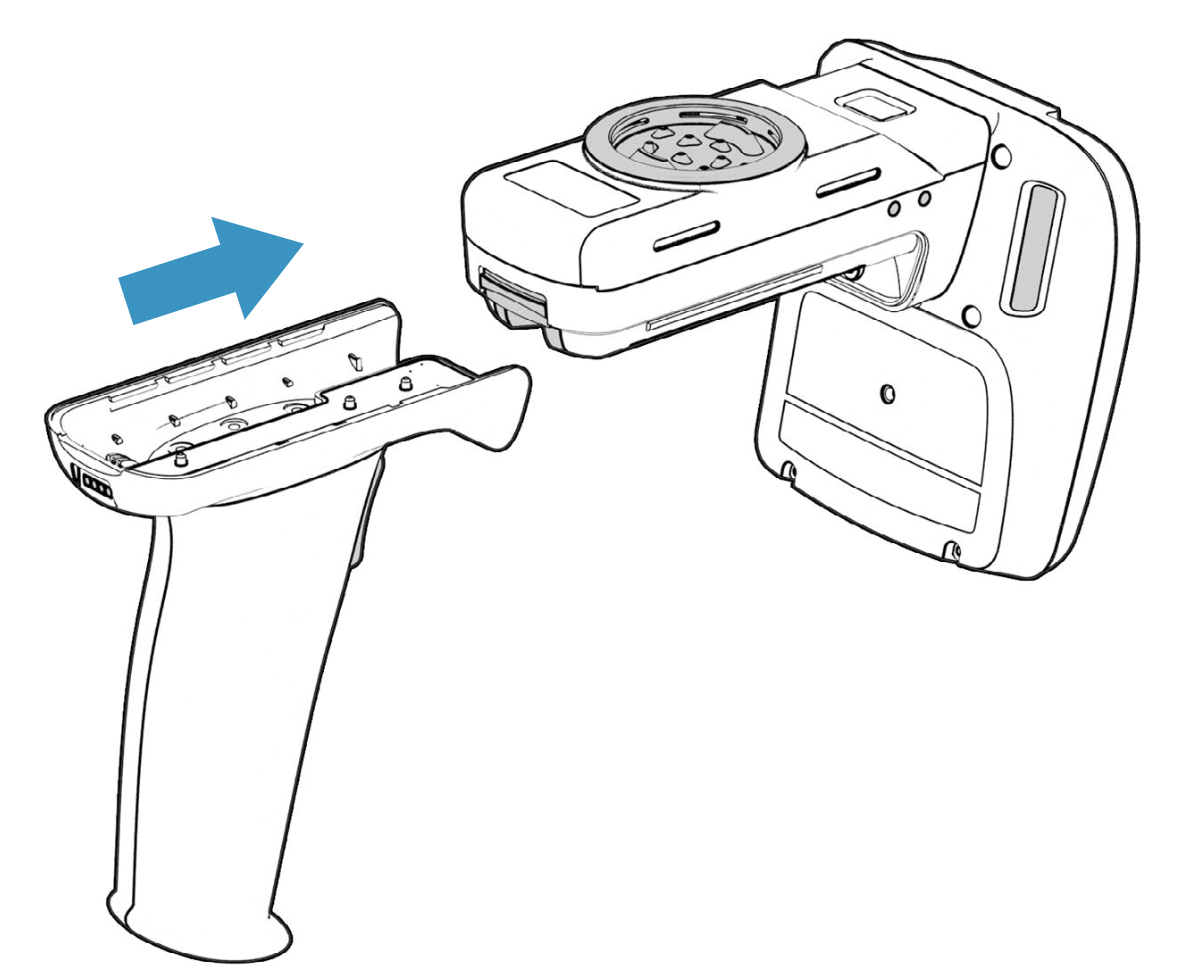](https://kb.simplerfid.com/uploads/images/gallery/2026-01/screenshot-2026-01-29-at-4-32-46-pm.png) ##### ****Next,**** [****pair your reader to your device****](https://kb.simplerfid.com/books/software-mobile-app/page/mobile-app-pair-bluetooth)****.**** # TSL Readers: Update Firmware ##### Updating the firmware on your TSL handheld reader can improve the performance of your scans, as well as ensuring you have important fixes that have been pushed by the manufacturer. First you must install the TSL Downloader.If you are using Windows for ARM, you need to install extra drivers. [Click here for instructions](https://kb.simplerfid.com/books/hardware-readers-printers/page/tsl-readers-installing-vcp-drivers-windows-for-arm).
[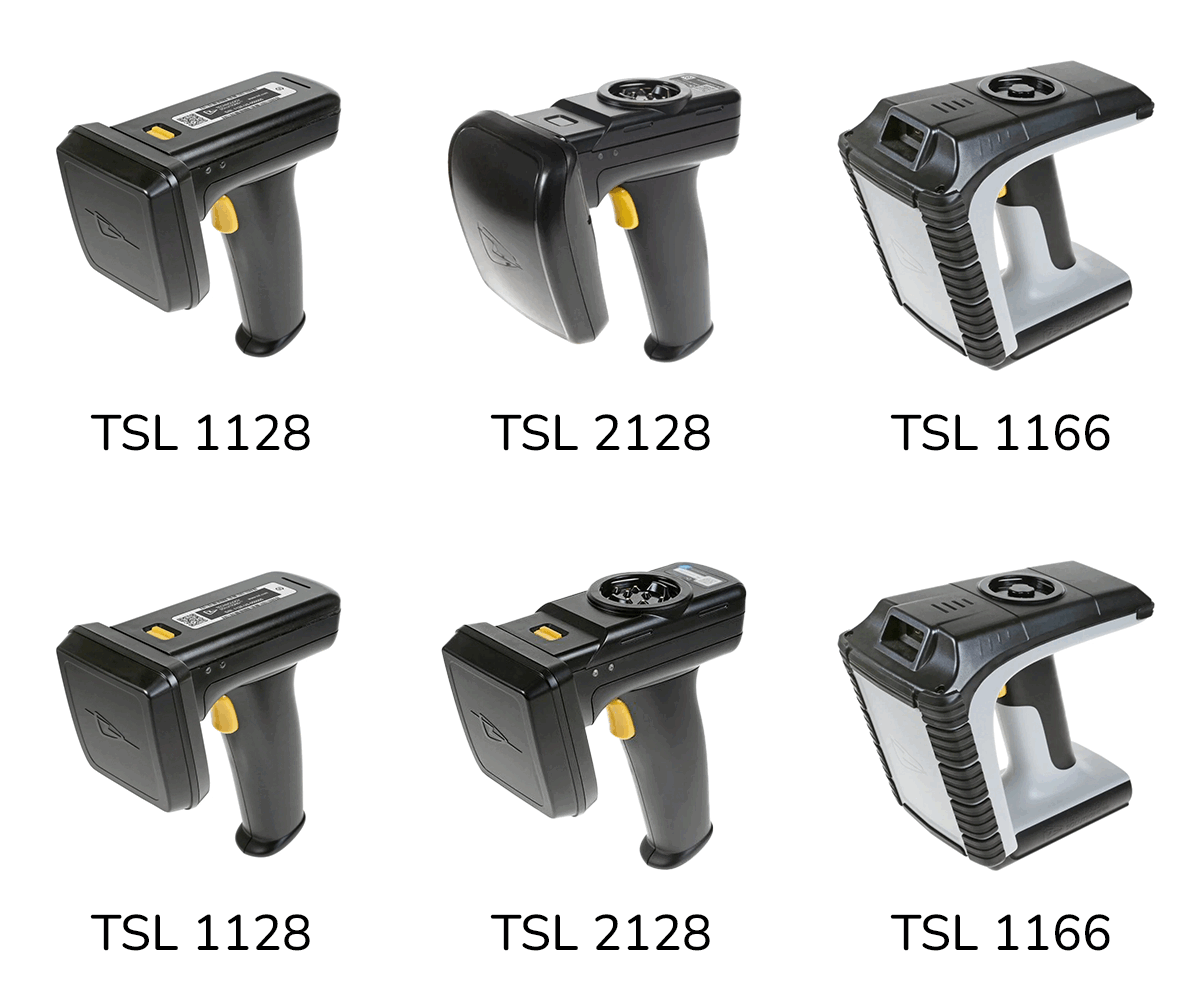](https://kb.simplerfid.com/uploads/images/gallery/2025-06/scaled-1680-/reader-options.png) ##### ****Requirements:**** - TSL Reader with battery installed and at least partially charged - PC or tablet running Windows 10 or higher - For ****TSL 1128****: - Included Micro-USB cable to connect the reader to your PC - For ****TSL 2128****: - Included docking cradle - Included Mini-USB cable to connect the docking cradle to your PC - For ****TSL 1166****: - Included docking cradle - Included Mini-USB cable to connect the docking station to your PCYou may be able to use a cable that was not included with your scanner; however not all cables can transmit data.
--- ##### ****Step 1 - Download the Desktop Firmware Loader, and firmware for your reader**** On the [web portal](https://portal.simplerfid.com/), click your account name at the top-right of the page and select ****Resources**** [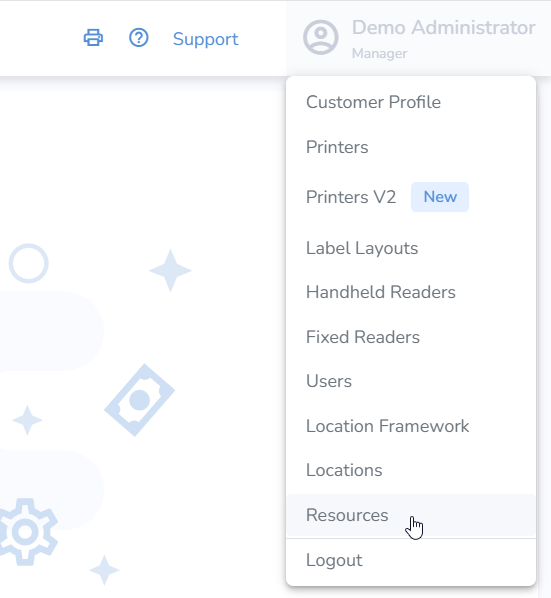](https://kb.simplerfid.com/uploads/images/gallery/2025-06/BgYimage.png) In the "TSL Firmware" section, click "Desktop Firmware Loader," then click the TSL Firmware link that corresponds with your reader: [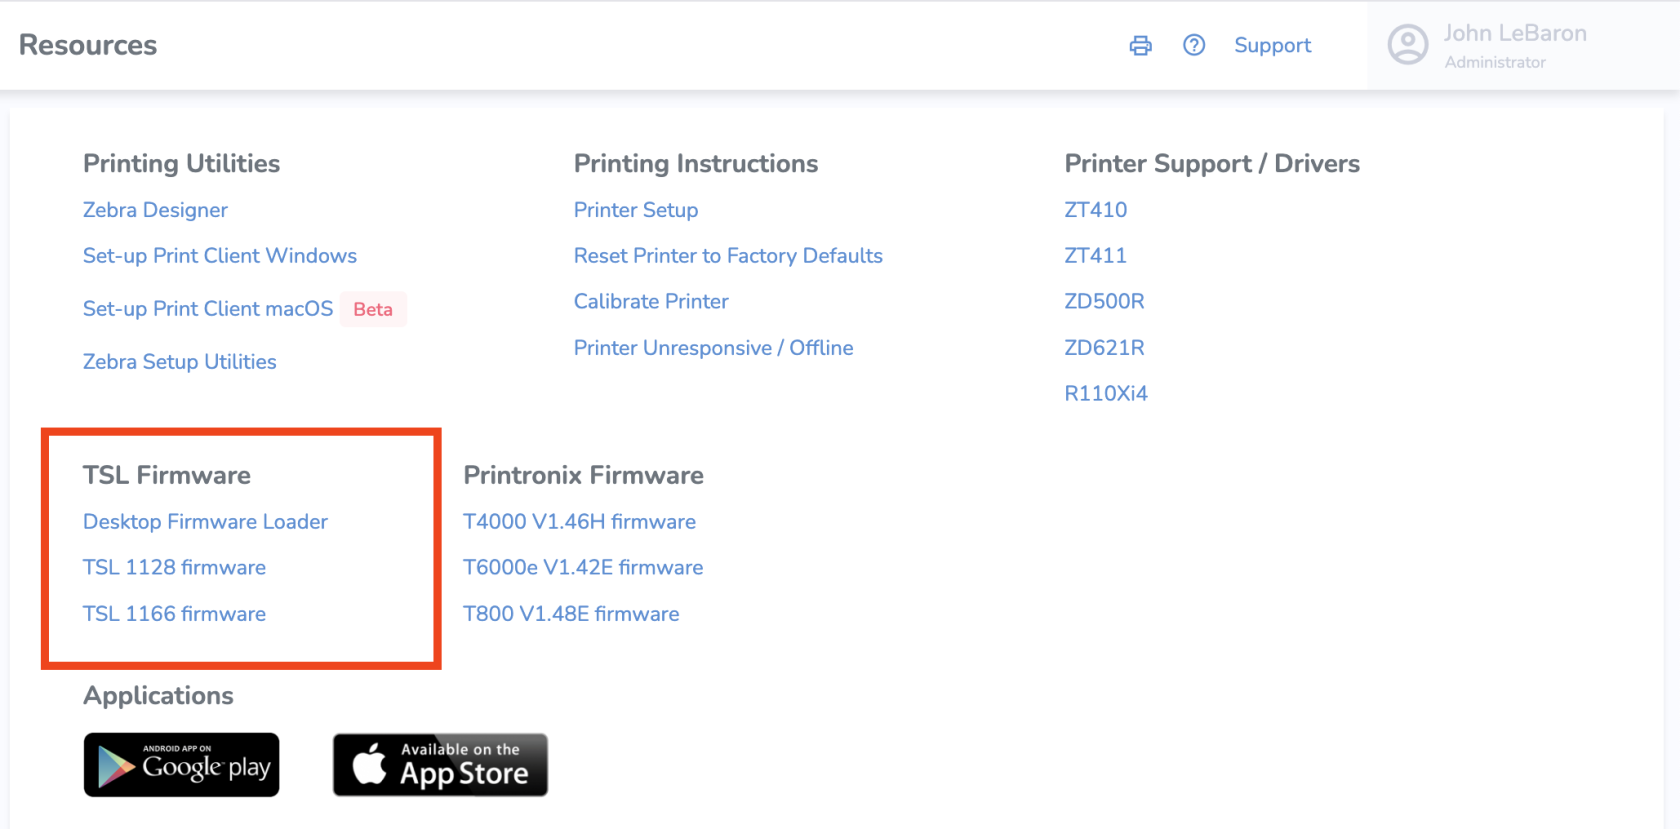](https://kb.simplerfid.com/uploads/images/gallery/2025-12/8QMimage.png) The Firmware Loader installer will be a ****.msi**** file, and the firmware itself will be a ****.pff**** file. --- ##### ****Step 2: Install the Desktop Firmware Loader**** Open the downloaded installer, ****tsl-desktop-firmware-loader.msi**** [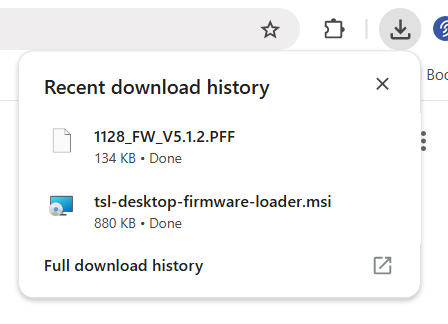](https://kb.simplerfid.com/uploads/images/gallery/2025-06/trZimage.png) Follow the setup wizard. If you're asked to allow changes to your computer, select ****Yes****. --- ##### ****Step 3 - Upgrade the firmware**** From the Start menu, launch Desktop Firmware Loader: [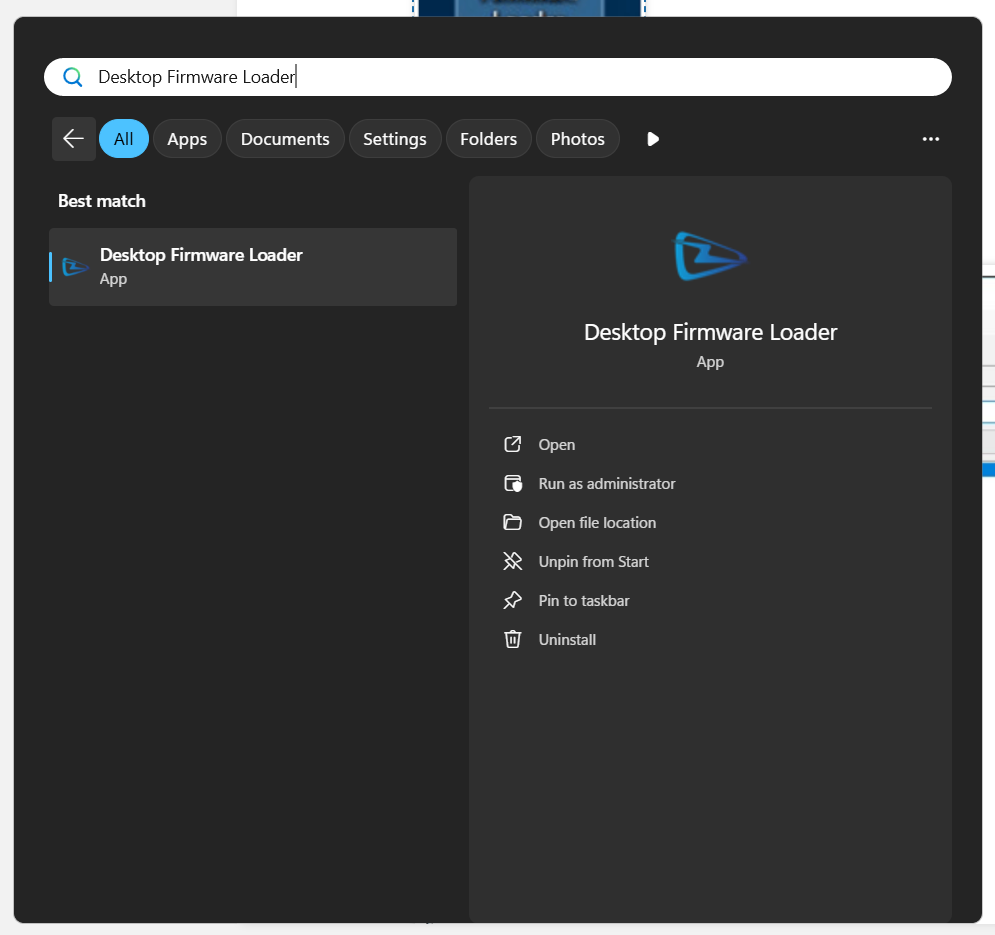](https://kb.simplerfid.com/uploads/images/gallery/2025-06/lLJimage.png) Select “…” to choose the firmware file to download 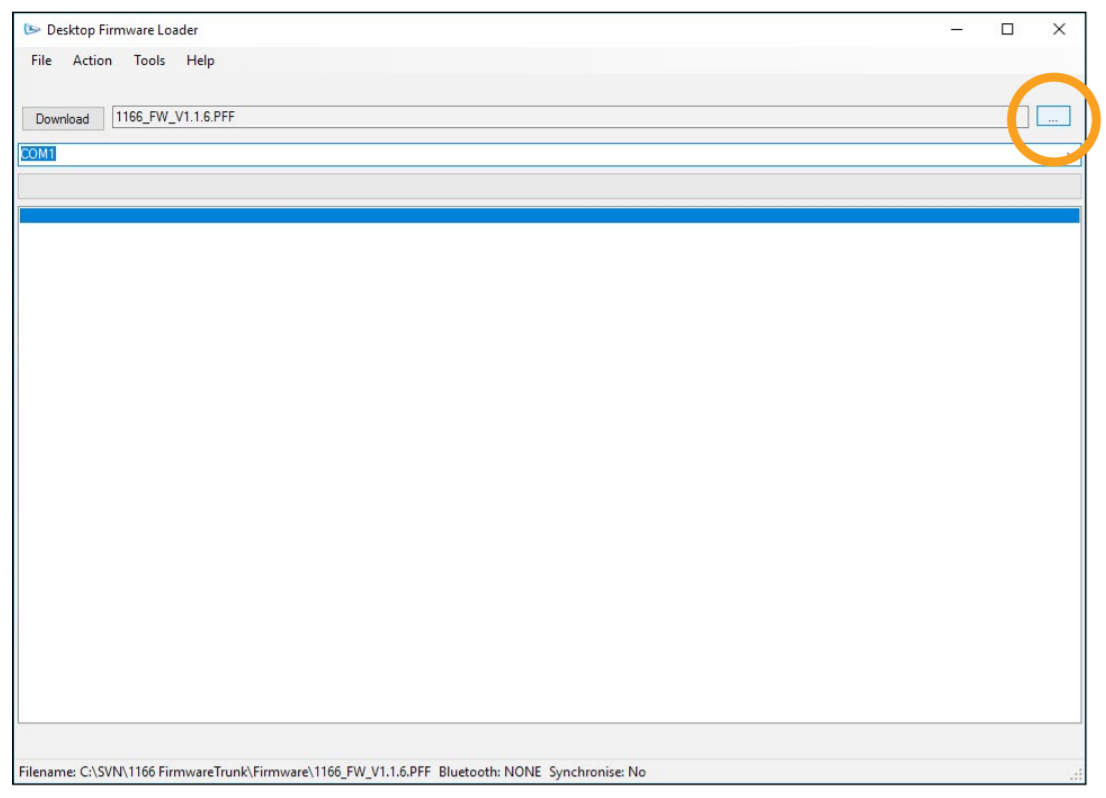 Locate and select the PFF file 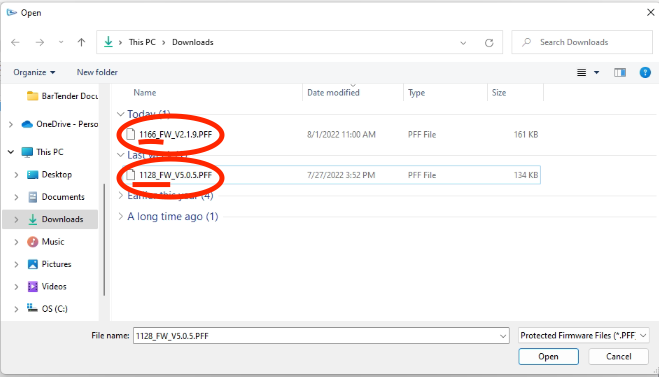 Connect the reader to the computer using the supplied USB cable. For TSL 1166 and TSL 2128, you will need to slide your reader into the docking cradle and connect the docking cradle to the computer via USB cable. 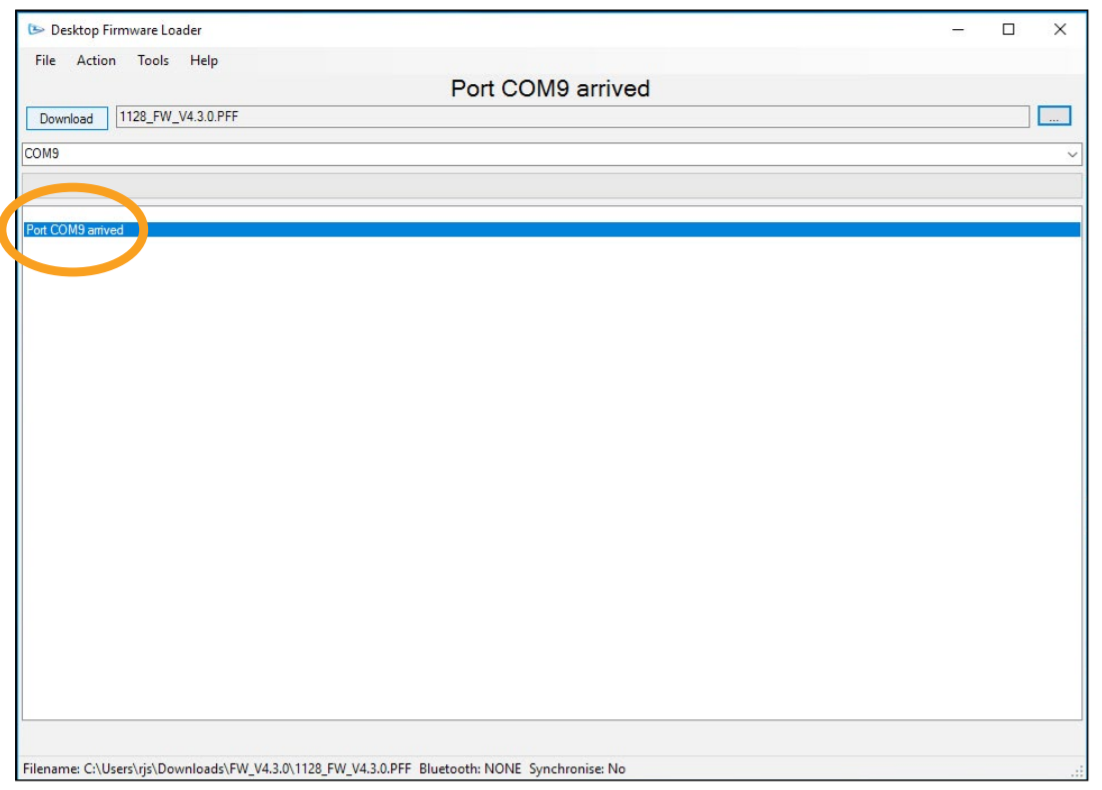If you don't see a message that a COM port has arrived (e.g. Port COM9 arrived), you may need to use a different USB cable.
Click “Download” to start the update process. Follow the download instructions. - You may be asked to wake the reader by pressing the trigger during the update process. - When you see the message that "Any iOS device must forget and re-pair with this reader before it can be used", the upgrade process is complete. "Forget" the device from your Bluetooth list in your system settings. --- ##### ****Verify Successful Installation****PLEASE NOTE: After firmware updates, any iOS devices MUST forget the scanner, then complete the pairing process again.
Once you have paired the app you can confirm the firmware version from the ****Connect Reader**** screen: [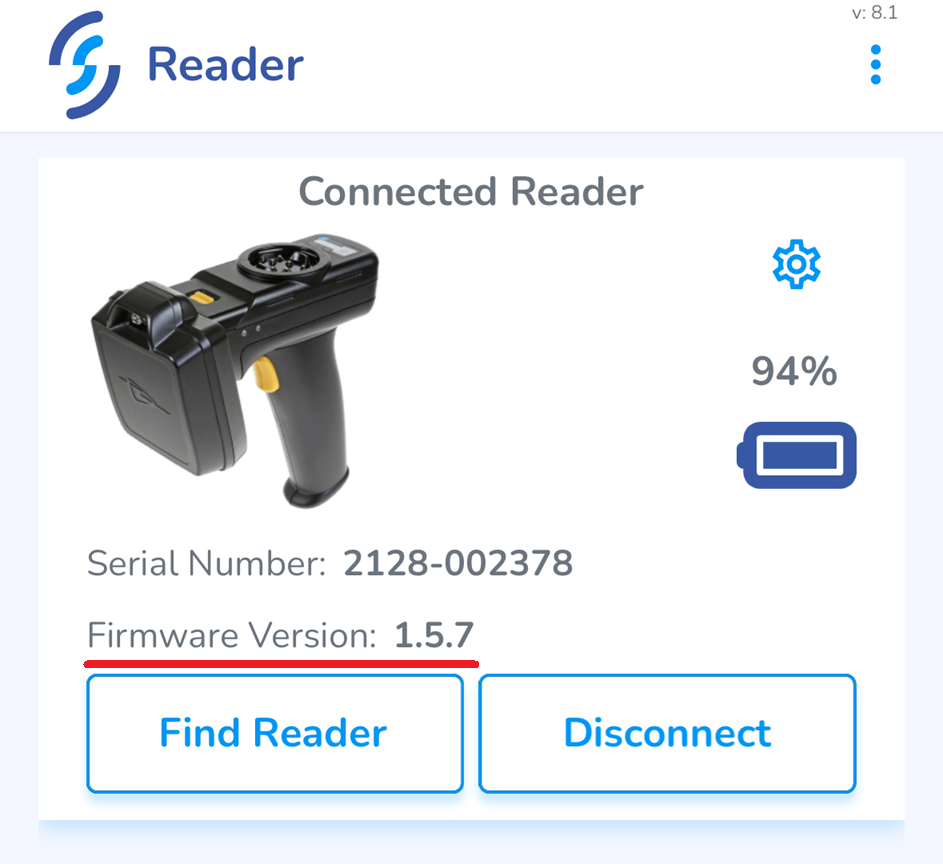](https://kb.simplerfid.com/uploads/images/gallery/2025-06/DCiimage.png) # TSL Readers: Installing VCP Drivers - Windows for ARMTSL readers' USB connection uses a Virtual COM port, which requires extra driver installations on Windows for ARM. These are the steps to install the drivers.
### Step 1: Install the bus layer driver First, plug the reader into your PC using the supplied USB cable. [Download the ZIP file](https://ftdichip.com/wp-content/uploads/2025/03/CDM-v2.12.36.20-for-ARM64-WHQL-Certified.zip) containing the drivers and extract the files to any location. To locate the device manager on Windows 10/11, right click on the Microsoft logo at the bottom left-hand corner of the screen and select Device Manager. [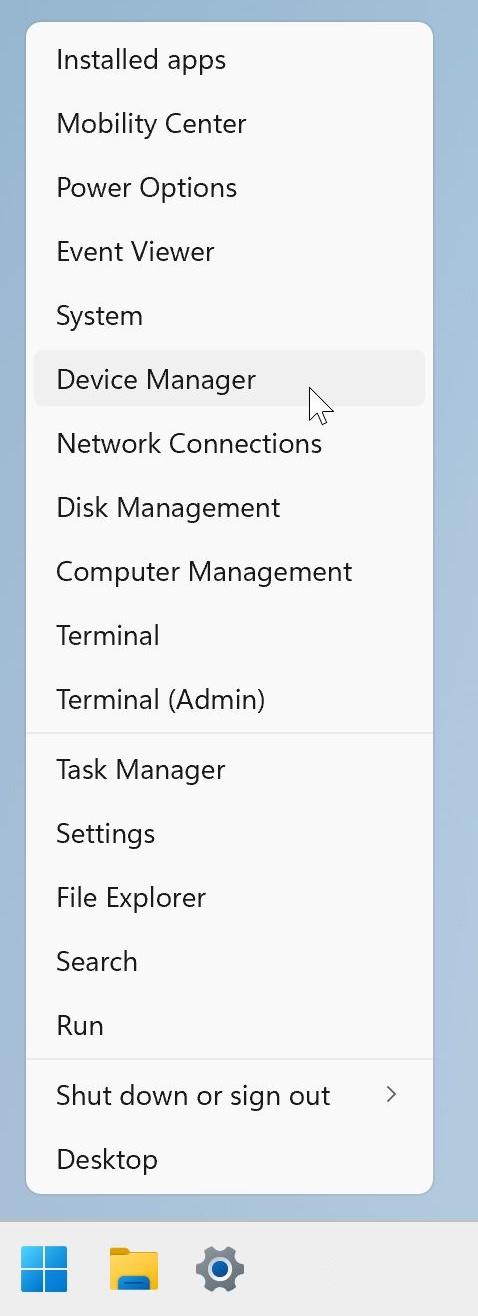](https://kb.simplerfid.com/uploads/images/gallery/2025-09/screenshot-2025-09-15-at-101824.jpg) In the Device Manager window there should be a device under Other Devices with a yellow warning symbol to indicate a problem i.e. no driver installed, as shown below. [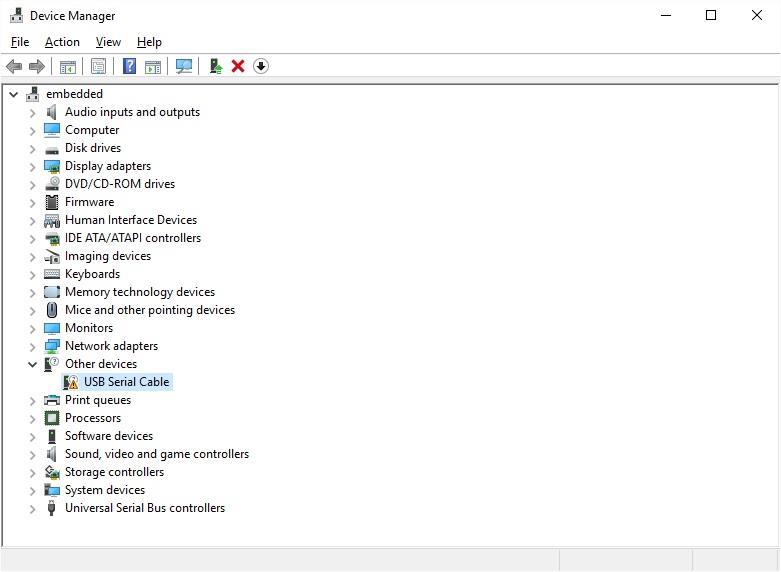](https://kb.simplerfid.com/uploads/images/gallery/2025-09/pdimages-001.jpg) Right click on the device, then select “Update Driver Software…” [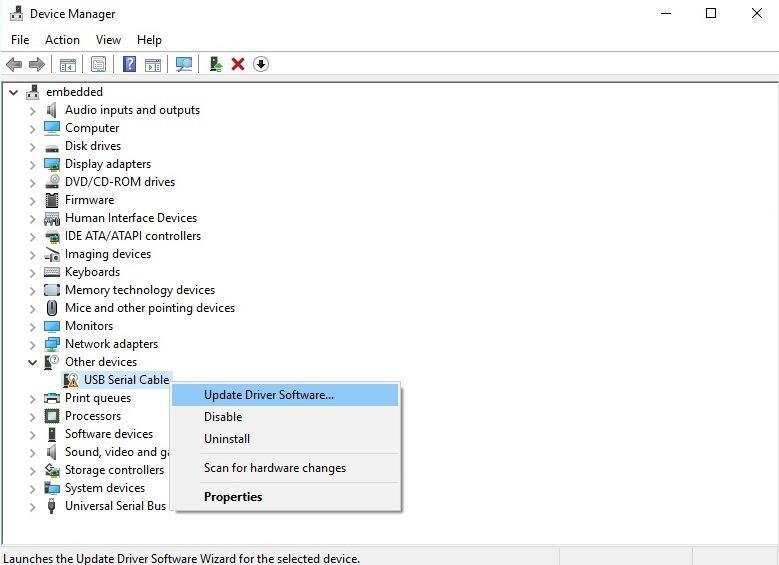](https://kb.simplerfid.com/uploads/images/gallery/2025-09/pdimages-002.jpg) This then displays the option for an automatic search or a manual search. Select the second option to browse manually. [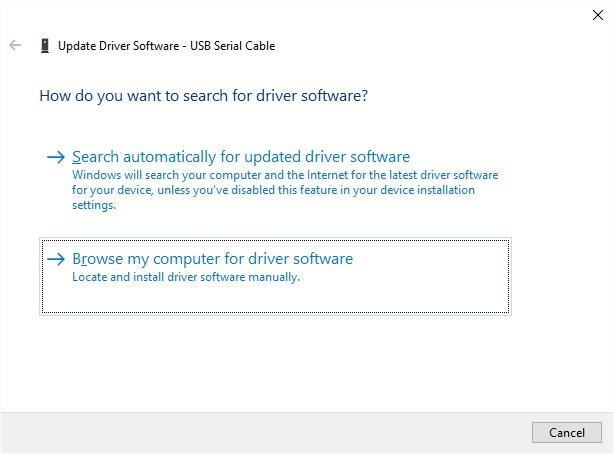](https://kb.simplerfid.com/uploads/images/gallery/2025-09/pdimages-004.jpg) Click Browse... and select the top-level folder of the extracted files (the location shown in the screenshot will not necessarily be the same as the location you choose). [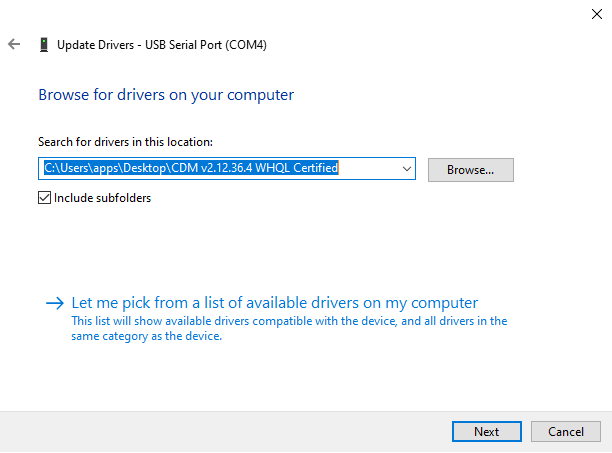](https://kb.simplerfid.com/uploads/images/gallery/2025-09/pdimages-005.png) Select “Next” to start the installation. When the installation has finished a completion screen is displayed. Press Close to close this window and go back to the Device Manager window. [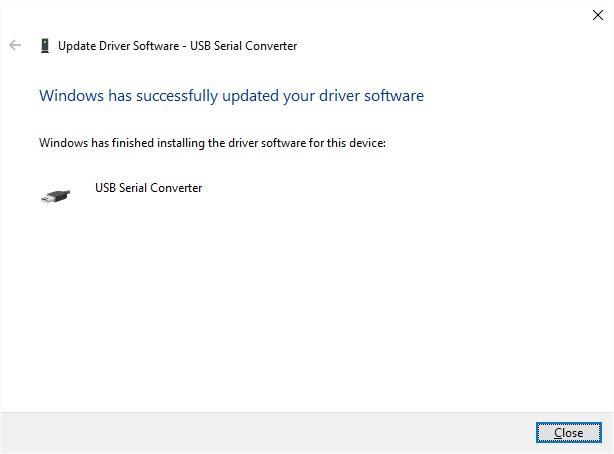](https://kb.simplerfid.com/uploads/images/gallery/2025-09/pdimages-008.jpg) ### Step 2: Install the Virtual Com Port layer of the driver Device Manager will show a device under Other Devices but in addition to this there is a new entry under Universal Serial Bus Controllers as the USB Serial Converter. This indicates the bus layer of the driver is installed.Installing the Virtual Com Port layer of the driver is a repeat of the last few steps.
Right click on the other device (USB Serial Por in this example) to bring up a menu as shown below. From the displayed menu select “Update Driver Software…” [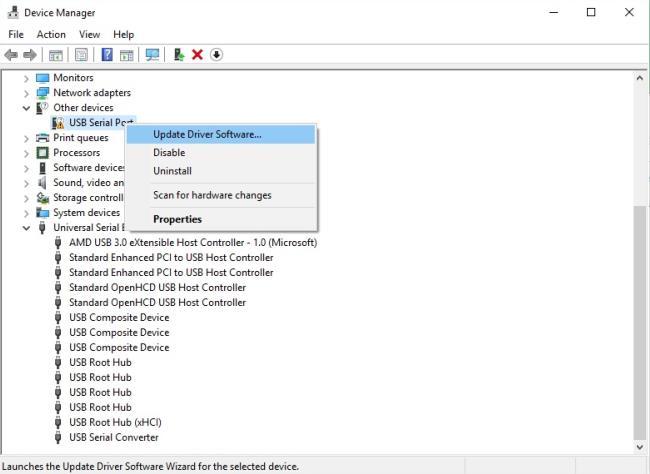](https://kb.simplerfid.com/uploads/images/gallery/2025-09/kH8pdimages-011.jpg) This then displays the option for an automatic search or a manual search. Select the second option to browse manually. [](https://kb.simplerfid.com/uploads/images/gallery/2025-09/pdimages-004.jpg) Click Browse... and select the top-level folder of the extracted files (the location shown in the screenshot will not necessarily be the same as the location you choose). [](https://kb.simplerfid.com/uploads/images/gallery/2025-09/pdimages-005.png) Select “Next” to start the installation. When the installation has finished a completion screen is displayed. Press Close to close this window and go back to the Device Manager window. [](https://kb.simplerfid.com/uploads/images/gallery/2025-09/pdimages-008.jpg) This time Device Manager does not have an entry under Other Devices but does show entries under Universal Serial Bus Controllers and Ports (COM & LPT). The image below displays a correct installation. The device is now ready to use. [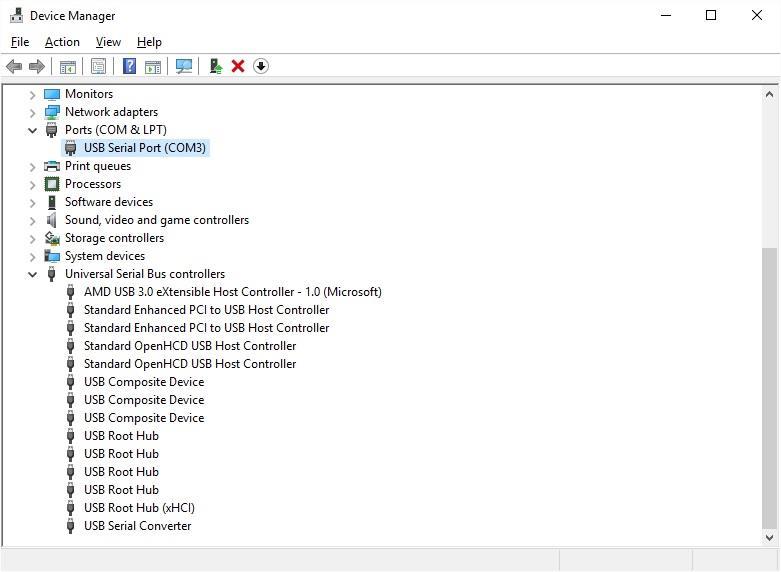](https://kb.simplerfid.com/uploads/images/gallery/2025-09/pdimages-019.jpg)